基于stm32的超声波感应垃圾桶
Posted studying~
tags:
篇首语:本文由小常识网(cha138.com)小编为大家整理,主要介绍了基于stm32的超声波感应垃圾桶相关的知识,希望对你有一定的参考价值。
一.应用模块
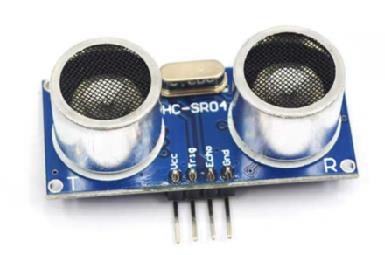
(1)超声波模块

1.介绍:超声波传感器模块上面通常有两个超声波元器件,一个用于发射,一个用于接收。电路板上有四个引脚:VCC GND Trig(触发),Echo(回应) 主要参数:
工作电压与电流:5V,15mA
感应距离: 2~400cm
感测角度: 不小于15°
被测物的面积不要小于50cm² 并且尽量平整
具备温度补偿电路
2.测距原理:
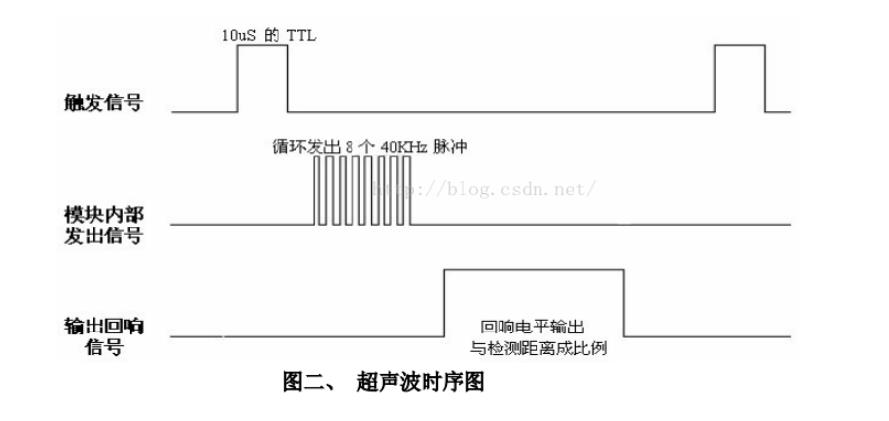
超声波模块的触发脚(Trig)输入10us 以上的高电位,即可发射超声波,发射超声波后,与接收到传回的超声波之前,”响应”脚(Echo)位呈现高电平。因此,程序可以从”响应”脚位(Echo)的高电平脉冲持续时间,换算出被测物的距离。

3.距离计算公式: 高电平持续时间 * 声速(340/秒) / 2
4.配置步骤:
1).开启时钟(定时器,GPIO)
2).配置GPIO引脚结构体(Trig,Echo)。
3).配置定时器结构体
4).配置定时器中断结构体
5).Trig引脚输出高电平(10us以上),然后关闭
6).等待Echo引脚输入高电平开始,定时器打开—>开启计数器计数
7).等待Echo引脚输入高电平结束,定时器关闭—>停止计数器计数
8).通过计数器的值计算得出超声波测量距离
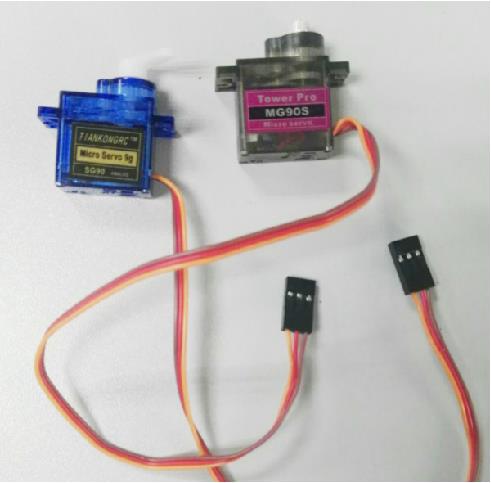
(2)SG90舵机

1.硬件接线:
红线 : 3.3v/ 5v
黑线 : GND
黄线 : 信号线
2.PWM输出 驱动SG90舵机 配置过程:
1.打开时钟 —> GPIO时钟,TIM定时器时钟,部分重映射时钟
2.GPIO结构体
3.配置通用定时器结构体
4.配置定时器输出PWM结构体
5.main函数配置PWM比较值,调控占空比使舵机偏转不同角度
二.代码示例
超声波.h文件
#include "stm32f10x.h"

#define ECHO_Recv     GPIO_ReadInputDataBit( GPIOB,  GPIO_Pin_7);
#define Trig_send(a)  if(a)\\
	                    GPIO_SetBits(GPIOB,GPIO_Pin_6);\\
                      else\\
										  GPIO_ResetBits(GPIOB,GPIO_Pin_6);

void HC_SR04Config(void);
void open_tim2(void);
void close_tim2(void);
int Get_Echo_Timer(void);
float Get_length(void);
超声波.c文件
#include "hc_sr04.h"
#include "stm32f10x.h"
#include "tim.h"
#include "systick.h"
u16 temp = 0;
void HC_SR04Config()
{
	 GPIO_InitTypeDef GPIO_Initstrue;
	 TIM_TimeBaseInitTypeDef TIM_TimeBaseInitstrue;
	 NVIC_InitTypeDef NVIC_Initstrue;

	 RCC_APB2PeriphClockCmd(RCC_APB2Periph_GPIOB, ENABLE);
	 RCC_APB1PeriphClockCmd(RCC_APB1Periph_TIM2, ENABLE);
	 NVIC_PriorityGroupConfig(NVIC_PriorityGroup_2);

	 GPIO_Initstrue.GPIO_Mode = GPIO_Mode_Out_PP;
	 GPIO_Initstrue.GPIO_Pin = GPIO_Pin_6;
	 GPIO_Initstrue.GPIO_Speed = GPIO_Speed_50MHz;
	 GPIO_Init( GPIOB, &GPIO_Initstrue);

	 GPIO_Initstrue.GPIO_Mode = GPIO_Mode_IN_FLOATING;
	 GPIO_Initstrue.GPIO_Pin = GPIO_Pin_7;
	 GPIO_Init( GPIOB, &GPIO_Initstrue);

	 TIM_TimeBaseInitstrue.TIM_ClockDivision = TIM_CKD_DIV1;
	 TIM_TimeBaseInitstrue.TIM_CounterMode = TIM_CounterMode_Up;
	 TIM_TimeBaseInitstrue.TIM_Period =  1000 -1;
	 TIM_TimeBaseInitstrue.TIM_Prescaler = 72 -1;
	 TIM_TimeBaseInit(TIM2, &TIM_TimeBaseInitstrue);
	 TIM_ITConfig(TIM2, TIM_IT_Update, ENABLE);
	 TIM_Cmd(TIM2, DISABLE);

   NVIC_Initstrue.NVIC_IRQChannel = TIM2_IRQn;
	 NVIC_Initstrue.NVIC_IRQChannelCmd = ENABLE;
	 NVIC_Initstrue.NVIC_IRQChannelPreemptionPriority = 1;
	 NVIC_Initstrue.NVIC_IRQChannelSubPriority = 1;
	 NVIC_Init(&NVIC_Initstrue);
}
void TIM2_IRQHandler()
{
   if(TIM_GetITStatus(TIM2,TIM_IT_Update) != RESET)
	 {
		 temp++;
		 TIM_ClearITPendingBit( TIM2, TIM_IT_Update);
	 }

}
//定时器开始计数
void open_tim2()
{
   TIM_SetCounter(TIM2, 0);
	 temp = 0;
	 TIM_Cmd(TIM2, ENABLE);
}
//关闭定时器
void close_tim2()
{
   TIM_Cmd(TIM2, DISABLE);
}
//获取定时器计数器的值
int Get_Echo_Timer()
{
	 uint32_t t = 0;
	 t = 1000*temp+TIM_GetCounter(TIM2);
	 TIM_SetCounter(TIM2, 0);
	 ms_delay(50);
   return t;
}
//获取超声波测距距离
float Get_length()
{
  float length=0,sum=0;
  u16 tim = 0;
	u16 i;
	/*测5次数据计算一次平均值*/
	for(i=0;i<5;i++)
	{
				Trig_send(1);  //拉高信号,作为触发信号
				us_delay(15);  //高电平信号超过10us
				Trig_send(0);
				/*等待回响信号*/
				while(GPIO_ReadInputDataBit(GPIOB,GPIO_Pin_9)==RESET);
				TIM_Cmd(TIM2,ENABLE);//回响信号到来,开启定时器计数

				while(GPIO_ReadInputDataBit(GPIOB,GPIO_Pin_9)==SET);//回响信号消失
				TIM_Cmd(TIM2,DISABLE);//关闭定时器

			  tim=TIM_GetCounter(TIM2);//获取计TIM2数寄存器中的计数值,一边计算回响信号时间
        length=(tim+temp*1000)/58.0;//通过回响信号计算距离
        sum=length+sum;
		    ms_delay(100);
	}
	length=sum/5;
	return length;//距离作为函数返回值
}
舵机.h文件
void pwm_init(void);

#include "stm32f10x.h"
舵机.c文件
#include "pwm.h"
#include "stm32f10x.h"

void pwm_init()
{
	GPIO_InitTypeDef GPIO_Initstrue;
	TIM_OCInitTypeDef TIM_OCInitstrue;
	TIM_TimeBaseInitTypeDef TIM_TimeBaseInitstrue;

    RCC_APB2PeriphClockCmd( RCC_APB2Periph_GPIOB | RCC_APB2Periph_AFIO, ENABLE);
	RCC_APB1PeriphClockCmd( RCC_APB1Periph_TIM3, ENABLE);

	GPIO_PinRemapConfig(GPIO_PartialRemap_TIM3, ENABLE);

	GPIO_Initstrue.GPIO_Mode = GPIO_Mode_AF_PP;
	GPIO_Initstrue.GPIO_Pin = GPIO_Pin_5;
	GPIO_Initstrue.GPIO_Speed = GPIO_Speed_50MHz;
	GPIO_Init(GPIOB,&GPIO_Initstrue);

	TIM_TimeBaseInitstrue.TIM_ClockDivision = TIM_CKD_DIV1;
	TIM_TimeBaseInitstrue.TIM_CounterMode = TIM_CounterMode_Up;
	TIM_TimeBaseInitstrue.TIM_Period = 200 -1;
	TIM_TimeBaseInitstrue.TIM_Prescaler = 7200 -1;
	TIM_TimeBaseInit(TIM3, &TIM_TimeBaseInitstrue);

	TIM_OCInitstrue.TIM_OCMode = TIM_OCMode_PWM1;
	TIM_OCInitstrue.TIM_OCPolarity = TIM_OutputState_Enable;
	TIM_OCInitstrue.TIM_OutputState = TIM_OCPolarity_Low;
	TIM_OC2Init(TIM3,&TIM_OCInitstrue);

	TIM_OC2PreloadConfig( TIM3, TIM_OCPreload_Enable);

	TIM_OC2PreloadConfig(TIM3, TIM_OCPreload_Enable);

	TIM_Cmd(TIM3, ENABLE);
}
main.c文件
#include "stm32f10x.h"
#include "usart.h"
#include "pwm.h"
#include "systick.h"
#include "hc_sr04.h"

int  main()
{
		float length=0;
		uint16_t a = 155;
		// usart_init();
		HC_SR04Config();
		pwm_init();
		while(1)
		{
			 a = 195;
			 length =  Get_length();
			 // printf("%.3f\\r\\n",length);
			 ms_delay(100);
			 if(length < 71)
			 {
				 for(a=195;a>=155;a-=5)
				 {
						TIM_SetCompare2( TIM2, a);
				 }
			 }
			 else
			 {
						TIM_SetCompare2( TIM2, a-20);
			 }
		}
}
以上是关于基于stm32的超声波感应垃圾桶的主要内容,如果未能解决你的问题,请参考以下文章