超详细·gitlab的高可用搭建完整过程
Posted 龙叔运维
tags:
篇首语:本文由小常识网(cha138.com)小编为大家整理,主要介绍了超详细·gitlab的高可用搭建完整过程相关的知识,希望对你有一定的参考价值。
代码仓库,gitlab使用相当广泛,大小公司基本都会使用到,下面简单介绍下gitlab高可用环境的搭建过程
整体架构图
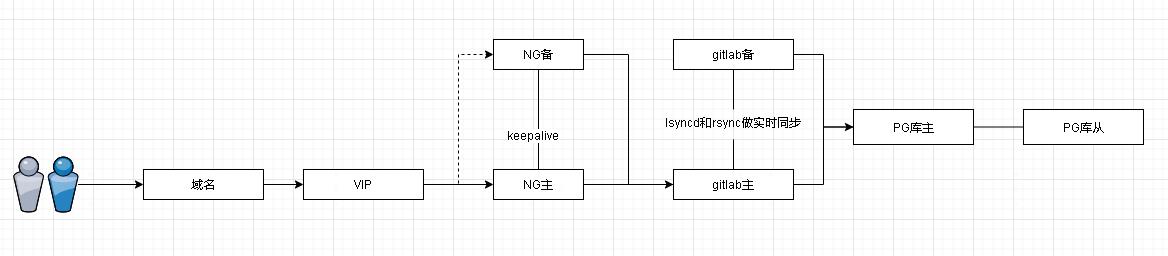
服务器信息(随便写的IP):
vip:1.1.1.1
nginx主节点 :2.2.2.2
nginx备节点:3.3.3.3
gitlab主节点:4.4.4.4
gitlab从节点:5.5.5.5
数据库IP:6.6.6.6 5432
操作系统都为centos7
1·nginx安装配置
nginx主节点 :2.2.2.2
nginx备节点:3.3.3.3
1.1·nginx安装
下载安装包 解压
/configure --prefix=/data/nginx
make
make install
安装完创建软连接,方便管理nginx:
ln -s /data/nginx/sbin/nginx /usr/bin/nginx
配置文件(主备一样):这里用的是nginx四层转发
user www;
worker_processes 2;worker_cpu_affinity 01 10;
worker_priority -5;
worker_rlimit_nofile 65535;error_log logs/error.log;
#error_log logs/error.log notice;
#error_log logs/error.log info;#pid logs/nginx.pid;
#worker_cpu_affinity 01 10;
events {
worker_connections 10240;
}
stream {
log_format main '[ $time_iso8601 ] - [ $protocol ] - [ $remote_addr ] - '
'[ $session_time ] - [ $upstream_addr ] - [ $upstream_connect_time ] - [ $status ]';upstream gitlab_ssh {
server 4.4.4.4:22;
#server 5.5.5.5:22;
}server {
access_log logs/gitlab-ssh-acc.log main;
listen 1122;
proxy_pass gitlab_ssh;
proxy_connect_timeout 1h;
proxy_timeout 1h;
}upstream gitlab_http {
server 4.4.4.4:80;
#server 5.5.5.5:80;
}server {
access_log logs/gitlab-http-acc.log main;
listen 80;
proxy_pass gitlab_http;
proxy_connect_timeout 1h;
proxy_timeout 1h;
}}
1.2·keepalived安装
下载安装包keepalived-2.0.20.tar.gz
安装前线安装下面的东西 不然会有对应的报错
OpenSSL is not properly installed on your system.
安装
/configure --prefix=/data/keepalived
make
make install
配置
# keepalived启动脚本变量引用文件,默认文件路径是/etc/sysconfig/,也可以不做软链接,直接修改启动脚本中文件路径即可(安装目录下)
[root@localhost /]# cp /data/keepalived/etc/sysconfig/keepalived /etc/sysconfig/keepalived
# 将keepalived主程序加入到环境变量(安装目录下)
[root@localhost /]# cp /data/keepalived/sbin/keepalived /usr/sbin/keepalived
# keepalived启动脚本(源码目录下),放到/etc/init.d/目录下就可以使用service命令便捷调用
[root@localhost /]# cp /root/wxl_src/keepalived-2.0.20/keepalived/etc/init.d/keepalived /etc/init.d/keepalived
# 将配置文件放到默认路径下
[root@localhost /]# mkdir /etc/keepalived
[root@localhost /]# cp /data/keepalived/etc/keepalived/keepalived.conf /etc/keepalived/keepalived.conf
- 加为系统服务:chkconfig --add keepalived
- 开机启动:chkconfig keepalived on
- 查看开机启动的服务:chkconfig --list
- 启动、关闭、重启service keepalived start|stop|restart
配置文件:
主节点:
! Configuration File for keepalived
global_defs {
notification_email {
hanzhouzhou@outlook.com
}
smtp_server 127.0.0.1
smtp_connect_timeout 30
router_id LVS_DEVEL
}
vrrp_instance VI_1 {
state MASTER
interface eth0
virtual_router_id 51
priority 100
advert_int 1
authentication {
auth_type PASS
auth_pass 1111
}
virtual_ipaddress {
1.1.1.1
}
}
备节点:
! Configuration File for keepalived
global_defs {
notification_email {
hanzhouzhou@outlook.com
}
smtp_server 127.0.0.1
smtp_connect_timeout 30
router_id LVS_DEVEL
}
vrrp_instance VI_1 {
state BACKUP
interface eth0
virtual_router_id 51
priority 95
advert_int 1
authentication {
auth_type PASS
auth_pass 1111
}
virtual_ipaddress {
1.1.1.1
}
}
3·gitlab安装配置
gitlab主节点:4.4.4.4
gitlab从节点:5.5.5.5
下载安装包gitlab-ce-13.12.6-ce.0.el7.x86_64.rpm
安装:yum install -y gitlab-ce-13.12.6-ce.0.el7.x86_64.rpm
3.1·gitlab相关配置
3.1.1·配置访问地址
external_url 'http://1.1.1.1'
3.1.2·仓库默认存放目录调整
git_data_dirs({
"default" => {
"path" => "/data/git-data"
}
})
3.1.3·配置使用外部数据库
修改为false,不启动自身pg
# postgresql['enable'] = true
修改为外部PG信息
gitlab_rails['db_username'] = "gitlabmgr"
gitlab_rails['db_password'] = "XXX"
gitlab_rails['db_host'] = "6.6.6.6"
gitlab_rails['db_port'] = 5432
3.1.4·配置使用SSO登录(也可以用ldap)
gitlab_rails['omniauth_enabled'] = true
gitlab_rails['omniauth_allow_single_sign_on'] = ['cas3']
gitlab_rails['omniauth_block_auto_created_users'] = false
gitlab_rails['omniauth_sync_email_from_provider'] = 'cas3'
gitlab_rails['omniauth_sync_profile_from_provider'] = ['cas3']
gitlab_rails['omniauth_sync_profile_attributes'] = ['email','name']
gitlab_rails['omniauth_external_providers'] = ['cas3']
gitlab_rails['omniauth_auto_sign_in_with_provider'] = 'cas3'
gitlab_rails['omniauth_providers'] = [
{
"name"=> "cas3",
"label"=> "SSO 登录",
"args"=> {
"url"=> 'https://sso-test.com',
"login_url"=> '/siam/login',
"service_validate_url"=> '/siam/p3/serviceValidate',
"logout_url"=> '/siam/logout'
}
}
]
3.1.5·配置邮箱
gitlab_rails['smtp_enable'] = true
gitlab_rails['smtp_address'] = "xx.xx.com"
gitlab_rails['smtp_port'] = 25
gitlab_rails['smtp_user_name'] = "xx@xx.com"
gitlab_rails['smtp_password'] = "xxxx"
gitlab_rails['smtp_domain'] = "xx.com"
gitlab_rails['smtp_authentication'] = "login"
gitlab_rails['smtp_enable_starttls_auto'] = false
gitlab_rails['smtp_tls'] = falsegitlab_rails['gitlab_email_from'] = 'xx@xx.com'
配置完可以进入控制台验证邮箱发送
验证方法:
gitlab-rails console
Notify.test_email("xx@xx.com","title","gitlab").deliver_now
3.2·配置主备节点数据同步
重要数据文件目录进行同步
代码仓库:/data/git-data/ (默认是/var/opt/gitlab/git-data/repositories/)
钩子函数:/opt/gitlab/embedded/service/gitlab-shell/hooks/
用户头像:/var/opt/gitlab/gitlab-rails/
ssh文件:/var/opt/gitlab/.ssh/
主备节点都进行安装:
yum install lsyncd
3.2.1·主节点配置
vi /etc/lsyncd.conf
settings {
logfile ="/var/log/lsyncd/lsyncd.log",
statusFile ="/var/log/lsyncd/lsyncd.status",
inotifyMode ="CloseWrite",
maxProcesses =1000,
maxDelays =200
}
sync {
default.rsync,
source ="/data/git-data",
target ="rsyncuser@5.5.5.5::repositories",
delay =10,
rsync = {
binary ="/usr/bin/rsync",
password_file ="/etc/rsync.client.pas",
archive =true,
compress =false,
verbose =true,
--delete =true
}
}
sync {
default.rsync,
source ="/opt/gitlab/embedded/service/gitlab-shell/hooks",
target = "rsyncuser@5.5.5.5::hooks",
delay =10,
rsync = {
binary ="/usr/bin/rsync",
password_file ="/etc/rsync.client.pas",
archive =true,
compress =false,
verbose =true
}
}
sync {
default.rsync,
source ="/var/opt/gitlab/.ssh",
target = "rsyncuser@5.5.5.5::ssh",
delay =10,
rsync = {
binary ="/usr/bin/rsync",
password_file ="/etc/rsync.client.pas",
archive =true,
compress =false,
verbose =true
}
}
sync {
default.rsync,
source ="/var/opt/gitlab/gitlab-rails",
target = "rsyncuser@5.5.5.5::gitlab-rails",
delay =10,
rsync = {
binary ="/usr/bin/rsync",
password_file ="/etc/rsync.client.pas",
archive =true,
compress =false,
verbose =true,
--delete =true
}
}
配置密码:
vi /etc/rsync.client.pas 直接写上密码
修改读写属性 chmod 0600 /etc/rsync.client.pas
相关命令:
systemctl enable lsyncd.service
systemctl start lsyncd.service
systemctl stop lsyncd.service
systemctl status lsyncd.service
3.2.2·备节点配置
vi /etc/rsyncd.conf
# /etc/rsyncd: configuration fileforrsync daemon mode
# See rsyncd.conf man pageformore options.
# configuration example:
# uid = nobody
# gid = nobody
# use chroot = yes
# max connections =4
# pid file = /var/run/rsyncd.pid
# exclude = lost+found/
# transfer logging = yes
# timeout =900
# ignore nonreadable = yes
# dont compress = *.gz *.tgz *.zip *.z *.Z *.rpm *.deb *.bz2
# [ftp]
# path = /home/ftp
# comment = ftp export area
uid = root
gid = root
use chroot = yes
log file=/var/log/rsyncd/rsyncd.log
#pid file=/var/run/rsyncd.pid
lock file=/var/run/rsyncd.lock
[repositories]
path = /data/git-data
read only = no
list = yes
auth users = rsyncuser
secrets file = /etc/rsync.pas
[hooks]
path = /opt/gitlab/embedded/service/gitlab-shell/hooks
read only = no
list = yes
auth users = rsyncuser
secrets file = /etc/rsync.pas
[ssh]
path = /var/opt/gitlab/.ssh
read only = no
list = yes
auth users = rsyncuser
secrets file = /etc/rsync.pas
[gitlab-rails]
path = /var/opt/gitlab/gitlab-rails
read only = no
list = yes
auth users = rsyncuser
secrets file = /etc/rsync.pas
建密码文件:vi /etc/rsync.pas,文件内容格式为:用户名:密码,比如:
rsyncuser:123456
相关命令:
systemctl enable rsyncd.service
systemctl start rsyncd.service
systemctl stop rsyncd.service
systemctl status rsyncd.service
以上是关于超详细·gitlab的高可用搭建完整过程的主要内容,如果未能解决你的问题,请参考以下文章