Android JNI开发三: SO库的使用
Posted 长沙火山
tags:
篇首语:本文由小常识网(cha138.com)小编为大家整理,主要介绍了Android JNI开发三: SO库的使用相关的知识,希望对你有一定的参考价值。
目录
Android JNI开发三: SO库的使用
Android JNI开发四: 鸿蒙JNI开发
本篇主要介绍如何在普通的安卓工程中使用编译好的SO库文件。首先,新建一个普通的安卓项目工程,我的工程名叫SOTest。项目工程建好后,就将SO库引入到工程中。
2.1 将SO库引入工程中
在不同的CPU架构下,会被编译成不同的SO库,所以我们需要将整个的lib文件拷贝至我们的项目工程中。SO库需要拷贝到app目录下,路径一定要正确,否则有可能出现因为路径不对而加载不到SO库。

2.2 配置SO库的路径
在build.gradle文件中添加so库的路径配置和依赖配置,如下图所示:

配置代码:
sourceSets {
        main {
            jniLibs.srcDirs = ['libs']
        }
  }

 implementation fileTree(include: ['*.jar'], dir: 'libs')
至此,SO库的引入和配置都好了,特别要注意SO库拷贝的目录和配置的路径一定要对应,否则会出现加载不到SO库的。
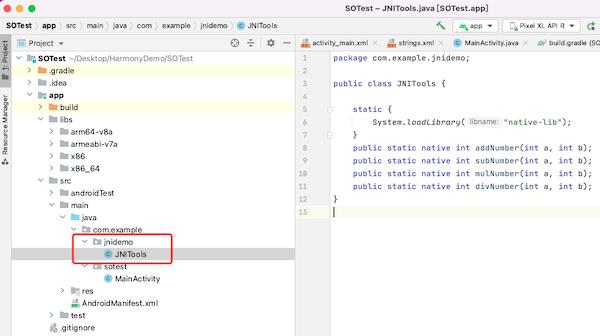
2.3 引入 JNITools 文件
SO库文件是一个动态库,无法打开,所以我们看不到里面有些什么,那么就有一个问题,如果我们把自己编译好的SO库给别人去用,别人又看不到SO里面的内容,那他怎么调SO库里面的方法呢?所以我们还需要提供一个配套的头文件给使用SO库的开发人员。这个JNITools就是头文件,当然你也可以取其他的名字。这个JNITools在我们上一节已经出现过了,这里还是把代码贴出来:
//这个包名要和原来创建SO库文件工程的包名一样,而不是现在新工程的包名
//因为SO库里面的包名也是 package com.example.jnidemo
package com.example.jnidemo;

public class JNITools {

    static {
        System.loadLibrary("native-lib");
    }
    public static native int addNumber(int a, int b);
    public static native int subNumber(int a, int b);
    public static native int mulNumber(int a, int b);
    public static native int divNumber(int a, int b);
}
在com.example目录下再新建一个包,包名为:jnidemo,然后再引入JNITools文件。
2.4 调用SO文件中的代码
这个就跟上一节讲的安卓代码是完全一样的,这里还是把代码再重复贴一遍。
(1) activity_main.xml 里添加布局代码:
<?xml version="1.0" encoding="utf-8"?>
<LinearLayout xmlns:android="http://schemas.android.com/apk/res/android"
    xmlns:app="http://schemas.android.com/apk/res-auto"
    xmlns:tools="http://schemas.android.com/tools"
    android:layout_width="match_parent"
    android:layout_height="match_parent"
    android:orientation="vertical"
    tools:context=".MainActivity">

    <LinearLayout
        android:layout_width="match_parent"
        android:layout_height="wrap_content">

        <EditText
            android:id="@+id/inputa"
            android:hint="请输入a"
            android:inputType="number"
            android:layout_weight="1.0"
            android:layout_width="match_parent"
            android:layout_height="wrap_content" />


        <EditText
            android:inputType="number"
            android:id="@+id/inputb"
            android:hint="请输入b"
            android:layout_weight="1.0"
            android:layout_width="match_parent"
            android:layout_height="wrap_content" />


    </LinearLayout>

    <TextView
        android:text="请选择符号"
        android:layout_width="match_parent"
        android:layout_height="wrap_content" />

    <LinearLayout
        android:orientation="horizontal"
        android:layout_width="match_parent"
        android:layout_height="wrap_content">


        <Button
            android:gravity="center"
            android:layout_weight="1.0"
            android:text="@string/add"
            android:id="@+id/add"
            android:layout_width="match_parent"
            android:layout_height="wrap_content" />

        <Button
            android:gravity="center"
            android:layout_weight="1.0"
            android:text="@string/sub"
            android:id="@+id/sub"
            android:layout_width="match_parent"
            android:layout_height="wrap_content" />

        <Button
            android:gravity="center"
            android:layout_weight="1.0"
            android:text="@string/mul"
            android:id="@+id/mul"
            android:layout_width="match_parent"
            android:layout_height="wrap_content" />

        <Button
            android:gravity="center"
            android:layout_weight="1.0"
            android:text="@string/div"
            android:id="@+id/div"
            android:layout_width="match_parent"
            android:layout_height="wrap_content" />
    </LinearLayout>

    <TextView
        android:id="@+id/result"
        android:text="计算结果"
        android:layout_width="wrap_content"
        android:layout_height="wrap_content" />
</LinearLayout>
(2) string.xml 里添加代码:
<resources>
    <string name="app_name">JniDemo</string>
    <string name="add">相加</string>
    <string name="sub">相减</string>
    <string name="mul">相乘</string>
    <string name="div">相除</string>
</resources>
(3) MainActivity 里添加代码:
package com.example.jnidemo;

import androidx.appcompat.app.AppCompatActivity;
import android.os.Bundle;
import android.widget.TextView;
import android.view.View;
import android.widget.Button;
import android.widget.EditText;

public class MainActivity extends AppCompatActivity implements View.OnClickListener {

    private Button btnAdd,btnSub,btnMul,btnDiv;
    private EditText inputA,inputB;
    private TextView tvResult;

    @Override
    protected void onCreate(Bundle savedInstanceState) {
        super.onCreate(savedInstanceState);
        setContentView(R.layout.activity_main);
        setupView();
        addListener();
    }

    private void addListener() {
        btnAdd.setOnClickListener(this);
        btnDiv.setOnClickListener(this);
        btnMul.setOnClickListener(this);
        btnSub.setOnClickListener(this);
    }
    private void setupView() {
        btnAdd=this.findViewById(R.id.add);
        btnDiv=this.findViewById(R.id.div);
        btnMul=this.findViewById(R.id.mul);
        btnSub=this.findViewById(R.id.sub);

        inputA=this.findViewById(R.id.inputa);
        inputB=this.findViewById(R.id.inputb);

        tvResult=this.findViewById(R.id.result);
    }
    @Override
    public void onClick(View v) {
        double result=0;
        String strA=inputA.getText().toString();
        String strB=inputB.getText().toString();
        int a=Integer.parseInt(strA);
        int b=Integer.parseInt(strB);

        //这里就是通过JNI调用C语言的代码
        switch (v.getId()){
            case R.id.add:
                result=JNITools.addNumber(a,b);
                break;
            case R.id.div:
                result=JNITools.divNumber(a,b);
                break;
            case R.id.mul:
                result=JNITools.mulNumber(a,b);
                break;
            case R.id.sub:
                result=JNITools.subNumber(a,b);
                break;
        }
        tvResult.setText(""+result);
    }
}
(4) 运行效果
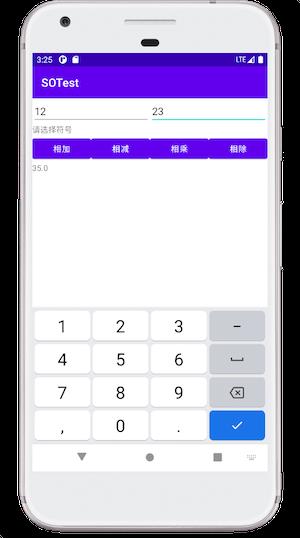
至此,就完整的介绍了如何生成SO库文件,以及如何使用SO库文件,你学会了么。
以上是关于Android JNI开发三: SO库的使用的主要内容,如果未能解决你的问题,请参考以下文章