Samba服务和FTP服务
Posted willem_chen
tags:
篇首语:本文由小常识网(cha138.com)小编为大家整理,主要介绍了Samba服务和FTP服务相关的知识,希望对你有一定的参考价值。
Samba服务和FTP服务
1.samba服务
Smb主要作为网络通信协议;
Smb是基于cs(client/server)架构(架构还有bs,broswer/server);
完成linux与windows之间的共享;
linux与linux之间共享用NFS。
1.1 安装samba
[root@localhost yum.repos.d]# yum install samba -y
1.2 编辑配置文件
[root@localhost ~]#mkdir /zxj                  #新建一个分享目录
[root@localhost ~]# vim /etc/samba/smb.conf    #进入主配置文件
#插入共享
[zxj]                                          #共享名
path =/zxj                                     #共享路径
read only = no                                 #关闭只读
public = yes                                   #公众
comment =  zxj                                 #注释
:wq
[root@localhost ~]# systemctl restart smb      #重启smb
smb.conf
# See smb.conf.example for a more detailed config file or
# read the smb.conf manpage.
# Run 'testparm' to verify the config is correct after
# you modified it.

[global]
	workgroup = WORKGROUP
	netbios name = wgchen
	security = user

	passdb backend = tdbsam

	printing = cups
	printcap name = cups
	load printers = yes
	cups options = raw

[homes]
	comment = Home Directories
	valid users = %S, %D%w%S
	browseable = No
	read only = No
	inherit acls = Yes

[printers]
	comment = All Printers
	path = /var/tmp
	printable = Yes
	create mask = 0600
	browseable = No

[print$]
	comment = Printer Drivers
	path = /var/lib/samba/drivers
	write list = @printadmin root
	force group = @printadmin
	create mask = 0664
	directory mask = 0775
[Public]
	path = /www/wwwroot/
	writable = yes
	browsable = yes
	guest ok = yes
	guest only = yes
	create mode = 0777
	directory mode = 0777

1.3 添加访问用户
[root@localhost ~]# useradd zxj                    #新加一个用户用以访问
[root@localhost ~]# pdbedit
-u, --user=USER                    use username
-a, --create                       create user
[root@localhost ~]# pdbedit -a -u zxj              #添加访问smb用户,用户必须存在
new password:
retype new password:
1.4 关闭防火墙
[root@localhost ~]# setenforce 0                   #关闭selinux
[root@localhost ~]# systemctl stop firewalld       #关闭防火墙
1.5 启动samba 服务
[root@localhost ~]# systemctl restart smb #重启smb
1.6 windows 访问
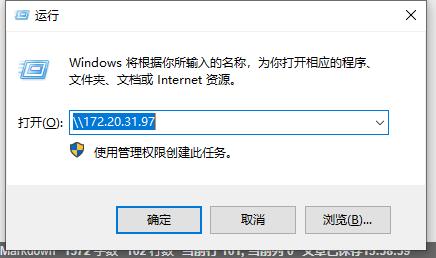
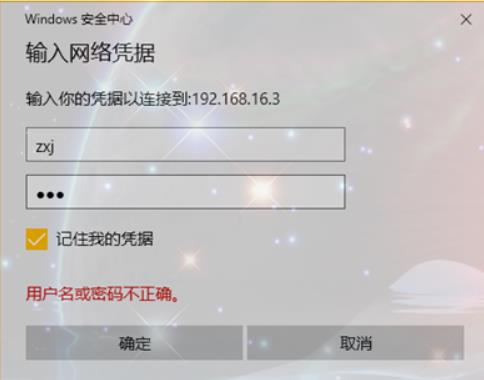

此时windows没有权限创建上传文件,需要给予写权限
[root@localhost ~]# ls -ld /zxj
drwxr-xr-x. 2 root root 6 apr 16 21:25 /zxj             #other没有读权限
[root@localhost ~]# chmod -R a+w /zxj                   #加写权限
[root@localhost ~]# ls -ld /zxj
drwxrwxrwx. 2 root root 6 apr 16 21:25 /zx
可以创建、上传了

[root@localhost ~]# ls /zxj
新建文件夹
2.FTP服务
2.1 概述
FTP服务器(File Transfer Protocol Server)是在互联网上提供文件存储和访问服务的计算机,它们依照FTP协议提供服务。
FTP(File Transfer Protocol: 文件传输协议)作用: internet 上用来传送文件的协议
2.2 vsftp
VSFTP是一个基于GPL发布的类Unix系统上使用的FTP服务器软件,它的全称是Very Secure FTP ,从此名称可以看出来,编制者的初衷是代码的安全。
vsftpd:实现了window与linux之间文件共享(默认被动模式)
特点:它是一个安全、高速、稳定的FTP服务器;
模式: C/S 模式;
端口:20(传数据)、21(传指令)
2.3 FTP工作流程(原理)(面试)
主动被动模式。
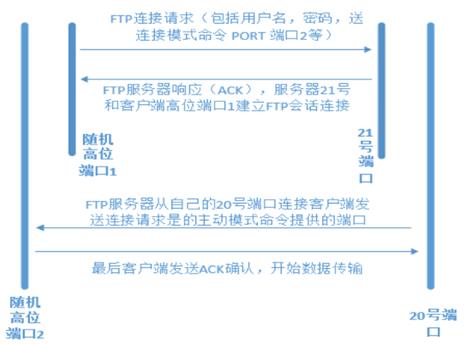
FTP会话包含了两个通道:控制通道和数据通道。FTP有两种工作方式:主动模式和被动模式,以FTPserver为参照物,主动模式:服务器主动连接客户端传输;被动模式:等待客户端的连接。
主动模式:FTP客户端连接到FTP服务端的21端口,发送用户和密码。客户端随机开放一个端口(1024以上),发送port命令到FTP服务端,告诉服务端客户采用主动模式开放端口;ftp服务端收到port主动模式命令和端口信号后通过服务器的20端口和客户端开放的端口连接,发送数据。
(客户端通过21端口,发送密码,用户port指令,服务器端相应客户端
服务器端使用20端口主动连接客户端的随机高位端口,客户端要返回确认,
开始传输数据)
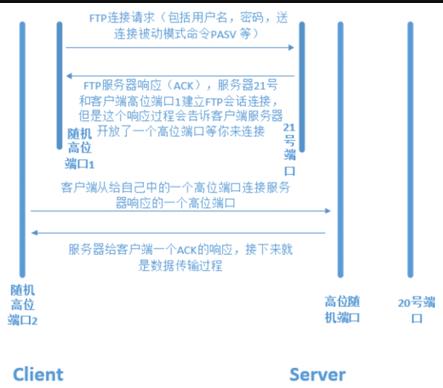
被动模式:pasv,passive,被动模式。FTP客户端连接到FTP服务端的21端口,发送用户名和密码,发送pasv命令到FTP服务器,服务器在本地随机开放一个端口(1024以上),然后把卡四方的端口告诉客户端,客户端再连接到服务器开放的端口进行端口数据传输。高位随机端口,更安全。
(客户端通过21端口,发送密码,用户pasv指令,服务器端相应客户端
服务器端使用随机高位端口主动连接客户端的随机高位端口,客户端要返回确认,
开始传输数据)
两种模式的比较:
(1)PORT(主动)模式模式只要开启服务器的21和20端口,而PASV(被动)模式需要开启服务器大于1024所有tcp端口和21端口。
(2)ftp PaSV更安全, RFC制定ftp PASV模式的主要目的是为了数据传输安全角度出发的,因为ftp port使用固定20端口进行传输数据,那么作为黑客很容使用sniffer等探嗅器抓取ftp数据,这样一来通过ftp PORT模式传输数据很容易被黑客窃取,因此使用PASV方式来架设ftp server是最安全绝佳方案。(默认是被动工作模式)
2.4 部署FTP
下载安装
[root@localhost ~]# yum install vsftpd -y
1)配置匿名开放模式
| 参数 | 作用 |
| anonymous_enable=YES | 允许匿名访问模式 |
| anon_umask=022 | 匿名用户上传文件的umask值 |
| anon_upload_enable=YES | 允许匿名用户上传文件 |
| anon_mkdir_write_enable=YES | 允许匿名用户创建目录 |
| anon_other_write_enable=YES | 允许匿名用户修改目录名称或删除目录 |
[root@localhost ~]# vim /etc/vsftpd/vsftpd.conf      #配置文件
anon_upload_enable=YES                               #删除注释,允许上载
anon_mkdir_write_enable=YES                          #删除注释,允许创建目录
:wq
[root@localhost ~]# systemctl  restart vsftpd        #重启
Windows端访问
ftp:\\\\192.168.16.3 #虚拟机iP

可以执行,无法写
[root@localhost ~]# find / -name "pub"
/var/ftp/pub
[root@localhost ~]# ls -dl /var/ftp/pub
drwxr-xr-x. 2 root root 6 Nov  6  2016 /var/ftp/pub        #other无w权限
给权限
1. ftp能够访问pub,改属主为ftp
[root@localhost ~]# chown  -R  ftp  /var/ftp/pub
[root@localhost ~]# ls -dl /var/ftp/pub
drwxr-xr-x. 2 ftp root 6 Nov  6  2016 /var/ftp/pub

2. 增加写权限
[root@localhost ~]#chmod -R a+w /var/ftp/pub

现在可以写了
2)配置本地用户模式
| 参数 | 作用 |
| anonymous_enable=NO | 禁止匿名访问模式 |
| local_enable=YES | 允许本地用户模式 |
| write_enable=YES | 设置可写权限 |
| local_umask=022 | 本地用户模式创建文件的umask值 |
| userlist_deny=YES(黑) | 启用“禁止用户名单”,名单文件为ftpusers和user_list |
| userlist_enable=YES(白) | 开启用户作用名单文件功能 |
[root@localhost ~]# vim /etc/vsftpd/vsftpd.conf      #配置文件
anonymous_enable=NO                                  #禁用匿名用户
[root@localhost ~]# systemctl restart vsftpd         #重启
root@localhost ~]# useradd zxj1                      #添加一个本地用户
[root@localhost ~]# passwd zxj1                      #设置密码
Changing password for user zxj1.                     #必须设置用户和密码
New password:
BaD PaSSWORD: The password is shorter than 8 characters
Retype new password:
passwd: all authentication tokens updated successfully.
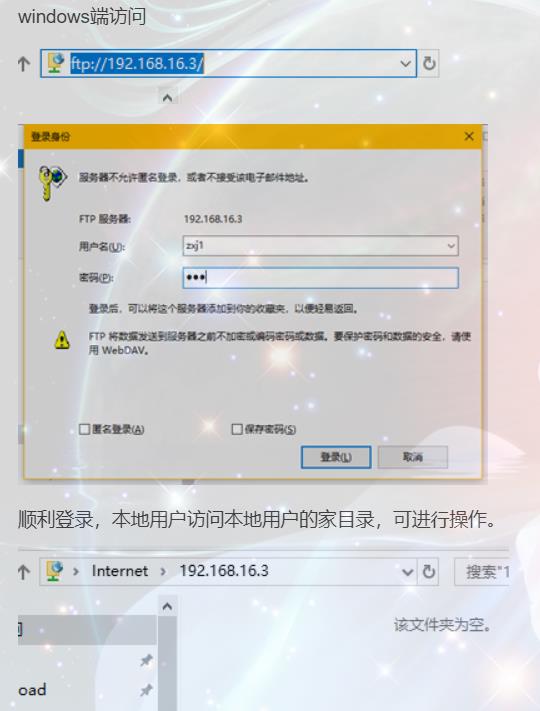
用户被上传至用户家目录下
[root@localhost ~]# ls /home
zxj  zxj1
3. systemctl常用操作以samba为例
| systemctl start smb | 启动smb服务 |
| systemctl restart smb | 重启smb服务 |
| systemctl stop smb | 停止smb服务 |
| systemctl status smb | 查看smb服务状态 |
| systemctl reload smb | 平滑重启smb |
| systemctl enable smb | 开机自启smb服务 |
| systemctl disable smb | 开机不启动smb服务 |
4. sshd服务
SSH 协议:安全外壳协议,为 Secure Shell 的缩写。SSH 为建立在应用层和传输层基础上的安全协议,默认端口22。
作用:sshd服务使用SSH协议可以用来进行远程控制, 或在计算机之间传送文件 ;
SSH 配置文件:
SSH 常用配置文件有两个/etc/ssh/ssh_config 和 /etc/sshd_config;
ssh_config 为客户端配置文件;
sshd_config 为服务器端配置文件;
4.1 几个隐藏文件
生成秘钥
[root@localhost ~]# ssh-keygen                              #生成秘钥对
Generating public/private rsa key pair.
Enter file in which to save the key (/root/.ssh/id_rsa):    #回车回车回车
Created directory '/root/.ssh'.
Enter passphrase (empty for no passphrase):
Enter same passphrase again:
Your identification has been saved in /root/.ssh/id_rsa.
Your public key has been saved in /root/.ssh/id_rsa.pub.
The key fingerprint is:
22:3f:61:70:a7:39:18:ab:e2:ef:3e:8d:bf:e2:c8:c8 root@localhost.localdomain
The key's randomart image is:
+--[ RSa 2048]----+
|                 |
|                 |
|    o . .        |
|     * +         |
|    + B S        |
|   . + +         |
|. . o o          |
|=..+ . .         |
|.E==+o.          |
+-----------------+
隐藏文件
[root@localhost ~]# ls .ssh/
id_rsa  id_rsa.pub
id_rsa                   # 私钥
id_rsa.pub               # 公钥     秘钥对,公钥解私钥
4.2 用于登录其他设备
比如用192.168.16.3登录192.168.16.5,可将公钥发送给.5
ssh-copy-id 192.168.64.5
[root@localhost ~]# ssh-copy-id 192.168.16.5              #发送秘钥
The authenticity of host '192.168.16.5 (192.168.16.5)' can't be established.
ECDSa key fingerprint is 3a:a6:03:6b:c2:f5:ae:64:a6:21:b7:f7:21:5a:0d:9c.
are you sure you want to continue connecting (yes/no)? yes
/usr/bin/ssh-copy-id: iNFO: attempting to log in with the new key(s), to filter out any that are already installed
/usr/bin/ssh-copy-id: iNFO: 1 key(s) remain to be installed -- if you are prompted now it is to install the new keys
root@192.168.16.5's password:

Number of key(s) added: 1

Now try logging into the machine, with:   "ssh '192.168.16.5'"
and check to make sure that only the key(s) you wanted were added.

[root@localhost ~]# ssh 192.168.16.5                     #远程免密登录
last login: Mon apr 15 19:18:09 2019
[root@localhost ~]# exit
logout
Connection to 192.168.16.5 closed.
登录节点:在发送完密钥之后即可不需要输入密码即可访问节点。
以上是关于Samba服务和FTP服务的主要内容,如果未能解决你的问题,请参考以下文章