第182天学习打卡(项目 谷粒商城24 OSS前后联调测试上传 )
Posted doudoutj
tags:
篇首语:本文由小常识网(cha138.com)小编为大家整理,主要介绍了第182天学习打卡(项目 谷粒商城24 OSS前后联调测试上传 )相关的知识,希望对你有一定的参考价值。
OSS前后联调测试上传

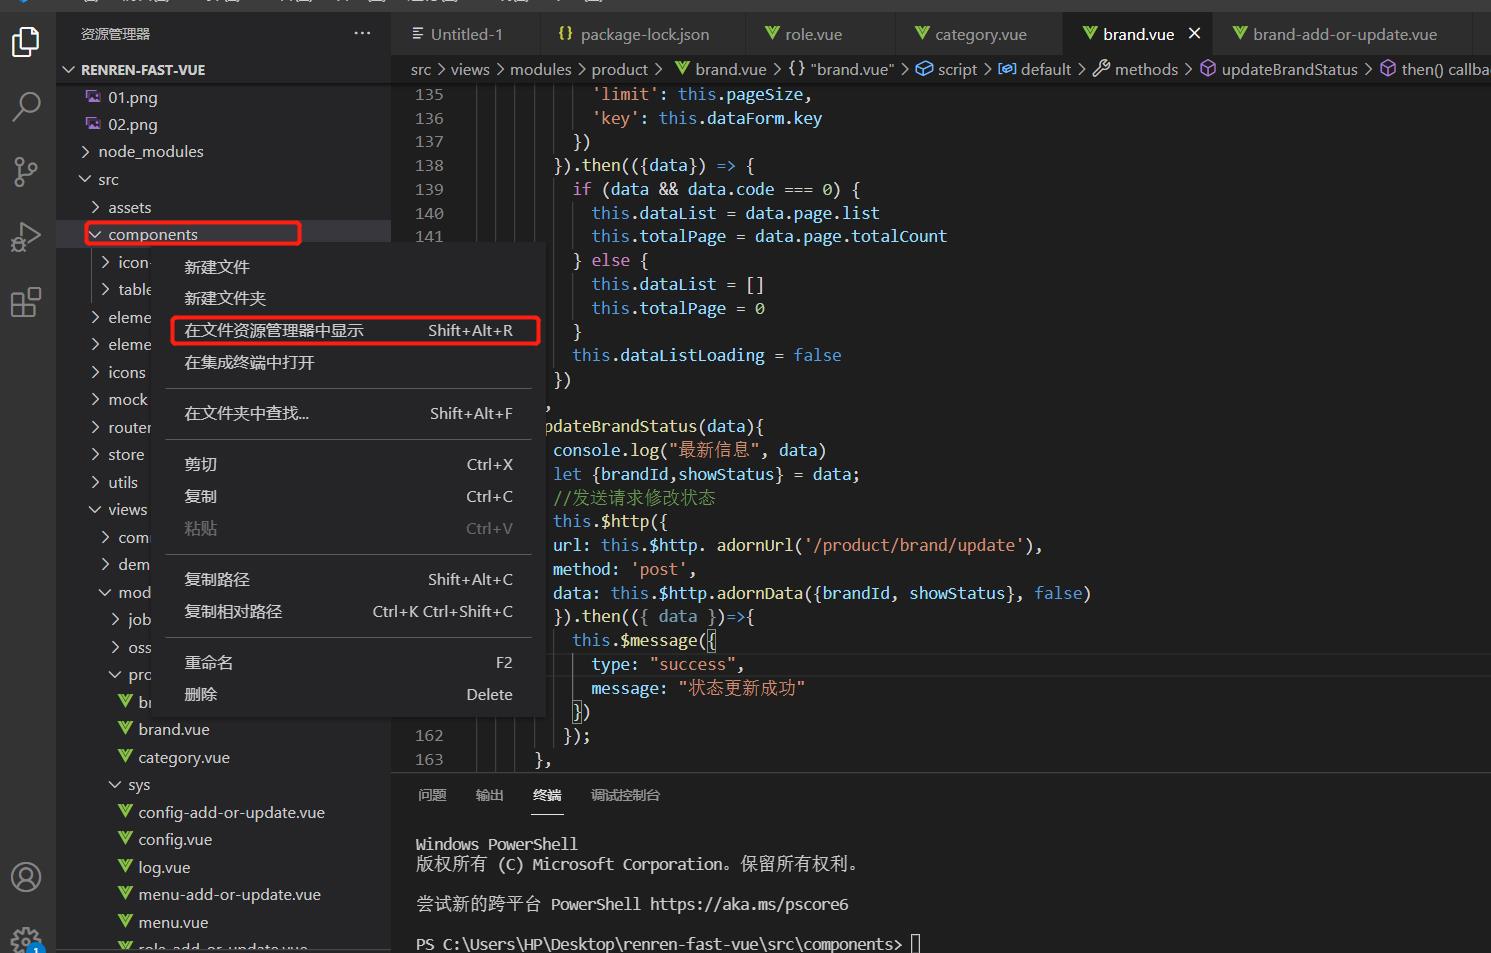
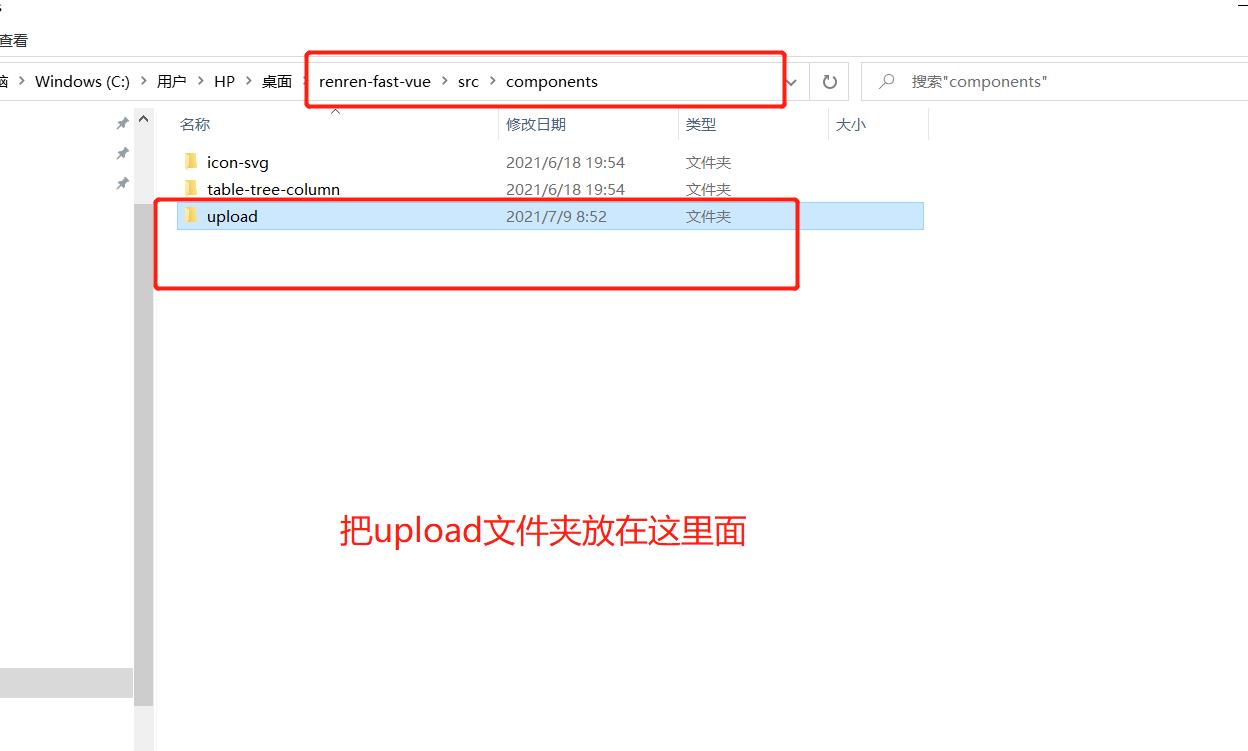
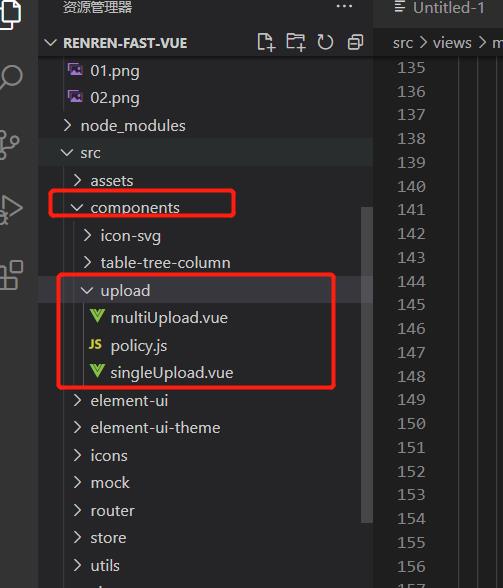
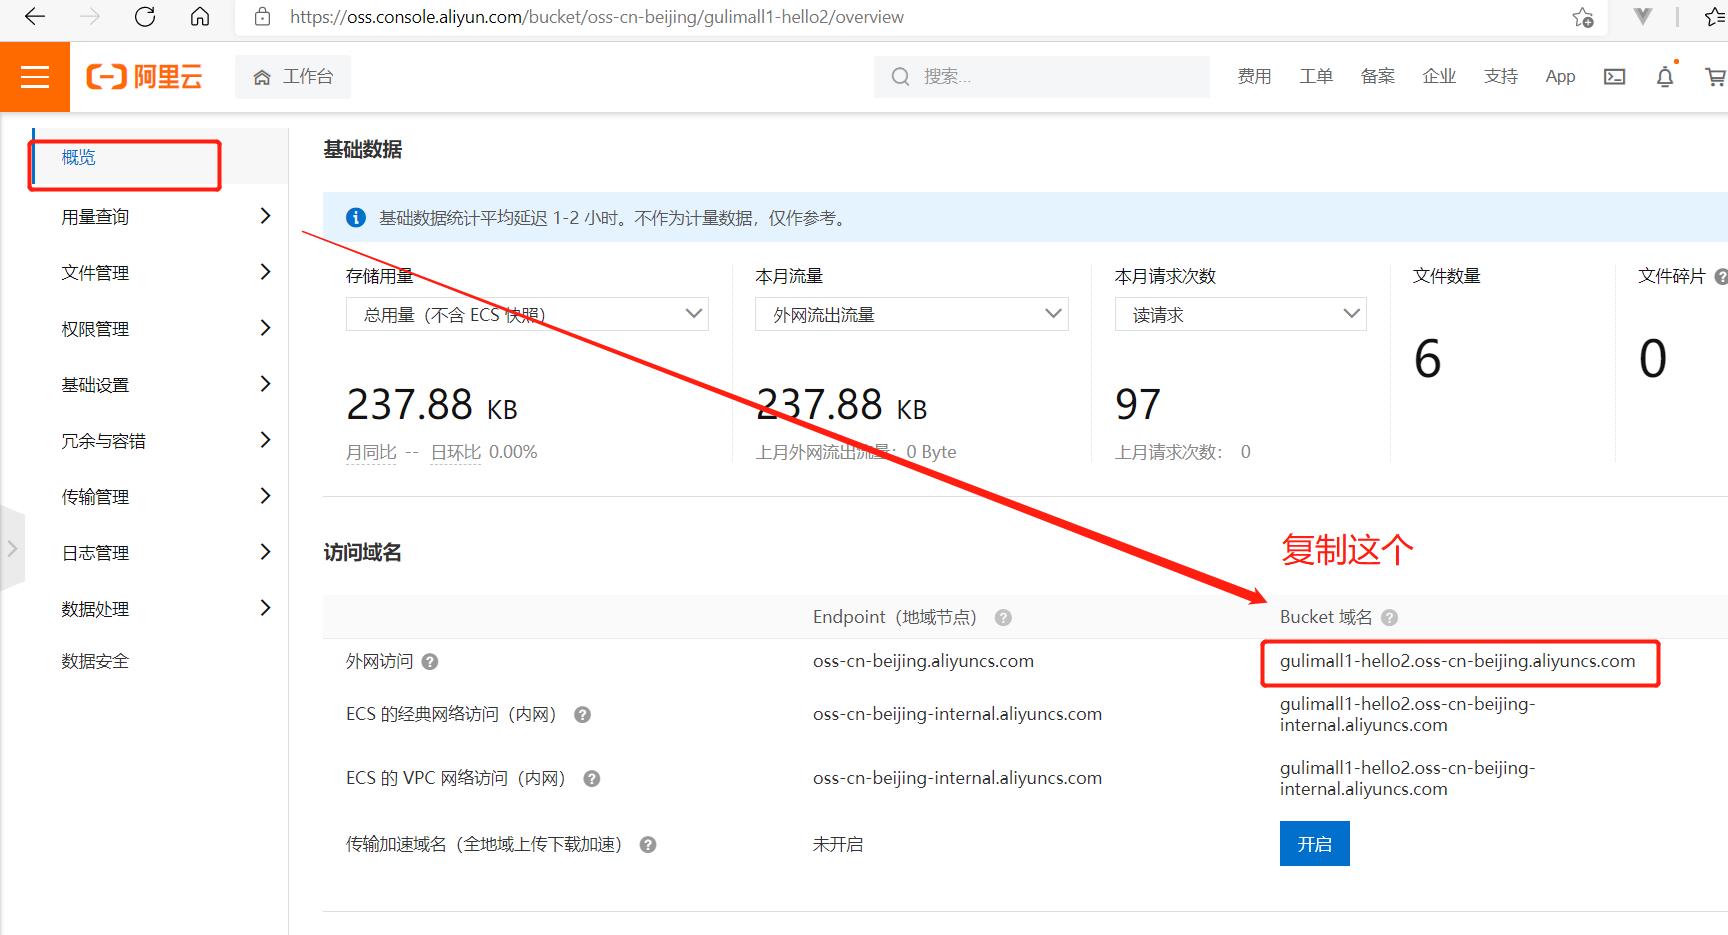
localhost:88/api/thirdparty/oss/policy
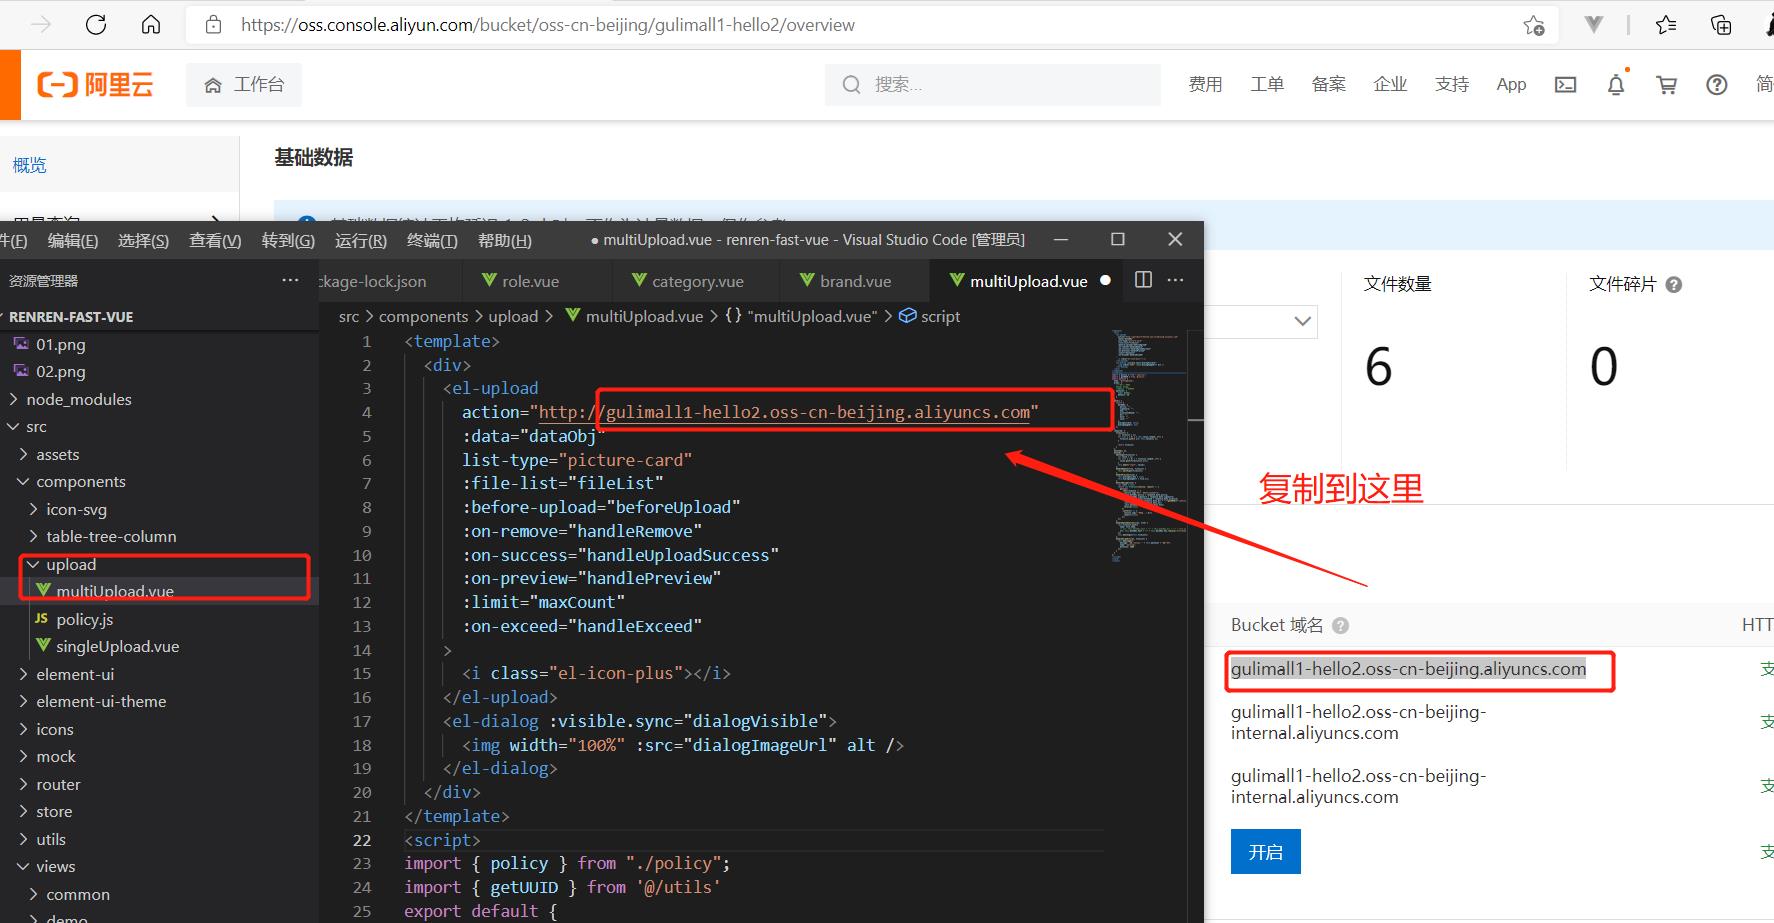
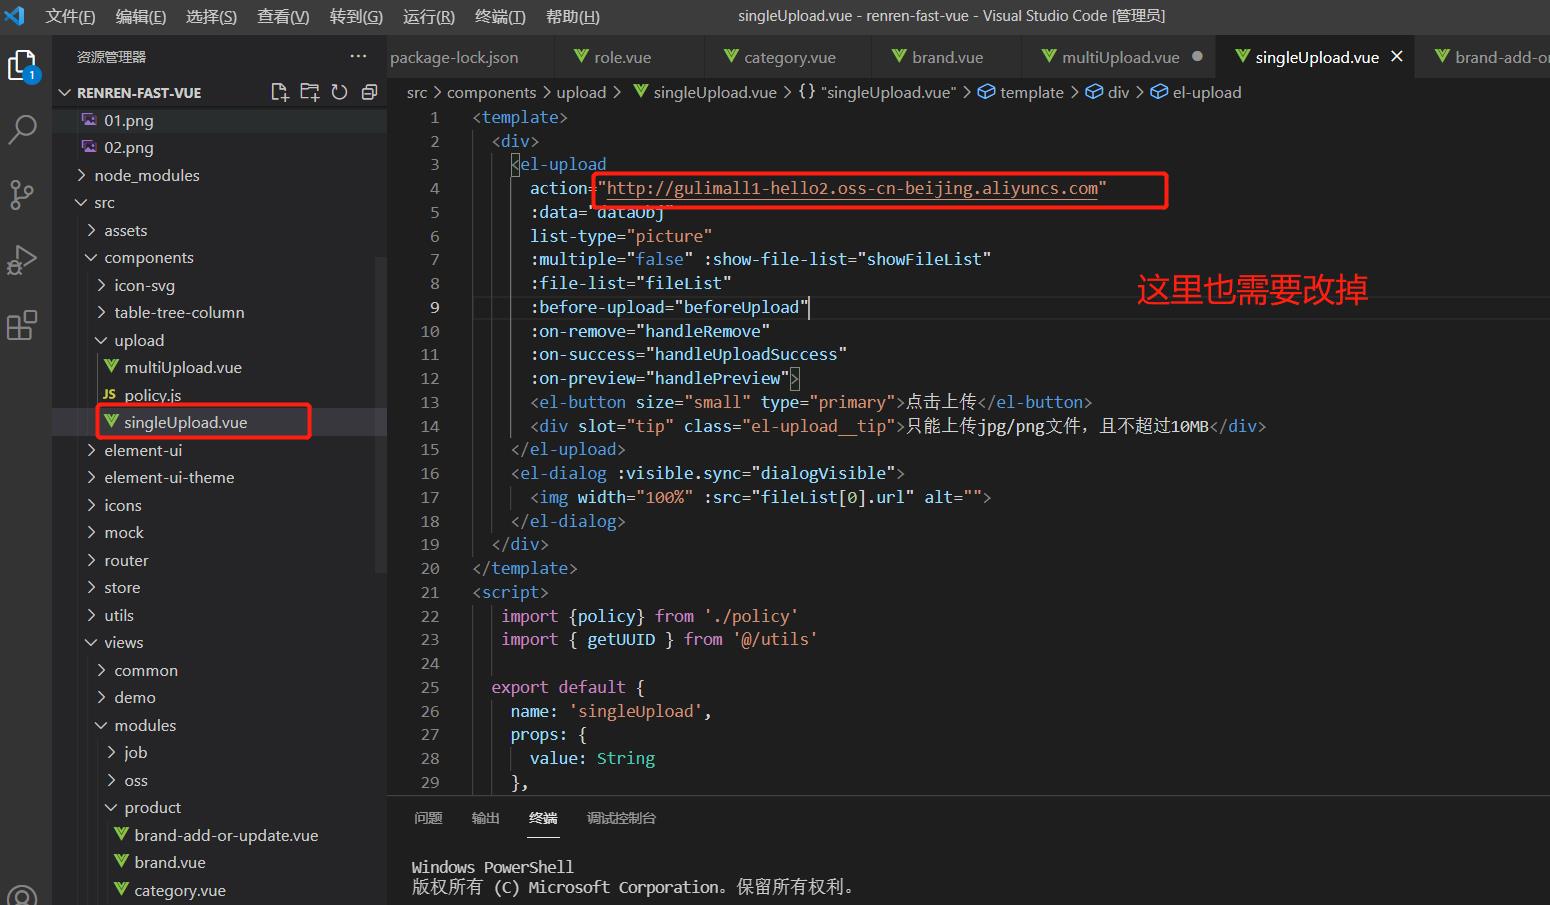
brand-add-or-update.vue
<template>
  <el-dialog
    :title="!dataForm.brandId ? '新增' : '修改'"
    :close-on-click-modal="false"
    :visible.sync="visible"
  >
    <el-form
      :model="dataForm"
      :rules="dataRule"
      ref="dataForm"
      @keyup.enter.native="dataFormSubmit()"
      label-width="140px"
    >
      <el-form-item label="品牌名" prop="name">
        <el-input v-model="dataForm.name" placeholder="品牌名"></el-input>
      </el-form-item>
      <el-form-item label="品牌logo地址" prop="logo">
        <!-- <el-input v-model="dataForm.logo" placeholder="品牌logo地址"></el-input> -->
        <single-upload v-model="dataForm.logo"></single-upload>

      </el-form-item>
      <el-form-item label="介绍" prop="descript">
        <el-input v-model="dataForm.descript" placeholder="介绍"></el-input>
      </el-form-item>
      <el-form-item label="显示状态" prop="showStatus">
        <el-switch
          v-model="dataForm.showStatus"
          active-color="#13ce66"
          inactive-color="#ff4949"
        >
        </el-switch>
      </el-form-item>
      <el-form-item label="检索首字母" prop="firstLetter">
        <el-input
          v-model="dataForm.firstLetter"
          placeholder="检索首字母"
        ></el-input>
      </el-form-item>
      <el-form-item label="排序" prop="sort">
        <el-input v-model="dataForm.sort" placeholder="排序"></el-input>
      </el-form-item>
    </el-form>
    <span slot="footer" class="dialog-footer">
      <el-button @click="visible = false">取消</el-button>
      <el-button type="primary" @click="dataFormSubmit()">确定</el-button>
    </span>
  </el-dialog>
</template>

<script>
import SingleUpload from "@/components/upload/singleUpload"
export default {
  components:{SingleUpload},
  data() {
    return {
      visible: false,
      dataForm: {
        brandId: 0,
        name: "",
        logo: "",
        descript: "",
        showStatus: "",
        firstLetter: "",
        sort: "",
      },
      dataRule: {
        name: [{ required: true, message: "品牌名不能为空", trigger: "blur" }],
        logo: [
          { required: true, message: "品牌logo地址不能为空", trigger: "blur" },
        ],
        descript: [
          { required: true, message: "介绍不能为空", trigger: "blur" },
        ],
        showStatus: [
          {
            required: true,
            message: "显示状态[0-不显示;1-显示]不能为空",
            trigger: "blur",
          },
        ],
        firstLetter: [
          { required: true, message: "检索首字母不能为空", trigger: "blur" },
        ],
        sort: [{ required: true, message: "排序不能为空", trigger: "blur" }],
      },
    };
  },
  methods: {
    init(id) {
      this.dataForm.brandId = id || 0;
      this.visible = true;
      this.$nextTick(() => {
        this.$refs["dataForm"].resetFields();
        if (this.dataForm.brandId) {
          this.$http({
            url: this.$http.adornUrl(
              `/product/brand/info/${this.dataForm.brandId}`
            ),
            method: "get",
            params: this.$http.adornParams(),
          }).then(({ data }) => {
            if (data && data.code === 0) {
              this.dataForm.name = data.brand.name;
              this.dataForm.logo = data.brand.logo;
              this.dataForm.descript = data.brand.descript;
              this.dataForm.showStatus = data.brand.showStatus;
              this.dataForm.firstLetter = data.brand.firstLetter;
              this.dataForm.sort = data.brand.sort;
            }
          });
        }
      });
    },
    // 表单提交
    dataFormSubmit() {
      this.$refs["dataForm"].validate((valid) => {
        if (valid) {
          this.$http({
            url: this.$http.adornUrl(
              `/product/brand/${!this.dataForm.brandId ? "save" : "update"}`
            ),
            method: "post",
            data: this.$http.adornData({
              brandId: this.dataForm.brandId || undefined,
              name: this.dataForm.name,
              logo: this.dataForm.logo,
              descript: this.dataForm.descript,
              showStatus: this.dataForm.showStatus,
              firstLetter: this.dataForm.firstLetter,
              sort: this.dataForm.sort,
            }),
          }).then(({ data }) => {
            if (data && data.code === 0) {
              this.$message({
                message: "操作成功",
                type: "success",
                duration: 1500,
                onClose: () => {
                  this.visible = false;
                  this.$emit("refreshDataList");
                },
              });
            } else {
              this.$message.error(data.msg);
            }
          });
        }
      });
    },
  },
};
</script>
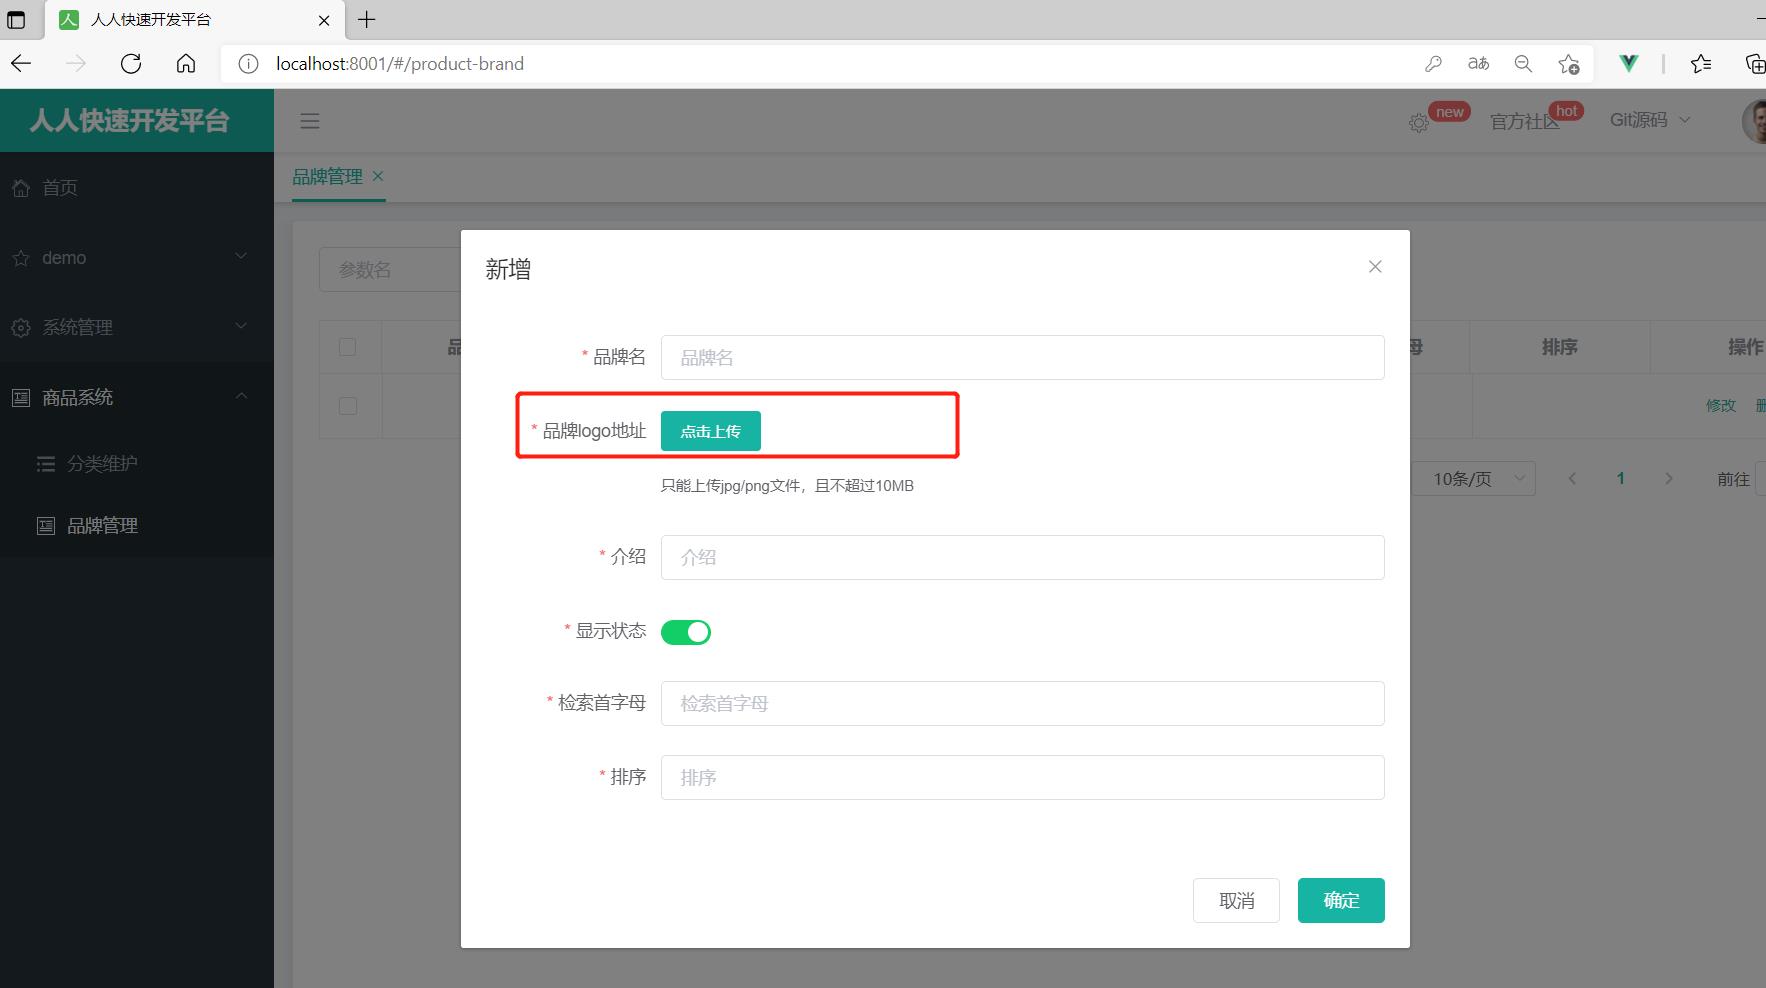
页面展示效果
**gulimall-third-party controller **
OssController.java(这里已经是把下面的错误修改成功的代码)
package com.doudou.gulimall.thirdparty.controller;


import com.aliyun.oss.OSS;
import com.aliyun.oss.common.utils.BinaryUtil;
import com.aliyun.oss.model.MatchMode;
import com.aliyun.oss.model.PolicyConditions;
import com.doudou.gulimall.thirdparty.common.utils.R;
import org.springframework.beans.factory.annotation.Value;
import org.springframework.web.bind.annotation.RequestMapping;
import org.springframework.web.bind.annotation.RestController;

import javax.annotation.Resource;
import java.text.SimpleDateFormat;
import java.util.Date;
import java.util.LinkedHashMap;
import java.util.Map;

@RestController
public class OssController {
    @Resource
    OSS ossClient;


    @Value("${spring.cloud.alicloud.oss.endpoint}")
    private String endpoint;
    @Value("${spring.cloud.alicloud.oss.bucket}")
    private String bucket;
    @Value("${spring.cloud.alicloud.access-key}")
    private String accessId;

    @RequestMapping("/oss/policy")
    public R policy() {


        String host = "https://" + bucket + "." + endpoint; // host的格式为 bucketname.endpoint
        // callbackUrl为 上传回调服务器的URL,请将下面的IP和Port配置为您自己的真实信息。
        //String callbackUrl = "http://88.88.88.88:8888";
        String format = new SimpleDateFormat("yyyy-MM-dd").format(new Date());
        String dir = format + "/"; // 用户上传文件时指定的前缀。

        Map<String, String> respMap = null;
        try {
            long expireTime = 30;
            long expireEndTime = System.currentTimeMillis() + expireTime * 1000;
            Date expiration = new Date(expireEndTime);
            // PostObject请求最大可支持的文件大小为5 GB,即CONTENT_LENGTH_RANGE为5*1024*1024*1024。
            PolicyConditions policyConds = new PolicyConditions();
            policyConds.addConditionItem(PolicyConditions.COND_CONTENT_LENGTH_RANGE, 0, 1048576000);
            policyConds.addConditionItem(MatchMode.StartWith, PolicyConditions.COND_KEY, dir);

            String postPolicy = ossClient.generatePostPolicy(expiration, policyConds);
            byte[] binaryData = postPolicy.getBytes("utf-8");
            String encodedPolicy = BinaryUtil.toBase64String(binaryData);
            String postSignature = ossClient.calculatePostSignature(postPolicy);

            respMap = new LinkedHashMap<String, String>();
            respMap.put("accessid", accessId);
            respMap.put("policy", encodedPolicy);
            respMap.put("signature", postSignature);
            respMap.put("dir", dir);
            respMap.put("host", host);
            respMap.put("expire", String.valueOf(expireEndTime / 1000));
            // respMap.put("expire", formatISO8601Date(expiration));


        } catch (Exception e) {
            // Assert.fail(e.getMessage());
            System.out.println(e.getMessage());
        } finally {
            ossClient.shutdown();
        }
        return R.ok().put("data", respMap);
    }
}
出现的错误:
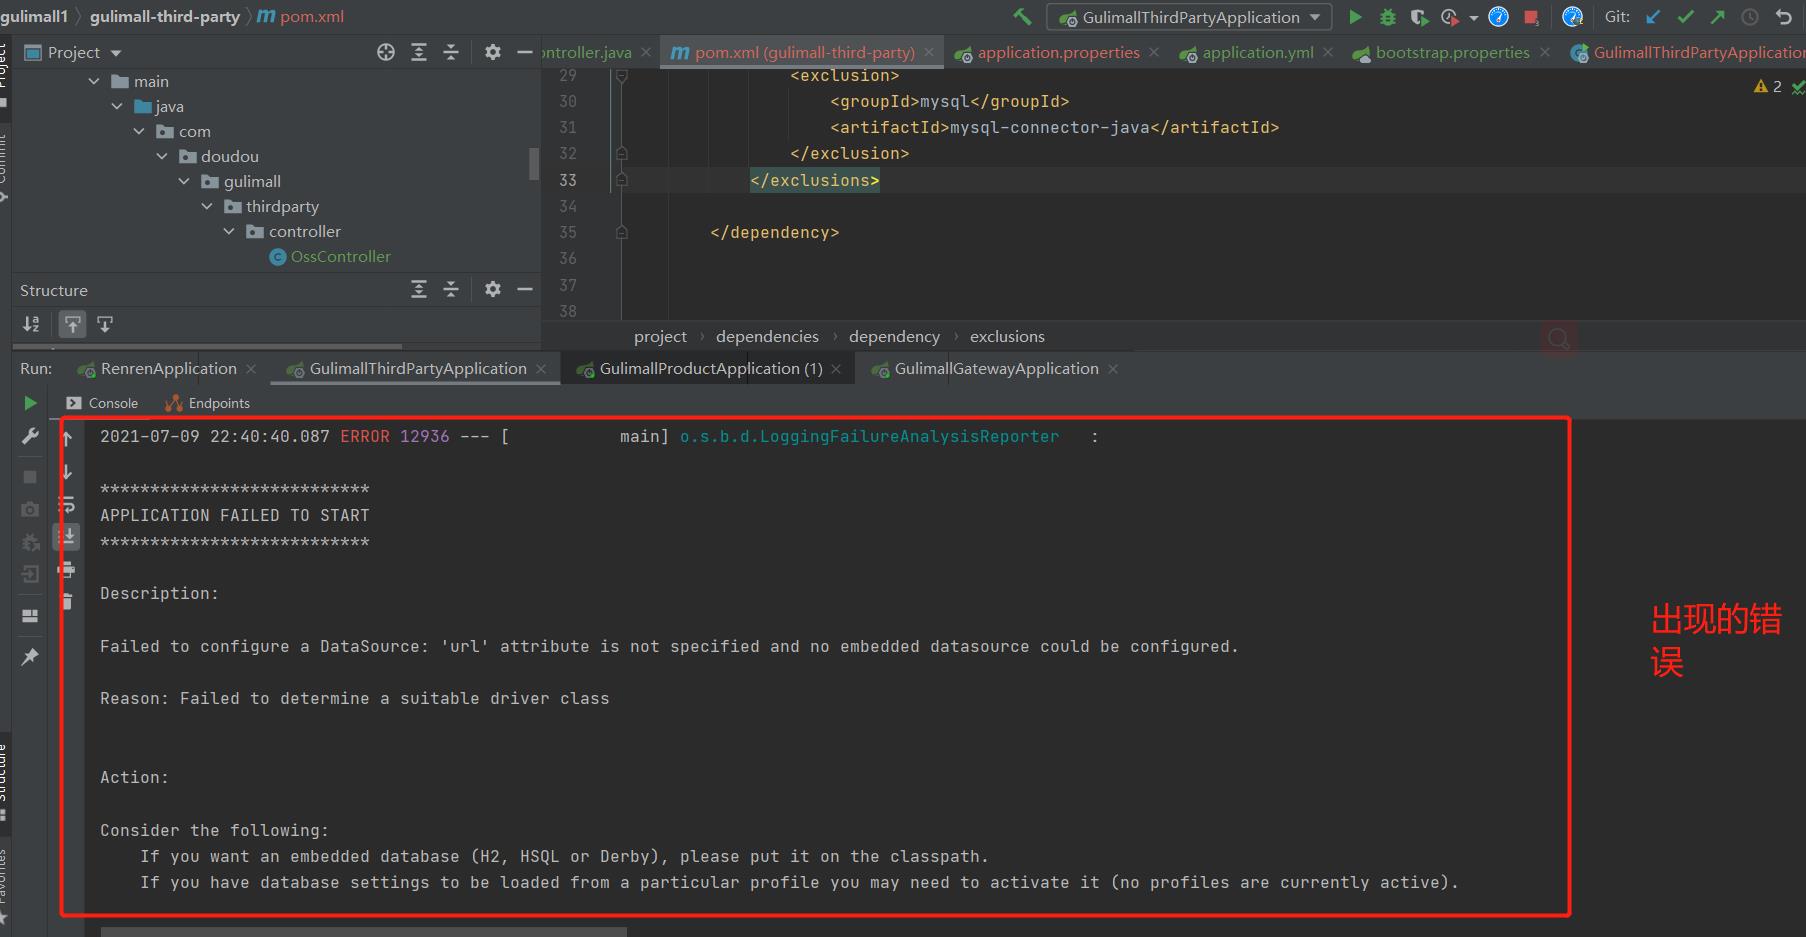
2021-07-09 22:32:31.502 ERROR 29812 --- [           main] o.s.b.d.LoggingFailureAnalysisReporter   :

***************************
APPLICATION FAILED TO START
***************************

Description:

Failed to configure a DataSource: 'url' attribute is not specified and no embedded datasource could be configured.

Reason: Failed to determine a suitable driver class


Action:

Consider the following:
	If you want an embedded database (H2, HSQL or Derby), please put it on the classpath.
	If you have database settings to be loaded from a particular profile you may need to activate it (no profiles are currently active).


Process finished with exit code 1
解决办法(因为我导入common的依赖会出错 所有没有导入 ,没有导入common,那么就导入不了R, 所以我把common里面的两个文件直接复制到gulimall-third-party里面,把R直接作为了gulimall-third-party的子文件然后在OssController里面进行导入):
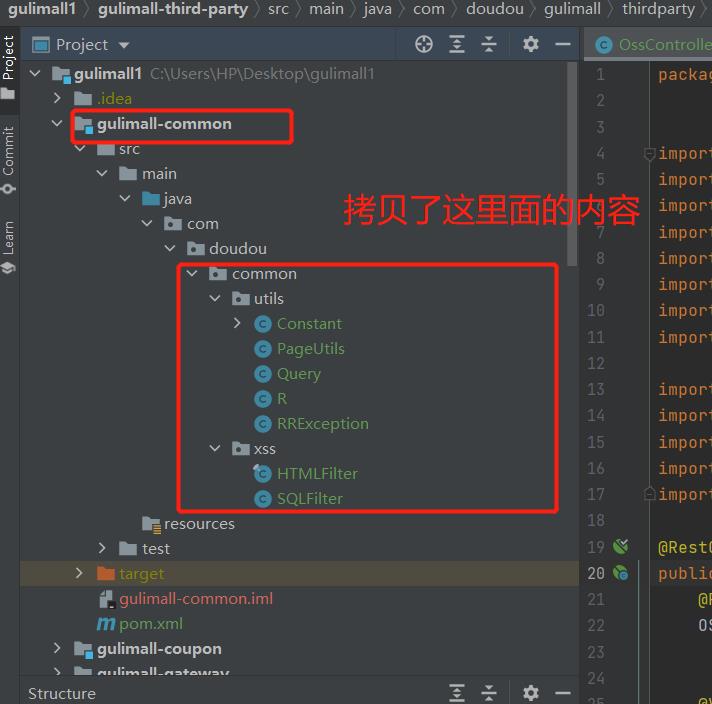
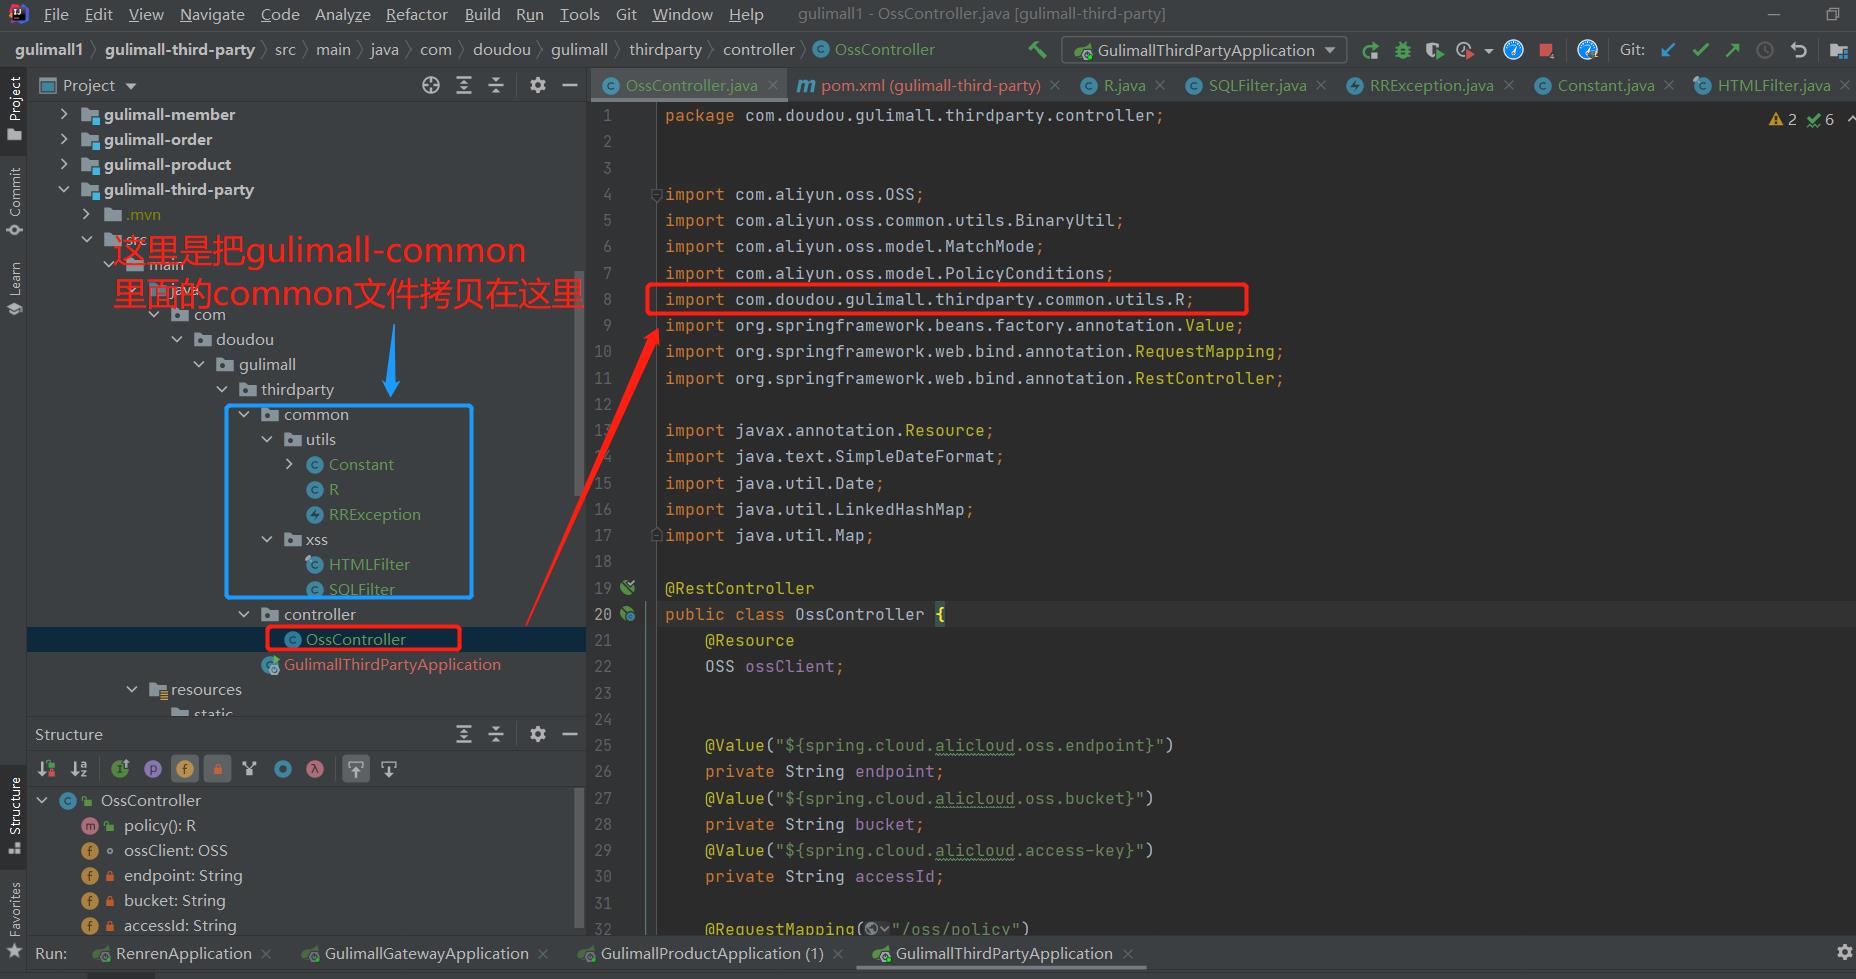
gulimall-third-party(pom.xml)
<?xml version="1.0" encoding="UTF-8"?>
<project xmlns="http://maven.apache.org/POM/4.0.0" xmlns:xsi="http://www.w3.org/2001/XMLSchema-instance"
         xsi:schemaLocation="http://maven.apache.org/POM/4.0.0 https://maven.apache.org/xsd/maven-4.0.0.xsd">
    <modelVersion>4.0.0</modelVersion>
    <groupId>com.doudou.gulimall</groupId>
    <artifactId>gulimall-third-party</artifactId>
    <version>0.0.1-SNAPSHOT</version>
    <name>gulimall-third-party</name>
    <description>第三方服务</description>

    <properties>
        <java.version>1.8</java.version>
        <project.build.sourceEncoding>UTF-8</project.build.sourceEncoding>
        <project.reporting.outputEncoding>UTF-8</project.reporting.outputEncoding>
        <spring-boot.version>2.3.7.RELEASE</spring-boot.version>
        <spring-cloud.version>Hoxton.SR9</spring-cloud.version>
    </properties>

    <dependencies>
<!--        <dependency>-->
<!--            <groupId>com.doudou.gulimall1</groupId>-->
<!--            <artifactId>gulimall-common</artifactId>-->
<!--            <version>0.0.1-SNAPSHOT</version>-->
<!--            <exclusions>-->
<!--                <exclusion>-->
<!--                    <groupId>com.baomidou</groupId>-->
<!--                    <artifactId>mybatis-plus-boot-starter</artifactId>-->
<!--                </exclusion>-->
<!--            </exclusions>-->
<!--        </dependency>-->
        <dependency>
            <groupId>com.alibaba.cloud</groupId>
            <artifactId>spring-cloud-starter-alibaba-nacos-discovery</artifactId>
        </dependency>
        <!--        配置中心来做配置管理-->
        <dependency>
            <groupId>com.alibaba.cloud</groupId>
            <artifactId>spring-cloud-starter-alibaba-nacos-config</artifactId>
        </dependency>


        <dependency>
            <groupId>org.springframework.boot</groupId>
            <artifactId>spring-boot-starter-web</artifactId>
        </dependency>
        <dependency>
            <groupId>org.springframework.cloud</groupId>
            <artifactId>spring-cloud-starter-openfeign</artifactId>
        </dependency>

        <dependency>
            <groupId>org.springframework.boot</groupId>
            <artifactId>spring-boot-starter-test</artifactId>
            <scope>test</scope>
            <exclusions>
                <exclusion>
                    <groupId>org.junit.vintage</groupId>
                    <artifactId>junit-vintage-engine</artifactId>
                </exclusion>
            </exclusions>
        </dependency>


        <dependency>
            <groupId>com.alibaba.cloud</groupId>
            <artifactId>spring-cloud-starter-alicloud-oss</artifactId>

        </dependency>
    </dependencies>

    <dependencyManagement>
        <dependencies>

            <dependency>
                <groupId>com.alibaba.cloud</groupId>
                <artifactId>spring-cloud-alibaba-dependencies</artifactId>
                <version>2.2.0.RELEASE</version>
                <type>pom</type>
                <scope>import</scope>
            </dependency>


            <dependency>
                <groupId>org.springframework.cloud</groupId>
                <artifactId>spring-cloud-dependencies</artifactId>
                <version>${spring-cloud.version}</version>
                <type>pom</type>
                <scope>import</scope>
            </dependency>
            <dependency>
                <groupId>org.springframework.boot</groupId>
                <artifactId>spring-boot-dependencies</artifactId>
                <version>${spring-boot.version}</version>
                <type>pom</type>
                <scope>import</scope>
            </dependency>
        </dependencies>
    </dependencyManagement>

    <build>
        <plugins>
            <plugin>
                <groupId>org.apache.maven.plugins</groupId>
                <artifactId>maven-compiler-plugin</artifactId>
                <version>3.8.1</version>
                <configuration>
                    <source>1.8</source>
                    <target>1.8</target>
                    <encoding>UTF-8</encoding>
                </configuration>
            </plugin>
            <plugin>
                <groupId>org.springframework.boot</groupId>
                <artifactId>spring-boot-maven-plugin</artifactId>
                <version>2.3.7.RELEASE</version>
                <configuration>
                    <mainClass>com.doudou.gulimall.thirdparty.GulimallThirdPartyApplication</mainClass>
                </configuration>
                <executions>
                    <execution>
                        <id>repackage</id>
                        <goals>
                            <goal>repackage</goal>
                        </goals>
                    </execution>
                </executions>
            </plugin>
        </plugins>
    </build>

</project>
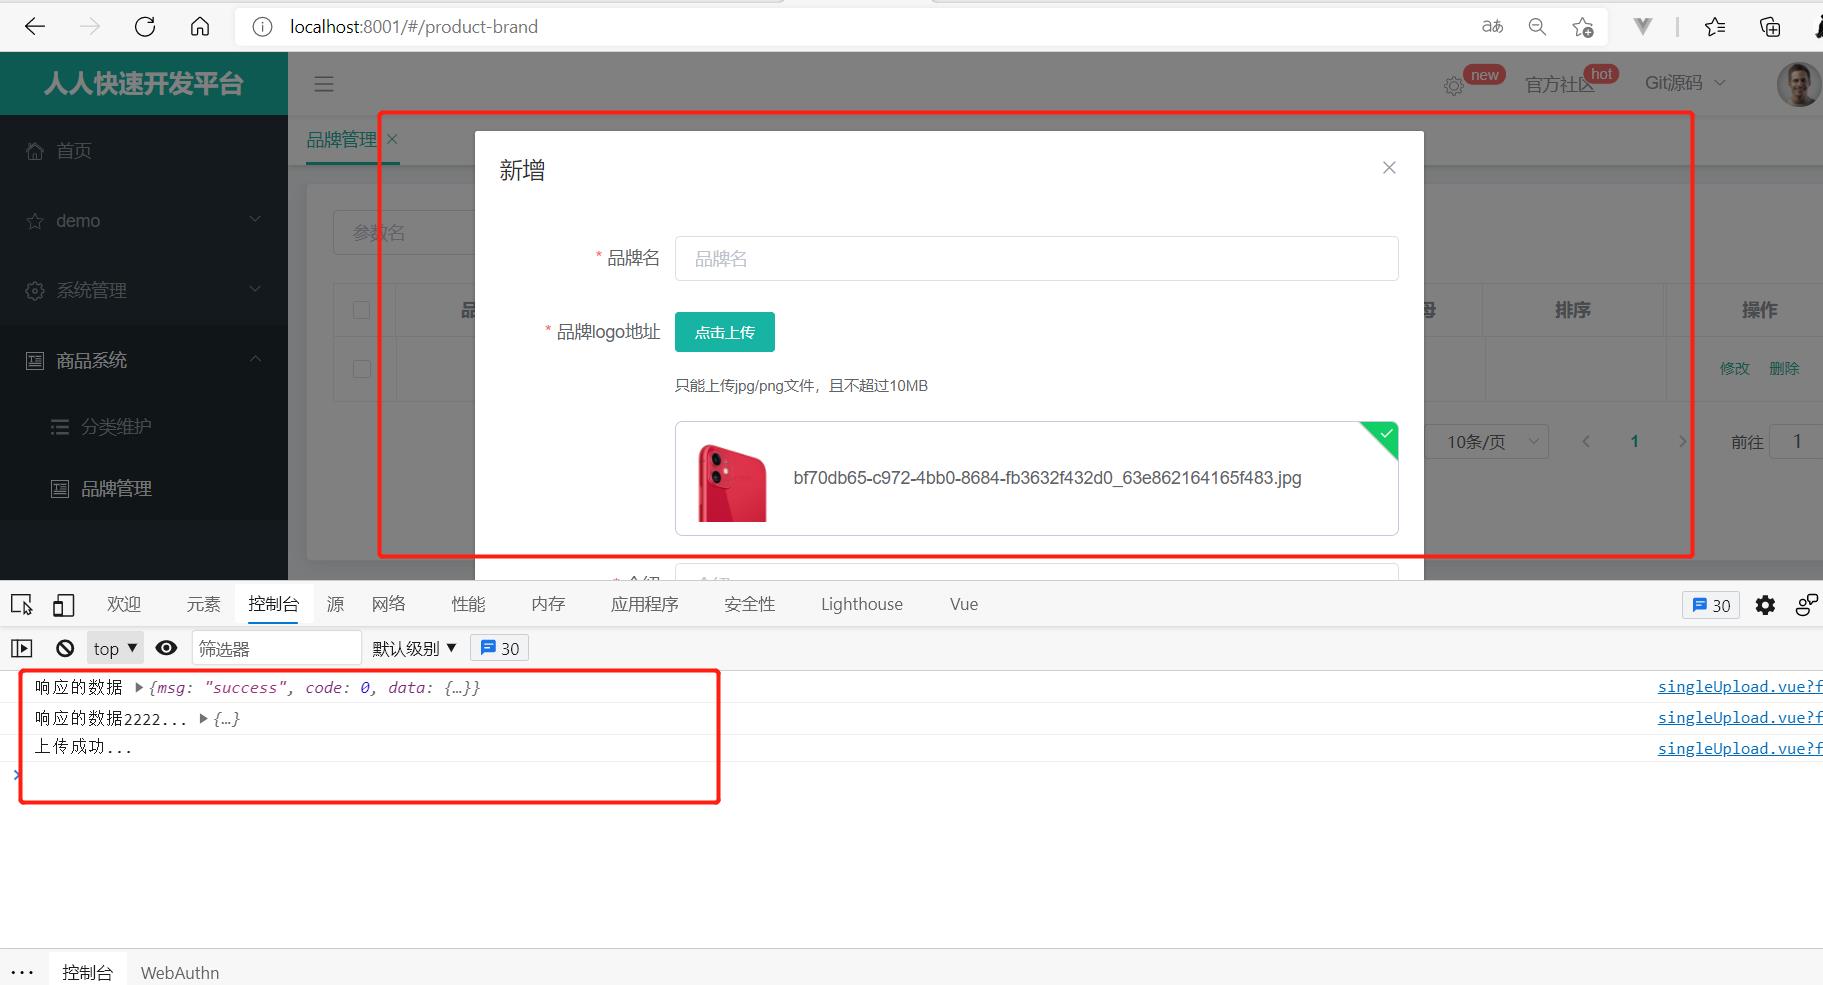
页面展示效果


签名上传的时候,由于浏览器是直接将文件以及singleUpload.vue里面的data 的dataObj直接提交给对象存储,所以出现了跨域请求
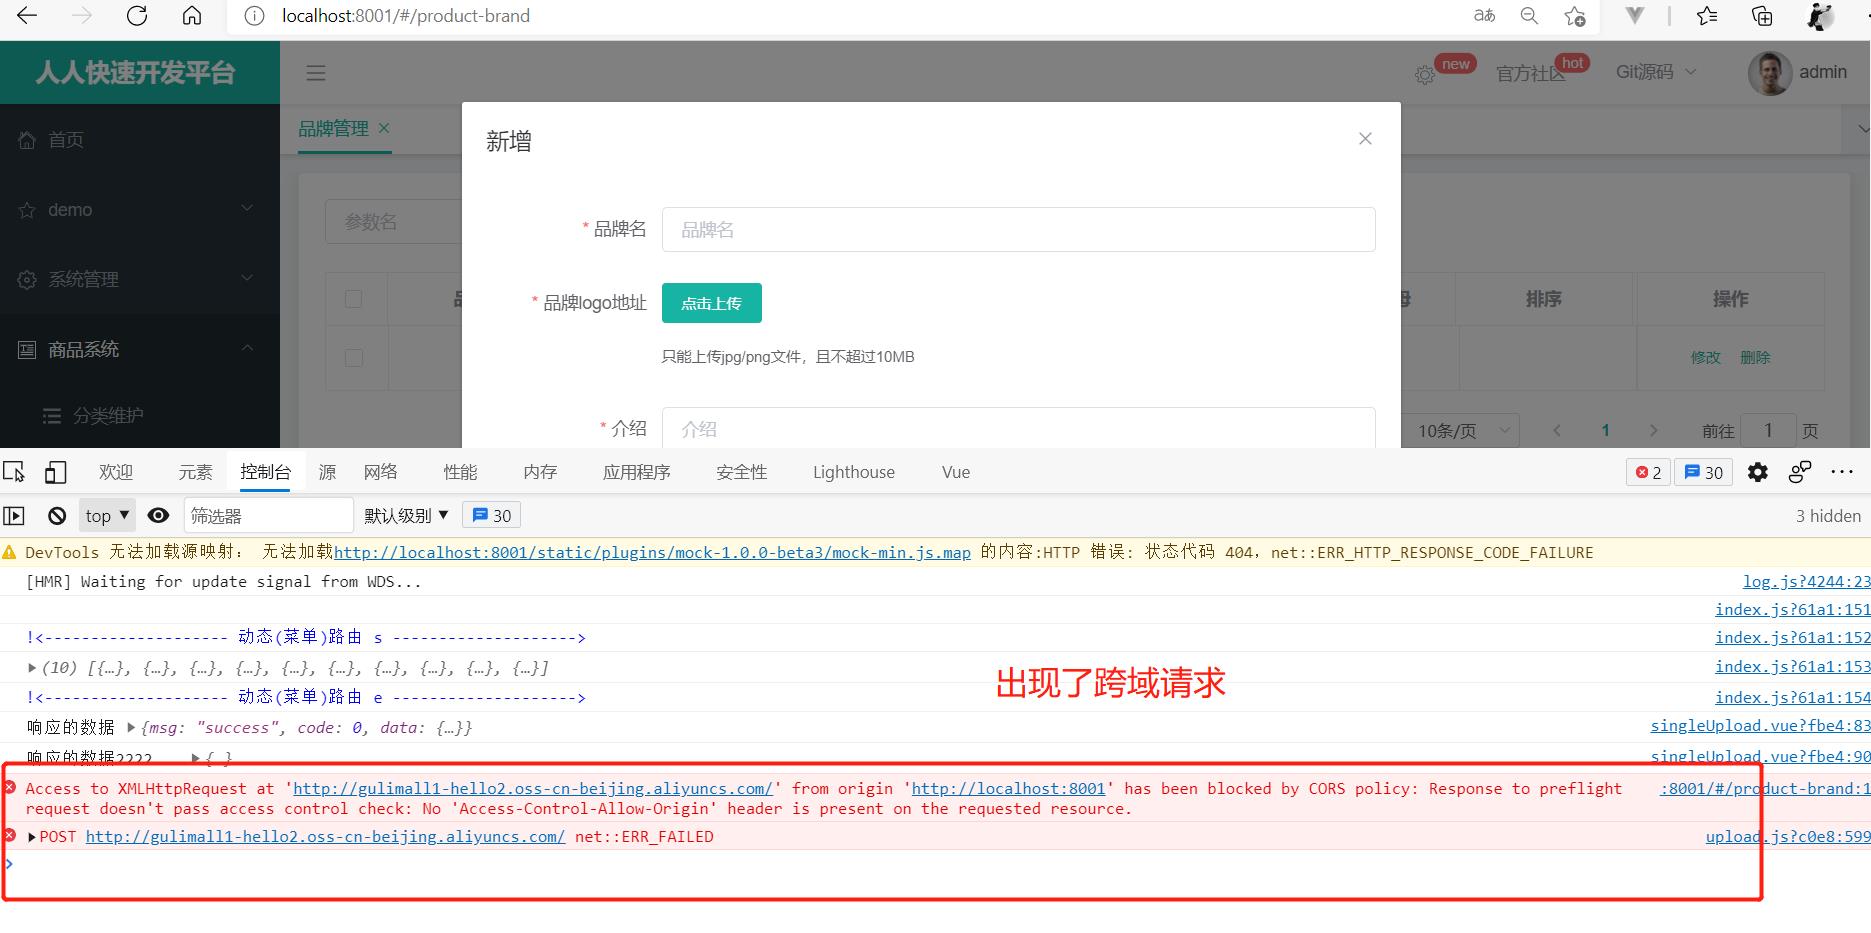
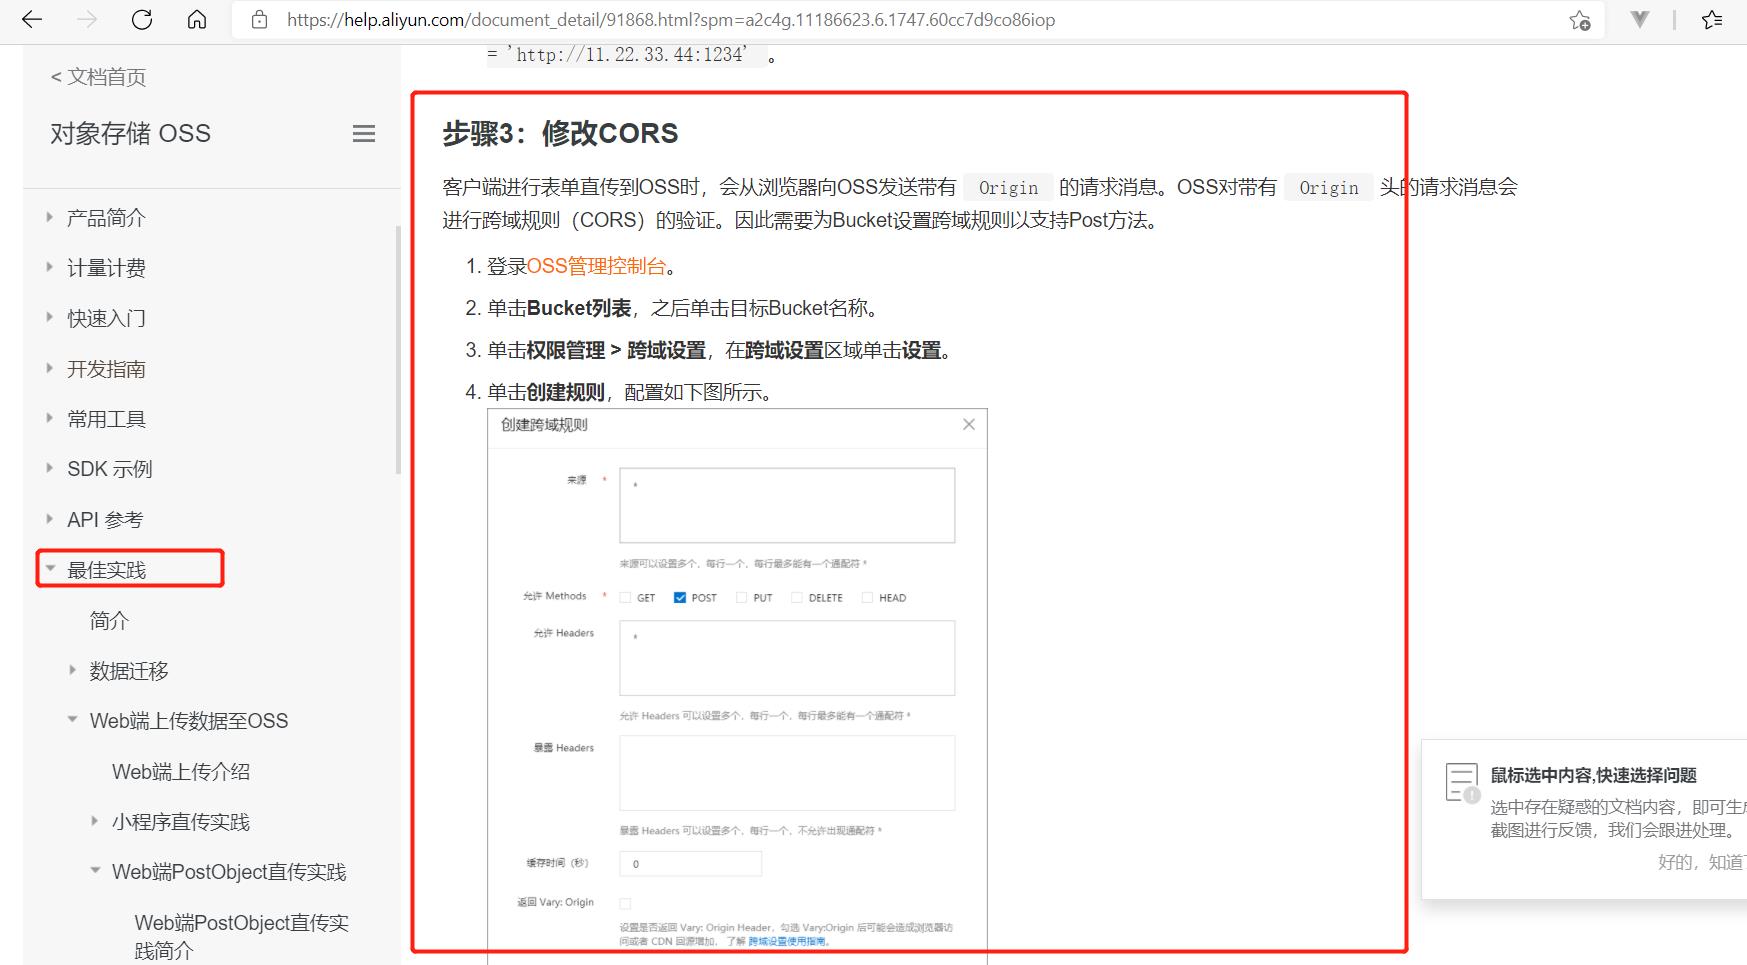
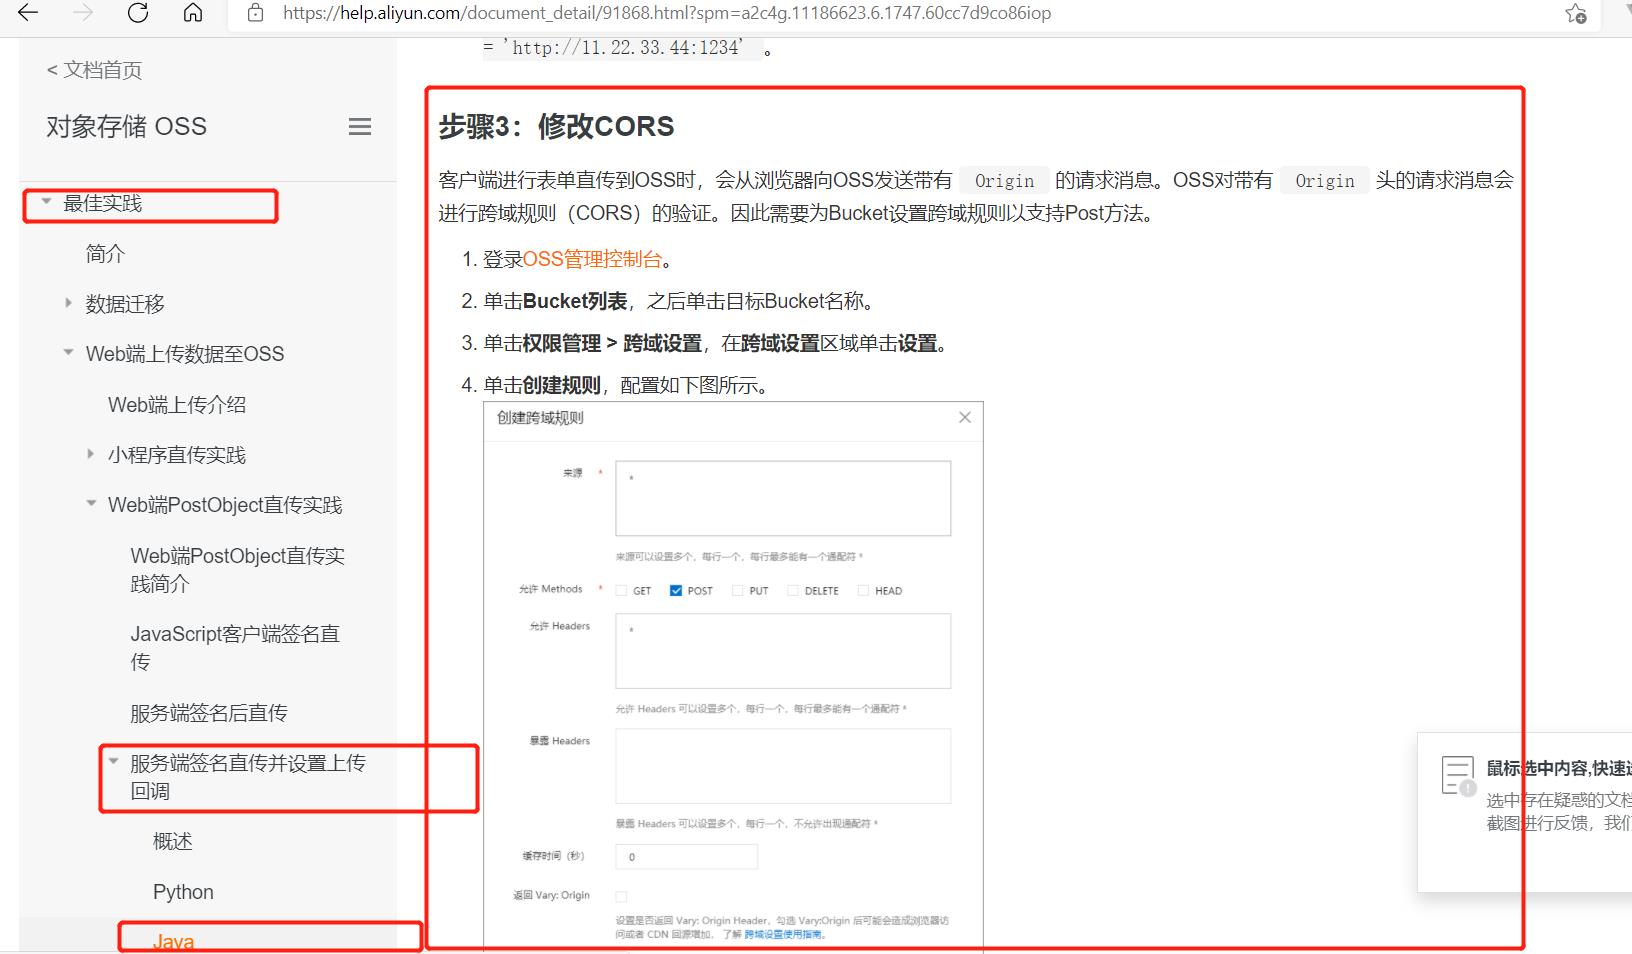
Java - 对象存储 OSS - 阿里云 (aliyun.com)
阿里云帮助中心-阿里云,领先的云计算服务提供商 (aliyun.com)
配置跨域规则
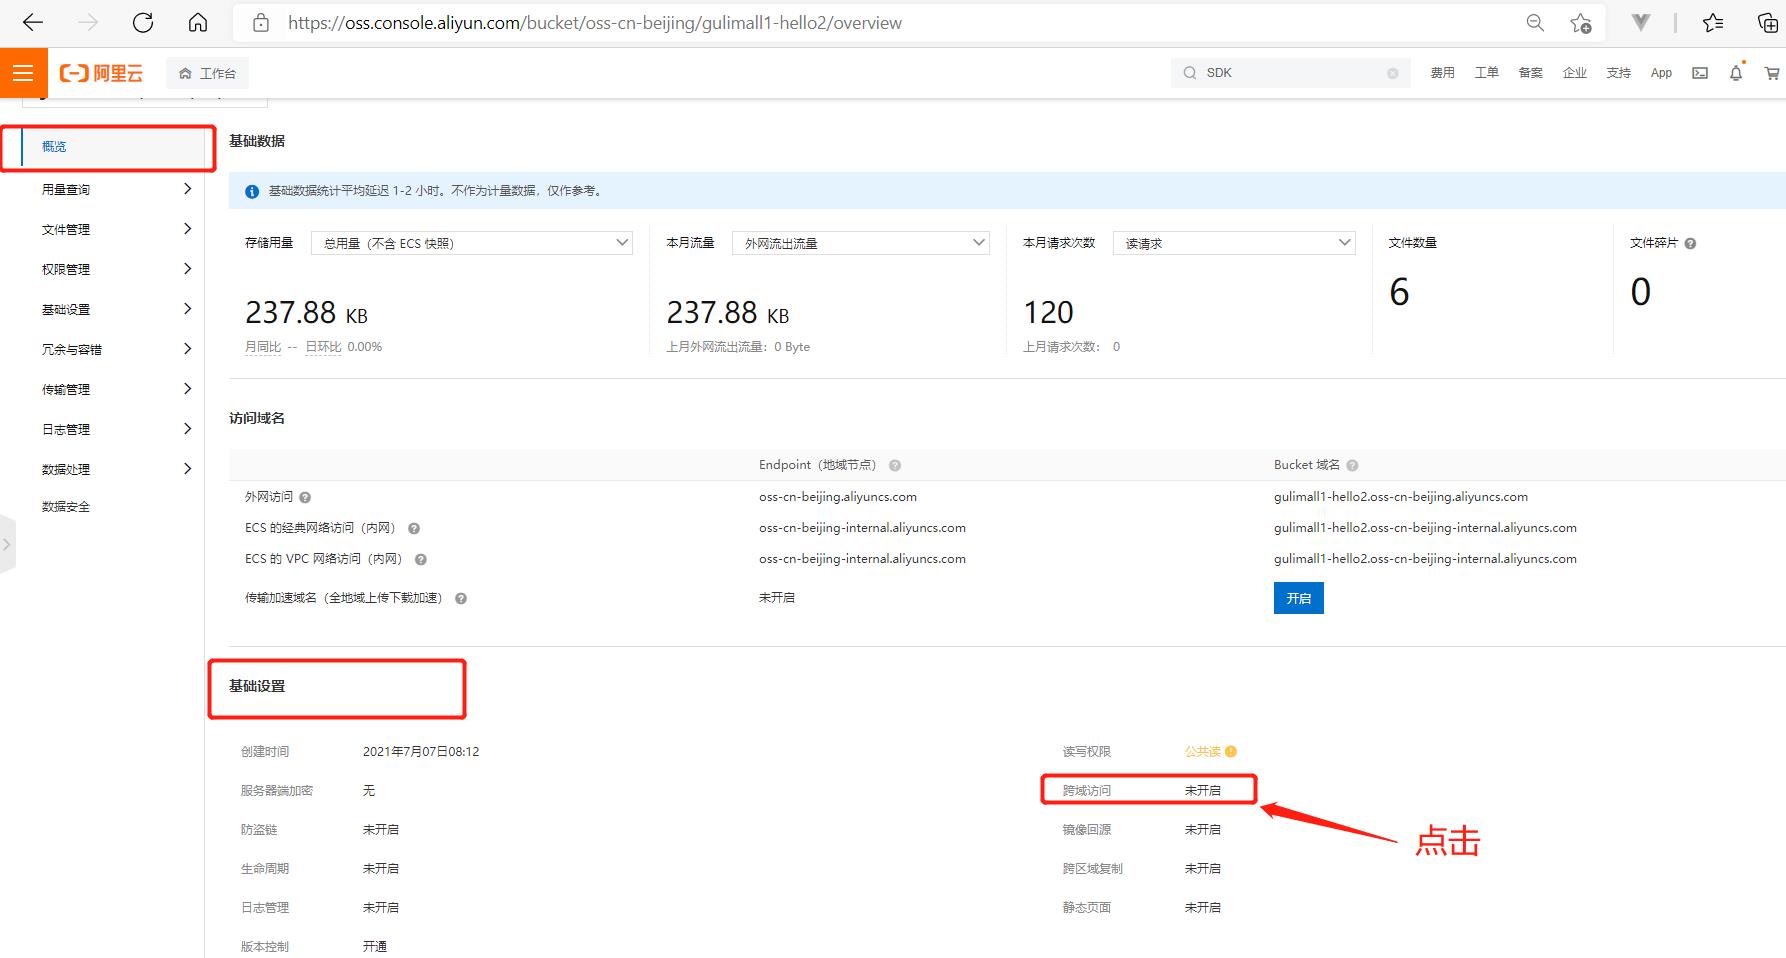
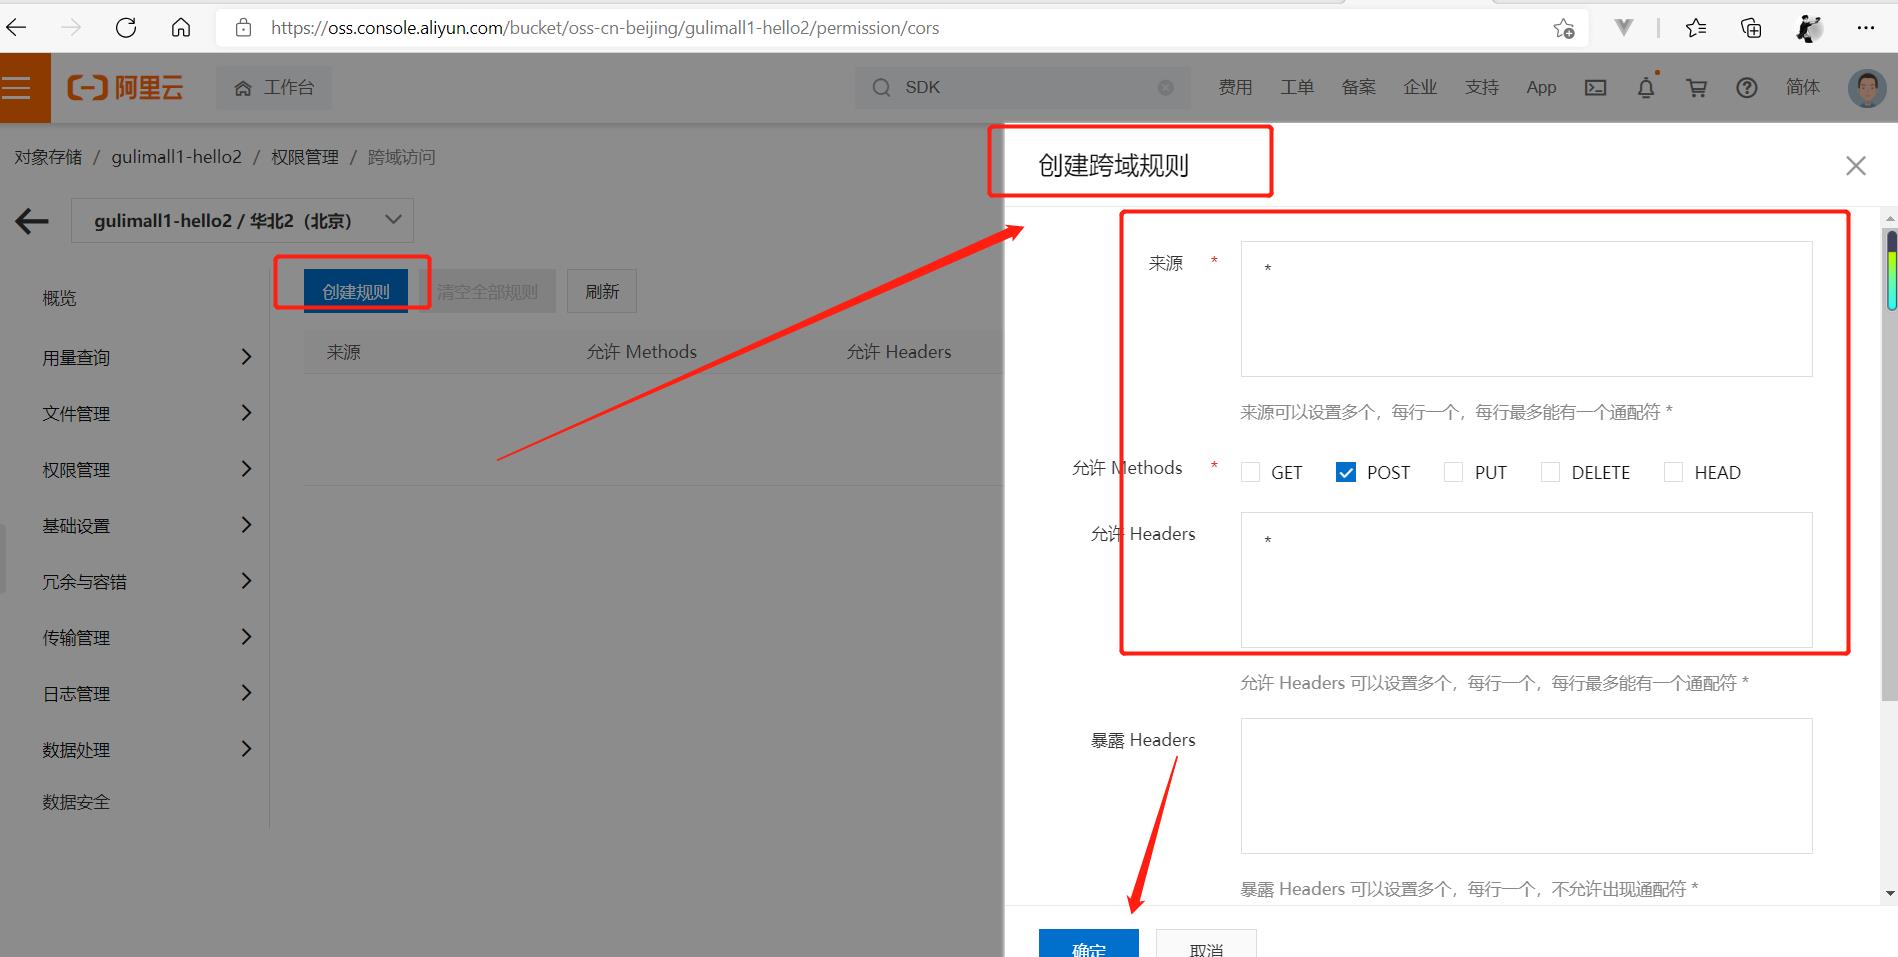
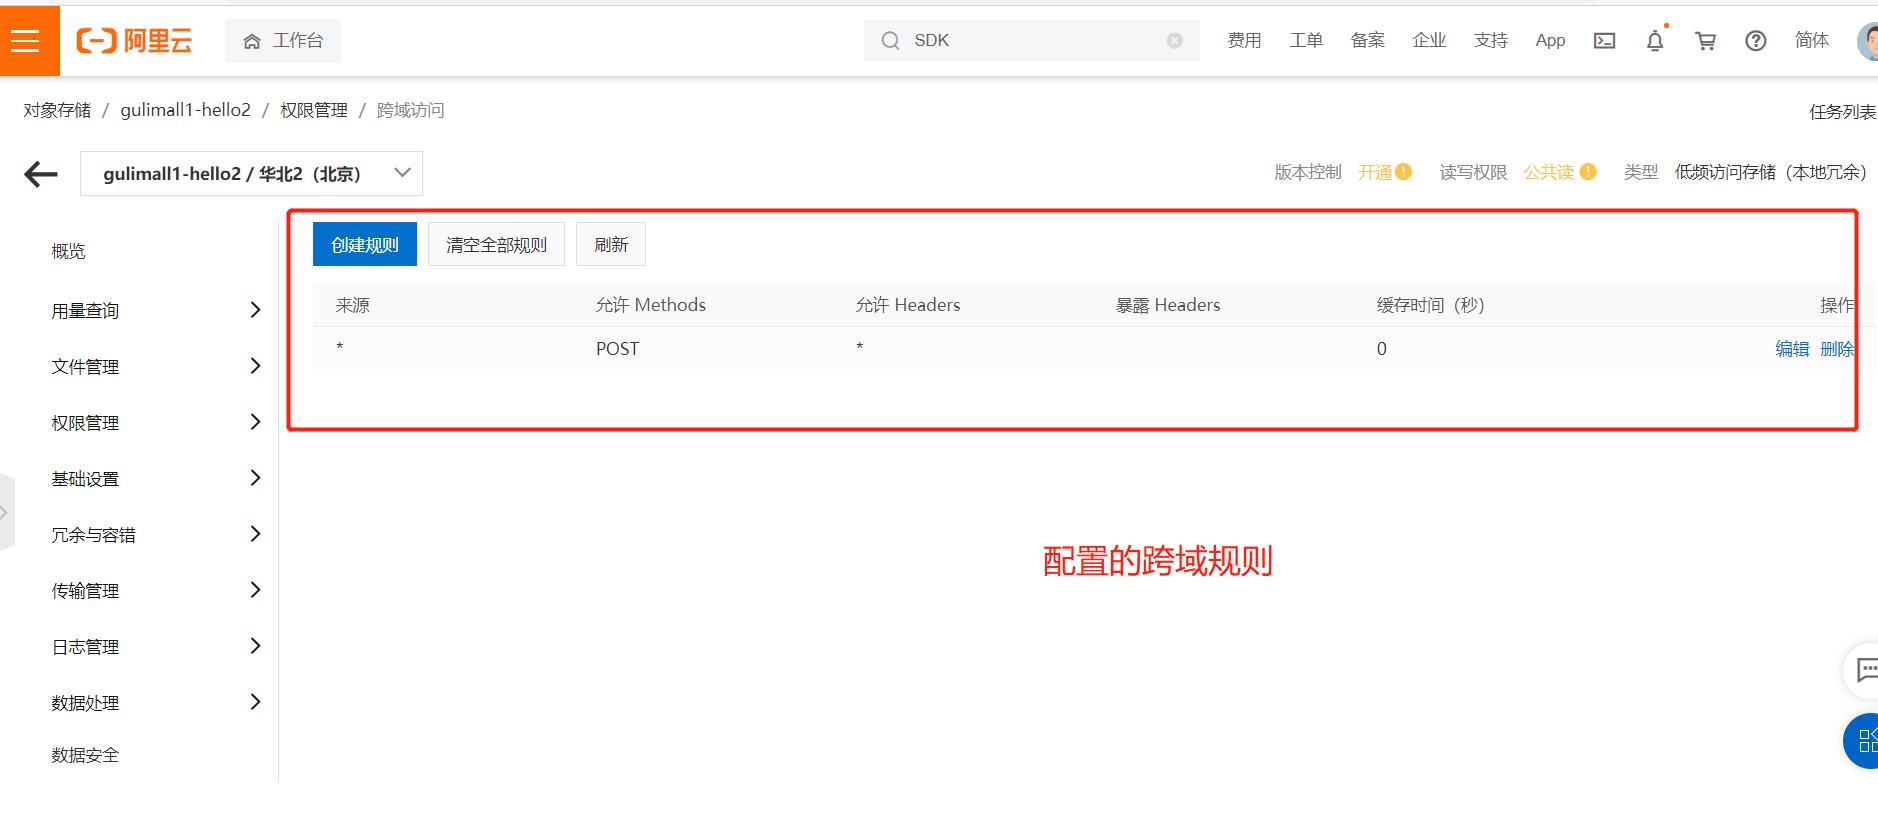
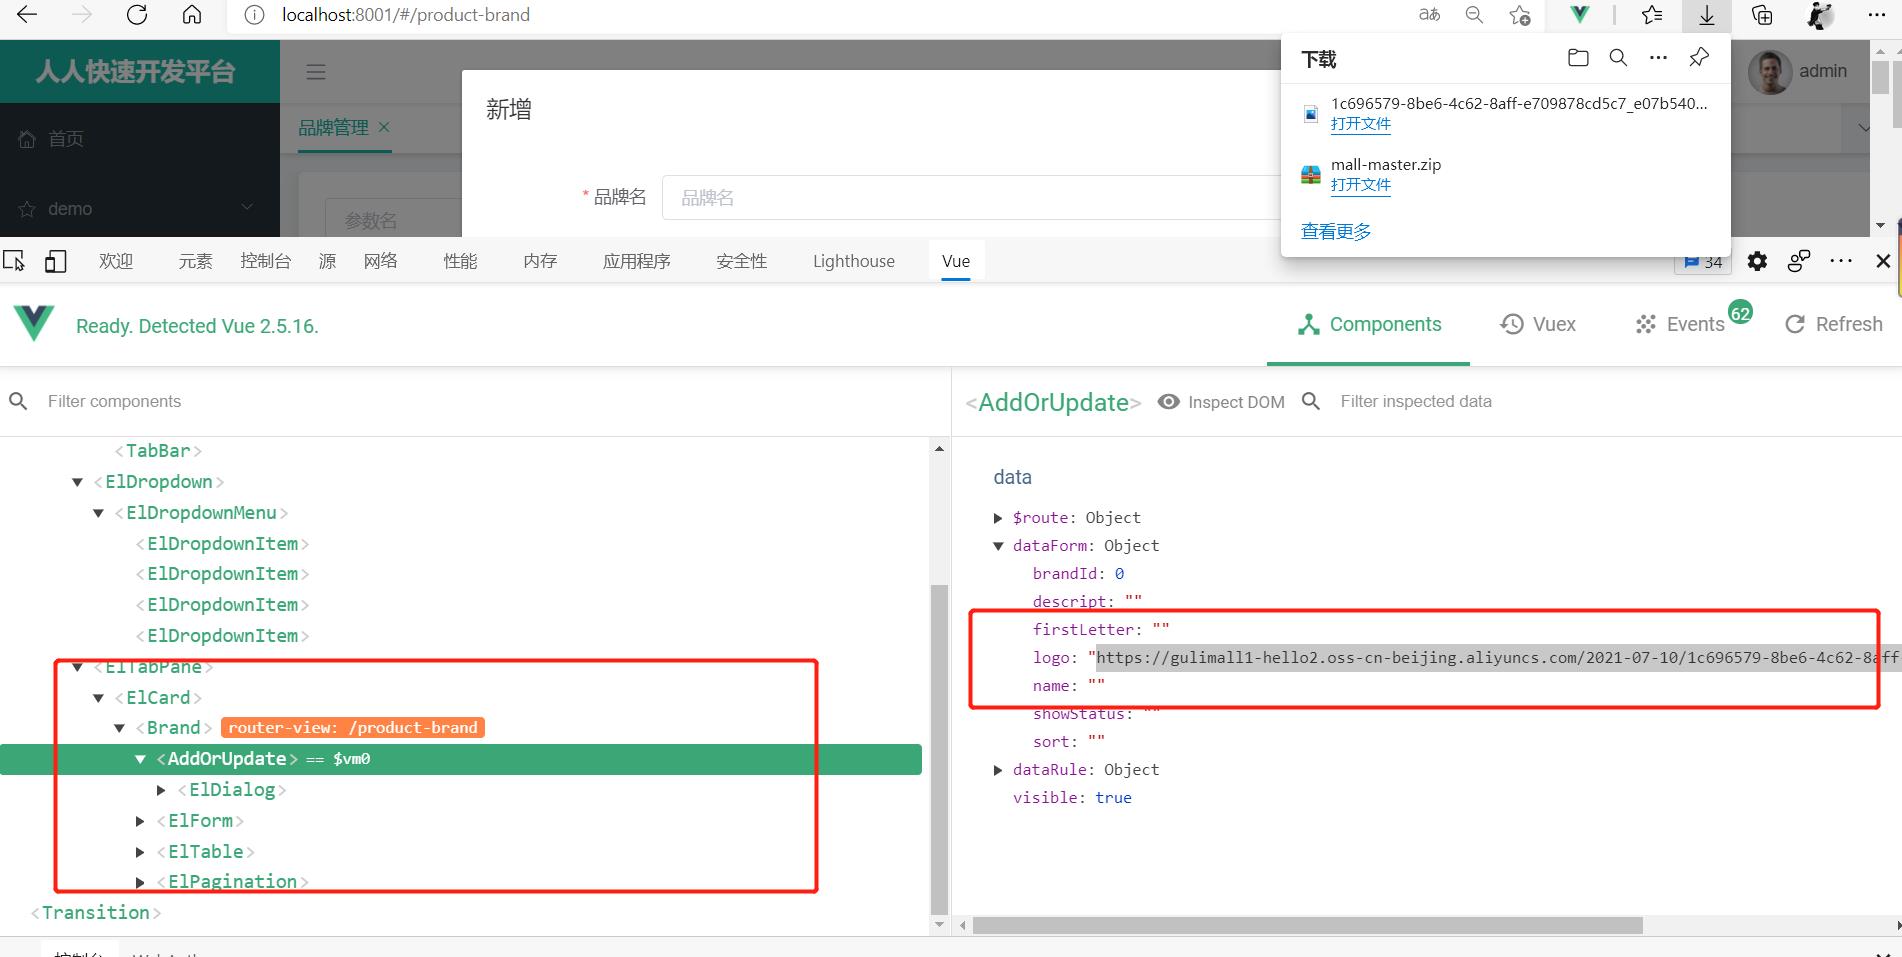
页面展示效果,跨域成功
以上是关于第182天学习打卡(项目 谷粒商城24 OSS前后联调测试上传 )的主要内容,如果未能解决你的问题,请参考以下文章