Mybatis和SpringBoot
Posted LZ名約山炮
tags:
篇首语:本文由小常识网(cha138.com)小编为大家整理,主要介绍了Mybatis和SpringBoot相关的知识,希望对你有一定的参考价值。
一、MyBatis
1. MyBatis简介
资料下载:https://pan.baidu.com/s/16P3uVfRuViM3hu514rO_6Q 提取码:5qi7
JDBC的弊端:SQL夹在Java代码块里,耦合度高导致硬编码内伤,维护不易。而实际开发需求中sql是有变化,频繁修改的情况多见。
Hibernate(全自动全映射的ORM框架)的弊端,自动生产的多长、难、复杂SQL,不容易做特殊优化。
Mybatis是一个java编写的轻量级的半自动的ORM映射的Dao层框架,在学习Mybatis之前,我们已经接触过原生JDBC的方式。对开发人员而言,核心sql还是需要自己优化+掌握在自己手上,简单来说,就是一句话,sql和java编码分开,功能边界清晰;一个专注业务、一个专注数据;二者之间通过简单的XML或注解用于配置和原始映射,将接口和Java的POJO映射成数据库中的记录,完成业务代码+底层数据库的媒介。Mybatis的最大优点: Java代码与SQL分层解耦
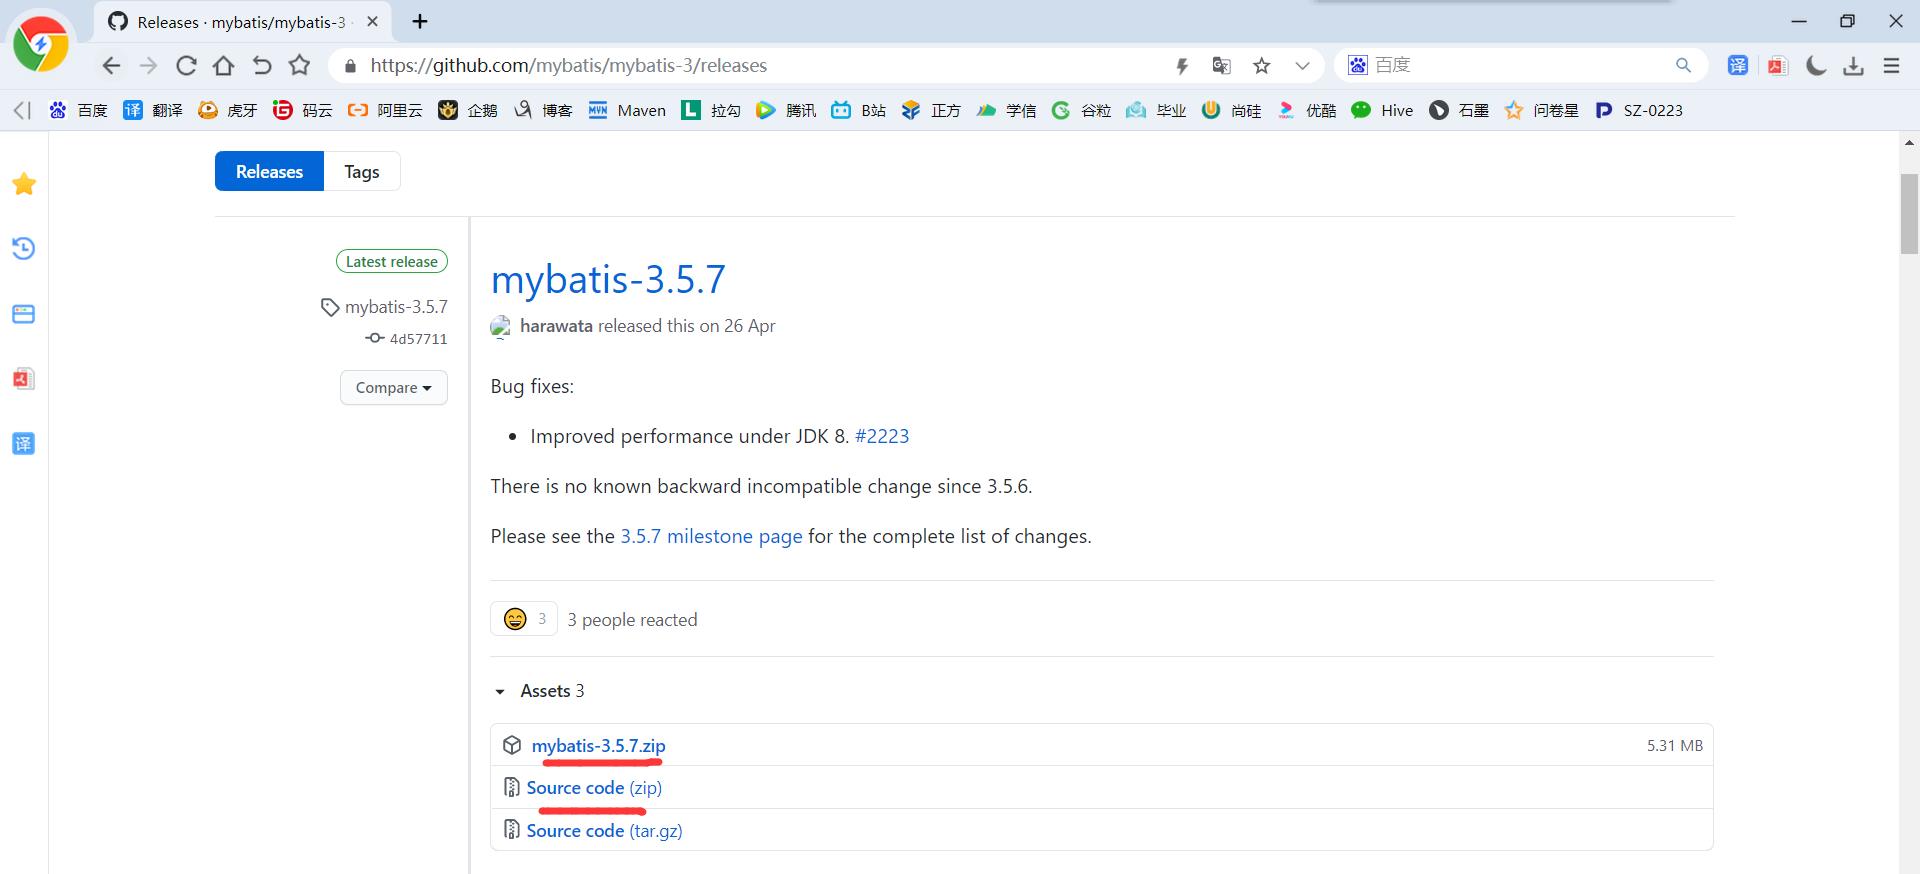
原是apache的一个开源项目iBatis, 2010年这个项目由apache software foundation 迁移到了google code,随着开发团队转投Google Code旗下,ibatis3.x正式更名为Mybatis ,代码于2013年11月迁移到Github(下载地址:https://github.com/mybatis/mybatis-3/releases)
iBATIS一词来源于“internet”和“abatis”的组合,是一个基于Java的持久层框架。iBATIS提供的持久层框架包括SQL Maps和Data Access Objects(DAO),MyBatis消除了几乎所有的JDBC代码和参数的手工设置以及对结果集的检索封装。MyBatis可以使用简单的XML或注解用于配置和原始映射,将接口和Java的POJO(Plain Old Java Objects,普通的Java对象)映射成数据库中的记录,本质是一个将SQL语句map到JAVA POJO的框架。
2. 准备工作
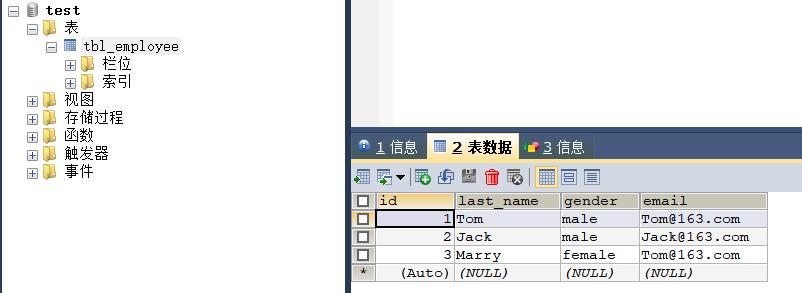
1)建库建表
CREATE TABLE tbl_employee(
  id INT(11) PRIMARY KEY AUTO_INCREMENT,
  last_name VARCHAR(255),
  gender VARCHAR(10),
  email VARCHAR(255)
);

INSERT INTO tbl_employee(last_name,gender,email) VALUES(\'Tom\',\'male\',\'Tom@163.com\');
INSERT INTO tbl_employee(last_name,gender,email) VALUES(\'Jack\',\'male\',\'Jack@163.com\');
INSERT INTO tbl_employee(last_name,gender,email) VALUES(\'Marry\',\'female\',\'Tom@163.com\');
2)建工程,导jar包
<!-- https://mvnrepository.com/artifact/org.mybatis/mybatis -->
        <dependency>
            <groupId>org.mybatis</groupId>
            <artifactId>mybatis</artifactId>
            <version>3.4.6</version>
        </dependency>
        <!-- https://mvnrepository.com/artifact/mysql/mysql-connector-java -->
        <dependency>
            <groupId>mysql</groupId>
            <artifactId>mysql-connector-java</artifactId>
            <version>5.1.47</version>
        </dependency>
        <!-- https://mvnrepository.com/artifact/org.projectlombok/lombok -->
        <dependency>
            <groupId>org.projectlombok</groupId>
            <artifactId>lombok</artifactId>
            <version>1.18.12</version>
            <scope>provided</scope>
        </dependency>
        <!-- https://mvnrepository.com/artifact/junit/junit -->
        <dependency>
            <groupId>junit</groupId>
            <artifactId>junit</artifactId>
            <version>4.12</version>
            <scope>provided</scope>
        </dependency>
3)POJO对象:Employee类
package com.yuange.mybatis.entity;

import lombok.AllArgsConstructor;
import lombok.Data;
import lombok.NoArgsConstructor;

/**
 * @作者:袁哥
 * @时间:2021/6/29 10:26
 */
@NoArgsConstructor
@AllArgsConstructor
@Data
public class Employee {
    private Integer id;
    private String lastName;
    private String gender;
    private String email;
}
4)加入log4j的配置文件
5)加入mybatis的配置文件
<?xml version="1.0" encoding="UTF-8" ?>
<!DOCTYPE configuration
        PUBLIC "-//mybatis.org//DTD Config 3.0//EN"
        "http://mybatis.org/dtd/mybatis-3-config.dtd">
<configuration>
    <!-- environmets标签里可以配置多个environment标签 -->
    <environments default="development">
        <!-- 一个environmet就代表一个数据库运行环境 -->
        <environment id="development">
            <!-- transactionManager:事务管理器 -->
            <transactionManager type="JDBC" />
            <!--dataSource:数据源,需要配置用户名,密码,驱动,连接 -->
            <dataSource type="POOLED">
                <property name="driver" value="com.mysql.jdbc.Driver" />
                <property name="url" value="jdbc:mysql://hadoop102:3306/test" />
                <property name="username" value="root" />
                <property name="password" value="root123" />
            </dataSource>
        </environment>
    </environments>

    <mappers>
        <mapper resource="mybatisMapper.xml"/>
    <!-- 后面会创建它 -->
     <mapper resource="mybatisMapper2.xml"/>
  </mappers>
</configuration>
3. Helloworld
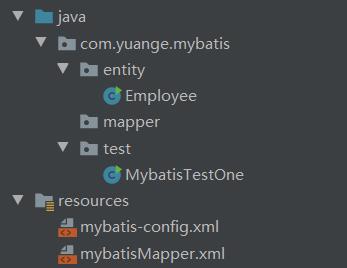
mybatis的优点在于java代码和sql语句相分离,sql语句编写在xxxMapper文件中,同时注意需要在全局配置文件中注册
<?xml version="1.0" encoding="UTF-8" ?>
<!DOCTYPE mapper
        PUBLIC "-//mybatis.org//DTD Mapper 3.0//EN"
        "http://mybatis.org/dtd/mybatis-3-mapper.dtd">
<mapper namespace="EmpMapper">

    <select id="selectEmp" resultType="com.yuange.mybatis.entity.Employee">
        select id,last_name lastName,gender,email from tbl_employee where id = #{id}
   </select>

</mapper>
package com.yuange.mybatis.test;

import com.yuange.mybatis.entity.Employee;
import org.apache.ibatis.io.Resources;
import org.apache.ibatis.session.SqlSession;
import org.apache.ibatis.session.SqlSessionFactory;
import org.apache.ibatis.session.SqlSessionFactoryBuilder;

import java.io.IOException;
import java.io.InputStream;

/**
 * @作者:袁哥
 * @时间:2021/6/29 11:50
 */
public class MybatisTestOne {
    public static void main(String[] args) throws IOException {
        //从mybatis-config.xml配置文件中构建sqlSessionFactory
        String resource = "mybatis-config.xml";
        InputStream inputStream = Resources.getResourceAsStream(resource);
        SqlSessionFactory sqlSessionFactory = new SqlSessionFactoryBuilder().build(inputStream);
        //使用sqlSessionFactory创建sqlSession
        SqlSession sqlSession = sqlSessionFactory.openSession();

        Employee employee = (Employee) sqlSession.selectOne("EmpMapper.selectEmp", 1);

        System.out.println(employee.toString());
    }
}

4. 接口式编程
使用原生API进行开发有以下不便之处:
①我们更倾向于使用Dao---DaoImpl来分层解耦
②方法的返回值,是Object类型,不能直接使用,需要强转
③方法的入参无法进行严格的检查
因此,在后续的mybatis版本中,推荐使用接口式编程开发!
1)编写接口,mybatis习惯上以mapper作为接口文件的命名
package com.yuange.mybatis.mapper;

import com.yuange.mybatis.entity.Employee;

import java.util.List;

/**
 * @作者:袁哥
 * @时间:2021/6/29 14:23
 */
public interface EmployeeMapper {
    public Employee getEmployeeById(Integer id);

    void deleteEmployeeById(Integer id);

    void insertEmployee(Employee employee);

    void updateEmployee(Employee employee);

    List<Employee> getAll();
}
2)编写sql语句的配置文件,并与接口中的方法进行绑定,所以新建mybatisMapper2.xml
<?xml version="1.0" encoding="UTF-8" ?>
<!DOCTYPE mapper
        PUBLIC "-//mybatis.org//DTD Mapper 3.0//EN"
        "http://mybatis.org/dtd/mybatis-3-mapper.dtd">
<mapper namespace="com.yuange.mybatis.mapper.EmployeeMapper">

    <select id="getEmployeeById"
            resultType="com.yuange.mybatis.entity.Employee" >
        select id,last_name lastName,gender,email from tbl_employee where id=#{id}
    </select>

    <delete id="deleteEmployeeById">
        delete from tbl_employee where id = #{id}
    </delete>

    <update id="updateEmployee">
        update tbl_employee set last_name=#{lastName},gender=#{gender},email=#{email}
        where id = #{id}
    </update>

    <insert id="insertEmployee">
        insert into tbl_employee(last_name,gender,email) values(#{lastName},#{gender},#{email})
    </insert>

    <select id="getAll" resultType="com.yuange.mybatis.entity.Employee">
        select id,last_name lastName,gender,email
        from tbl_employee
    </select>

</mapper>
要求:
①namespace:必须和接口的全类名一致
②sql 的id必须和对应的方法名一致
③select 标签中,返回值类型及参数类型也必须和对应的方法一致,parameterType参数类型也可以不写,mybatis会根据 typeHandler自动判断
3)通过sqlsession的getMapper()方法获取接口的代理对象,执行其方法
package com.yuange.mybatis.mapper;

import com.yuange.mybatis.entity.Employee;
import org.apache.ibatis.io.Resources;
import org.apache.ibatis.session.SqlSession;
import org.apache.ibatis.session.SqlSessionFactory;
import org.apache.ibatis.session.SqlSessionFactoryBuilder;
import org.junit.Test;

import java.io.IOException;
import java.io.InputStream;
import java.util.List;

/**
 * @作者:袁哥
 * @时间:2021/6/29 14:46
 */
public class EmployeeMapperTest {

    SqlSessionFactory sqlSessionFactory;

    {
        //从mybatis-config.xml配置文件中构建sqlSessionFactory
        String resource = "mybatis-config.xml";
        InputStream inputStream = null;
        try {
            inputStream = Resources.getResourceAsStream(resource);
        } catch (IOException e) {
            e.printStackTrace();
        }
        sqlSessionFactory = new SqlSessionFactoryBuilder().build(inputStream);
    }

    @Test
    public void getEmployeeById() {
        SqlSession session = sqlSessionFactory.openSession(true);
        try {
            EmployeeMapper mapper = session.getMapper(EmployeeMapper.class);
            Employee employee = mapper.getEmployeeById(1);
            System.out.println(employee);
        }finally {
            session.close();
        }
    }

    @Test
    public void deleteEmployeeById() {
        SqlSession session = sqlSessionFactory.openSession(true);
        try {
            EmployeeMapper mapper = session.getMapper(EmployeeMapper.class);
            System.out.println("删除之前=="+mapper.getEmployeeById(2));
            mapper.deleteEmployeeById(2);
            System.out.println("删除之后=="+mapper.getEmployeeById(2));
        }finally {
            session.close();
        }
    }

    @Test
    public void insertEmployee() {
        SqlSession session = sqlSessionFactory.openSession(true);
        try {
            EmployeeMapper mapper = session.getMapper(EmployeeMapper.class);
            mapper.insertEmployee(new Employee(2,"zhangsan","male","zhangsan@qq.com"));
            System.out.println("添加之后=="+mapper.getAll());
        }finally {
            session.close();
        }
    }

    @Test
    public void updateEmployee() {
        SqlSession session = sqlSessionFactory.openSession(true);
        try {
            EmployeeMapper mapper = session.getMapper(EmployeeMapper.class);
            System.out.println("修改之前=="+mapper.getEmployeeById(2));
            mapper.updateEmployee(new Employee(2,"王五","male","王五@qq.com"));
            System.out.println("修改之后=="+mapper.getEmployeeById(2));
        }finally {
            session.close();
        }
    }

    @Test
    public void getAll() {
        SqlSession session = sqlSessionFactory.openSession(true);
        try {
            EmployeeMapper mapper = session.getMapper(EmployeeMapper.class);
            List<Employee> all = mapper.getAll();
            for (Employee employee : all) {
                System.out.println(employee);
            }
        }finally {
            session.close();
        }
    }
}
5. SqlSession的细节
①sqlSession 代表和数据库的一次会话。sqlSession不是线程安全的,不能被共享!因此它的范围最好是一个方法对应自己的sqlSession,或一次请求,创建一个sqlSession。
②SqlSession在每次方法执行完成之后,必须保证关闭,因此我们常常在方法的finally语句块中,执行其close()方法,将其关闭。
二、SpringBoot
1. SpringBoot简介
官网地址:https://spring.io/projects/spring-boot
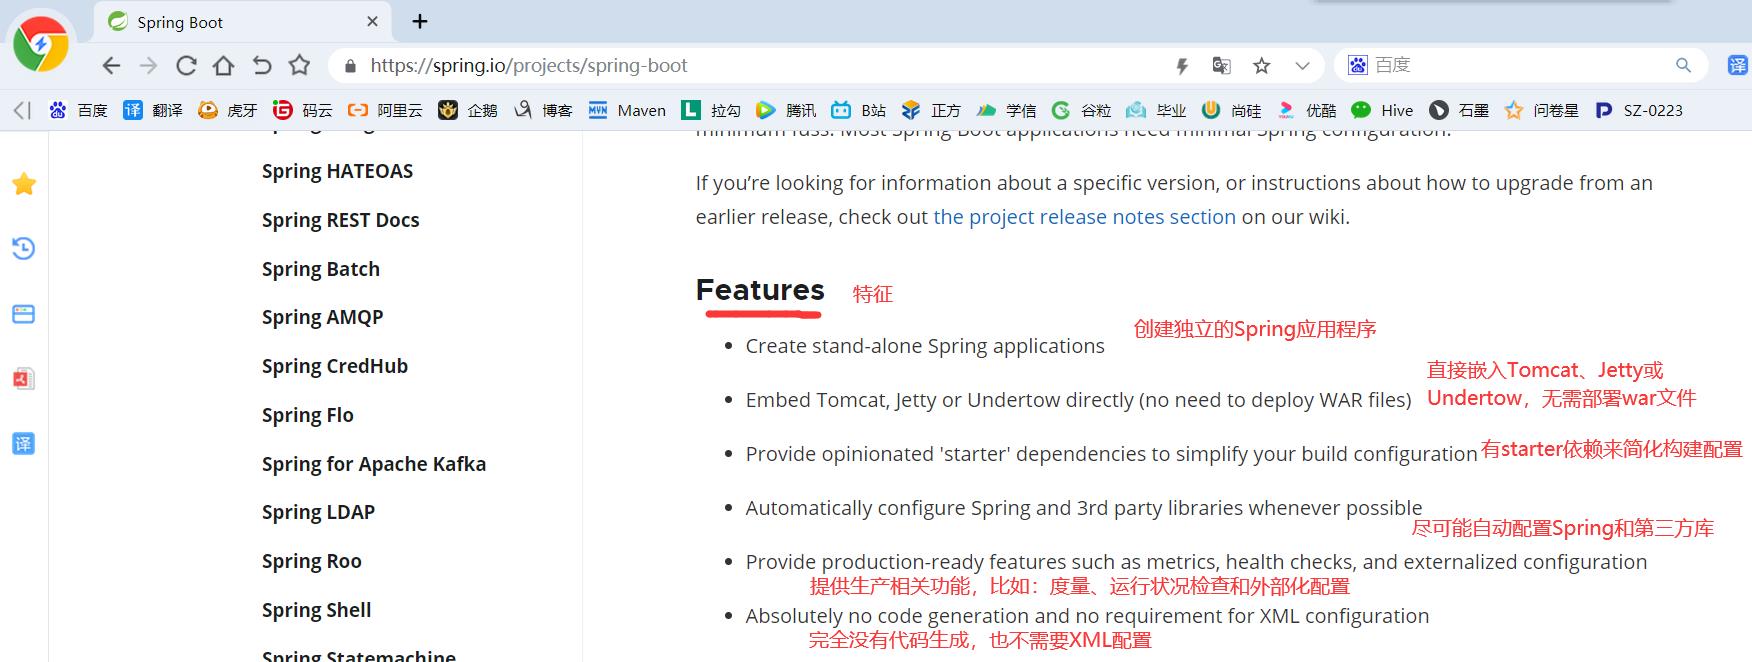
SpringBoot的作用是为了在使用Spring的应用进行开发时,简化配置,并且以最简单的方式来整合第三方的应用,例如Redis,Mybatis,SpringBoot等
2. SpringBoot入门
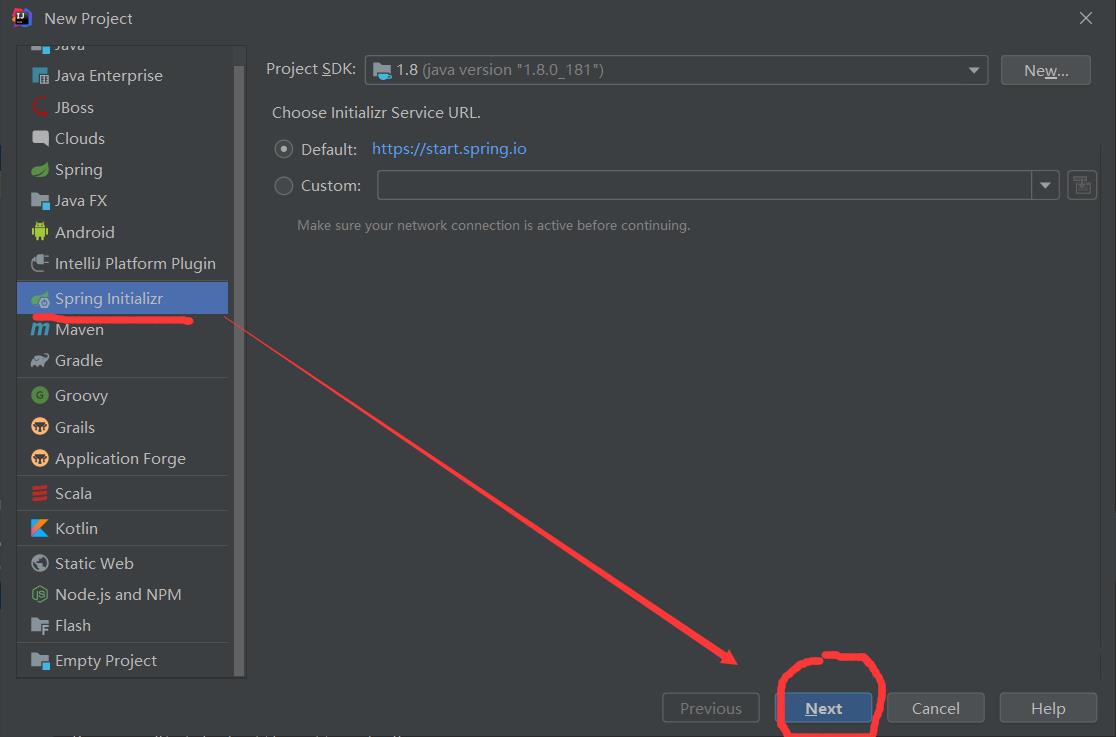
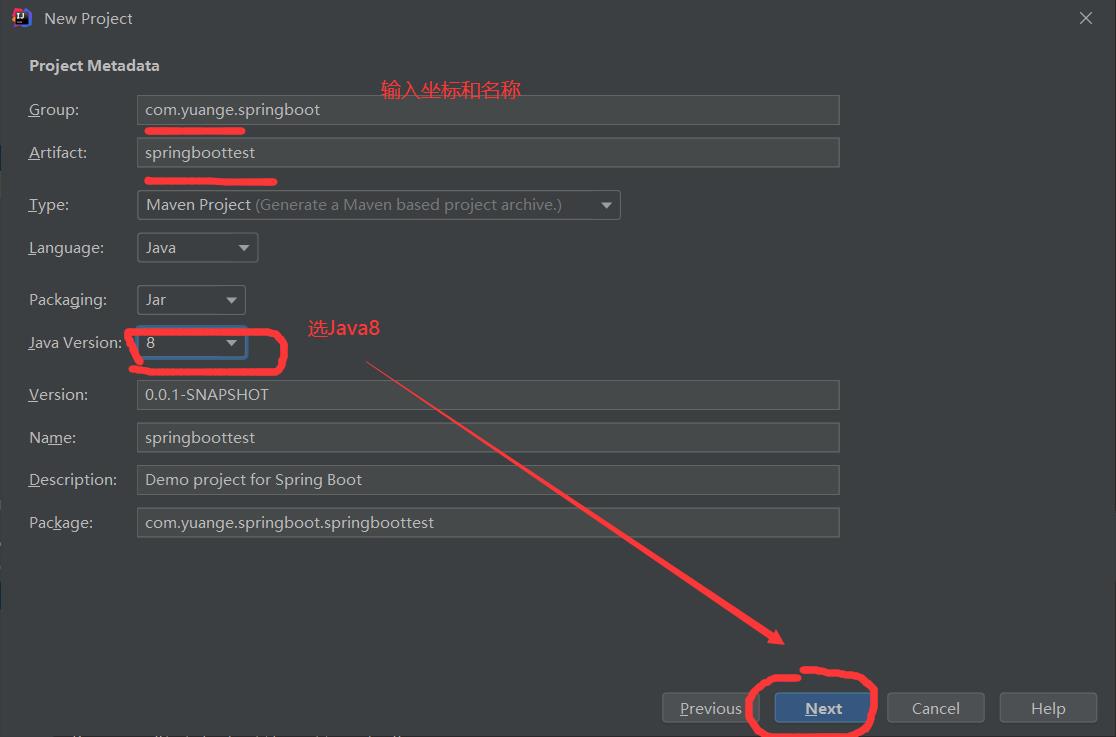
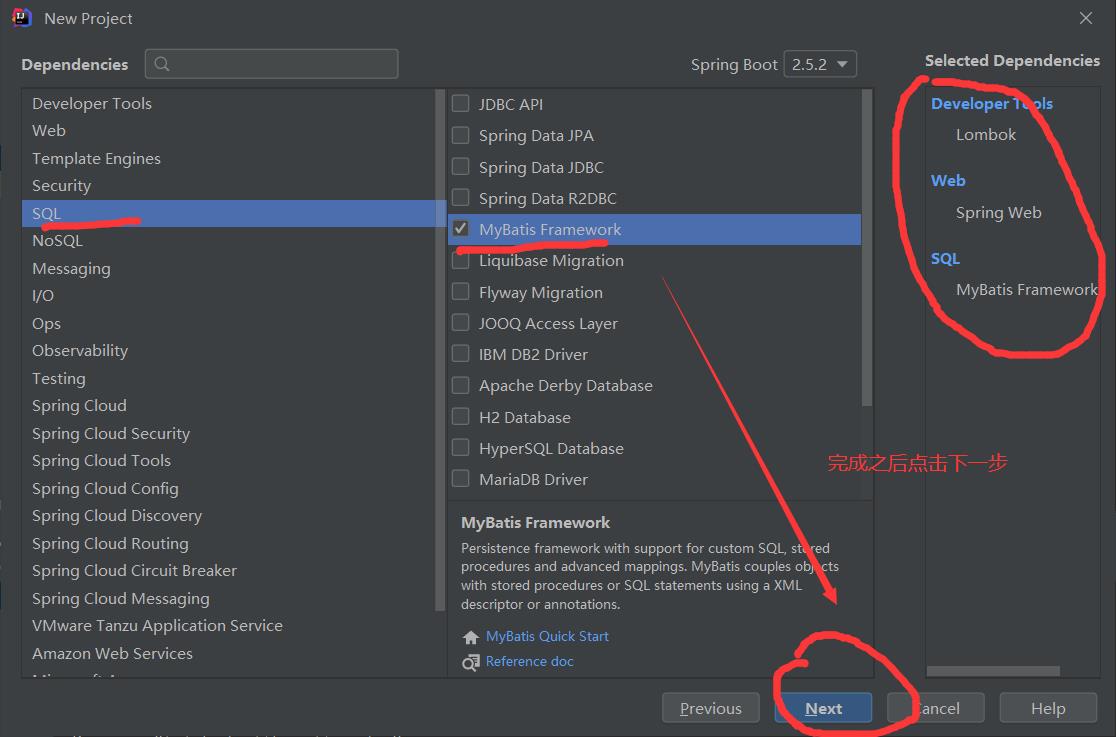
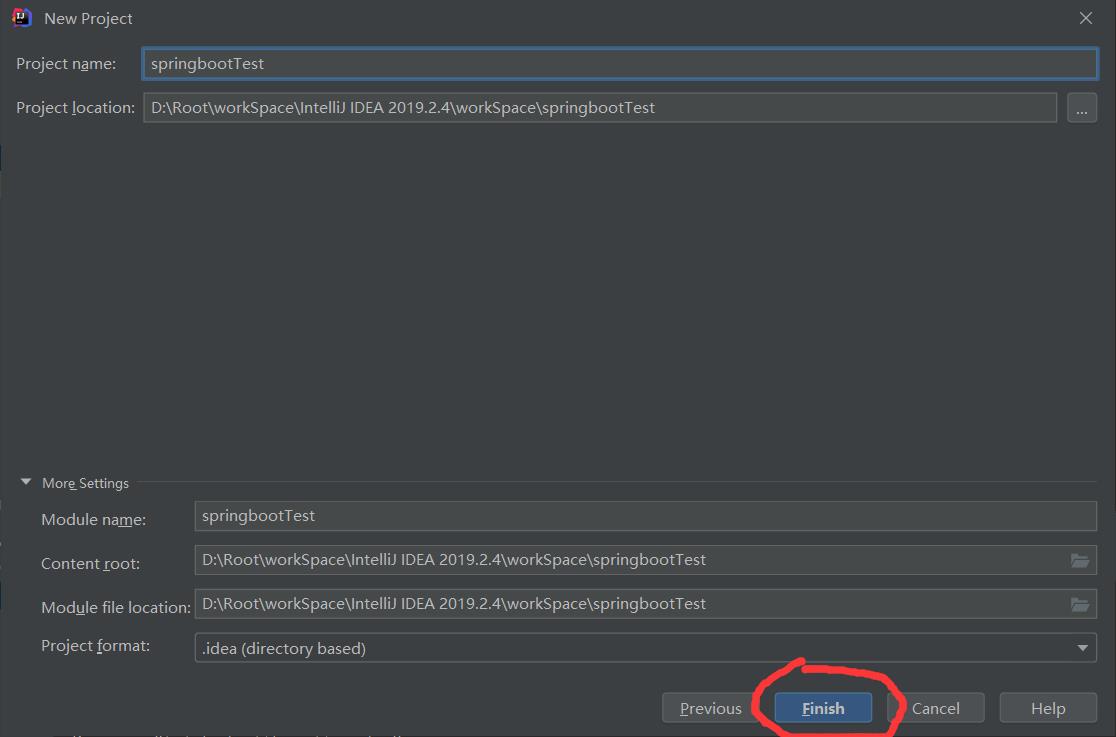
1)创建SpringBoot工程,并整合Mybatis(由于系统无低版本的SpringBoot,所以我们创建好之后需要将版本修改为 1.5.10.RELEASE)



<?xml version="1.0" encoding="UTF-8"?>
<project xmlns="http://maven.apache.org/POM/4.0.0" xmlns:xsi="http://www.w3.org/2001/XMLSchema-instance"
         xsi:schemaLocation="http://maven.apache.org/POM/4.0.0 https://maven.apache.org/xsd/maven-4.0.0.xsd">
    <modelVersion>4.0.0</modelVersion>
    <parent>
        <groupId>org.springframework.boot</groupId>
        <artifactId>spring-boot-starter-parent</artifactId>
        <version>1.5.10.RELEASE</version>
        <relativePath/> <!-- lookup parent from repository -->
    </parent>
    <groupId>com.yuange.springboot</groupId>
    <artifactId>springboottest</artifactId>
    <version>0.0.1-SNAPSHOT</version>
    <name>springboottest</name>
    <description>Demo project for Spring Boot</description>
    <properties>
        <java.version>1.8</java.version>
    </properties>
    <dependencies>
        <dependency>
            <groupId>org.springframework.boot</groupId>
            <artifactId>spring-boot-starter-web</artifactId>
        </dependency>
        <dependency>
            <groupId>org.mybatis.spring.boot</groupId>
            <artifactId>mybatis-spring-boot-starter</artifactId>
            <version>2.2.0</version>
        </dependency>

        <!--<dependency>
            <groupId>mysql</groupId>
            <artifactId>mysql-connector-java</artifactId>
        </dependency>
        <dependency>
            <groupId>com.alibaba</groupId>
            <artifactId>druid</artifactId>
            <version>1.0.5</version>
        </dependency>-->

        <dependency>
            <groupId>org.projectlombok</groupId>
            <artifactId>lombok</artifactId>
            <optional>true</optional>
        </dependency>
        <dependency>
            <groupId>org.springframework.boot</groupId>
            <artifactId>spring-boot-starter-test</artifactId>
            <scope>test</scope>
        </dependency>
    </dependencies>

    <build>
        <plugins>
            <plugin>
                <groupId>org.springframework.boot</groupId>
                <artifactId>spring-boot-maven-plugin</artifactId>
                <configuration>
                    <excludes>
                        <exclude>
                            <groupId>org.projectlombok</groupId>
                            <artifactId>lombok</artifactId>
                        </exclude>
                    </excludes>
                </configuration>
            </plugin>
        </plugins>
    </build>
</project>
2)查看SpringBoot项目的主启动类

3)创建Handler处理器
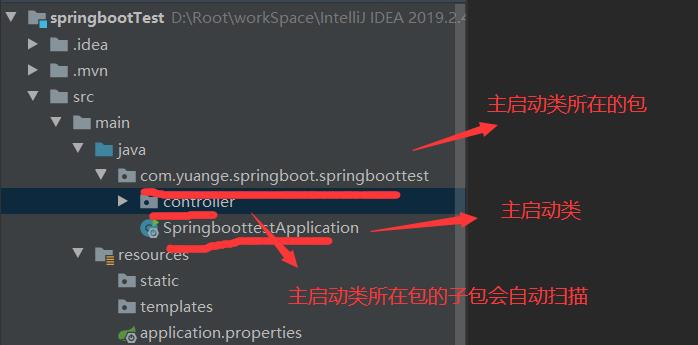
package com.yuange.springboot.springboottest.controller;

import org.springframework.stereotype.Controller;
import org.springframework.web.bind.annotation.RequestMapping;
import org.springframework.web.bind.annotation.ResponseBody;

/**
 * @作者:袁哥
 * @时间:2021/6/29 20:38
 */
@Controller
public class HelloWorld {

    @ResponseBody
    @RequestMapping("/hello")
    public String helloWorld(){
        return "你好丫,我是SpringBoot";
    }
}
4)运行主启动类中的main方法启动SpringBoot程序(若启动报Cannot determine embedded database driver class for database type NONE,则先将Mybatis的依赖先注释掉)


5)通过浏览器访问应用

3. SpringBoot下的配置文件
SpringBoot环境下常用的配置文件有两种,一种是properties属性文件,一种是yml文件。二者各有特点,语法也有很大区别,但是最终效果基本一致。
3.1 使用Properties文件进行配置
文件名:application.properties
语法格式:属性名=属性值
3.2 yml语法配置
yml是YAML(YAML Ain\'t Markup Language)语言的文件,以数据为中心,比json、xml等更适合做配置文件。
yml语法:
1)使用缩进表示层级关系
2)缩进时不允许使用Tab键,只允许使用空格。
3)缩进的空格数目不重要,只要相同层级的元素左侧对齐即可
4)大小写敏感
YAML 支持的三种数据结构:
1)对象:键值对的集合
2)数组:一组按次序排列的值
3)字面量:单个的、不可再分的值
#例如
spring:
  application:
    name: apple
server:
  port: 8181
    context-path: /banan
4. 整合Mybatis
1)加入MySQL的依赖和Druid依赖(需要将Mybatis依赖的注释打开)

<dependency>
            <groupId>mysql</groupId>
            <artifactId>mysql-connector-java</artifactId>
        </dependency>

        <dependency>
            <groupId>com.alibaba</groupId>
            <artifactId>druid</artifactId>
            <version>1.0.5</version>
        </dependency>
2)在application.yml中增加数据库环境配置信息
spring:
  datasource:
    name: mysqlTest
    type: com.alibaba.druid.pool.DruidDataSource
    url: jdbc:mysql://hadoop102:3306/test?characterEncoding=utf-8
    username: root
    password: root123
    driver-class-name: com.mysql.jdbc.Driver
mybatis:
  mapper-locations: classpath*:/mybatis/*Mapper.xml
3)在主启动类上,使用注解指定要扫描的包,会为此报下的接口创建代理对象
@MapperScan("com.yuange.springboot.springboottest.mapper")

4)创建Employee类
package com.yuange.springboot.springboottest.entity;

import lombok.AllArgsConstructor;
import lombok.Data;
import lombok.NoArgsConstructor;

/**
 * @作者:袁哥
 * @时间:2021/6/29 10:26
 */
@NoArgsConstructor
@AllArgsConstructor
@Data
public class Employee {
    private Integer id;
    private String lastName;
    private String gender;
    private String email;

    public static void main(String[] args) {
        Employee employee = new Employee(1, "zhangsna", "男", "132@qq.com");
        System.out.println(employee.getEmail());
        employee.setEmail("www@qq.com");
        System.out.println(employee.getEmail());
    }
}
5)创建 EmployeeMapper 接口
package com.yuange.springboot.springboottest.mapper;

import com.yuange.springboot.springboottest.entity.Employee;
import org.springframework.stereotype.Repository;

import java.util.List;

/**
 * @作者:袁哥
 * @时间:2021/6/29 14:23
 */
@Repository
public interface EmployeeMapper {

    Employee getEmployeeById(Integer id);

    void deleteEmployeeById(Integer id);

    void insertEmployee(Employee employee);

    void updateEmployee(Employee employee);

    List<Employee> getAll();
}
6)在application.properties文件中添加以下内容
#配置访问路径前缀
server.context-path=/mywebapp
#配置端口号
server.port=8099
#开启驼峰命名
mybatis.configuration.mapUnderscoreToCamelCase=true
7)在resources/mybatis 文件夹中创建 EmployeeMapper.xml
<?xml version="1.0" encoding="UTF-8" ?>
<!DOCTYPE mapper
        PUBLIC "-//mybatis.org//DTD Mapper 3.0//EN"
        "http://mybatis.org/dtd/mybatis-3-mapper.dtd">
<mapper namespace="com.yuange.springboot.springboottest.mapper.EmployeeMapper">

    <select id="getEmployeeById"
            resultType="com.yuange.springboot.springboottest.entity.Employee" >
        select id,last_name lastName,gender,email from tbl_employee where id=#{id}
    </select>

    <delete id="deleteEmployeeById">
        delete from tbl_employee where id = #{id}
    </delete>

    <update id="updateEmployee">
        update tbl_employee set last_name=#{lastName},gender=#{gender},email=#{email}
        where id = #{id}
    </update>

    <insert id="insertEmployee">
        insert into tbl_employee(last_name,gender,email) values(#{lastName},#{gender},#{email})
    </insert>

    <select id="getAll" resultType="com.yuange.springboot.springboottest.entity.Employee">
        select id,last_name lastName,gender,email
        from tbl_employee
    </select>
</mapper>
8)在resources/static 文件夹中创建 index.html
<!DOCTYPE html>
<html lang="en">
<head>
    <meta charset="UTF-8">
    <title>首页</title>
</head>
<body>
        <h1>这是首页</h1><br/>
        <hr/>
        <form action="/mywebapp/emp" method="post" >
            <input name="op" value="select" type="radio">查询</input>
            <input name="op" value="delete" type="radio">删除</input>
            <input name="op" value="update" type="radio">更新</input>
            <input name="op" value="insert" type="radio">新增</input> <br/>

            <input name="id" value="1" >  <br/>
            <input name="lastName" value="jack" >  <br/>
            <input name="email" value="jack@qq.com" >  <br/>
            <input name="gender" value="male" >  <br/>
            <input  value="提交按钮" type="submit" >
        </form>
</body>
</html>
9)在resources/static 文件夹中创建 success.html
<!DOCTYPE html> <html lang="en"> <head> <meta charset="UTF-8"> <title>成功页面</title> </head> <body> <h1<以上是关于Mybatis和SpringBoot的主要内容,如果未能解决你的问题,请参考以下文章
SpringBoot:4.SpringBoot整合Mybatis实现数据库访问