Java中线程安全的集合浅析
Posted 敖胤
tags:
篇首语:本文由小常识网(cha138.com)小编为大家整理,主要介绍了Java中线程安全的集合浅析相关的知识,希望对你有一定的参考价值。
1、JDK1.5之前
旧版本的集合主要有两个Vector和Hashtable,在java.util包下。
这两个类保证线程安全都是采用synchronized修饰方法的方式。在1.5之前,效率不高,现在已基本弃用。
1.1、Vector
1.2、Hashtable
1.3、Collections工具类
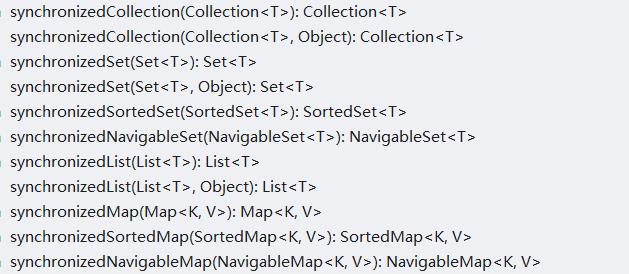
在JDK1.5之前,可以通过java.util.Collections工具类将非线程安全的集合通过public static <T> Collection<T> synchronizedCollection(Collection<T> c)方法转化为线程安全的集合

2、JDK1.5之后
jdk1.5之后,在java.util.concurrent包下,新加入了几个高效的线程安全集合类。
常用的有CopyOnWriteArrayList、CopyOnWriteArraySet
2.1、CopyOnWriteArrayList
线程安全的ArrayList,加强版的读写分离。
写加锁,读无锁,读写不阻塞,优于读写锁。
线程安全实现方式:写入时,先copy一个容器副本,再添加新元素,最后替换引用。是一种用空间换取线程安全的实现方式。
使用方式和一般的ArrayList一样。
2.1.1、使用示例
//jdk1.5之前可以使用collections将线程不安全的集合转为线程安全的
/*List list = new ArrayList();
List synchronizedList = Collections.synchronizedList(list);*/

//jdk1.5之后可以使用java.util.concurrent包下线程安全的集合
List list = new CopyOnWriteArrayList();

ExecutorService threadPool = Executors.newFixedThreadPool(5);
for (int i = 0; i < 5; i++) {
    int t = i;
    threadPool.submit(new Runnable() {
        @Override
        public void run() {
            for (int j = 0; j < 10; j++) {
                list.add(Thread.currentThread().getName() +"添加:"+ t + "---" + j);
            }
        }
    });
}
threadPool.shutdown();
while (!threadPool.isTerminated()) {

}
System.out.println(list.toString());
2.1.2、源码解析
2.1.2.1、add()方法
public boolean add(E e) {
    //获取锁对象并加锁
    final ReentrantLock lock = this.lock;
    lock.lock();
    try {
        //得到元素数组
        Object[] elements = getArray();
        int len = elements.length;
        //复制副本
        Object[] newElements = Arrays.copyOf(elements, len + 1);
        //添加新元素
        newElements[len] = e;
        //设置新的数组
        setArray(newElements);
        return true;
    } finally {
        //释放锁
        lock.unlock();
    }
}
2.1.2.2、set()方法
public E set(int index, E element) {
    final ReentrantLock lock = this.lock;
    lock.lock();
    try {
        Object[] elements = getArray();
        E oldValue = get(elements, index);
		//判断新元素是否和就元素相等
        //不相等则替换,相等则不做操作
        if (oldValue != element) {
            int len = elements.length;
            Object[] newElements = Arrays.copyOf(elements, len);
            newElements[index] = element;
            setArray(newElements);
        } else {
            // Not quite a no-op; ensures volatile write semantics
            setArray(elements);
        }
        return oldValue;
    } finally {
        lock.unlock();
    }
}
2.1.2.3、get()方法
@SuppressWarnings("unchecked")
private E get(Object[] a, int index) {
    return (E) a[index];
}

/**
 * {@inheritDoc}
 *
 * @throws IndexOutOfBoundsException {@inheritDoc}
 */
public E get(int index) {
    return get(getArray(), index);
}
2.1.2.4、remove方法
public E remove(int index) {
    final ReentrantLock lock = this.lock;
    lock.lock();
    try {
        Object[] elements = getArray();
        int len = elements.length;
        E oldValue = get(elements, index);
        int numMoved = len - index - 1;
        if (numMoved == 0)
            setArray(Arrays.copyOf(elements, len - 1));
        else {
            Object[] newElements = new Object[len - 1];
            System.arraycopy(elements, 0, newElements, 0, index);
            System.arraycopy(elements, index + 1, newElements, index,
                             numMoved);
            setArray(newElements);
        }
        return oldValue;
    } finally {
        lock.unlock();
    }
}
2.2、CopyOnWriteArraySet
线程安全的set集合,底层是一个CopyOnWriteArrayList。
与CopyOnWriteArrayList的不同是添加元素的add()方法使用的CopyOnWriteArrayList的addIfAbsent()方法实现。会遍历整个数组。如果元素已存在,则不添加,丢弃副本。
2.2.1、使用示例
CopyOnWriteArraySet set = new CopyOnWriteArraySet();
set.add("123");
set.add("456");
set.add("abc");
set.add("123");

set.forEach(o -> System.out.println(o));
2.2.2、源码解析
2.2.2.1、实例化
public class CopyOnWriteArraySet<E> extends AbstractSet<E> implements java.io.Serializable {
    private static final long serialVersionUID = 5457747651344034263L;

    private final CopyOnWriteArrayList<E> al;

    /**
     * Creates an empty set.
     */
    public CopyOnWriteArraySet() {
        al = new CopyOnWriteArrayList<E>();
    }
}
2.2.2.2、add()方法
public boolean add(E e) {
    return al.addIfAbsent(e);
}

==>CopyOnWriteArrayList
public boolean addIfAbsent(E e) {
    Object[] snapshot = getArray();
    //先判断元素是否存在与旧数组中
    //存在则直接返回false,不做操作,反之则调用addIfAbsent(e, snapshot)方法
    return indexOf(e, snapshot, 0, snapshot.length) >= 0 ? false :
    addIfAbsent(e, snapshot);
}
private boolean addIfAbsent(E e, Object[] snapshot) {
    final ReentrantLock lock = this.lock;
    lock.lock();
    try {
        Object[] current = getArray();
        int len = current.length;
        if (snapshot != current) {
            // Optimize for lost race to another addXXX operation
            int common = Math.min(snapshot.length, len);
            for (int i = 0; i < common; i++)
                if (current[i] != snapshot[i] && eq(e, current[i]))
                    return false;
            if (indexOf(e, current, common, len) >= 0)
                return false;
        }
        Object[] newElements = Arrays.copyOf(current, len + 1);
        newElements[len] = e;
        setArray(newElements);
        return true;
    } finally {
        lock.unlock();
    }
}
2.2.2.3、remove()方法
public boolean remove(Object o) {
    return al.remove(o);
}
2.3、ConcurrentLinkedQueue
无界队列,元素个数无上限,可以一直添加。
线程安全,高效可读写的队列,高并发下性能最好。
没有使用锁的方式(无锁),而是采用CAS算法(Compare And Switch ——比较交换算法)实现线程安全。
添加方法包括三个核心参数(V/E/N):V—需要更新的值,E—预期值(V的备份),N—更新值。更新前,先将V赋值给E,拿到N准备更新时,先比较此时的V和E是否相等,相等则更新,否则放弃更新。即:只有当V==E时,才会执行V=N,否则表示已经更新过,取消操作。
CAS是基于硬件的一种原子操作算法,效率极高。
2.3.1、使用示例
ConcurrentLinkedQueue queue = new ConcurrentLinkedQueue();
//        queue.add("1");//添加方法,底层使用offer()实现,会抛出异常
//        queue.add("a");
        queue.offer("2");//添加方法,不会抛出异常
        queue.offer(3);

        System.out.println("---" + queue.size());
        for (int i = 0; i <= queue.size(); i++) {
//            System.out.println(queue.remove());//获取并移除第一个元素,与add()成对使用,会抛出异常
            System.out.println(queue.poll());//获取并移除第一个元素,offer()成对使用,不会抛出异常
        }
        System.out.println("===" + queue.size());
2.3.2、源码解析
2.3.2.1、实例化
public class ConcurrentLinkedQueue<E> extends AbstractQueue<E>
        implements Queue<E>, java.io.Serializable {
    private static final long serialVersionUID = 196745693267521676L;

    public ConcurrentLinkedQueue() {
        head = tail = new Node<E>(null);
    }
2.3.2.2、offer()方法
public boolean offer(E e) {
    checkNotNull(e);
    final Node<E> newNode = new Node<E>(e);

    for (Node<E> t = tail, p = t;;) {
        Node<E> q = p.next;
        if (q == null) {
            // p is last node
            if (p.casNext(null, newNode)) {
                //这里可以看到采用的是CAS算法
                // Successful CAS is the linearization point
                // for e to become an element of this queue,
                // and for newNode to become "live".
                if (p != t) // hop two nodes at a time
                    casTail(t, newNode);  // Failure is OK.
                return true;
            }
            // Lost CAS race to another thread; re-read next
        }
        else if (p == q)
            // We have fallen off list.  If tail is unchanged, it
            // will also be off-list, in which case we need to
            // jump to head, from which all live nodes are always
            // reachable.  Else the new tail is a better bet.
            p = (t != (t = tail)) ? t : head;
        else
            // Check for tail updates after two hops.
            p = (p != t && t != (t = tail)) ? t : q;
    }
}
2.3.2.3、poll() 方法
public E poll() {
    restartFromHead:
    for (;;) {
        for (Node<E> h = head, p = h, q;;) {
            E item = p.item;

            if (item != null && p.casItem(item, null)) {
                // Successful CAS is the linearization point
                // for item to be removed from this queue.
                if (p != h) // hop two nodes at a time
                    updateHead(h, ((q = p.next) != null) ? q : p);
                return item;
            }
            else if ((q = p.next) == null) {
                updateHead(h, p);
                return null;
            }
            else if (p == q)
                continue restartFromHead;
            else
                p = q;
        }
    }
}
2.4、BlockingQueue
Queue的子接口,阻塞队列,元素有个数限制,怎加了两个线程状态为无限等待的方法:
-
put()—添加
-
take()—取出
生产者消费者模式的最好实现。
其重要的两个实现类为:
- ArrayBlockingQueue:数组实现,需要自定义元素上限。
- LinkedBlockingQueue:链表实现,默认元素上限为Integer.MAX_VALUE
2.4.1、使用示例
2.4.1.1、ArrayBlockingQueue使用
ArrayBlockingQueue queue = new ArrayBlockingQueue(4);
try {
    queue.put(1);
    queue.put(2);
    queue.put(3);
    queue.put(4);
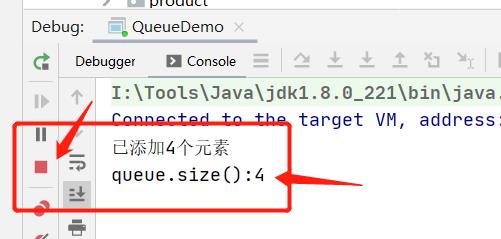
    System.out.println("已添加4个元素");
    System.out.println("queue.size():" + queue.size());
    //由于队列容量为4,所以以下操作会无限等待下去
    queue.put(5);
    System.out.println("已添加5个元素");
    System.out.println("queue.size():" + queue.size());
} catch (InterruptedException e) {
    e.printStackTrace();
}

ArrayBlockingQueue queue = new ArrayBlockingQueue(4);
try {
    queue.put(1);
    queue.put(2);
    queue.put(3);
    queue.put(4);
    System.out.println("已添加4个元素");
    System.out.println("queue.size():" + queue.size());
    queue.take();//取出一个元素
    queue.put(5);
    System.out.println("已添加5个元素");
    System.out.println("queue.size():" + queue.size());
    System.out.println(queue.toString());
} catch (InterruptedException e) {
    e.printStackTrace();
}

2.4.1.2、LinkedBlockingQueue使用
与ArrayBlockingQueue类似
2.4.2、源码解析
2.4.2.1、ArrayBlockingQueue实例化
public ArrayBlockingQueue(int capacity) {
    this(capacity, false);
}

public ArrayBlockingQueue(int capacity, boolean fair) {
    if (capacity <= 0)
        throw new IllegalArgumentException();
    this.items = new Object[capacity];
    lock = new ReentrantLock(fair);
    notEmpty = lock.newCondition();
    notFull =  lock.newCondition();
}
2.4.2.2、LinkedBlockingQueue实例化
public LinkedBlockingQueue() {
    this(Integer.MAX_VALUE);
}

public LinkedBlockingQueue(int capacity) {
    if (capacity <= 0) throw new IllegalArgumentException();
    this.capacity = capacity;
    last = head = new Node<E>(null);
}
2.4.2.3、put()方法
===>ArrayBlockingQueue
public void put(E e) throws InterruptedException {
    checkNotNull(e);
    final ReentrantLock lock = this.lock;
    lock.lockInterruptibly();
    try {
        while (count == items.length)
            notFull.await();
        enqueue(e);
    } finally {
        lock.unlock();
    }
}

===>LinkedBlockingQueue
public void put(E e) throws InterruptedException {
    if (e == null) throw new NullPointerException();
    // Note: convention in all put/take/etc is to preset local var
    // holding count negative to indicate failure unless set.
    int c = -1;
    Node<E> node = new Node<E>(e);
    final ReentrantLock putLock = this.putLock;
    final AtomicInteger count = this.count;
    putLock.lockInterruptibly();
    try {
        /*
             * Note that count is used in wait guard even though it is
             * not protected by lock. This works because count can
             * only decrease at this point (all other puts are shut
             * out by lock), and we (or some other waiting put) are
             * signalled if it ever changes from capacity. Similarly
             * for all other uses of count in other wait guards.
             */
        while (count.get() == capacity) {
            notFull.await();
        }
        enqueue(node);
        c = count.getAndIncrement();
        if (c + 1 < capacity)
            notFull.signal();
    } finally {
        putLock.unlock();
    }
    if (c == 0)
        signalNotEmpty();
}
2.4.2.4、take()方法
===>ArrayBlockingQueue
public E take() throws InterruptedException {
    final ReentrantLock lock = this.lock;
    lock.lockInterruptibly();
    try {
        while (count == 0)
            notEmpty.await();
        return dequeue();
    } finally {
        lock.unlock();
    }
}

===>LinkedBlockingQueue
public E take() throws InterruptedException {
    E x;
    int c = -1;
    final AtomicInteger count = this.count;
    final ReentrantLock takeLock = this.takeLock;
    takeLock.lockInterruptibly();
    try {
        while (count.get() == 0) {
            notEmpty.await();
        }
        x = dequeue();
        c = count.getAndDecrement();
        if (c > 1)
            notEmpty.signal();
    } finally {
        takeLock.unlock();
    }
    if (c == capacity)
        signalNotFull();
    return x;
}
2.5、ConcurrentHashMap
jdk1.8之前:
采用分段锁设计的线程安全Map集合,初始容量默认为16段(Segment)。
不是对整个map加锁,而是对每个segment加锁,以提高效率。最理想的状态是16个对象分别存入16个segment,并发量为16。
jdk1.8开始:
采用CAS算法实现同步。
使用方式与HashMap无异。
2.5.1、使用示例
Map map = new ConcurrentHashMap();
for (int i = 0; i < 5; i++) {
    int t = i;
    new Thread(new Runnable() {
        @Override
        public void run() {
            map.put(t, new Random().nextInt(100));
        }
    }).start();
}

map.forEach((key, value) -> System.out.println(key + " ==> " + value));

以上是关于Java中线程安全的集合浅析的主要内容,如果未能解决你的问题,请参考以下文章