MyBatis 入门
Posted distance66
tags:
篇首语:本文由小常识网(cha138.com)小编为大家整理,主要介绍了MyBatis 入门相关的知识,希望对你有一定的参考价值。
MyBatis 入门
注意:此处JavaWeb项目只涉及普通Maven项目,未整合SSM、SpringBoot等
1、MyBatis概述

MyBatis官网:https://mybatis.org/mybatis-3/zh/index.html
什么是 MyBatis?
MyBatis 是一款优秀的持久层框架,它支持自定义 SQL、存储过程以及高级映射。
MyBatis 免除了几乎所有的 JDBC 代码以及设置参数和获取结果集的工作。
MyBatis 可以通过简单的 XML 或注解来配置和映射原始类型、接口和 Java POJO(Plain Old Java Objects,普通老式 Java 对象)为数据库中的记录。
MyBatis 特点
- 简单易学:本身就很小且简单。没有任何第三方依赖,最简单安装只要两个jar文件+配置几个sql映射文件易于学习,易于使用,通过文档和源代码,可以比较完全的掌握它的设计思路和实现。
- 灵活:mybatis不会对应用程序或者数据库的现有设计强加任何影响。 sql写在xml里,便于统一管理和优化。通过sql语句可以满足操作数据库的所有需求。
- 解除sql与程序代码的耦合:通过提供DAO层,将业务逻辑和数据访问逻辑分离,使系统的设计更清晰,更易维护,更易单元测试。sql和代码的分离,提高了可维护性。
- 提供映射标签,支持对象与数据库的orm字段关系映射
- 提供对象关系映射标签,支持对象关系组建维护
- 提供xml标签,支持编写动态sql。
2、MyBatis环境搭建
这里将通过一个简单的单表CRUD来阐述 MyBatis 的功能,在此之前,假设你已经:
- 拥有 Java 开发环境以及相应 IDE
- 熟悉 Maven
- 熟悉 JavaWeb 项目
创建数据库 mybatis_study 及 User 表
其中 User 表,结构如下
| id | name | age | |
|---|---|---|---|
| 1 | Jone | 18 | test1@163.com |
| 2 | Jack | 20 | test2@163.com |
| 3 | Tom | 28 | test3@163.com |
| 4 | Sandy | 21 | test4@163.com |
| 5 | Billie | 24 | test5@163.com |
其对应的数据库脚本如下:
use mybatis_study;

DROP TABLE IF EXISTS user;

CREATE TABLE user
(
	id int(11) NOT NULL COMMENT \'主键ID\',
	name VARCHAR(30) NULL DEFAULT NULL COMMENT \'姓名\',
	age INT(11) NULL DEFAULT NULL COMMENT \'年龄\',
	email VARCHAR(50) NULL DEFAULT NULL COMMENT \'邮箱\',
	PRIMARY KEY (id)
);

INSERT INTO user (id, name, age, email) VALUES
(1, \'Jone\', 18, \'test1@163.com\'),
(2, \'Jack\', 20, \'test2@163.com\'),
(3, \'Tom\', 28, \'test3@163.com\'),
(4, \'Sandy\', 21, \'test4@163.com\'),
(5, \'Billie\', 24, \'test5@163.com\');
初始化工程
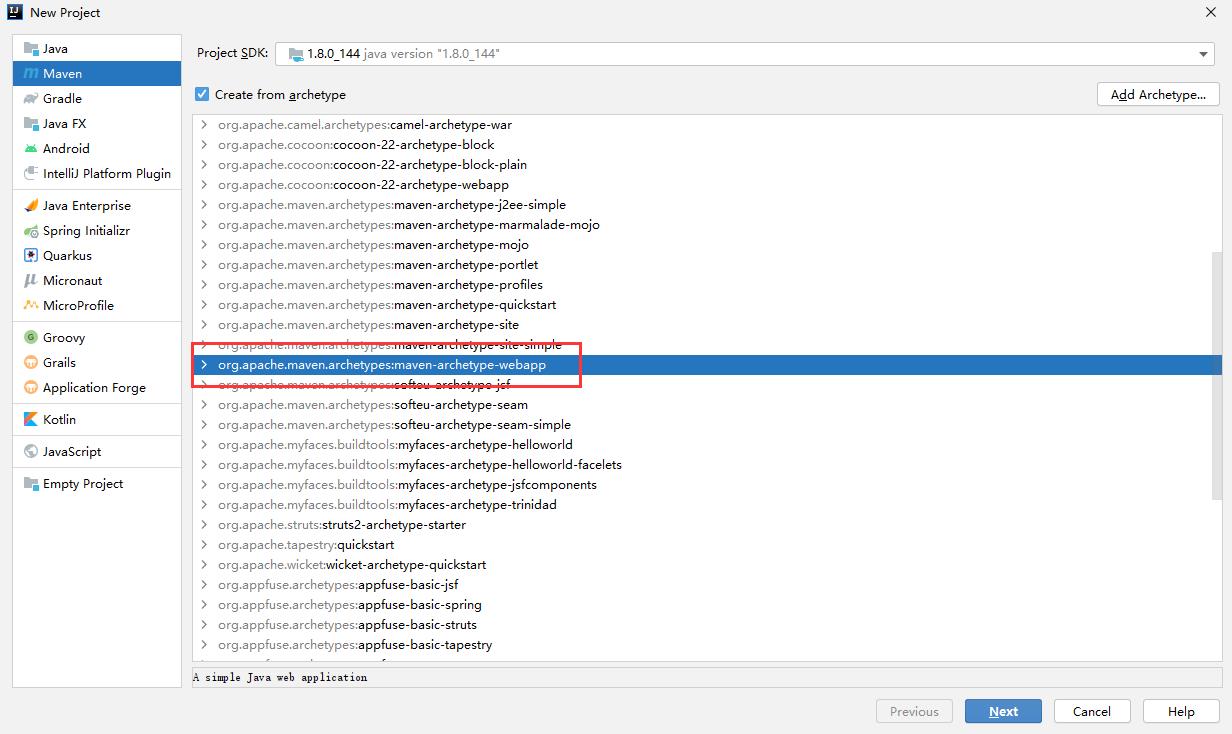
创建一个webapp的maven项目(项目数据库使用 mysql8.0 )
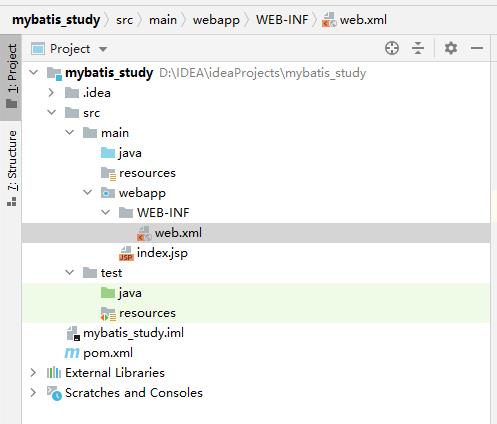
项目初始结构
添加依赖
pom.xml
<!--?xml version="1.0" encoding="UTF-8"?-->

<project xmlns="http://maven.apache.org/POM/4.0.0" xmlns:xsi="http://www.w3.org/2001/XMLSchema-instance" xsi:schemalocation="http://maven.apache.org/POM/4.0.0 http://maven.apache.org/xsd/maven-4.0.0.xsd">
  <modelversion>4.0.0</modelversion>

  <!--以自己的项目为准-->
  <groupid>org.example</groupid>
  <artifactid>mybatis_study</artifactid>
  <version>1.0-SNAPSHOT</version>
  <packaging>war</packaging>

  <!--配置版本号-->
  <properties>
    <project.build.sourceencoding>UTF-8</project.build.sourceencoding>
    <maven.compiler.source>1.7</maven.compiler.source>
    <maven.compiler.target>1.7</maven.compiler.target>
    <junit.version>4.13</junit.version>
    <mysql.version>8.0.11</mysql.version> <!-- mysql驱动版本 -->
    <mybatis.version>3.5.2</mybatis.version>  <!--mybatis版本-->
  </properties>

  <!--maven导入依赖-->
  <dependencies>
    <!--junit-->
    <dependency>
      <groupid>junit</groupid>
      <artifactid>junit</artifactid>
      <version>${junit.version}</version>
      <scope>test</scope>
    </dependency>
    <!--mysql驱动-->
    <dependency>
      <groupid>mysql</groupid>
      <artifactid>mysql-connector-java</artifactid>
      <version>${mysql.version}</version>
    </dependency>
    <!--mybatis-->
    <dependency>
      <groupid>org.mybatis</groupid>
      <artifactid>mybatis</artifactid>
      <version>${mybatis.version}</version>
    </dependency>

  </dependencies>

  <!--在build中配置resources,来防止我们资源导出失败的问题-->
  <build>
    <resources>
      <resource>
        <directory>src/main/resources</directory>
        <includes>
          <include>**/*.properties</include>
          <include>**/*.xml</include>
        </includes>
        <filtering>false</filtering>
      </resource>
      <resource>
        <directory>src/main/java</directory>
        <includes>
          <include>**/*.properties</include>
          <include>**/*.xml</include>
        </includes>
        <filtering>false</filtering>
      </resource>
    </resources>
  </build>

</project>
项目连接数据库
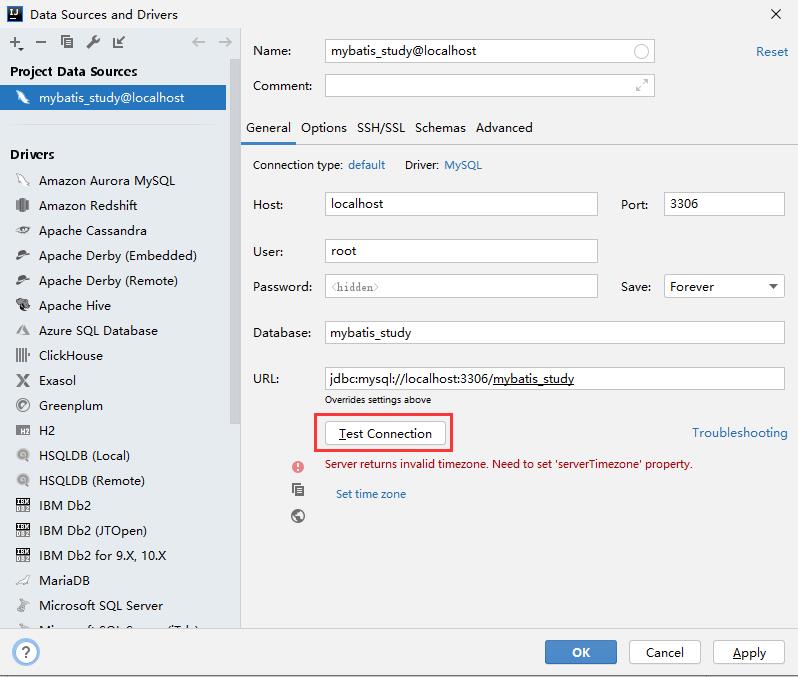
可以设置时区为 Asia/Shanghai
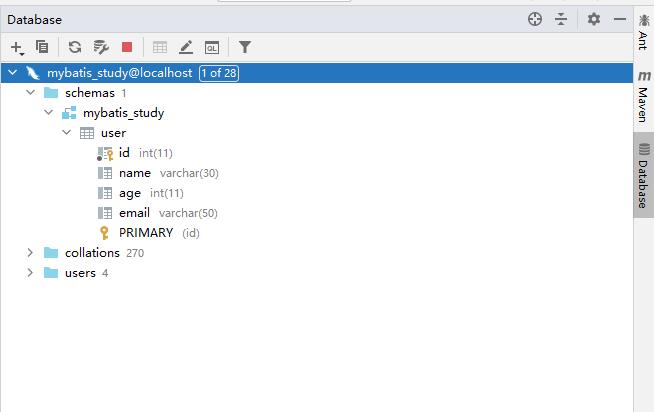
连接成功!
项目总体结构
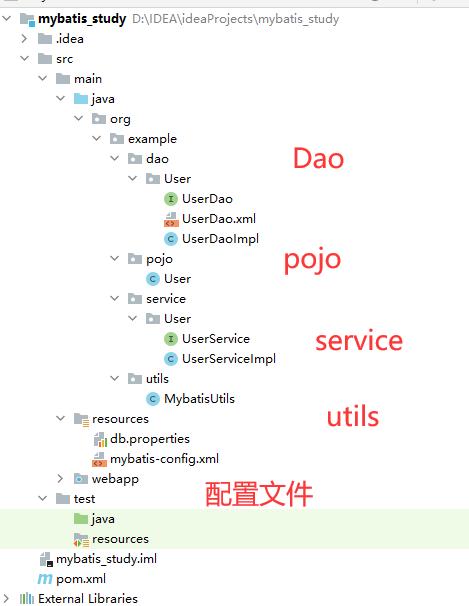
编写实体类
User
package org.example.pojo;

import java.io.Serializable;

public class User implements Serializable {

    private int id;
    private String name;
    private int age;
    private String email;

    public User() {
    }

    public User(int id, String name, int age, String email) {
        this.id = id;
        this.name = name;
        this.age = age;
        this.email = email;
    }

    public int getId() {
        return id;
    }

    public void setId(int id) {
        this.id = id;
    }

    public String getName() {
        return name;
    }

    public void setName(String name) {
        this.name = name;
    }

    public int getAge() {
        return age;
    }

    public void setAge(int age) {
        this.age = age;
    }

    public String getEmail() {
        return email;
    }

    public void setEmail(String email) {
        this.email = email;
    }

    @Override
    public String toString() {
        return "User{" +
                "id=" + id +
                ", name=\'" + name + \'\\\'\' +
                ", age=" + age +
                ", email=\'" + email + \'\\\'\' +
                \'}\';
    }
}
编写配置文件
db.properties
driver=com.mysql.cj.jdbc.Driver
url=jdbc:mysql://localhost:3306/mybatis_study?useSSL=false&useUnicode=true&characterEncoding=UTF-8&serverTimezone=Asia/Shanghai
username=root
password=123456
# 数据库密码以自己的为准
mybatis-config.xml
<!--?xml version="1.0" encoding="UTF-8" ?-->


<!--configuration核心配置文件-->
<configuration>

    <!--引入外部数据库配置文件-->
    <properties resource="db.properties">

    <!--配置日志-->
    <settings>
        <!--标准的日志工厂,可以查看sql语句-->
        <setting name="logImpl" value="STDOUT_LOGGING">
        <!--开启驼峰命名自动映射-->
        <setting name="mapUnderscoreToCamelCase" value="true">
    </setting></setting></settings>

    <!--配置环境-->
    <environments default="development">
        <environment id="development">
            <transactionmanager type="JDBC">
            <datasource type="POOLED">
                <property name="driver" value="${driver}">
                <property name="url" value="${url}">
                <property name="username" value="${username}">
                <property name="password" value="${password}">
            </property></property></property></property></datasource>
        </transactionmanager></environment>
    </environments>

</properties></configuration>
编写工具类
MyBatisUtils
package org.example.utils;

import org.apache.ibatis.io.Resources;
import org.apache.ibatis.session.SqlSession;
import org.apache.ibatis.session.SqlSessionFactory;
import org.apache.ibatis.session.SqlSessionFactoryBuilder;

import java.io.IOException;
import java.io.InputStream;

//通过 sqlSessionFactory 获取 sqlSession
public class MybatisUtils {
    private static SqlSessionFactory sqlSessionFactory;
    static {
        try {
            //使用Mybatis 第一步:获取sqlSessionFactory对象
            String resource = "mybatis-config.xml";
            InputStream inputStream = Resources.getResourceAsStream(resource);
            sqlSessionFactory = new SqlSessionFactoryBuilder().build(inputStream);
        } catch (IOException e) {
            e.printStackTrace();
        }
    }
    // SqlSession 提供了在数据库执行 SQL 命令所需的所有方法。
    // 可以通过 SqlSession 实例来直接执行已映射的 SQL 语句。
    public static SqlSession getSqlSession() {
        //设置自动提交事务
        return sqlSessionFactory.openSession(true);
    }
}
编写 Dao 层
UserDao
package org.example.dao.User;

import org.apache.ibatis.annotations.Param;
import org.example.pojo.User;

import java.util.List;

public interface UserDao {

    // 查询所有用户
    List<user> selectAll();

    // 根据 id 查询用户
    User selectById(@Param("id") int id);

    // 根据用户名 , 模糊查询用户
    List<user> selectByName(@Param("name") String name);

    // 增加用户
    int insert(User user);

    // 根据 id 删除用户
    int deleteById(@Param("id") int id);

    // 更新用户信息
    int update(User user);

}
UserDao.xml
<!--?xml version="1.0" encoding="UTF-8" ?-->

<!--namespace=绑定一个对应的Dao/Mapper接口-->
<mapper namespace="org.example.dao.User.UserDao">

    <select id="selectAll" resulttype="org.example.pojo.User">
        select * from user
    </select>

    <select id="selectById" resulttype="org.example.pojo.User">
        select * from user
            where id = #{id}
    </select>

    <select id="selectByName" resulttype="org.example.pojo.User">
        select * from user
            where name like concat(\'%\',#{name},\'%\')
    </select>

    <insert id="insert">
        insert into user(id, name, age, email)
            VALUES (#{id} , #{name} , #{age} , #{email})
    </insert>

    <delete id="deleteById">
        delete from user
            where id = #{id}
    </delete>

    <update id="update">
        update user
            set name = #{name} , age = #{age} , email = #{email}
            where id = #{id}
    </update>

</mapper>
注意xml文件需要绑定对应包下的Dao接口,且Dao接口也需要在配置文件中绑定。
在mybatis配置文件中绑定Dao接口

<mappers>
    <!--绑定Dao-->
    <mapper class="org.example.dao.User.UserDao"/>
</mappers>
编写Dao接口的实现类
UserDaoImpl
package org.example.dao.User;

import org.apache.ibatis.session.SqlSession;
import org.example.pojo.User;
import org.example.utils.MybatisUtils;

import java.util.List;

public class UserDaoImpl implements UserDao {

    @Override
    public List<user> selectAll() {
        // 获取 SqlSession
        SqlSession sqlSession = MybatisUtils.getSqlSession();
        // 通过反射,获取Dao
        UserDao userDao = sqlSession.getMapper(UserDao.class);
        // 输出调试信息
        System.out.println("UserDaoImpl => selectAll");
        List<user> userList = null;
        try {   // try catch 捕获异常
            userList = userDao.selectAll();
        } catch (Exception e) {
            e.printStackTrace();
        } finally {
            sqlSession.close(); // 关闭 sqlSession
        }
        return userList;
    }

    @Override
    public User selectById(int id) {
        SqlSession sqlSession = MybatisUtils.getSqlSession();
        UserDao userDao = sqlSession.getMapper(UserDao.class);

        System.out.println("UserDaoImpl => selectById");
        User user = null;
        try {
            user = userDao.selectById(id);
        } catch (Exception e) {
            e.printStackTrace();
        } finally {
            sqlSession.close();
        }
        return user;
    }

    @Override
    public List<user> selectByName(String name) {
        SqlSession sqlSession = MybatisUtils.getSqlSession();
        UserDao userDao = sqlSession.getMapper(UserDao.class);

        System.out.println("UserDaoImpl => selectByName");
        List<user> userList = null;
        try {
            userList = userDao.selectByName(name);
        } catch (Exception e) {
            e.printStackTrace();
        } finally {
            sqlSession.close();
        }
        return userList;
    }

    @Override
    public int insert(User user) {
        SqlSession sqlSession = MybatisUtils.getSqlSession();
        UserDao userDao = sqlSession.getMapper(UserDao.class);

        System.out.println("UserDaoImpl => insert");
        int res = 0;
        try {
            res = userDao.insert(user);
        } catch (Exception e) {
            e.printStackTrace();
        } finally {
            sqlSession.close();
        }
        return res;
    }

    @Override
    public int deleteById(int id) {
        SqlSession sqlSession = MybatisUtils.getSqlSession();
        UserDao userDao = sqlSession.getMapper(UserDao.class);

        System.out.println("UserDaoImpl => deleteById");
        int res = 0;
        try {
            res = userDao.deleteById(id);
        } catch (Exception e) {
            e.printStackTrace();
        } finally {
            sqlSession.close();
        }
        return res;
    }

    @Override
    public int update(User user) {
        SqlSession sqlSession = MybatisUtils.getSqlSession();
        UserDao userDao = sqlSession.getMapper(UserDao.class);

        System.out.println("UserDaoImpl => update");
        int res = 0;
        try {
            res = userDao.update(user);
        } catch (Exception e) {
            e.printStackTrace();
        } finally {
            sqlSession.close();
        }
        return res;
    }
}
编写 Service 层
UserService
package org.example.service.User;

import org.apache.ibatis.annotations.Param;
import org.example.pojo.User;

import java.util.List;

public interface UserService {

    // 查询所有用户
    List<user> selectAll();

    // 根据 id 查询用户
    User selectById(int id);

    // 根据用户名 , 模糊查询用户
    List<user> selectByName(String name);

    // 增加用户
    boolean insert(User user);

    // 根据 id 删除用户
    boolean deleteById(int id);

    // 更新用户信息
    boolean update(User user);
}
编写Service接口的实现类
UserServiceImpl
package org.example.service.User;

import org.example.dao.User.UserDao;
import org.example.dao.User.UserDaoImpl;
import org.example.pojo.User;

import java.util.List;

public class UserServiceImpl implements UserService {

    private UserDao userDao = null;

    public UserServiceImpl() {
        userDao = new UserDaoImpl();
    }

    @Override
    public List<user> selectAll() {
        return userDao.selectAll();
    }

    @Override
    public User selectById(int id) {
        return userDao.selectById(id);
    }

    @Override
    public List<user> selectByName(String name) {
        return userDao.selectByName(name);
    }

    @Override
    public boolean insert(User user) {
        return userDao.insert(user) > 0;
    }

    @Override
    public boolean deleteById(int id) {
        return userDao.deleteById(id) > 0;
    }

    @Override
    public boolean update(User user) {
        return userDao.update(user) > 0;
    }
}
编写测试类
利用 junit 单元测试 service 层的各个功能。
import org.example.pojo.User;
import org.example.service.User.UserService;
import org.example.service.User.UserServiceImpl;
import org.junit.Test;

import java.util.List;

public class UserTest {

    private UserService userService = new UserServiceImpl();

    @Test
    public void test1() {
        List<user> userList = userService.selectAll();
        userList.forEach(System.out::println);
    }
}
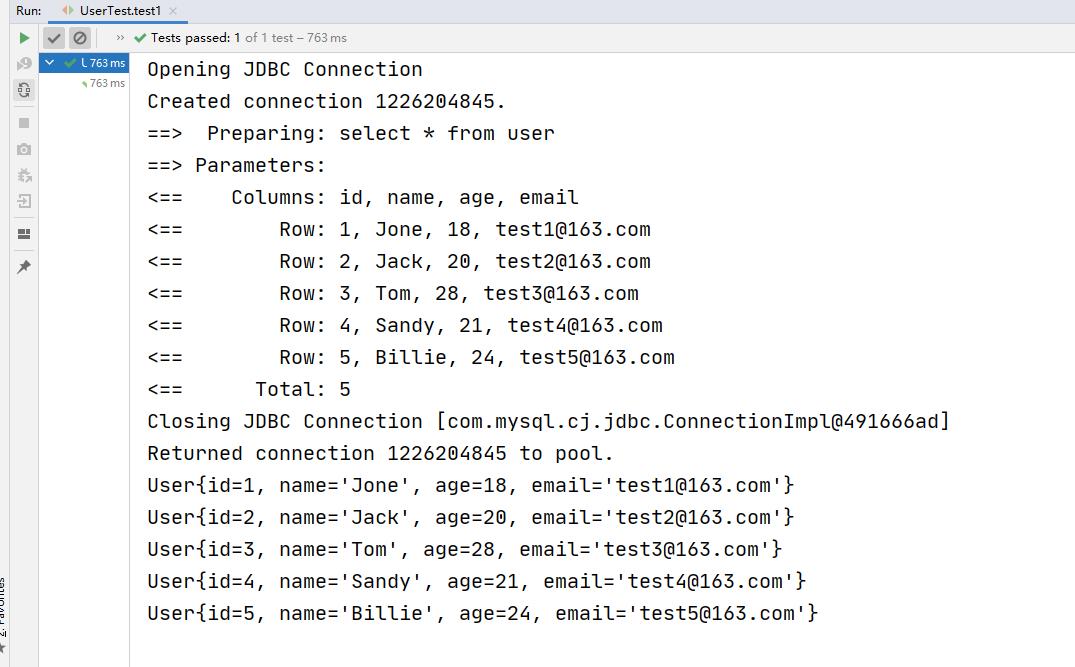
测试成功!
至此,一个简单的mybatis项目demo,已经搭建完成!
service中剩下的其它功能请自行测试!
总结
1、parameterType:在 SQL 映射文件中指定输入参数类型的,可以指定为基本数据类型(如 int、float 等)、包装数据类型(如 String、Interger 等)以及用户自己编写的 JavaBean 封装类。
2、resultType:在加载 SQL 配置,并绑定指定输入参数和运行 SQL 之后,会得到数据库返回的响应结果,使用 resultType 就是用来指定数据库返回的信息对应的 Java 的数据类型。
3、“#{}”:在传统的 JDBC 的编程中,占位符用 “?” 来表示,然后再加载 SQL 之前按照 “?” 的位置设置参数。而 “#{}” 在 MyBatis 中也代表一种占位符,该符号接受输入参数,在大括号中编写参数名称来接受对应参数。当 “#{}” 接受简单类型时可以用 value 或者其他任意名称来获取。
4、“@Param”:@Param是MyBatis所提供的(org.apache.ibatis.annotations.Param),作为Dao层的注解,作用是用于传递参数,从而可以与SQL中的的字段名相对应,一般在2=<参数数<=5时使用。
更多内容请参考MyBatis官网
以上是关于MyBatis 入门的主要内容,如果未能解决你的问题,请参考以下文章