58同城二手车数据爬虫——数字加密解码(Python原创)
Posted 阿波罗的手
tags:
篇首语:本文由小常识网(cha138.com)小编为大家整理,主要介绍了58同城二手车数据爬虫——数字加密解码(Python原创)相关的知识,希望对你有一定的参考价值。
一、基础首页爬取
def crawler():
  # 设置cookie
    cookie = \'\'\'cisession=19dfd70a27ec0e                                                                                                                                           t_f805f7762a9a237a0deac37015e9f6d9=1483926368\'\'\'
    header = {
        \'User-Agent\': \'Mozilla/5.0 (Windows NT 6.1; WOW64) AppleWebKit/537.36 (Khtml, like Gecko) Chrome/53.0.2785.143 Safari/537.36\',
        \'Connection\': \'keep-alive\',
        \'accept\': \'text/html,application/xhtml+xml,application/xml;q=0.9,image/webp,*/*;q=0.8\',
        \'Cookie\': cookie}

    # 设置请求头,模仿浏览器访问
    # headers = {
    #     \'User-Agent\': \'Mozilla/5.0 (Windows NT 10.0; Win64; x64) AppleWebKit/537.36 (KHTML, like Gecko) Chrome/80.0.3987.149 Safari/537.36\'
    # }
    headers = {
        \'User-Agent\': \'Mozilla/5.0 (Windows NT 10.0; Win64; x64) AppleWebKit/537.36 (KHTML, like Gecko) Chrome/80.0.3987.149 Safari/537.36\',
        \'Referer\': \'https://sg.58.com/ershouche/?spm=242729801700.bd_vid&utm_source=sem-esc-baidu-pc\'}
    # 设置想要爬取的网页链接
    url = \'https://sg.58.com/ershouche/?spm=242729801700.bd_vid&utm_source=sem-esc-baidu-pc\'
    response = requests.get(url, headers=headers)
    return response
二、寻找获取加密方法
2.1页面分析:
如下图页面数据展示可以看出,该数字数据被加密成特定的其他字符表示,因此我们先找到起加密方式
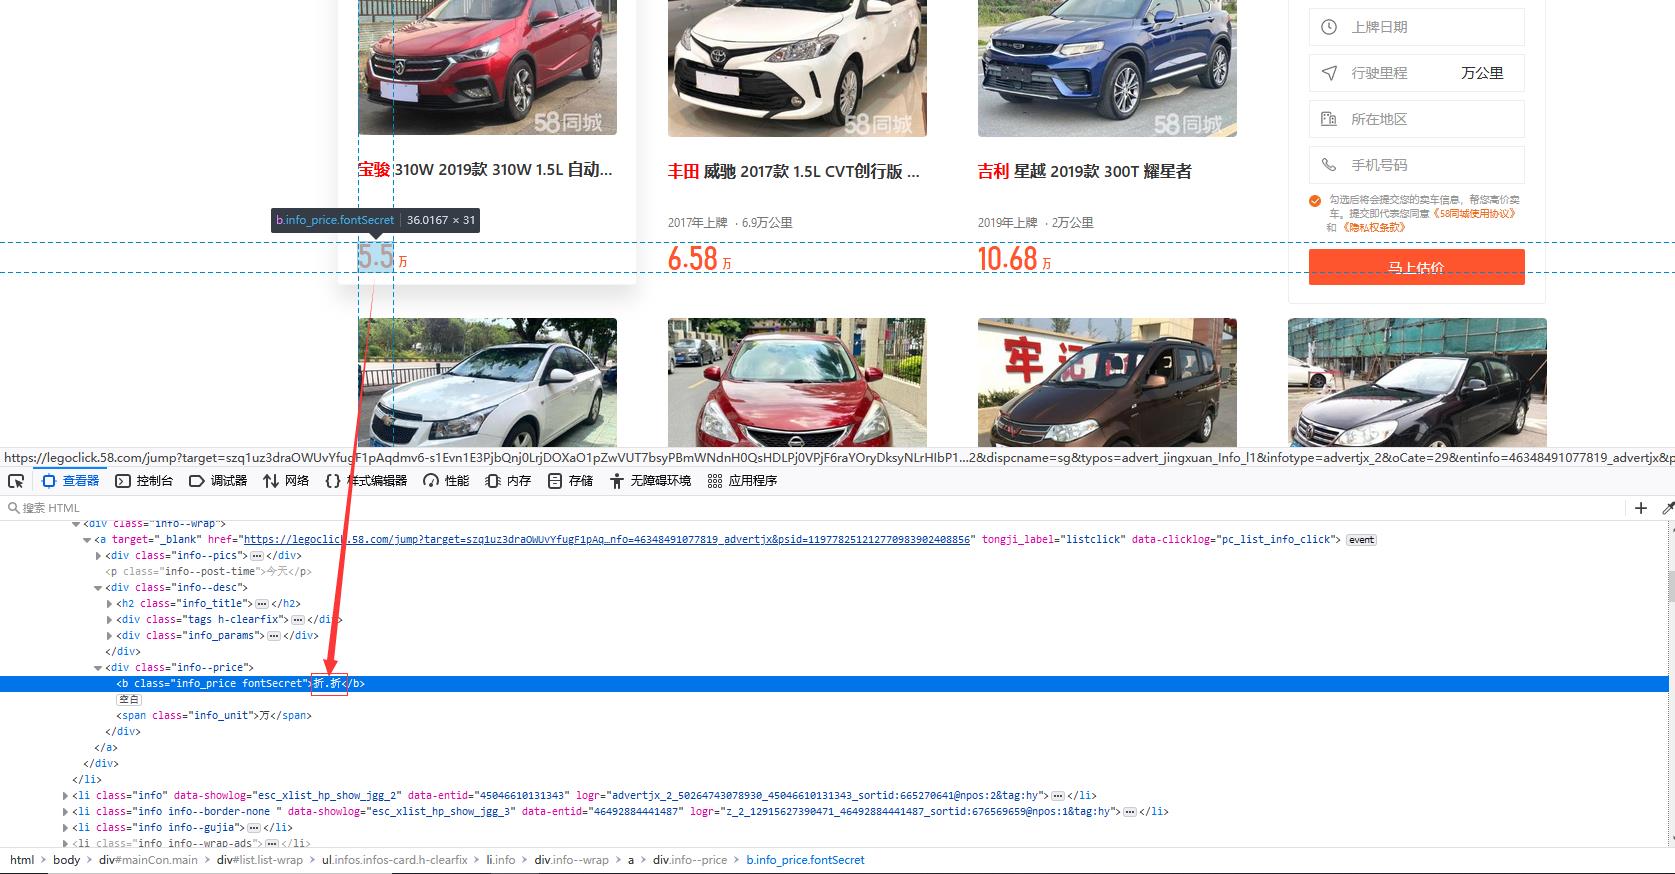
通过F12查看该前端样式发现,取消勾选font-family页面前后展示数据对比:
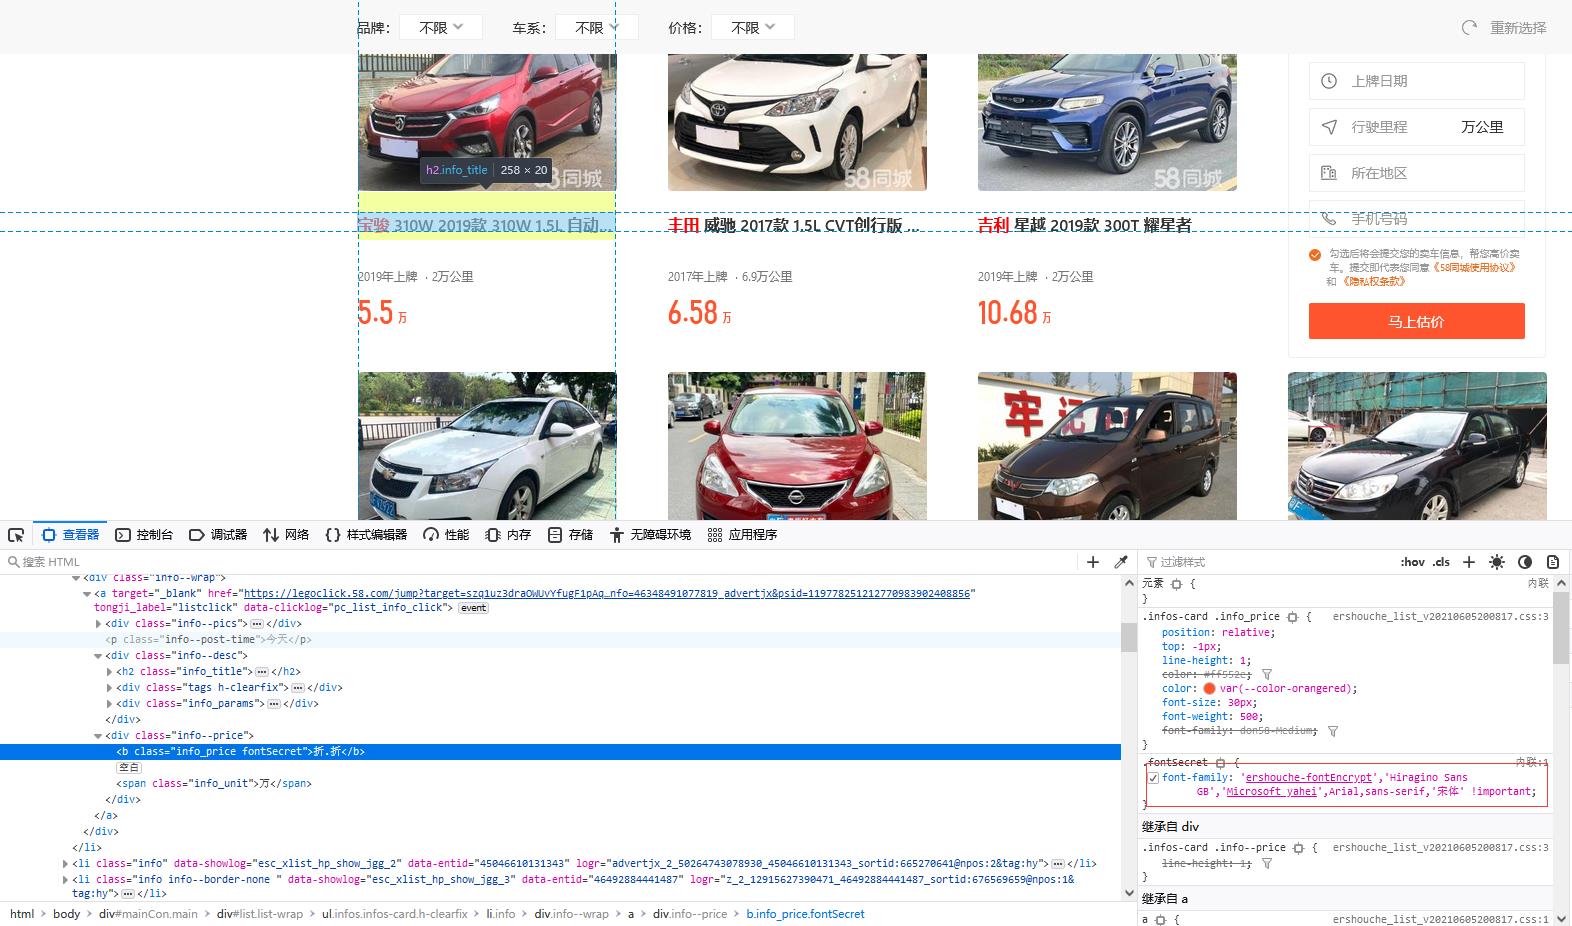
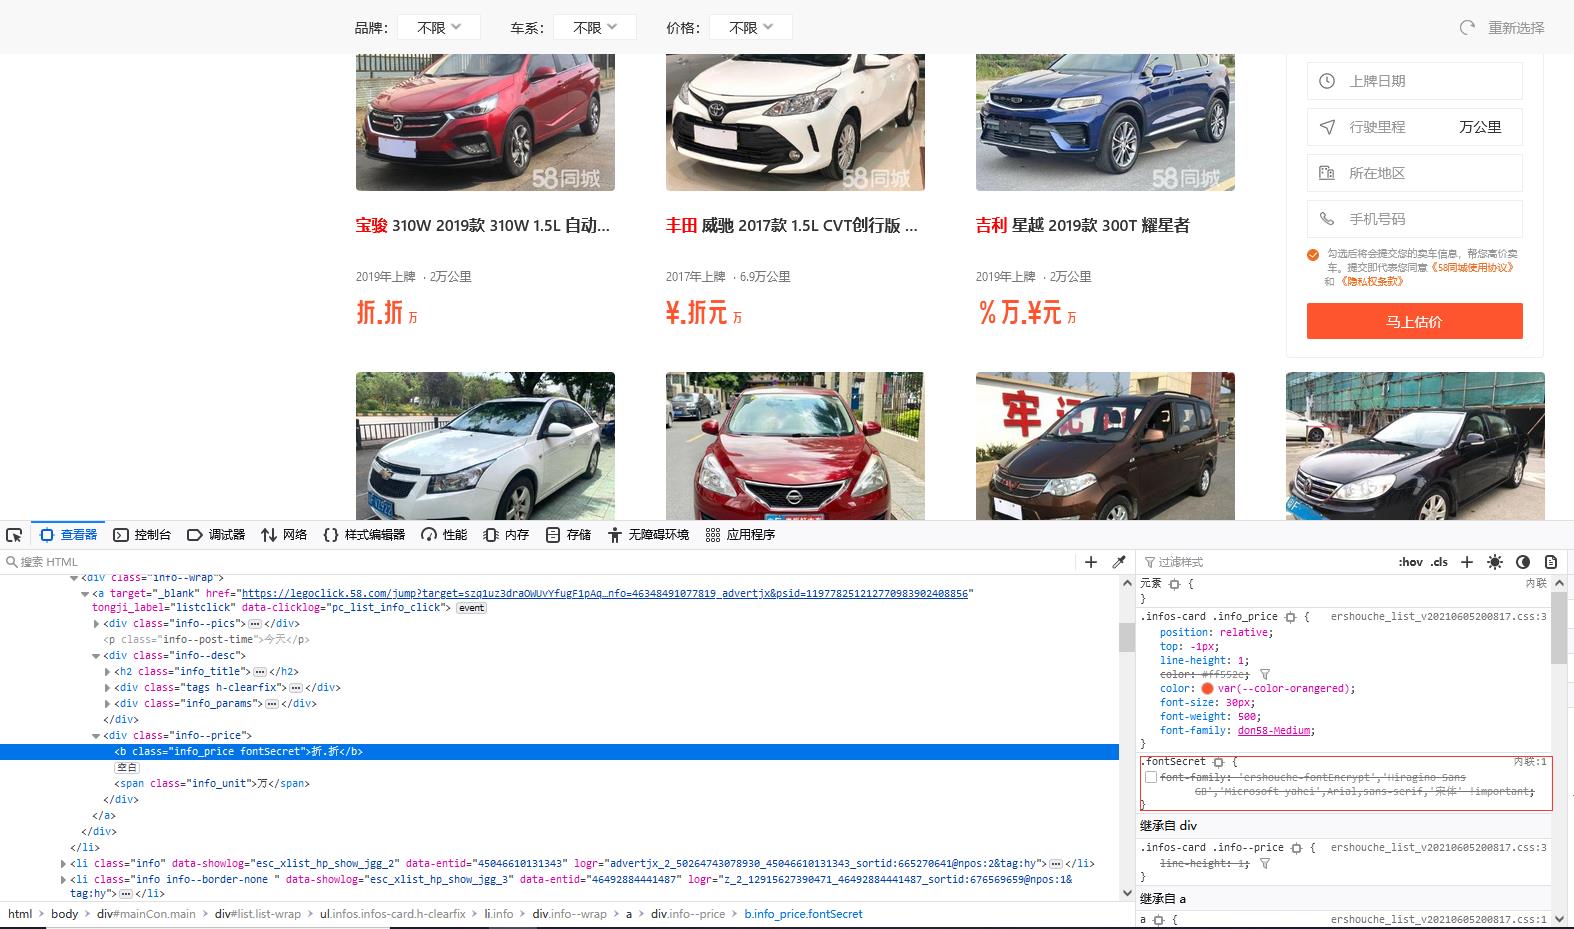
通过Ctrl+F搜索fontSecret可以看到如下内容,就是该页面的加密方式,并且经过测试发现该页面每刷新一次加密方式就会发生变化,因此我们需要通过爬虫获取每次刷新后的新加密方法:

2.2编写代码:
def parse_one_page(html):
    #使用正则表达式获取每次加密的新加密内容
    pattern = re.compile(
        \'<style>.*?(AAEAAAAO.*?wAP.*?).*?</style>\',
        re.S)
    items = re.findall(pattern, html)
    str = "\'" + items[0].strip() + "\'"
    #根据此加密内容输出woff字体文件
    bin_data = base64.decodebytes(str.encode())
    with open(\'58font.woff\', \'wb\') as f:
        f.write(bin_data)
    # print(\'第\' + str(page_num) + \'次访问网页,字体文件保存成功!\')
    # 获取字体文件,将其转换为xml文件
    font = TTFont(\'58font.woff\')
    font.saveXML(\'58font.xml\')
三、解析xml文件
3.1文件内容
在xml文件中存在阿拉伯数字和与之对应的数字编码,需要注意的是在58同城页面升级后,这些数字编码并不捆绑阿拉伯数字,而是每次刷新进行随机分配,且(阿拉伯数字-1)=页面展示数字。
例如:在红框中id=5,其对应的uni002B反应给前台的显示数据是4,其他也是同理。
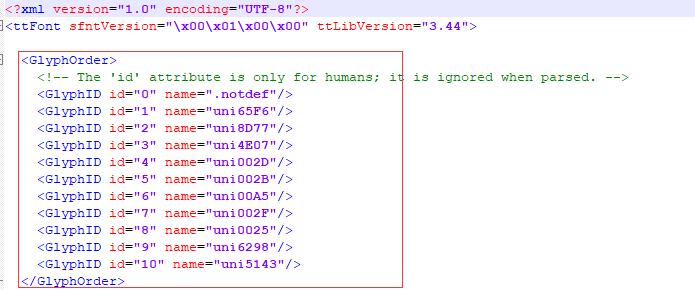
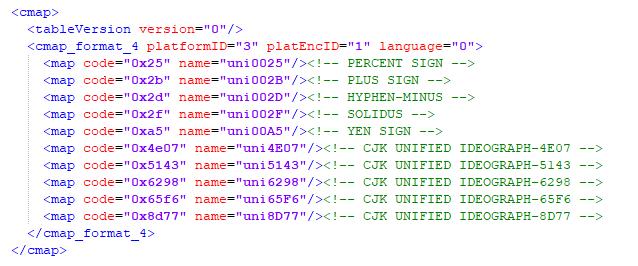
在下图中这是数字编码对应的16进制数,且数字编码也是每次刷新后重新分配给16进制数:
3.2设计代码思路
上半部分为粗略猜想的58加密方法,下半部分为解密思路
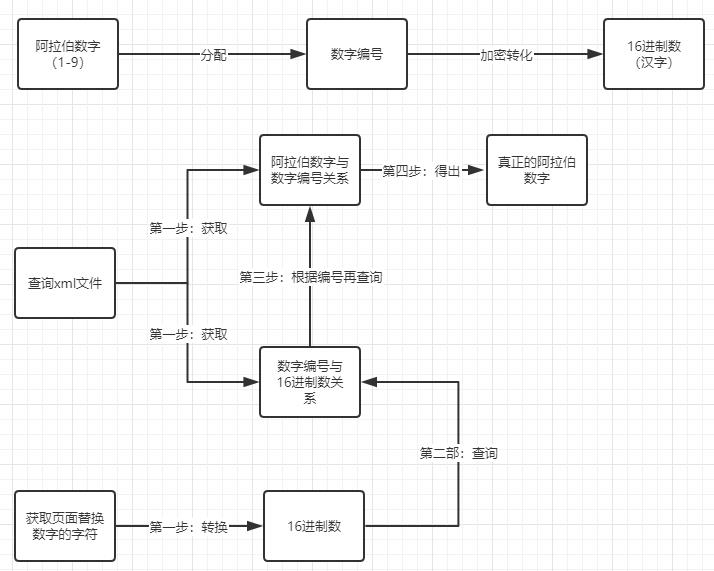
3.3代码
根据以上思路代码分为两块:
    #建立列表
    all_Price=[]
    #遍历所有汽车价格信息的列表将其转化为16进制数字后放入新的列表中
    for price in  price_list:
        str = price.get_text().replace("\\n", "")
        Zu_list=[]
        #将每个汽车的价格拆封,然后一个个进行节码
        #例如“¥.-起”拆分成“¥”、“.”、“-”、“起”然后逐个解码
        for i in range(len(str)-1):
            decode_num = ord(str[i])
            # 转成16进制
            priceBaser64_Str = hex(decode_num)
       #传入方法中
            find_result=find_font(priceBaser64_Str)
            #合并解码后的阿拉伯数字得到真正的价格数字
            Zu_list.append(find_result)
        #类型转化,放入新的列表中
        all_Price.append("".join(Zu_list))
    print(all_Price)
#传入16进制数
def find_font(priceBaser64_Str):
    # 利用xpath语法匹配xml文件内容,查询以glyph开头的编码对应的数字
    font_data = etree.parse(\'./58font.xml\')
    num_code = [\'1\',\'2\',\'3\',\'4\',\'5\',\'6\',\'7\',\'8\',\'9\',\'10\']
    # 建立字典存储每次,数字编码码对应的数字编号
    # 样例格式:{\'uni002B\': 4, \'uni00A5\': 5, \'uni65F6\': 0, \'uni002D\': 3, \'uni002F\': 6, \'uni6298\': 8, \'uni0025\': 7, \'uni5143\': 9, \'uni8D77\': 1, \'uni4E07\': 2}
    glyph_list ={}
    for number in num_code:
        glyph_reslut=font_data.xpath("//GlyphOrder//GlyphID[@id=\'{}\']/@name".format(number))[0]
        glyph_list[glyph_reslut] = int(number)-1

    # 除了随机的数字编码对应的16进制数外,还有“.”则固定对应0x2e
    # 依次循环查找xml文件里code对应的name
    if priceBaser64_Str == \'0x2e\':
        result=\'.\'
        return result
        #num_list.append(result)
        #print(result)
    else:
        #使用xpath查询方式根据传进来的16进制数寻找对应的数字编号,再通过数字编号去遍历建立好的glyph_list找出对应的阿拉伯数字
        result = font_data.xpath("//cmap_format_4//map[@code=\'{}\']/@name".format(priceBaser64_Str))[0]
        # 循环字典的key,如果code对应的name与字典的key相同,则得到key对应的value
        for key in glyph_list.keys():
            if result == key:
                familly_result = str(glyph_list[key])
                return familly_result
    #print(\'已成功找到编码所对应的数字!\')
四、最终写出xml文件保存
全部代码:
from fontTools.misc import etree
from fontTools.ttLib import TTFont
import base64
import xlsxwriter
import re
import requests
from bs4 import BeautifulSoup

#传入16进制数
def find_font(priceBaser64_Str):
    # 利用xpath语法匹配xml文件内容,查询以glyph开头的编码对应的数字
    font_data = etree.parse(\'./58font.xml\')
    num_code = [\'1\',\'2\',\'3\',\'4\',\'5\',\'6\',\'7\',\'8\',\'9\',\'10\']
    # 建立字典存储每次,数字编码码对应的数字编号
    # 样例格式:{\'uni8D77\': \'2\', \'uni0025\': \'8\', \'uni5143\': \'10\', \'uni002B\': \'5\', \'uni4E07\': \'3\', \'uni6298\': \'9\', \'uni00A5\': \'6\', \'uni65F6\': \'1\', \'.notdef\': \'0\', \'uni002F\': \'7\', \'uni002D\': \'4\'}
    glyph_list ={}
    for number in num_code:
        glyph_reslut=font_data.xpath("//GlyphOrder//GlyphID[@id=\'{}\']/@name".format(number))[0]
        glyph_list[glyph_reslut] = int(number)-1

    # 除了随机的数字编码对应的16进制数外,还有“.”则固定对应0x2e
    # 依次循环查找xml文件里code对应的name
    if priceBaser64_Str == \'0x2e\':
        result=\'.\'
        return result
        #num_list.append(result)
        #print(result)
    else:
        #使用xpath查询方式根据传进来的16进制数寻找对应的数字编号,再通过数字编号去遍历建立好的glyph_list找出对应的阿拉伯数字
        result = font_data.xpath("//cmap_format_4//map[@code=\'{}\']/@name".format(priceBaser64_Str))[0]
        # 循环字典的key,如果code对应的name与字典的key相同,则得到key对应的value
        for key in glyph_list.keys():
            if result == key:
                familly_result = str(glyph_list[key])
                return familly_result
    #print(\'已成功找到编码所对应的数字!\')


def parse_one_page(html):
    #使用正则表达式获取每次加密的新加密内容
    pattern = re.compile(
        \'<style>.*?(AAEAAAAO.*?wAP.*?).*?</style>\',
        re.S)
    items = re.findall(pattern, html)
    str = "\'" + items[0].strip() + "\'"
    #根据此加密内容输出woff字体文件
    bin_data = base64.decodebytes(str.encode())
    with open(\'58font.woff\', \'wb\') as f:
        f.write(bin_data)
    # print(\'第\' + str(page_num) + \'次访问网页,字体文件保存成功!\')
    # 获取字体文件,将其转换为xml文件
    font = TTFont(\'58font.woff\')
    font.saveXML(\'58font.xml\')

    # for item in items:
    #     print(item)
    #     yield {
    #         \'index\':items[0],
    #         \'image\':items[1].,
    #         \'title\':items[2],
    #     }

def crawler():
    cookie = \'\'\'cisession=19dfd70a27ec0                                                                                                     t_f805f7762a9a237a0deac37015e9f6d9=1482722012,1483926313;Hm_lpvt_f805f7762a9a237a0deac37015e9f6d9=1483926368\'\'\'
    header = {
        \'User-Agent\': \'Mozilla/5.0 (Windows NT 6.1; WOW64) AppleWebKit/537.36 (KHTML, like Gecko) Chrome/53.0.2785.143 Safari/537.36\',
        \'Connection\': \'keep-alive\',
        \'accept\': \'text/html,application/xhtml+xml,application/xml;q=0.9,image/webp,*/*;q=0.8\',
        \'Cookie\': cookie}

    # 设置请求头,模仿浏览器访问
    # headers = {
    #     \'User-Agent\': \'Mozilla/5.0 (Windows NT 10.0; Win64; x64) AppleWebKit/537.36 (KHTML, like Gecko) Chrome/80.0.3987.149 Safari/537.36\'
    # }
    headers = {
        \'User-Agent\': \'Mozilla/5.0 (Windows NT 10.0; Win64; x64) AppleWebKit/537.36 (KHTML, like Gecko) Chrome/80.0.3987.149 Safari/537.36\',
        \'Referer\': \'https://sg.58.com/ershouche/?spm=242729801700.bd_vid&utm_source=sem-esc-baidu-pc\'}
    # 设置想要爬取的网页链接
    # url = \'https://nn.58.com/ershouche/?utm_source=market&spm=u-2d2yxv86y3v43nkddh1.BDPCPZ_BT&PGTID=0d100000-0034-d9f8-fe87-cbe415320007&ClickID=4\'
    url = \'https://sg.58.com/ershouche/?spm=242729801700.bd_vid&utm_source=sem-esc-baidu-pc\'
    response = requests.get(url, headers=headers)
    return response


#爬虫数据转为xmlx文本写出
def writer_xml(response,sheetHeaders):
    #转化为文本格式
    content = response.content
    soup = BeautifulSoup(content, \'lxml\')

    # 创建名为58car.xlsx的excel文件
    workbook = xlsxwriter.Workbook(\'19ar.xlxs\')
    # 在excel文件中添加一个sheet工作表
    worksheet = workbook.add_worksheet(\'韶关\')
    # 获取所有的汽车名称,并存储在一个列表里
    name_list = soup.find_all(\'span\', attrs={\'class\': \'info_link\'})
    # 获取所有的汽车描述信息,并存储在一个列表里
    describe_list = soup.find_all(\'div\', attrs={\'class\': \'info_params\'})
    # 获取所有的汽车价格信息,并存储在一个列表里
    price_list = soup.find_all(\'div\', attrs={\'class\': \'info--price\'})

    #建立列表
    all_Price=[]
    #遍历所有汽车价格信息的列表将其转化为16进制数字后放入新的列表中
    for price in  price_list:
        str = price.get_text().replace("\\n", "")
        Zu_list=[]
        #将每个汽车的价格拆封,然后一个个进行节码
        #例如“¥.-起”拆分成“¥”、“.”、“-”、“起”然后逐个节码
        for i in range(len(str)-1):
            decode_num = ord(str[i])
            # 转成16进制
            priceBaser64_Str = hex(decode_num)
            find_result=find_font(priceBaser64_Str)
            #合并解码后的阿拉伯数字得到真正的价格数字
            Zu_list.append(find_result)
        #类型转化,放入新的列表中
        all_Price.append("".join(Zu_list))
    print(all_Price)

    # 设置表头
    for i in range(0,len(sheetHeaders)):
        worksheet.write(0, i, sheetHeaders[i])

    # 通过len()方法得到汽车信息个数并进行遍历
    for i in range(len(name_list)):
        # 在第i行第1列写入第i辆汽车的名称
        worksheet.write(i + 1, 0, name_list[i].get_text().replace("\\n", ""))
        # 在第i行第2列写入第i辆汽车的描述信息
        worksheet.write(i + 1, 1, describe_list[i].get_text())
        # 在第i行第3列写入第i辆汽车的价格信息
        worksheet.write(i + 1, 2, all_Price[i])

    # 数据写入完毕后将表格关闭
    workbook.close()

if __name__ == \'__main__\':
    sheetHeaders = ["汽车名称","描述信息","价格信息"]
    html = crawler()
    parse_one_page(html.text)
    writer_xml(html,sheetHeaders)
五、注意事项(可能出现的错误)
由于每次都需要重新导出xml文件并对其进行解析,因此建议使用者在对所有需要导出的文件命名时采用“随机码”或“时间”的方式对其进行命名,或则在运行前删除代码存放目录下所有之前导出的文件,否则重新运行会因为旧的xml无法被覆盖而导致解析出来的的是旧的对应关系,出现实际解码后的数据错误。
以上是关于58同城二手车数据爬虫——数字加密解码(Python原创)的主要内容,如果未能解决你的问题,请参考以下文章