centos7---LVM根分区扩容
Posted ordinaryRoadX
tags:
篇首语:本文由小常识网(cha138.com)小编为大家整理,主要介绍了centos7---LVM根分区扩容相关的知识,希望对你有一定的参考价值。
第一季 LVM概念
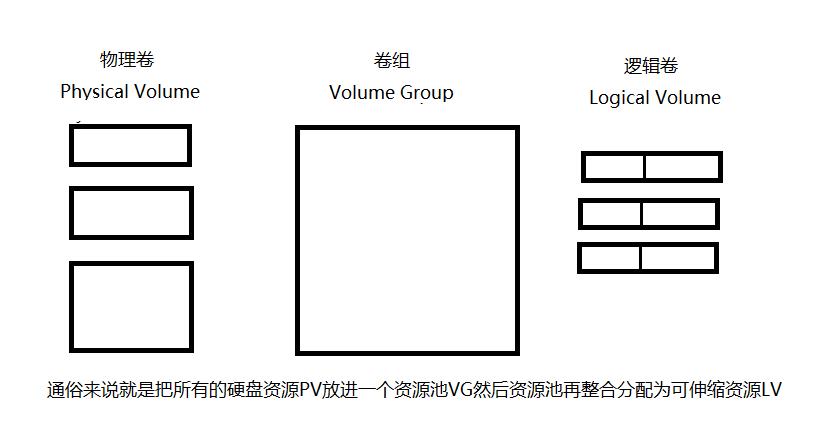
逻辑卷管理LogicalVolumeManager(LVM):利用Linux内核的device-mapper来实现存储系统的虚拟化.
物理卷PhysicalVolume(PV):可以在上面建立卷组的媒介,可以是硬盘分区,也可以是硬盘本身或者回环文件(loopbackfile).物理卷包括一个特殊的header,其余部分被切割为一块块物理区域(physical extents).
卷组VolumeGroup(VG):将一组物理卷收集为一个管理单元.
逻辑卷LogicalVolume(LV):虚拟分区,由物理区域(PhysicalExtents)组成.逻辑卷即是挂载在目录上的卷.
物理区域PhysicalExtent(PE):硬盘可供指派给逻辑卷的最小单位(通常为4MB).

LVM扩容流程:创建一个物理分区-->将这个物理分区转换为物理卷PV-->把这个物理卷添加到要扩展的卷组中VG-->然后用extend命令扩展此卷组中的逻辑卷LVM.
第二季 LVM根分区扩容
1、当前版本
[root@k3s19-db ~]# cat /etc/redhat-release
CentOS Linux release 7.9.2009 (Core)
[root@k3s19-db ~]# uname -r
5.12.9-1.el7.elrepo.x86_64
2、查看分区信息
[root@k3s19-db ~]# df -TH
文件系统                类型      容量  已用  可用 已用% 挂载点
devtmpfs                devtmpfs  8.4G     0  8.4G    0% /dev
tmpfs                   tmpfs     8.4G     0  8.4G    0% /dev/shm
tmpfs                   tmpfs     8.4G  9.1M  8.4G    1% /run
tmpfs                   tmpfs     8.4G     0  8.4G    0% /sys/fs/cgroup

/dev/mapper/centos-root xfs        35G  4.7G   30G   14% /

/dev/vda1               xfs       207M  193M   15M   94% /boot
tmpfs                   tmpfs     1.7G     0  1.7G    0% /run/user/0
pvdisplay #查看物理卷
vgdisplay #查看卷组
lvdisplay #查看逻辑卷
[root@k3s19-db ~]# pvs
 PV         VG     Fmt  Attr PSize  PFree
 /dev/vda2  centos lvm2 a--  39.80g    0

[root@k3s19-db ~]# vgs
 VG     #PV #LV #SN Attr   VSize  VFree
 centos   1   2   0 wz--n- 39.80g    0

[root@k3s19-db ~]# lvs
 LV   VG     Attr       LSize  Pool Origin Data%  Meta%  Move Log Cpy%Sync Convert
 root centos -wi-ao---- 31.80g
 swap centos -wi-ao----  8.00g

[root@k3s19-db ~]# lsblk
NAME            MAJ:MIN RM  SIZE RO TYPE MOUNTPOINT
sr0              11:0    1 1024M  0 rom
fd0               2:0    1    4K  0 disk
vda             252:0    0 1000G  0 disk
├─vda2          252:2    0 39.8G  0 part
│ ├─centos-swap 253:1    0    8G  0 lvm  [SWAP]
│ └─centos-root 253:0    0 31.8G  0 lvm  /
└─vda1          252:1    0  200M  0 part /boot
3、新增一块1T的磁盘用于扩容,格式化(我这里直接把原有硬盘vda调整到1T)
4、把新增磁盘分区,格式调整为LVM
[root@k3s19-db ~]# fdisk /dev/vda
命令(输入 m 获取帮助):n
Partition type:
   p   primary (2 primary, 0 extended, 2 free)
   e   extended
Select (default p): p
分区号 (3,4,默认 3):
起始 扇区 (83886080-2097151999,默认为 83886080):
将使用默认值 83886080
Last 扇区, +扇区 or +size{K,M,G} (83886080-2097151999,默认为 2097151999):
将使用默认值 2097151999
分区 3 已设置为 Linux 类型,大小设为 960 GiB
命令(输入 m 获取帮助):w
5、刷新分区即可看到vda3
[root@k3s19-db ~]# partprobe /dev/vda
[root@k3s19-db ~]# lsblk
NAME            MAJ:MIN RM  SIZE RO TYPE MOUNTPOINT
sr0              11:0    1 1024M  0 rom
fd0               2:0    1    4K  0 disk
vda             252:0    0 1000G  0 disk
├─vda2          252:2    0 39.8G  0 part
│ ├─centos-swap 253:1    0    8G  0 lvm  [SWAP]
│ └─centos-root 253:0    0 31.8G  0 lvm  /
├─vda3          252:3    0  960G  0 part
└─vda1          252:1    0  200M  0 part /boot
6、创建PV
[root@k3s19-db ~]# pvcreate /dev/vda3
  Physical volume "/dev/vda3" successfully created.
[root@k3s19-db ~]# pvs
  PV         VG     Fmt  Attr PSize   PFree
  /dev/vda2  centos lvm2 a--   39.80g      0
  /dev/vda3         lvm2 ---  960.00g 960.00g
7、把PV扩展到VG
[root@k3s19-db ~]# vgextend centos /dev/vda3
  Volume group "centos" successfully extendedvg
[root@k3s19-db ~]# vgs
  VG     #PV #LV #SN Attr   VSize    VFree
  centos   2   2   0 wz--n- <999.80g <960.00g

#查看扩展后的VG,容量增加有没有扩展成功
[root@k3s19-db ~]# vgdisplay
  --- Volume group ---
  VG Name               centos
  System ID
  Format                lvm2
  Metadata Areas        2
  Metadata Sequence No  5
  VG Access             read/write
  VG Status             resizable
  MAX LV                0
  Cur LV                2
  Open LV               2
  Max PV                0
  Cur PV                2
  Act PV                2
  VG Size               <999.80 GiB
  PE Size               4.00 MiB
  Total PE              255948
  Alloc PE / Size       10189 / 39.80 GiB
  Free  PE / Size       245759 / <960.00 GiB
  VG UUID               a6E1TP-mnjA-wy0v-Ddgm-d9kd-9tl9-y5UfHm
8、使用VG扩展LVM资源
[root@k3s19-db ~]# lvs
  LV   VG     Attr       LSize  Pool Origin Data%  Meta%  Move Log Cpy%Sync Convert
  root centos -wi-ao---- 31.80g
  swap centos -wi-ao----  8.00g

[root@k3s19-db ~]# lvdisplay
  --- Logical volume ---
  LV Path                /dev/centos/swap
  LV Name                swap
  VG Name                centos
  LV UUID                UTJ3XB-yvNi-E8HX-GyY2-1swh-e3ZG-YuFBbw
  LV Write Access        read/write
  LV Creation host, time localhost.localdomain, 2021-06-02 16:15:27 +0800
  LV Status              available
  # open                 2
  LV Size                8.00 GiB
  Current LE             2048
  Segments               1
  Allocation             inherit
  Read ahead sectors     auto
  - currently set to     8192
  Block device           253:1
  --- Logical volume ---
  LV Path                /dev/centos/root
  LV Name                root
  VG Name                centos
  LV UUID                94Bdf5-t2wT-RzfO-fprc-ctzv-2Fyd-8OvEXM
  LV Write Access        read/write
  LV Creation host, time localhost.localdomain, 2021-06-02 16:15:27 +0800
  LV Status              available
  # open                 1
  LV Size                31.80 GiB
  Current LE             8141
  Segments               1
  Allocation             inherit
  Read ahead sectors     auto
  - currently set to     8192
  Block device           253:0

[root@k3s19-db ~]# lvextend -l +100%FREE /dev/centos/root
  Size of logical volume centos/root changed from 31.80 GiB
  (8141 extents) to <991.80 GiB (253900 extents).
  Logical volume centos/root successfully resized.
9、刷新根分区
#(XFS格式的磁盘不支持减少空间)
[root@k3s19-db ~]# xfs_growfs /dev/centos/root
meta-data=/dev/mapper/centos-root isize=512    agcount=4, agsize=2084096 blks
         =                       sectsz=512   attr=2, projid32bit=1
         =                       crc=1        finobt=0 spinodes=0
data     =                       bsize=4096   blocks=8336384, imaxpct=25
         =                       sunit=0      swidth=0 blks
naming   =version 2              bsize=4096   ascii-ci=0 ftype=1
log      =internal               bsize=4096   blocks=4070, version=2
         =                       sectsz=512   sunit=0 blks, lazy-count=1
realtime =none                   extsz=4096   blocks=0, rtextents=0
data blocks changed from 8336384 to 259993600

#注:如果文件类型是ext4,格式化命令
resize2fs /dev/centos/root
mkfs.ext4 /dev/centos/root

[root@k3s19-db ~]# df -h
文件系统                 容量  已用  可用 已用% 挂载点
devtmpfs                 7.8G     0  7.8G    0% /dev
tmpfs                    7.8G     0  7.8G    0% /dev/shm
tmpfs                    7.8G  8.7M  7.8G    1% /run
tmpfs                    7.8G     0  7.8G    0% /sys/fs/cgroup

/dev/mapper/centos-root  992G  4.3G  988G    1% /

/dev/vda1                197M  184M   14M   94% /boot
tmpfs                    1.6G     0  1.6G    0% /run/user/0
第三季 开机启动自动挂载
[root@k3s19-db ~]# blkid
[root@k3s19-db ~]# cat /etc/fstab

#
# /etc/fstab
# Created by anaconda on Wed Jun  2 16:15:28 2021
#
# Accessible filesystems, by reference, are maintained under \'/dev/disk\'
# See man pages fstab(5), findfs(8), mount(8) and/or blkid(8) for more info
#
/dev/mapper/centos-root /                       xfs     defaults        0 0
UUID=2c80a0df-5352-4340-9827-05d0cbe4346e /boot xfs     defaults        0 0
/dev/mapper/centos-swap swap                    swap    defaults        0 0
作者:ordinaryRoadX
出处:https://www.cnblogs.com/ordinaryRoadX/p/14864887.html
版权:本作品采用「署名-非商业性使用-相同方式共享 4.0 国际」许可协议进行许可。
以上是关于centos7---LVM根分区扩容的主要内容,如果未能解决你的问题,请参考以下文章