Python脚本实现KVM虚机添加磁盘
Posted 天枢
tags:
篇首语:本文由小常识网(cha138.com)小编为大家整理,主要介绍了Python脚本实现KVM虚机添加磁盘相关的知识,希望对你有一定的参考价值。
Python脚本实现KVM虚机添加磁盘
实现方式:①远程Linux下载到本地 ②本地修改 ③上传到Linux远程并覆盖原文件
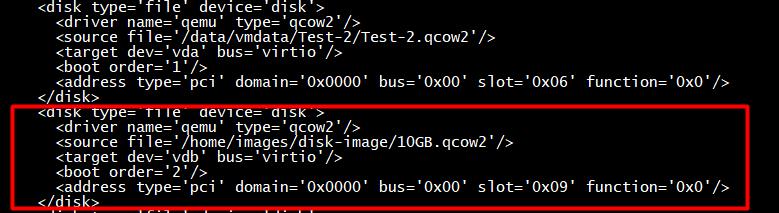
import os
import paramiko
from TSDRM import settings
from lxml import etree
from xml.dom.minidom import parse

ip = \'192.168.1.61\'
username = \'root\'
password = \'******\'
system_tag = \'Linux\'
kvm_name = \'Test-1\'
disk_file = \'/home/images/disk-image/10GB.qcow2\'

try:
    linux_file_path = \'/etc/libvirt/qemu/{0}.xml\'.format(kvm_name)
    file_path = os.path.join(
        os.path.join(
            os.path.join(settings.BASE_DIR, "drm"),
            "upload"
        ),
        "kvmxml"
    )
    local_file_path = file_path + os.sep + "{0}.xml".format(kvm_name)
    ssh = paramiko.Transport((ip, 22))
    ssh.connect(username=username, password=password)
    sftp = paramiko.SFTPClient.from_transport(ssh)
except paramiko.ssh_exception.SSHException as e:
    kvmlog = "连接服务器失败:{0}。".format(e)
else:
    # ①开始下载
    sftp.get(linux_file_path, local_file_path)
    except Exception as e:
      kvmlog = "下载linux脚本文件失败:{0}。".format(e)
    else:
        # ②修改本地xml文件:xml文件内容转成dom
        domtree = parse(local_file_path)
        rootnode = domtree.documentElement

        # 找到磁盘父节点
        devices_node = rootnode.getElementsByTagName("devices")[0]

        # 新建disk节点
        """
        <disk type=\'file\' device=\'disk\'>
            <driver name=\'qemu\' type=\'qcow2\'/>
            <source file=\'/home/images/disk-image/10GB.qcow2\'/>
            <target dev=\'vdb\' bus=\'virtio\'/>
            <boot order=\'2\'/>
            <address type=\'pci\'/>
        </disk>
        """
        config = etree.XML(rootnode.toxml())
        kvm_devices = config.xpath("//devices//disk")
        disk_list = []
        for disk in kvm_devices:
            file = disk.xpath(\'source\')
            if file:
                file = disk.xpath(\'source\')[0].attrib[\'file\']
                device = disk.xpath(\'target\')[0].attrib[\'dev\']
                order = disk.xpath(\'boot\')[0].attrib[\'order\']
                disk_list.append({
                    \'name\': device,
                    \'file\': file,
                    \'order\': order
                })
        """
        disk_list:
        [{\'order\': \'1\', \'name\': \'vda\', \'file\': \'/data/vmdata/Test-4/Test-4.qcow2\'},
        {\'order\': \'2\', \'name\': \'vdb\', \'file\': \'/home/images/disk-image/10GB.qcow2\'},
        {\'order\': \'3\', \'name\': \'vdc\', \'file\': \'/opt/1GB.qcow2\'}]

        """
        count = len(disk_list)
        disk_order = count + 1
        disk_dev = \'\'
        disk_dev_dict = {
            0: \'vda\', 1: \'vdb\', 2: \'vdc\', 3: \'vdd\', 4: \'vde\', 5: \'vdf\', 6: \'vdg\',
            7: \'vdh\', 8: \'vdi\', 9: \'vdj\', 10: \'vdk\', 11: \'vdl\', 12: \'vdm\', 13: \'vdn\'
        }
        # 动态加载order字段属性和dev字段属性,使之与存在的磁盘数据不同
        for i in disk_list:
            if disk_order == i[\'order\']:
                disk_order += 1
            if disk_dev_dict[count] == i[\'name\']:
                disk_dev = disk_dev_dict[count + 1]
            else:
                disk_dev = disk_dev_dict[count]

        disk_node = domtree.createElement("disk")
        disk_node.setAttribute("type", "file")
        disk_node.setAttribute("device", "disk")

        # 新建driver节点
        driver_node = domtree.createElement("driver")
        driver_node.setAttribute("name", "qemu")
        driver_node.setAttribute("type", "qcow2")

        # 新建source节点
        source_node = domtree.createElement("source")
        source_node.setAttribute("file", disk_file)

        # 新建target节点
        target_node = domtree.createElement("target")
        target_node.setAttribute("dev", disk_dev)
        target_node.setAttribute("bus", "virtio")

        # 新建boot节点
        boot_node = domtree.createElement("boot")
        boot_node.setAttribute("order", str(disk_order))

        # 新建address节点
        address_node = domtree.createElement("address")
        address_node.setAttribute("type", "pci")

        # 磁盘节点添加子节点
        disk_node.appendChild(driver_node)
        disk_node.appendChild(source_node)
        disk_node.appendChild(target_node)
        disk_node.appendChild(boot_node)
        disk_node.appendChild(address_node)

        # 父节点添加子节点:磁盘节点
        devices_node.appendChild(disk_node)

        # 重新覆盖写入本地文件
        try:
            with open(local_file_path, \'w\') as f:
                domtree.writexml(f, addindent=\' \', encoding=\'utf-8\')
        except Exception as e:
            kvmlog = "修改文件失败:{0}。".format(e)
        else:
            # ③上传到服务器
            try:
                ssh = paramiko.Transport((ip, 22))
                ssh.connect(username=username, password=password)
                sftp = paramiko.SFTPClient.from_transport(ssh)
            except paramiko.ssh_exception.SSHException as e:
                kvmlog = "连接服务器失败:{0}。".format(e)
            else:
                try:
                    # 开始上传
                    sftp.put(local_file_path, linux_file_path)
                except Exception as e:
                    kvmlog = "上传linux脚本文件失败:{0}。".format(e)
                else:
                    log = \'上传成功\'
查看:
以上是关于Python脚本实现KVM虚机添加磁盘的主要内容,如果未能解决你的问题,请参考以下文章