26.Qt Quick QML-RotationAnimationPathAnimationSmoothedAnimationBehaviorPauseAnimationSequential(代码片段
Posted NQian
tags:
篇首语:本文由小常识网(cha138.com)小编为大家整理,主要介绍了26.Qt Quick QML-RotationAnimationPathAnimationSmoothedAnimationBehaviorPauseAnimationSequential(代码片段相关的知识,希望对你有一定的参考价值。
1.RotationAnimation
RotationAnimation也是继承于PropertyAnimation组件,但是它有点特殊,它只需要指定taget目标对象,并且不需要指定property,因为rotation就是要绑定的属性.并且它还多了个direction属性:
- direction : enumeration,设置旋转的方向,取值有:
- RotationAnimation.Numerical (默认值) - 数值旋转,通过to-from得出要旋转的度数,然后进行旋转,比如from为10,to为100,那么旋转就是90°
- RotationAnimation.Clockwise - 在两个度数之间进行顺时针旋转,比如from为10,to为100,那么顺旋转就是90°
- RotationAnimation.Counterclockwise - 在两个度数之间进行逆时针旋转,比如from为10,to为100,那么逆旋转就是90°
- RotationAnimation.Shortest - 沿最短路径的方向旋转。比如from为10,to为350,那么将逆时针旋转20°
示例如下所示:
  property var rotationModel: [
        ["#00FF00", RotationAnimation.Numerical],
        ["#FF0000", RotationAnimation.Clockwise],
        ["#0000FF", RotationAnimation.Counterclockwise],
        ["#00FFFF", RotationAnimation.Shortest],
    ]
    property var animations: new Array(0)

    MouseArea {
        id: area
        anchors.fill: parent
        onPressed: {
            for (var i in animations) {
                console.log(animations[i].direction)
                animations[i].start();
            }
        }
    }

    Row {
        spacing: 10
        Repeater {
            model: rotationModel.length
            Rectangle {
                id: rect
                width: 100
                height: 100
                radius: width / 2
                color: rotationModel[index][0]
                Text {
                    anchors.centerIn: parent
                    text: "model"+ index.toString()
                    color: "white"
                    font.pixelSize: 18
                    font.bold: true
                }
                RotationAnimation {
                    running: true
                    duration: 500
                    target: rect
                    direction: rotationModel[index][1]
                    from :  10
                    to :  350
                    Component.onCompleted: animations[index] = this
                }
            }
        }
    }
效果如下所示:

2.PathAnimation
PathAnimation继承于Animation组件,用来实现一个路径动画.
它的属性如下所示:
- anchorPoint : point,设置目标瞄点,默认为目标的左上角(其0,0点)将定位到(或跟随)路径。比如10x10的Rectangle,那么anchorPoint为Qt.point(5, 5)时则表示始终让物体中心处于路径上
- duration : int,持续时间
- easing.type : enumeration,设置动画的缓和曲线.默认值为Easing.Linear(线性过程),比如我们设置为Easing.InQuad时,动画效果就是从慢到快的过程.
- easing.amplitude : real,设置缓和曲线的振幅,默认值为1.0,值越大振幅越大,仅当easing.type为Easing.InBounce, Easing.OutBounce, Easing.InOutBounce, Easing.OutInBounce, Easing.InElastic, Easing.OutElastic, Easing.InOutElastic or Easing.OutInElastic才生效
- orientation : enumeration,设置对象在路径上的方向,取值有以下几种:
- PathAnimation.Fixed (default) - 在动画中只是移动物体,并不旋转物体
- PathAnimation.RightFirst - 始终让目标的右侧在前面沿着路径移动
- PathAnimation.LeftFirst - 始终让目标的左侧在前面沿着路径移动
- PathAnimation.BottomFirst - 始终让目标的底部在前面沿着路径移动
- PathAnimation.TopFirst - 始终让目标的顶部在前面沿着路径移动
- endRotation : real,设置目标移动路径结束后的旋转角度,如果orientationEntryDuration未设置,物体则会直接跳转到该值,否则就以动画的形式结束
- orientationEntryDuration : real,设置启动时的旋转过渡时间(毫秒单位),比如启动动画时,如果当前目标方向和orientation值方向不一致,则需要一个过渡时间才行
- orientationExitDuration : real,设置结束时的旋转过渡时间(毫秒单位),如果endRotation已设置,那么就会有个过渡时间,让物体最终旋转到endRotation角度.
- target : Item ,设置动画的目标对象
- path : Path,设置动画的路径。
接下来我们便来讲解Path路径
3.Path
一个Path可以由下面多个Path段组成:
- PathLine : 由一个坐标指定的直线路径
- PathPolyline : 由一个path坐标列表指定的多段路径
- PathQuad : 由一个控制点生成的二次贝塞尔曲线路径
- PathCubic : 由两个控制点生成的三次贝塞尔曲线路径
- PathArc : 由结束坐标,以及一个radiusX和radiusY半径实现的一个圆弧(顺时针绘画)
- PathAngleArc : 由中心点、半径和起始角度startAngle、旋转角度sweepAngle指定的圆弧。
- PathCurve :由一个坐标点生成的curve曲线路径(通常需要配合多个PathCurve才行)
- PathSvg : 由SVG路径字符串实现的路径。你可以用它创建线条, 曲线, 弧形等等
显示一个Path路径
我们可以通过设置context2D的path属性,来显示出我们绘画的Path路径,不然都不知道绘制的路径到底对不对,真是"半夜吃黄瓜-摸不着头尾"
我们以PathArc为例,示例如下所示:
Canvas {
            id: canvas
            anchors.fill: parent
            antialiasing: true

            onPaint: {
                var context = canvas.getContext("2d")
                context.clearRect(0, 0, width, height)
                context.strokeStyle = "black"
                context.path = path
                context.stroke()
            }
        }

        Path {
            id: path
            startX: 100; startY: 100

            PathArc {
              x: 100; y: 140
              radiusX: 100; radiusY: 50
              useLargeArc: true
              xAxisRotation: 30
            }
}
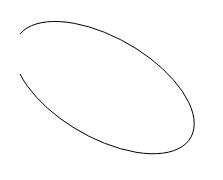
效果如下所示:

这里我们设置弧线的起始位置为(100,100),终点位置为(100,140).
它的useLargeArc为true,表示使用角度大的那个圆弧,如果设置为false,则将会使用小的那个圆弧
它的xAxisRotation表示x水平方向是否倾斜,我们这里按顺时针倾斜了30°,该值仅在x和y半径不同时有用,这意味着圆弧是椭圆形的
接下来我们便来学习PathSvg路径.
4.PathSvg
PathSvg支持的命令如下所示:
- M = moveto,移动画笔到指定点处(只是移动位置,不画线),写法:M x y
- L = lineto,从当前点绘制一条直线到目的点,写法:L x y
- H = horizontal lineto,绘制一条平行线,写法:H x
- V = vertical lineto,绘制一条垂直线,写法:V y
- C = curveto,绘制一条三次贝塞尔曲线,写法:C x1 y1, x2 y2, x y (x和y为终点,其它两个为控制点)
- S = smooth curveto,用来写在C命令后面时来延长贝塞尔曲线,当然也可以跟在S命令后面,写法:S x1 y1, x y(x1和y1是控制点,x和y是终点)
- Q = quadratic Bézier curve,绘制一条二次贝塞尔曲线,写法:Q x1 y1, x y
- T = smooth quadratic Bézier curveto,用来写在Q命令后面时来延长贝塞尔曲线,当然也可以跟在T命令后面,写法:T x y
- A = elliptical Arc,绘制一条圆弧,写法:A rx ry x-axis-rotation large-arc-flag sweep-flag x y
- rx、ry:表示圆弧的半径
- x-axis-rotation: 表示x水平方向是否倾斜,比如设置为-45,则圆弧会逆时针倾斜45°,注意:该值仅在x和y半径不同时有用,这意味着圆弧是椭圆形的
- large-arc-flag:设置为0表示绘制小圆弧,为1表示大圆弧
- sweep-flag: 表示弧线的方向,0表示从起点到终点沿逆时针画弧,1表示从起点到终点沿顺时针画弧
- x、y:表示绘制的终点位置
- Z = closepath,关闭路径,将会从当前点绘制一条直线到开始点.
5.PathAnimation使用PathSvg示例
Canvas {
            id: canvas
            anchors.fill: parent
            antialiasing: true
            onPaint: {
                var context = getContext("2d")
                context.clearRect(0, 0, width, height)
                context.strokeStyle = "red"
                context.path = pathAnim.path
                context.stroke()
            }
    }

    PathAnimation {
        id: pathAnim
        running: true
        loops: Animation.Infinite
        duration: 5000
        easing.type: Easing.InQuad
        target: car
        orientation: PathAnimation.RightFirst
        anchorPoint: Qt.point(car.width/2, car.height)
        path: Path {
            startX: 100; startY: 100

            PathSvg {
               path: "M100 100 C600 50, 50 300, 550 250"
            }
        }
    }

    Item {
        id: car
        x: 25; y: 25
        width: 80; height: 38

        Canvas {
            id: canvas2
            anchors.fill: parent
            antialiasing: true
            onPaint: {
                var context = getContext("2d")
                context.clearRect(0, 0, width, height)
                context.fillStyle = "blue"
                context.fillRect(0,0,width,height-10)

                context.fillStyle = "yellow"
                context.ellipse(10,height-20,20,20)

                context.ellipse(width-30,height-20,20,20)
                context.fill()
                console.log(width,height)
            }
        }

        Text {
            anchors.centerIn: parent
            text: "小车"
            color: "white"
        }
    }
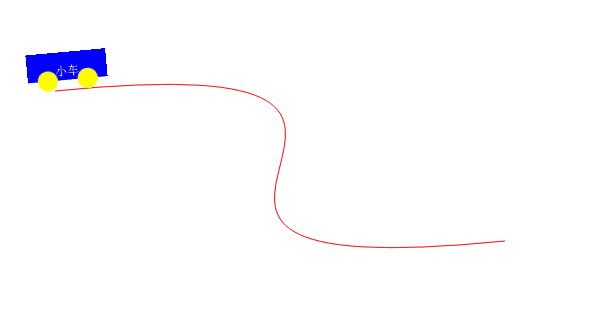
效果如下所示:

6.SmoothedAnimation
SmoothedAnimation继承于NumberAnimation组件,它比NumberAnimation更加人性化,不仅可以设置duration时间,还可以设置滑动速率。
并且SmoothedAnimation的easing.type默认值为Easing.InOutQuad(慢->快->慢).
SmoothedAnimation如果同时指定了velocity速度和duration持续时间,则会选择导致动画速度最快的那个所需时间.
例如:
- 如果velocity速度设置为200,如果duration设置为5000.
- 假如此时需要将一个物体从0位移到800,那么此时将会选择velocity速度的时间,因为只需要4秒时间.
- 假如此时需要将一个物体从0位移到2000,那么此时将会选择duration时间,因为只需要5秒时间.
它的属性如下所示:
- duration : int,持续时间,默认值为-1.表示禁用持续时间值。
- reversingMode : enumeration,设置如果动画方向被突然被反转后的行为(比如当前动画正在往左边移动时,突然用户让动画往右边移动),取值如下所示:
- SmoothedAnimation.Eased(默认)-动画将按照速度平滑减速到0后,开始反转方向加速
- SmoothedAnimation.Immediate-动画将立即以0的速度开始反向加速
- SmoothedAnimation.Sync-立即将属性设置为目标值
- velocity : real,设置速度,默认值为200(200像素点每秒),如果将此设置为-1(默认值)将禁用速度值。
示例如下所示:
    MouseArea {
            anchors.fill: parent
            hoverEnabled: true
            onPositionChanged: {

                animation1.to = mouseX - rect.width/2
                animation2.to = mouseY - rect.height/2
                animation1.restart()
                animation2.restart()
            }
        }

    Rectangle {
        id: rect
        color: "red"
        width: 60; height: 60
        radius: width/2

        SmoothedAnimation on x{
            id: animation1
            velocity: 100
            reversingMode: SmoothedAnimation.Immediate
        }
        SmoothedAnimation on y{
            id: animation2
            velocity: 100
            reversingMode: SmoothedAnimation.Immediate
        }

    }
只要当我们鼠标位置发生改变就会启动SmoothedAnimation动画进行平滑移动,但是我们这样写,代码显得有点繁琐,可以使用Behavior组件来代替设置from和to的行为来节省代码量
接下来我们来给大家讲讲Behavior.
7.Behavior
Behavior用来让动画绑定到对象一个属性上,Behavior中文翻译就是行为的意思,所以当绑定属性发生改变时,就会自动触发Behavior行为,Behavior就会自动设置动画的to属性,并启动动画.
Behavior只有两个属性animation和enabled, animation保存着要触发行为的哪个动画,enabled表示是否使能行为,默认为true.
Behavior示例如下所示:
MouseArea {
        anchors.fill: parent
        hoverEnabled: true
        onPositionChanged: {
            rect.x = mouseX - rect.width/2
            rect.y = mouseY - rect.height/2
        }
    }

Rectangle {
    id: rect
    color: "red"
    width: 60; height: 60
    radius: width/2

    Behavior on x {
        SmoothedAnimation {
            velocity: 100
            reversingMode: SmoothedAnimation.Immediate
        }
    }
    Behavior on y {
        SmoothedAnimation {
            velocity: 100
            reversingMode: SmoothedAnimation.Immediate
        }
    }

}
这里我们使用Behavior分别为属性绑定了SmoothedAnimation动画,然后我们只需要改变x,y属性,就会自动触发行为,设置我们改变的值到动画的to属性中,并启动动画
8.PauseAnimation
PauseAnimation顾名思义就是暂停动画的意思,只有一个duration属性,用来设置该期间内什么都不做.
并且只能在SequentialAnimation动画中使用,接下来我们便来学习SequentialAnimation和ParallelAnimation,并在代码中使用它
9.SequentialAnimation和ParallelAnimation
SequentialAnimation用来将多个动画串行地执行下去.而ParallelAnimation是用来将多个动画并行地执行下去.
并且SequentialAnimation和ParallelAnimation还可以互相嵌套.
需要注意的是:
- SequentialAnimation或ParallelAnimation中定义的动画不能单独启动和停止;必须作为一个组来启动和停止。
- 并且SequentialAnimation和ParallelAnimation的running默认为false.如果要想加载组件后立即启动的话,我们需要手动设置(不需要全部设置,只需要设置最顶层动画的running值即可)
示例如下所示:
Window{
    id: window
    width: 480
    height: 320
    visible: true

    SequentialAnimation {
        SequentialAnimation {
            ParallelAnimation {
                NumberAnimation {
                    target: ball1
                    property: "y"
                    from: 20
                    to: height - ball1.height - 20
                    easing.type: Easing.OutBounce;
                    duration: 1200
                }
                NumberAnimation {
                    target: ball2
                    property: "y"
                    from: 20
                    to: height - ball2.height - 20
                    easing.type: Easing.OutBounce;
                    duration: 800
                }
            }
        }
        PauseAnimation { duration: 500 }
        running: true
        loops: Animation.Infinite
    }

    Rectangle {
        id: ball1
        width: 40; height: 40;
        radius: 20
        color: "blue"
        x: 30
    }
    Rectangle {
        id: ball2
        width: 60; height: 60;
        radius: 30
        color: "red"
        x: 200
    }
}
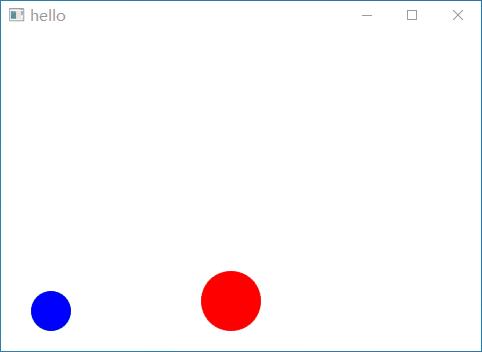
效果如下所示:

如上图所示,可以看到每当小球落到地后,就会启动PauseAnimation暂停动画,等待500ms
以上是关于26.Qt Quick QML-RotationAnimationPathAnimationSmoothedAnimationBehaviorPauseAnimationSequential(代码片段的主要内容,如果未能解决你的问题,请参考以下文章