WordPress安装篇:YUM方式安装LNMP并部署WordPress
Posted 云引未来
tags:
篇首语:本文由小常识网(cha138.com)小编为大家整理,主要介绍了WordPress安装篇:YUM方式安装LNMP并部署WordPress相关的知识,希望对你有一定的参考价值。
YUM方式安装软件的优点就是简单、方便、快捷,本文介绍在Linux上如何使用YUM方式快速安装LNMP并部署WordPress。使用Linux CentOS 7.9 + nginx 1.18 + mysql 8.0.23 + php 7.4.19来搭建WordPress的运行环境。
本文的操作在华为云ECS、阿里云ECS以及VMware WorkStation虚拟化软件上验证过,成功部署WordPress 5.7。

LNMP是什么?
LNMP是指一组来运行动态网站或者服务器的开源软件名称的首字母缩写。L指Linux,N指Nginx,M一般指MySQL,也可以指MariaDB,P一般指PHP,也可以指Perl或Python。LNMP典型的代表就是:Linux + Nginx + MySQL + PHP这种网站服务器架构,本文中的LNMP就是指这种典型的网站服务器架构。
为什么选择LNMP部署WordPress?
LNMP架构主要有以下几方面的优势:
- Linux、Nginx、MySQL都是开源软件,可以免费使用,降低部署网站的成本。
- Linux Server比Windows Server占用更少的系统资源,稳定性更好,安全性相对更高一些。
- Nginx相比Apache占用更少的系统资源,支持高并发,支持四到七层的负载均衡,在构建大型的站点时,Nginx的优势明显。
- WordPress是使用PHP语言开发的,必须要在支持PHP的环境中才能运行。
环境信息
| 系统、软件名称 | 版本 | 官网下载地址 |
|---|---|---|
| Linux | CentOS 7.9 | CentOS 7.9 |
| Nginx | Nginx 1.18.0 | Nginx 1.18.0 |
| MySQL | MySQL 8.0.23 | MySQL 8.0.23 |
| PHP | PHP 7.4.19 | PHP 7.4.19 |
| WordPress | WordPress 5.7 | 中文版 英文版 |
操作步骤
在Linux上使用YUM方式快速安装LNMP并部署WordPress的安装流程如下所示:
①安装与配置MySQL → ②安装与配置NGINX → ③安装与配置PHP → ④安装WordPress前的准备 → ⑤安装WordPress
步骤一:安装与配置MySQL
1、卸载MySQL和MariaDB
使用SecureCRT、Xshell等工具通过SSH方式远程连接到CentOS服务器,如果您的系统中已经安装了MySQL或者MariaDB,请卸载MySQL和MariaDB数据库后再安装MySQL8.0,避免导致安装MySQL8.0不成功。命令如下:
rpm -qa | grep mysql*              # 查询是否安装了mysql
rpm -e --nodeps mysql*             # 卸载mysql
rpm -qa | grep mariadb*            # 查询是否安装了MariaDB
rpm -e --nodeps mariadb-libs-5.5.68-1.el7.x86_64	 # 卸载MariaDB
2、添加MySQL的Yum软件仓库
yum -y install https://dev.mysql.com/get/mysql80-community-release-el7-3.noarch.rpm
3、安装MySQL
安装MySQL-community-server-8.0.23需要下载的软件包一共573M左右,安装完成后输出信息如下:
yum -y install mysql-community-server-8.0.23-1.el7
4、启动MySQL服务
启动MySQL服务
systemctl start mysqld
检查MySQL服务的状态,当状态为active (running) 时说明mysql服务正常启动了。
[root@Linux ~]# systemctl status
mysqldmysqld.service - MySQL Server
  Loaded: loaded (/usr/lib/systemd/system/mysqld.service; enabled; vendor preset: disabled)
  Active: active (running) since Mon 2021-05-17 22:26:33 EDT; 16s ago
   Docs: man:mysqld(8)
      http://dev.mysql.com/doc/refman/en/using-systemd.html
  Process: 17957 ExecStartPre=/usr/bin/mysqld_pre_systemd (code=exited, status=0/SUCCESS)  Main PID: 18031 (mysqld)
 Status: "Server is operational"
 CGroup: /system.slice/mysqld.service
     └─18031 /usr/sbin/mysqld

May 17 22:26:28 Linux systemd[1]: Starting MySQL Server...
May 17 22:26:33 Linux systemd[1]: Started MySQL Server.
设置mysql服务开机时自动启动
systemctl enable mysqld
5、配置数据库
5.1 获取MySQL数据库root用户的初始密码
root用户的初始密码保存在/var/log/mysqld.log日志文件中(请保存好此密码,登录MySQL时需要使用),root用户的初始密码为:xs7,s>:UsfCH
[root@Linux ~]# grep \'temporary password\' /var/log/mysqld.log2021-05-18T02:26:30.173361Z 6 [Note] [MY-010454] [Server] A temporary password is generated for root@localhost: xs7,s>:UsfCH
5.2更改root密码
使用mysql -uroot -p命令连接数据库
[root@Linux ~]# mysql -uroot -pEnter password:    #输入初始密码
Welcome to the MySQL monitor.  Commands end with ; or \\g.
Your MySQL connection id is 8
Server version: 8.0.23
Copyright (c) 2000, 2021, Oracle and/or its affiliates.
Oracle is a registered trademark of Oracle Corporation and/or its
affiliates. Other names may be trademarks of their respective
owners.
Type \'help;\' or \'\\h\' for help. Type \'\\c\' to clear the current input statement.
mysql>
更改root密码,建议密码由大小写字母、数字和特殊符号组成16位或以上,将Your@pass2021替换为您的数据库密码,命令如下:
mysql> ALTER USER root@\'localhost\' IDENTIFIED BY \' Your@pass2021\';
Query OK, 0 rows affected (0.01 sec)
5.3 创建名称为“wordpress”的数据库,供WordPress程序连接使用
mysql> CREATE DATABASE wordpress;Query OK, 1 row affected (0.01 sec)
查看wordpress数据库是否创建成功
mysql> show databases;
+--------------------+
| Database           |
+--------------------+
| information_schema |
| mysql              |
| performance_schema |
| sys                |
| wordpress          |
+--------------------+
5 rows in set (0.00 sec)
5.4 创建数据库用户
创建名称为wordpress(用户名称可自定义)的数据库用户,wordpress程序连接Mysql数据库时使用wordpress这个用户。
mysql> CREATE USER wordpress@\'localhost\' IDENTIFIED BY \'Your@pass2021\';
Query OK, 0 rows affected (0.01 sec)
授权wordpress用户对wordpress数据库具有所有的操作权限
mysql> GRANT ALL privileges ON wordpress.* TO wordpress@\'localhost\';
Query OK, 0 rows affected (0.01 sec)
设置wordpress用户的密码永不过期
mysql> ALTER USER \'wordpress\'@\'localhost\' PASSWORD EXPIRE NEVER;
Query OK, 0 rows affected (0.01 sec)
刷新权限
mysql> flush privileges;Query OK, 0 rows affected (0.00 sec)
退出MySQL
mysql> exit
Bye
[root@Linux ~]#
步骤二:安装与配置Nginx
CentOS默认没有安装Nginx的软件仓库,需要安装Nginx软件仓库才能使用Yum安装Nginx。Nginx默认的安装路径为:/usr/share/nginx/html,配置文件的默认路径为:/etc/nginx
1、安装Nginx软件仓库
rpm -Uvh http://nginx.org/packages/centos/7/noarch/RPMS/nginx-release-centos-7-0.el7.ngx.noarch.rpm
2、安装Nginx1.18
yum -y install nginx-1.18.0-2.el7.ngx
3、启动Nginx
systemctl start nginx
查看Nginx运行状态
[root@Linux ~]# systemctl status nginx
● nginx.service - nginx - high performance web server
Loaded: loaded (/usr/lib/systemd/system/nginx.service; disabled; vendor preset: disabled)   Active: active (running) since Mon 2021-05-17 23:00:43 EDT; 12s ago
   Docs: http://nginx.org/en/docs/
Process: 18176 ExecStart=/usr/sbin/nginx -c /etc/nginx/nginx.conf (code=exited, status=0/SUCCESS)
Main PID: 18177 (nginx)
CGroup: /system.slice/nginx.service
    ├─18177 nginx: master process /usr/sbin/nginx -c /etc/nginx/nginx.conf                   └─18178 nginx: worker process

May 17 23:00:43 Linux systemd[1]: Starting nginx - high performance web server...
May 17 23:00:43 Linux systemd[1]: Started nginx - high performance web server.
设置Nginx开机自动启动
[root@Linux ~]# systemctl enable nginx
Created symlink from /etc/systemd/system/multi-user.target.wants/nginx.service to /usr/lib/systemd/system/nginx.service.
4、验证Nginx是否安装成功
验证前需要Linux防火墙放行80端口,如果服务器是华为云ECS、阿里云ECS,在安全组内添加规则放行80端口或者http协议即可。
Linux防火墙放行80端口
firewall-cmd --add-port=80/tcp --zone=public --permanent
重新加载防火墙规则
firewall-cmd --reload
在浏览器地址栏输入Linux服务器的IP地址,看到 Welcome to ningx! 说明Nginx安装成功。
步骤三:安装与配置PHP
CentOS默认的软件仓库中没有PHP安装包,需要添加EPEL软件仓库和remi软件仓库后才能安装PHP及PHP的相关扩展程序。
1、安装软件仓库
安装EPEL软件仓库
yum -y install epel-release
安装REMI软件仓库
yum -y install http://rpms.remirepo.net/enterprise/remi-release-7.rpm
2、安装PHP及相关扩展模块
yum -y install php74-php php74-php-common php74-php-fpm php74-php-mysqlnd php74-php-pdo php74-php-cli php74-php-json php74-php-mbstring php74-php-sodium php74-php-pecl-imagick php74-php-xml php74-php-gd php74-php-pecl-mcrypt php74-php-pecl-zip
3、验证是否成功安装
查看PHP版本信息
[root@Linux ~]# php74 -v
PHP 7.4.19 (cli) (built: May  4 2021 11:06:37) ( NTS )
Copyright (c) The PHP Group
Zend Engine v3.4.0, Copyright (c) Zend Technologies
启动PHP
systemctl start php74-php-fpm
查看PHP的运行状态,ACTIVE状态为 active(running)说明PHP启动成功
[root@Linux ~]# systemctl status php74-php-fpm
● php74-php-fpm.service - The PHP FastCGI Process Manager
Loaded: loaded (/usr/lib/systemd/system/php74-php-fpm.service; disabled; vendor preset: disabled)
Active: active (running) since Tue 2021-05-18 00:00:31 EDT; 10s ago
Main PID: 18587 (php-fpm)
Status: "Processes active: 0, idle: 5, Requests: 0, slow: 0, Traffic: 0req/sec"
CGroup: /system.slice/php74-php-fpm.service
├─18587 php-fpm: master process (/etc/opt/remi/php74/php-fpm.conf)
├─18588 php-fpm: pool www
├─18589 php-fpm: pool www
├─18590 php-fpm: pool www
├─18591 php-fpm: pool www
└─18592 php-fpm: pool www May 18 00:00:31

Linux systemd[1]: Starting The PHP FastCGI Process Manager...May 18 00:00:31
Linux systemd[1]: Started The PHP FastCGI Process Manager.
设置PHP开机时自动启动
systemctl enable php74-php-fpm
4、配置PHP
4.1 修改PHP的配置文件“www.conf”
cd /etc/opt/remi/php74/php-fpm.d/		#进入PHP配置目录
cp -p www.conf www.conf.bak			    #备份配置文件
vim /etc/opt/remi/php74/php-fpm.d/www.conf	  #编辑配置文件www.conf
开启vim显示行号的功能,在非编辑状态输入 :set number 回车,输入:24 回车
第24行user = apache 修改为user = nginx,26行的group = apache修改为group = nginx ,修改后保存退出。
注意:如果www.conf配置文件的user与group参数不修改为nginx的话,在WordPress发布文章的时候因为权限问题可能导致无法上传图片,出现“无法将上传的文件移动至wp-content/uploads”的错误提示。
4.2 重启PHP
systemctl restart php74-php-fpm
查看PHP的运行状态,确认运行正常
systemctl status php74-php-fpm
步骤四:安装WordPress前的准备
1、下载wordpress
新建software与wordpress目录
mkdir /opt/softwaremkdir -p /usr/data/wordpresscd /opt/software #进入software目录
下载wordpress5.7到 /opt/software目录
wget -O wordpress5.7.tar.gz https://cn.wordpress.org/wordpress-5.7-zh_CN.tar.gz
解压缩wordpress安装包
tar -zxvf wordpress5.7.tar.gz
将解压后的wordpress目录下的所有子目录和文件都复制到 /usr/data/ wordpress/目录下
cp -R /opt/software/wordpress/* /usr/data/wordpress/
将/usr/data/wordpress目录及子目录下的所有文件的“拥有者”和“拥有者组”修改为nginx,命令如下:
chown -R nginx:nginx /usr/data/wordpress
将/usr/data/wordpress目录及所有子目录的权限设置为755, wordpress目录下的所有文件的权限统一设置为644,命令如下:
find /usr/data/wordpress -type d -exec chmod 755 {} \\;
find /usr/data/wordpress -type f -exec chmod 644 {} \\;
2、配置Nginx
编辑Nginx的配置文件
vim /etc/nginx/conf.d/default.conf
default.conf的默认配置如下:
server {
    listen       80;
    server_name  localhost;

    #charset koi8-r;
    #access_log  /var/log/nginx/host.access.log  main;

    location / {
        root   /usr/share/nginx/html;
        index  index.html index.htm;
    }

    #error_page  404              /404.html;

    # redirect server error pages to the static page /50x.html
    #
    error_page   500 502 503 504  /50x.html;
    location = /50x.html {
        root   /usr/share/nginx/html;
    }

    # proxy the PHP scripts to Apache listening on 127.0.0.1:80
    #
    #location ~ \\.php$ {
    #    proxy_pass   http://127.0.0.1;
    #}

    # pass the PHP scripts to FastCGI server listening on 127.0.0.1:9000
    #
    #location ~ \\.php$ {
    #    root           html;
    #    fastcgi_pass   127.0.0.1:9000;
    #    fastcgi_index  index.php;
    #    fastcgi_param  SCRIPT_FILENAME  /scripts$fastcgi_script_name;
    #    include        fastcgi_params;
	#}

    # deny access to .htaccess files, if Apache\'s document root
    # concurs with nginx\'s one
    #
    #location ~ /\\.ht {
    #    deny  all;
    #}
}
开启vim显示行号的功能,在非编辑状态输入 :set number 回车(set前面有一个冒号,不要漏掉)。
第9行Nginx的root目录修改为 /usr/data/wordpress 。此目录与wordpress程序所在的目录必须一致,否则无法成功配置wordpress,修改为你自己的wordpress目录。
第10行 添加index.php
删除第30至36行前面的#号注释符
第31行的root目录修改为 /usr/data/wordpress
第34行的/scripts$fastcgi_script_name; 改为 $document_root$fastcgi_script_name;
default.conf修改后的内容如下:
server {
    listen       80;
    server_name  localhost;

    #charset koi8-r;
    #access_log  /var/log/nginx/host.access.log  main;

    location / {
        root   /usr/data/wordpress;
        index  index.php index.html index.htm;
    }

    #error_page  404              /404.html;

    # redirect server error pages to the static page /50x.html
    #
    error_page   500 502 503 504  /50x.html;
    location = /50x.html {
        root   /usr/share/nginx/html;
    }

    # proxy the PHP scripts to Apache listening on 127.0.0.1:80
    #
    #location ~ \\.php$ {
    #    proxy_pass   http://127.0.0.1;
    #}

    # pass the PHP scripts to FastCGI server listening on 127.0.0.1:9000
    #
    location ~ \\.php$ {
        root           /usr/data/wordpres;
        fastcgi_pass   127.0.0.1:9000;
        fastcgi_index  index.php;
        fastcgi_param  SCRIPT_FILENAME  $document_root$fastcgi_script_name;
        include        fastcgi_params;
	    }

    # deny access to .htaccess files, if Apache\'s document root
    # concurs with nginx\'s one
    #
    #location ~ /\\.ht {
    #    deny  all;
    #}
}
检查配置文件的配置是否正确,看到如下输出,代表配置没问题。
[root@Linux conf.d]# nginx -t
nginx: the configuration file /etc/nginx/nginx.conf syntax is ok
nginx: configuration file /etc/nginx/nginx.conf test is successful
重新加载Nginx配置文件
systemctl reload nginx
查看Nginx的运行状态
systemctl status nginx
步骤五:安装WordPress
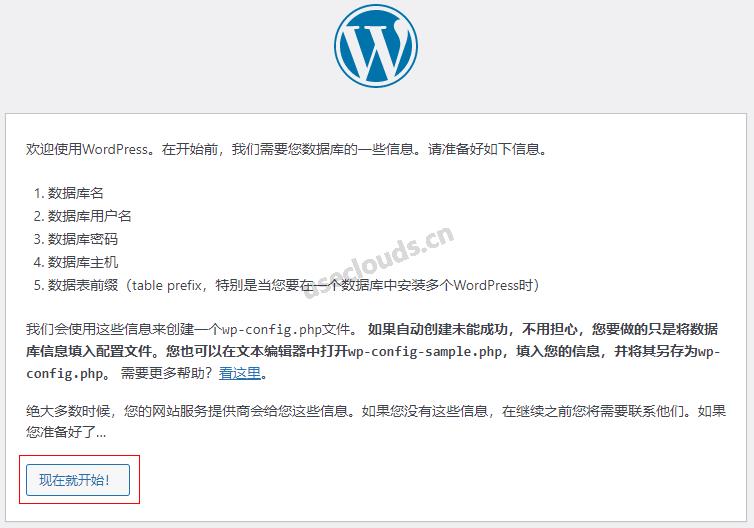
现在开始安装WordPress,在物理机的浏览器地址栏输入Linux Server的IP地址192.168.1.100 回车,点【现在就开始!】按钮开始安装WordPress。
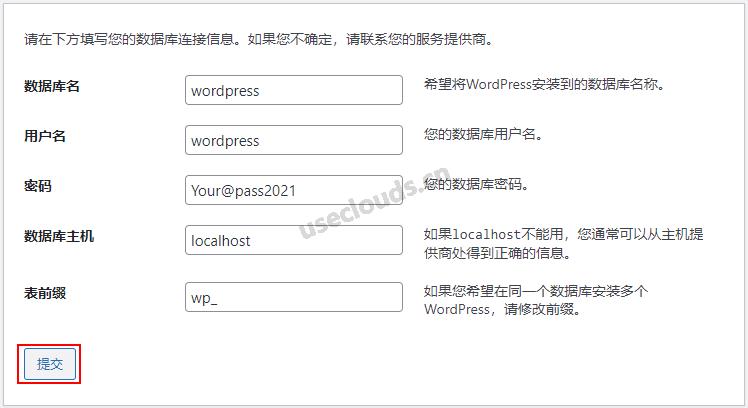
如下图,填写前面已经创建好的数据库名,用户名以及密码,数据库主机使用默认的localhost,表前缀使用默认wp_ ,点击【提交】。
接下来点击【现在安装】按钮继续安装

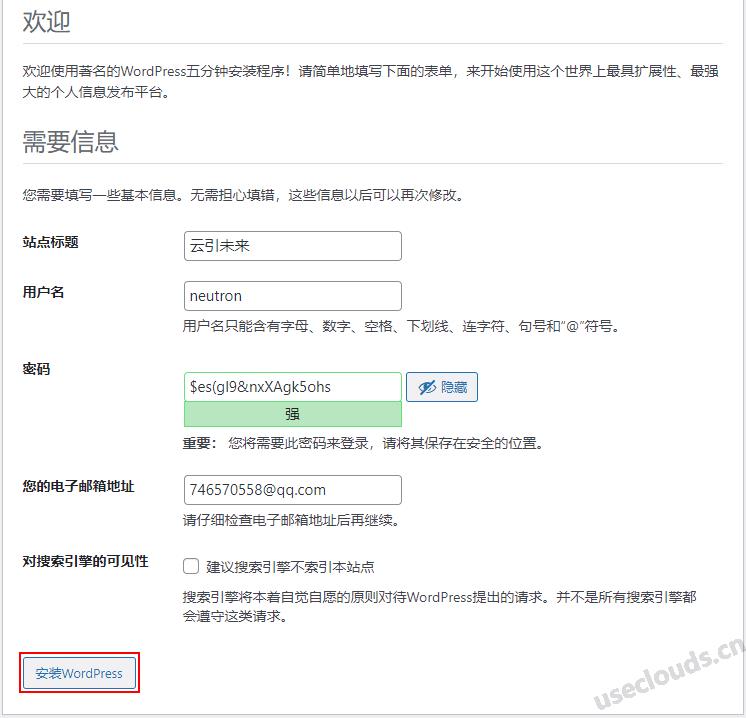
根据下图填写网站的基本信息,填好后点击【安装WordPress】进入下一步。
站点标题:站点的名称,给你站点起一个响亮或者令人印象深刻的名字
用户名:这个用户是WordPress的后台管理员账户,具有后台最高管理权限,用户名确认后不可更改。建议用户名不要使用admin、administrator、root等常用的管理员账号名称,因为黑K很喜欢破解这类用户的密码。
密码:默认会生成一个复杂的随机密码,请保管好,初始密码在后台可以更改。建议在这里输入你自己准备好的复杂密码(设置密码16位或以上,由大小写字母,数字与特殊符号组成),密码如果太简单很容易被破解。
电子邮箱:输入电子邮箱地址
对搜索引擎的可见性:建议不要勾选,如果你的网站不想被搜索引擎收录的话可以勾选,就算勾选了也不能保证搜索引擎就一定不收录。
提示WordPress安装成功,点击【登录】 按钮准备登录WordPress。

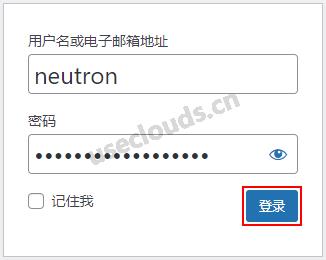
输入用户名和密码,点击【登录】按钮进入WordPress后台管理系统。
已成功登录WordPress后台管理系统,如下图:
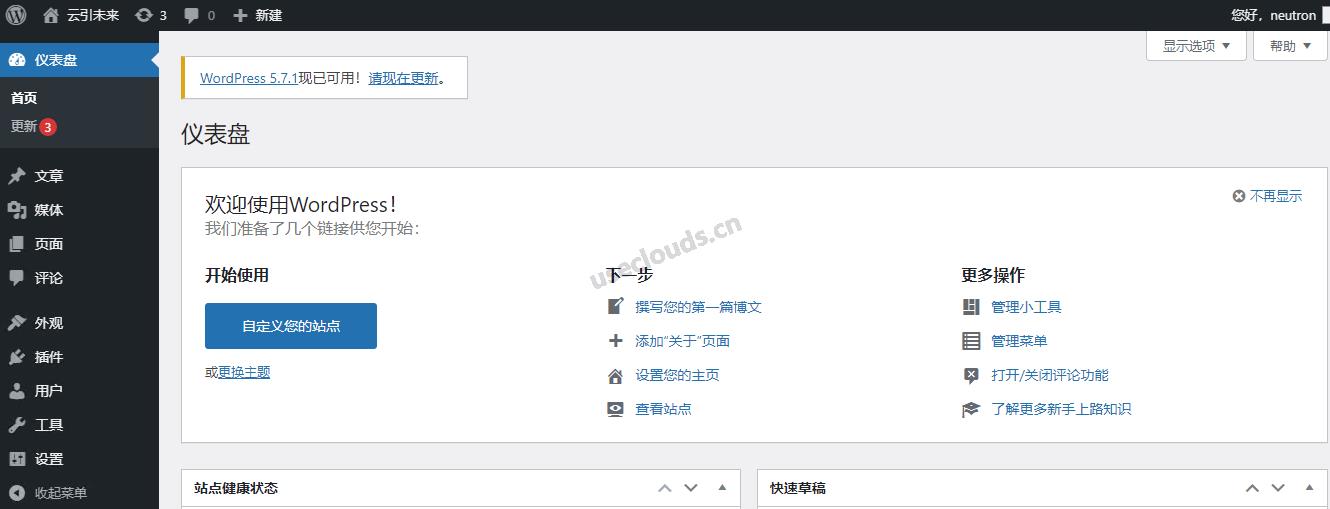
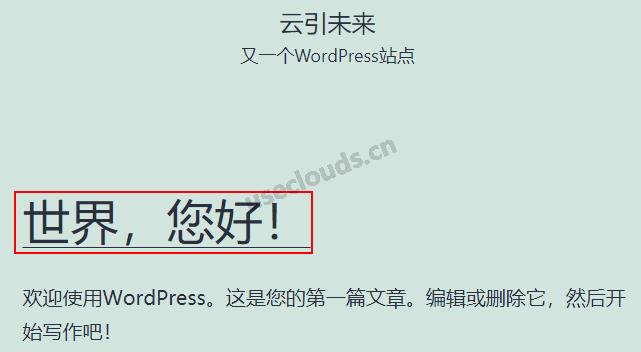
WordPress已经完成初始化安装,目前使用的是默认主题而且网站只有一篇“世界,您好!”的文章,所以看起来很简单,安装一个精美的主题并完善网站的内容后,你期待的网站才会出现。
安装WordPress的更多方法如下:
WordPress安装篇(1):使用PHPStudy安装WordPress
WordPress安装篇(2):用宝塔面板在Windows上安装WordPress
WordPress安装篇(3):用宝塔面板在Linux上安装WordPress
WordPress安装篇(4):YUM方式安装LNMP并部署WordPress
WordPress安装篇(5):源码编译安装LNMP并部署WordPress
以上是关于WordPress安装篇:YUM方式安装LNMP并部署WordPress的主要内容,如果未能解决你的问题,请参考以下文章