nginx安装lua+redis
Posted Json2011315
tags:
篇首语:本文由小常识网(cha138.com)小编为大家整理,主要介绍了nginx安装lua+redis相关的知识,希望对你有一定的参考价值。
1.安装lua
1.1安装LuaJIT
[root@localhost ~]# yum install readline-devel
[root@localhost ~]# mkdir -p lua-file
[root@localhost ~]# cd lua-file/
[root@localhost lua_file]# wget http://luajit.org/download/LuaJIT-2.0.5.tar.gz
[root@localhost lua_file]# tar -zxvf LuaJIT-2.0.5.tar.gz
[root@localhost lua_file]# ls
LuaJIT-2.0.5  LuaJIT-2.0.5.tar.gz
[root@localhost lua_file]# cd LuaJIT-2.0.5
[root@localhost LuaJIT-2.0.5]# make && make install PREFIX=/usr/local/luajit
1.2配置LuaJIT环境变量
[root@localhost lua-file]# vim /etc/profile

#/etc/profile 文件中加入环境变量
export LUAJIT_LIB=/usr/local/luajit/lib
export LUAJIT_INC=/usr/local/luajit/include/luajit-2.0

[root@localhost lua-file]# source /etc/profile
1.3 lua安装测试
[root@localhost lua-file]# vim hello.lua
print('hello world lua');

[root@localhost lua-file]# lua hello.lua
hello world lua
2.ngx_devel_kit和lua-nginx-module
ngx_devel_kit简称NDK,提供函数和宏处理一些基本任务,减轻第三方模块开发的代码量。
lua-nginx-module是nginx的lua模块
[root@localhost ~]# mkdir -p /usr/local/src/nginx
[root@localhost ~]# cd /usr/local/src/nginx/
[root@localhost nginx]# wget https://github.com/simpl/ngx_devel_kit/archive/v0.3.0.tar.gz
[root@localhost nginx]# wget https://github.com/openresty/lua-nginx-module/archive/v0.10.9rc7.tar.gz
[root@localhost nginx]# ls
v0.10.9rc7.tar.gz  v0.3.0.tar.gz
[root@localhost nginx]# tar -zxvf v0.10.9rc7.tar.gz
[root@localhost nginx]# tar -zxvf v0.3.0.tar.gz
3.查看已安装好的nginx
3.1查看原安装
[root@localhost nginx]# /usr/local/nginx/sbin/nginx -V
nginx version: nginx/1.14.2
built by gcc 4.8.5 20150623 (Red Hat 4.8.5-36) (GCC)
built with OpenSSL 1.0.2k-fips  26 Jan 2017
TLS SNI support enabled
configure arguments: --prefix=/usr/local/nginx --with-pcre --with-http_ssl_module --with-http_gzip_static_module

3.2 安装依赖
[root@localhost nginx]# yum -y install openssl openssl-devel zlib zlib-devel pcre-devel
3.3 进入nginx解压目录,安装扩展
[root@localhost ~]# cd nginx-1.14.2
[root@localhost nginx-1.14.2]#
3.3.1.清空之前的编译文件
[root@localhost nginx-1.14.2]# make clean
3.3.2 执行 nginx -V 查看之前的编译参数
[root@localhost nginx-1.14.2]# /usr/local/nginx/sbin/nginx -V
nginx version: nginx/1.14.2
built by gcc 4.8.5 20150623 (Red Hat 4.8.5-36) (GCC)
built with OpenSSL 1.0.2k-fips  26 Jan 2017
TLS SNI support enabled
configure arguments: --prefix=/usr/local/nginx --with-pcre --with-http_ssl_module --with-http_gzip_static_module
3.3.3 添加扩展执行编译
[root@localhost nginx-1.14.2]# ls /usr/local/src/nginx/
lua-nginx-module-0.10.9rc7  ngx_devel_kit-0.3.0  v0.10.9rc7.tar.gz  v0.3.0.tar.gz
[root@localhost nginx-1.14.2]# ./configure --prefix=/usr/local/nginx --with-pcre --with-http_ssl_module --with-http_gzip_static_module --add-module=/usr/local/src/nginx/lua-nginx-module-0.10.9rc7/ --add-module=/usr/local/src/nginx/ngx_devel_kit-0.3.0/
3.3.4.执行make (不能执行 make install)
[root@localhost nginx-1.14.2]# make
3.3.5.(打开新连接窗口操作)重命名 nginx 旧版本二进制文件,即 sbin 目录下的 nginx(期间 nginx 并不会停止服务)
客户端2
[root@localhost nginx-1.14.2]# cd /usr/local/nginx/sbin/
[root@localhost sbin]# ls
nginx
[root@localhost sbin]# mv nginx nginx.old
[root@localhost sbin]# ls
nginx.old
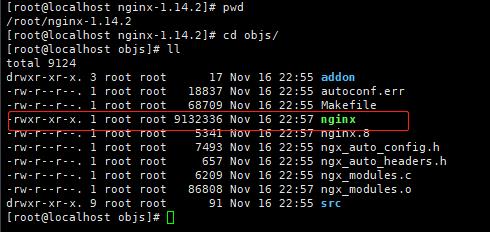
3.3.6.拷贝一份新编译的二进制文件到安装目录
[root@localhost nginx-1.14.2]# pwd
/root/nginx-1.14.2
[root@localhost nginx-1.14.2]# cd objs/
[root@localhost objs]# ll
total 9124
drwxr-xr-x. 3 root root      17 Nov 16 22:55 addon
-rw-r--r--. 1 root root   18837 Nov 16 22:55 autoconf.err
-rw-r--r--. 1 root root   68709 Nov 16 22:55 Makefile
-rwxr-xr-x. 1 root root 9132336 Nov 16 22:57 nginx
-rw-r--r--. 1 root root    5341 Nov 16 22:57 nginx.8
-rw-r--r--. 1 root root    7493 Nov 16 22:55 ngx_auto_config.h
-rw-r--r--. 1 root root     657 Nov 16 22:55 ngx_auto_headers.h
-rw-r--r--. 1 root root    6209 Nov 16 22:55 ngx_modules.c
-rw-r--r--. 1 root root   86808 Nov 16 22:57 ngx_modules.o
drwxr-xr-x. 9 root root      91 Nov 16 22:55 src
[root@localhost objs]# cp nginx /usr/local/nginx/sbin/
[root@localhost objs]# ls /usr/local/nginx/sbin/
nginx  nginx.old

3.3.7.在源码目录执行 make upgrade 开始升级
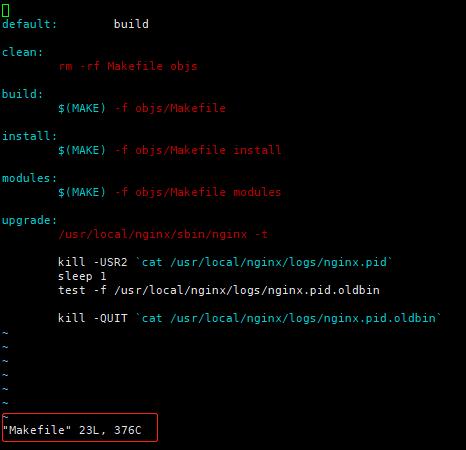
[root@localhost nginx-1.14.2]# make upgrade
/usr/local/nginx/sbin/nginx -t
nginx: the configuration file /usr/local/nginx/conf/nginx.conf syntax is ok
nginx: configuration file /usr/local/nginx/conf/nginx.conf test is successful
kill -USR2 `cat /usr/local/nginx/logs/nginx.pid`
sleep 1
test -f /usr/local/nginx/logs/nginx.pid.oldbin
kill -QUIT `cat /usr/local/nginx/logs/nginx.pid.oldbin`

###查看是否安装成功
[root@localhost nginx-1.14.2]# /usr/local/nginx/sbin/nginx -V
nginx version: nginx/1.14.2
built by gcc 4.8.5 20150623 (Red Hat 4.8.5-39) (GCC)
built with OpenSSL 1.0.2k-fips  26 Jan 2017
TLS SNI support enabled
configure arguments: --prefix=/usr/local/nginx --with-pcre --with-http_ssl_module --with-http_gzip_static_module --add-module=/usr/local/src/nginx/lua-nginx-module-0.10.9rc7/ --add-module=/usr/local/src/nginx/ngx_devel_kit-0.3.0/

启动nginx,如果有这个报错:nginx: error while loading shared libraries: libluajit-5.1.so.2: cannot open shared object file: No such file or directory
#解决方案
[root@localhost nginx-1.14.2]# vim /etc/ld.so.conf
#新增一条
 /usr/local/luajit/lib

#保存文件,执行ldconfig
[root@localhost nginx-1.14.2]# ldconfig
4 nginx引入lua调试
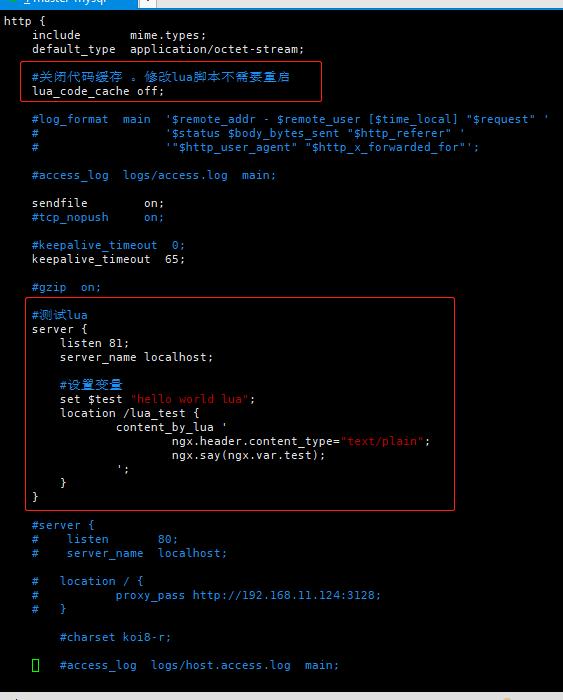
4.1 nginx.conf引入lua
[root@localhost conf]# pwd
/usr/local/nginx/conf
[root@localhost conf]# vim nginx.conf

	#关闭代码缓存 。修改lua脚本不需要重启
    lua_code_cache off;

	 #测试lua
    server
        listen 81;
        server_name localhost;

        #设置变量
        set $test "hello world lua";
        location /lua_test
                content_by_lua '
                        ngx.header.content_type="text/plain";
                        ngx.say(ngx.var.test);
                ';
4.2 重启nginx,执行访问
[root@localhost nginx]# killall nginx
[root@localhost nginx]# /usr/local/nginx/sbin/nginx
nginx: [alert] lua_code_cache is off; this will hurt performance in /usr/local/nginx/conf/nginx.conf:22

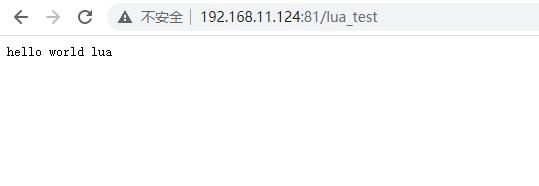
浏览器执行访问:
5.实现lua连接redis
redis集群扩展包:https://github.com/onlonely/lua-redis-cluster
对于lua来说,它是一个非常轻量级的脚本语言,而它本身也与php的composer是一样的,是可以添加扩展,只是他们的扩展我们需要自己找对应的模块库
官方组件:https://openresty.org/cn/components.html
5.1 下载lua-redis-cluster(连接redis-cluster集群) 客户端
[root@localhost 5.1]# pwd
/usr/local/luajit/share/lua/5.1
[root@localhost 5.1]# git clone https://github.com/onlonely/lua-redis-cluster.git
[root@localhost 5.1]# ls
lua-redis-cluster
5.2 下载快速JSON编码/解析
[root@localhost 5.1]# git clone https://github.com/openresty/lua-cjson.git
[root@localhost 5.1]# ls
lua-cjson  lua-redis-cluster
[root@localhost 5.1]#
5.3 下载 lua-resty-redis (单机版redis)客户端
[root@localhost 5.1]# git clone https://github.com/openresty/lua-resty-redis
[root@localhost 5.1]# ls
lua-cjson  lua-redis-cluster  lua-resty-redis
5.4 lua连接单机版本redis
资料地址:https://github.com/openresty/lua-resty-redis
5.4.1编辑nginx.conf脚本
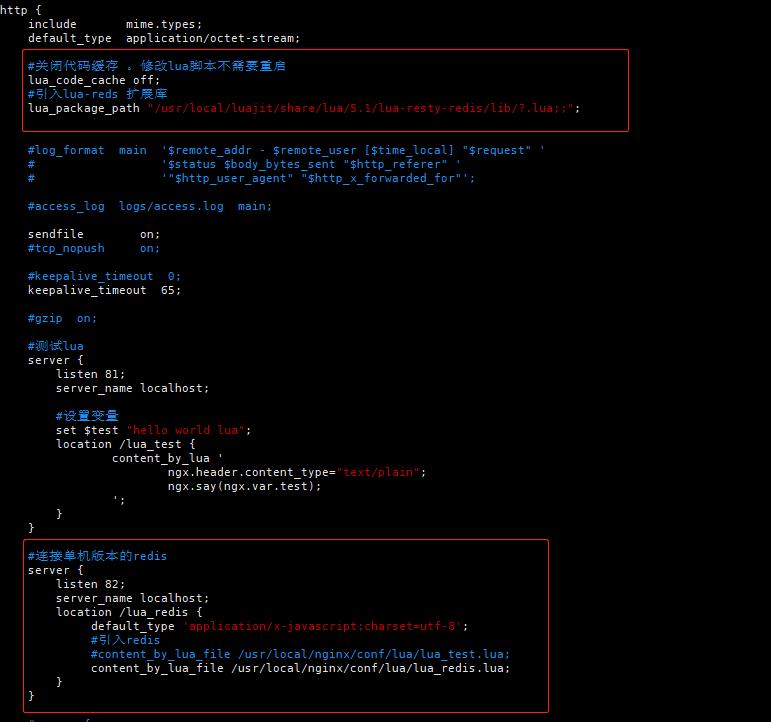
	#关闭代码缓存 。修改lua脚本不需要重启
    lua_code_cache off;
    #引入lua-reds 扩展库(此处可以在lua脚本里面引入,公共的也可以在此引入)
    lua_package_path "/usr/local/luajit/share/lua/5.1/lua-resty-redis/lib/?.lua;;";

    #连接单机版本的redis
    server
        listen 82;
        server_name localhost;
        location /lua_redis
             default_type 'application/x-javascript;charset=utf-8';
             #引入redis
             #content_by_lua_file /usr/local/nginx/conf/lua/lua_test.lua;
             content_by_lua_file /usr/local/nginx/conf/lua/lua_redis.lua;
截图nginx.conf:
5.4.2 编辑连接redis的lua脚本
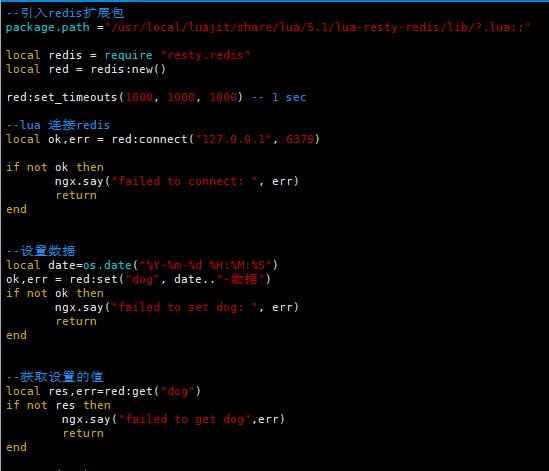
[root@localhost conf]# vim lua/lua_redis.lua

--引入redis扩展包
package.path ="/usr/local/luajit/share/lua/5.1/lua-resty-redis/lib/?.lua;;"

local redis = require "resty.redis"
local red = redis:new()

red:set_timeouts(1000, 1000, 1000) -- 1 sec

--lua 连接redis
local ok,err = red:connect("127.0.0.1", 6379)

if not ok then
       ngx.say("failed to connect: ", err)
       return
end


--设置数据
local date=os.date("%Y-%m-%d %H:%M:%S")
ok,err = red:set("dog", date.."-数据")
if not ok then
       ngx.say("failed to set dog: ", err)
       return
end


--获取设置的值
local res,err=red:get("dog")
if not res then
	ngx.say("failed to get dog",err)
	return
end

ngx.say(res)
截图lua_redis.lua :
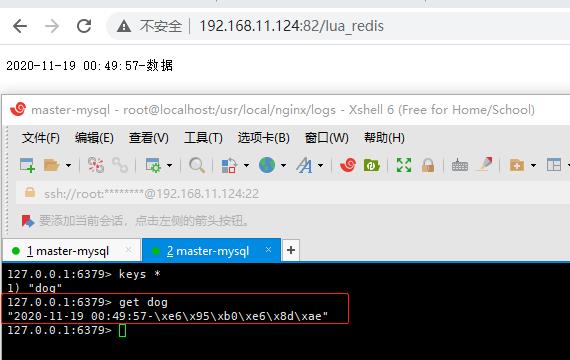
5.4.3 重启nginx,访问nginx,数据成功写入redis,并读取
[root@localhost lua]# /usr/local/nginx/sbin/nginx -s reload

#(重启报错,自行查看nginx 的 error.log文件,具体根据自行的错误日志输错文件目录查看)
[root@localhost lua]# ls /usr/local/nginx/logs/
access.log  error.log
5.5 lua连接redis-cluster 集群
资料地址:
https://github.com/onlonely/lua-redis-cluster (以下demo使用该资源)
https://github.com/steve0511/resty-redis-cluster
5.5.1自行准备redis-cluster集群
5.5.2 编写连接redis-cluster的lua脚本
[root@localhost conf]# vim lua/lua_redis_cluster.lua

--引入redis-cluster扩展包
--package.path ="/usr/local/luajit/share/lua/5.1/lua-redis-cluster/?.lua;;/usr/local/luajit/share/lua/5.1/lua-resty-redis/lib/?.lua;;"
package.path ="/usr/local/luajit/share/lua/5.1/lua-redis-cluster/?.lua;;"


ngx.header.content_type="text/plain"
-- 构建redis集群
local function redis_cluster_init ()
    local redis_cluster = require "resty.redis_cluster"
    local cluster_id = "redis_cluster"
    local startup_nodes =
        "192.168.11.124",6391,
		"192.168.11.124",6392,
		"192.168.11.124",6393,
		"192.168.11.124",6394,
		"192.168.11.124",6395,
		"192.168.11.124",6396,

    local opt =
    	  timeout = 1000,--执行超时时间
    	  keepalive_size = 50,--长连接数量
        keepalive_duration = 60000 --长连接保持时间

    rc = redis_cluster:new(cluster_id, startup_nodes, opt)
    return rc
end
local redis = redis_cluster_init();
--调用API获取数据
--设置商品库存
local key = "goods_stock_12"
local res, err = redis:set(key,100)
if not res then
    ngx.say("set msg error : ", err)
end

--获取商品库存
local stock, err = redis:get(key)
if not stock then
    ngx.say("get msg error : ", err)
end
--得到的数据为空处理
if stock == ngx.null then
    stock = 0  --比如默认值
end
ngx.say("goods stock : ", stock)
截图lua_redis_cluster.lua:

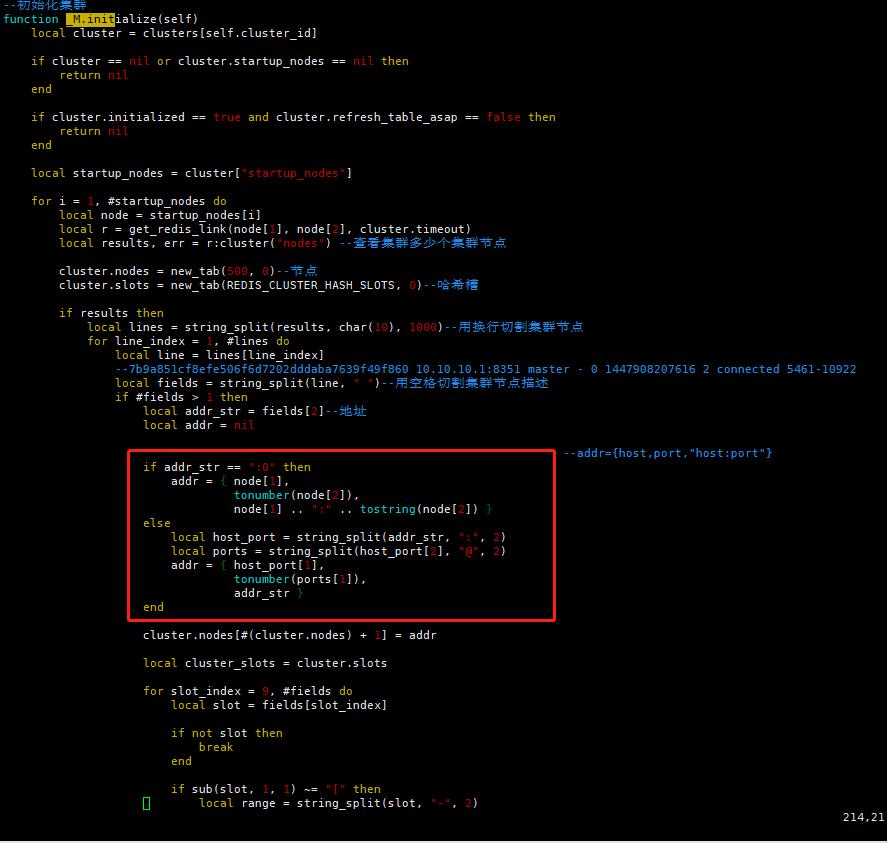
5.5.3 lua-redis-cluster 模块存在问题,需要修改底层源码
[root@localhost resty]# pwd
/usr/local/luajit/share/lua/5.1/lua-redis-cluster/resty
#修改此文件
[root@localhost resty]# vim redis_cluster.lua

#修改的方法
function _M.initialize(self)
		....
		--替换此处代码
				 if addr_str == ":0" then
                    addr =  node[1],
                             tonumber(node[2]),
                             node[1] .. ":" .. tostring(node[2])
                else
                    local host_port = string_split(addr_str, ":", 2)
                    local ports = string_split(host_port[2], "@", 2)
                    addr =  host_port[1],
                             tonumber(ports[1]),
                             addr_str
                end
		....
end
截图提示redis_cluster.lua:
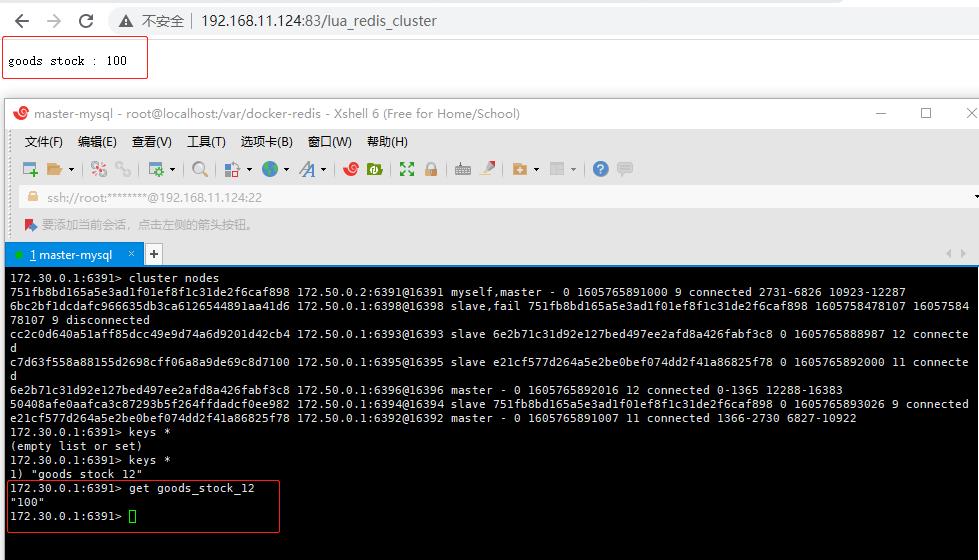
5.5.4 重启nginx,浏览器访问,数据成功写入redis-cluster集群
以上是关于nginx安装lua+redis的主要内容,如果未能解决你的问题,请参考以下文章