Ueditor 前后端分离实现文件上传到独立服务器
Posted £冷☆月№
tags:
篇首语:本文由小常识网(cha138.com)小编为大家整理,主要介绍了Ueditor 前后端分离实现文件上传到独立服务器相关的知识,希望对你有一定的参考价值。
关于Ueditor 前后端分离实现文件上传到独立服务器,在网上搜索确实遇到大坑,不过还好遇到了 虚若影 最终实现了,在此感谢!
虚若影的原文博客网址:http://www.cnblogs.com/hpnet/p/6290452.html
具体项目:如下截图

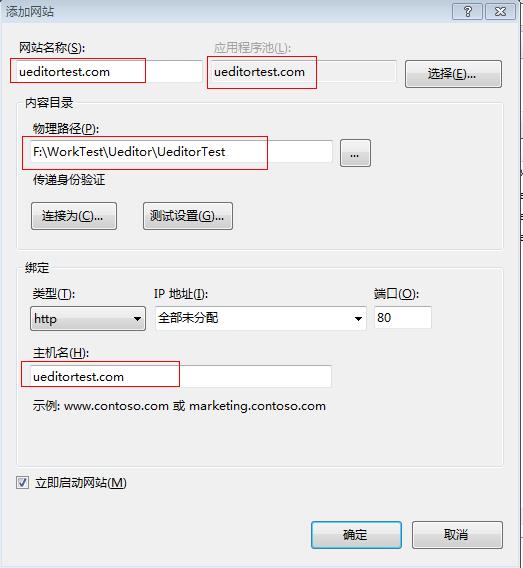
1.在本地IIS 中添加网站 ueditorweb.com 、ueditortest.com 、 testweb (注意应用程序池要选择.net的版本)


2.hosts文件中添加
127.0.0.1 ueditorweb.com ueditor后台上传处理程序
127.0.0.1 ueditortest.com ueditor前台使用项目1
127.0.0.1 testweb.com ueditor前台使用项目2
3.在接下来打开ueditortest.com 和 testweb.com下面的ueditor.config.js, 找到:, serverUrl: URL + "net/controller.ashx"改成:, serverUrl: "http://ueditorweb.com/controller.ashx"
4.在ueditorweb.com项目下。打开config.json,搜索 Prefix": "/ueditor/net/", 全部改成 UrlPrefix": "http://ueditorweb.com/", 这是图片上传成功后的地址前缀。
5.多图上传、附件、视频等上传的实现设置:(两种方法)
(1)在ueditorweb.com项目下配置web.config
    <system.webServer>
        <httpProtocol>
            <customHeaders>
                <add name="Access-Control-Allow-Headers" value="Content-Type,X_Requested_With" />
                <add name="Access-Control-Allow-Methods" value="GET,POST,PUT,DELETE,OPTIONS,TRACE,HEAD" />
                <add name="Access-Control-Allow-Origin" value="*" />
            </customHeaders>
        </httpProtocol>
    </system.webServer>
(2)在IIS中添加


注意:Access-Control-Allow-Origin:* 表示允许任何域名跨域访问
我这里使用*是因为有多个网站需要用到为了实现单图片上传,如果只有一个网站用到,为了安全最好使用 Access-Control-Allow-Origin:http://ueditortest.com
好了,至此多图上传、附件、视频等,就能实现上传了
6.单图片上传,使用iframe跨域,实现起来比较麻烦
在ueditor前台应用项目中添加result.ashx 代码如下(下面要用到,如果是多个项目,每个项目都添加)
        public void ProcessRequest(HttpContext context)
        {
            context.Response.ContentType = "text/plain";
            var result = context.Request["result"];
            //当然这里最好判断一下result是否安全,不要接收到内容就显示这样会被人利用。
            if (result != null)
                context.Response.Write(result.ToString());
            //context.Response.Write("Hello World");
        }

        public bool IsReusable
        {
            get
            {
                return false;
            }
        }
打开ueditor.all.js或者ueditor.all.min.js你页面上调用哪个就打开哪个,搜索<input id="edui_input_ 在</form>之前加上:
<input type="hidden" name="issimpleupload" value="true" /> 这样上传后我们好通过获取issimpleupload来判断是不是简单文件上传。
ueditor.all.js

ueditor.all.min.js

打开ueditorweb.com项目中App_Code文件夹中Handler.cs,将WriteJson方法修改替换成如下代码
    protected void WriteJson(object response)
    {
        string jsonpCallback = Request["callback"],
            json = JsonConvert.SerializeObject(response);
        if (String.IsNullOrWhiteSpace(jsonpCallback))
        {
            var webupload = Request["webupload"];
            var weburl = "ueditortest.com";
            if (webupload != null)
            {
                switch (webupload)
                {
                    case "ueditortest":
                        weburl = "ueditortest.com";
                        break;
                    case "testweb":
                        weburl = "testweb.com";
                        break;
                }
            }

            var issimple = Request["IsSimpleUpload"];
            if (issimple != null && issimple.ToString() == "true")
            {
                Response.Redirect("http://" + weburl + "/result.ashx?result=" + json); //把json传递到c.com下面去呈现结果。
            }
            Response.AddHeader("Content-Type", "text/plain");
            Response.Write(json);
        }
        else
        {
            Response.AddHeader("Content-Type", "application/javascript");
            Response.Write(String.Format("{0}({1});", jsonpCallback, json));
        }
        Response.End();
    }
至此,ueditor上传图片、附件、视频、截图、涂鸦等功能都能上传独立的服务器上。
在此还要感谢下 虚若影 感谢 感谢 非常感谢!!!
以上是关于Ueditor 前后端分离实现文件上传到独立服务器的主要内容,如果未能解决你的问题,请参考以下文章