ansible用法
Posted www.cnblogs.com
tags:
篇首语:本文由小常识网(cha138.com)小编为大家整理,主要介绍了ansible用法相关的知识,希望对你有一定的参考价值。
企业级自动化运维工具Ansible
1、定义:
ansible是新出现的自动化运维工具,基于Python开发,集合了众多运维工具(puppet、chef、func、fabric)的优点,实现了批量系统配置、批量程序部署、批量运行命令等功能。
ansible是基于 paramiko(框架) 开发的,并且基于模块化工作,本身没有批量部署的能力。真正具有批量部署的是ansible所运行的模块,ansible只是提供一种框架。ansible不需要在远程主机上安装client/agents,因为它们是基于ssh来和远程主机通讯的。ansible目前已经已经被红帽官方收购,是自动化运维工具中大家认可度最高的,并且上手容易,学习简单。是每位运维工程师必须掌握的技能之一。

2、ansible 特点
1)部署简单,只需在主控端部署Ansible环境,被控端无需做任何操作,没有agent;
-
默认使用SSH协议对设备进行管理;
-
有大量常规运维操作模块,可实现日常绝大部分操作。
-
配置简单、功能强大、扩展性强;
-
支持API及自定义模块,可通过Python轻松扩展;
-
通过Playbooks(剧本)来定制强大的配置、状态管理;
-
轻量级,无需在客户端安装agent,更新时,只需在操作机上进行一次更新即可;
-
提供一个功能强大、操作性强的Web管理界面和REST API接口——AWX平台。
9)模块化:调用特定的模块,完成特定任务。
10)无需代理不依赖PKI(无需ssl)
11)幂等性:一个任务执行1遍和执行n遍效果一样,不因重复执行带来意外情况
12)可使用任何编程语言写模块
13)安全,基于OpenSSH
14)有Paramiko,PyYAML,Jinja2(模板语言)三个关键模块
3、ansible架构
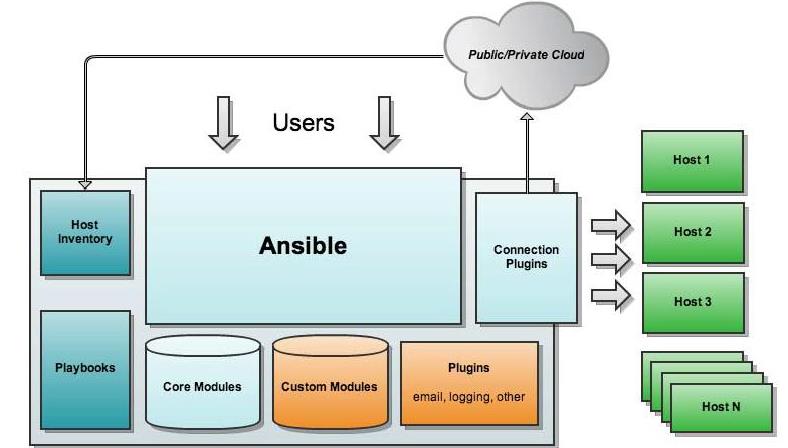
上图为ansible的基本架构,从上图可以了解到其由以下部分组成:
- 核心:ansible
- 核心模块(Core Modules):这些都是ansible自带的模块
- 扩展模块(Custom Modules):如果核心模块不足以完成某种功能,可以添加扩展模块
- 插件(Plugins):完成模块功能的补充
- 剧本(Playbooks):ansible的任务配置文件,将多个任务定义在剧本中,由ansible自动执行
- 连接插件(Connectior Plugins):ansible基于连接插件连接到各个主机上,虽然ansible是使用ssh连接到各个主机的,但是它还支持其他的连接方法,所以需要有连接插件
- 主机群(Host Inventory):定义ansible管理的主机
4、工作原理:
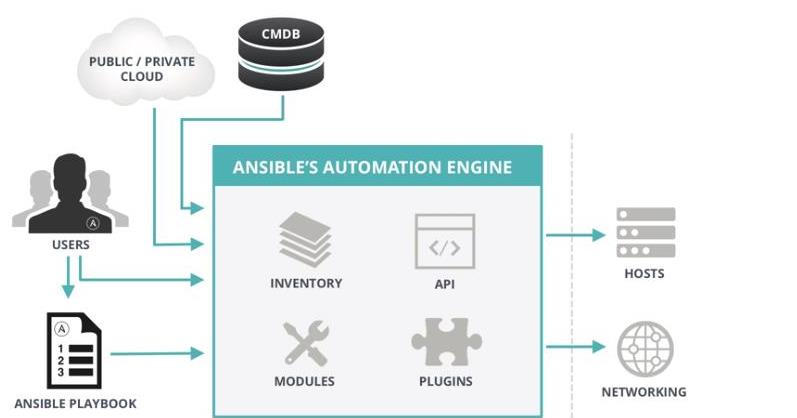
Ansible主要组成部分
- ANSIBLE PLAYBOOKS:任务剧本(任务集),编排定义Ansible任务集的配置文件,由Ansible顺序依次执行,通常是JSON格式的YML文件
- INVENTORY:Ansible管理主机的清单/etc/anaible/hosts
- MODULES:Ansible执行命令的功能模块,多数为内置核心模块,也可自定义
- PLUGINS:模块功能的补充,如连接类型插件、循环插件、变量插件、过滤插件等,该功能不常用
- API:供第三方程序调用的应用程序编程接口
- ANSIBLE:组合INVENTORY、API、MODULES、PLUGINS的绿框,可以理解为是ansible命令工具,其为核心执行工具
- Ansible命令执行来源:
USER,普通用户,即SYSTEM ADMINISTRATOR
CMDB(配置管理数据库) API 调用
PUBLIC/PRIVATE CLOUD API调用
USER-> Ansible Playbook -> Ansibile
- 利用ansible实现管理的方式:
1、Ad-Hoc 即ansible命令,主要用于临时命令使用场景
2、Ansible-playbook 主要用于长期规划好的,大型项目的场景,需要有前提的规划9)Ansible-playbook(剧本)执行过程:
3、将已有编排好的任务集写入Ansible-Playbook
4、通过ansible-playbook命令分拆任务集至逐条ansible命令,按预定规则逐条执行
- Ansible主要操作对象:
HOSTS主机
NETWORKING网络设备
注意事项
执行ansible的主机一般称为主控端,中控,master或堡垒机
主控端Python版本需要2.6或以上
被控端Python版本小于2.4需要安装python-simplejson
被控端如开启SELinux需要安装libselinux-python
windows不能做为主控端
5、ansible 任务执行模式
Ansible系统由控制主机对被管节点的操作方式可分为两类,即ad-hoc和playbook:
·ad-hoc(点对点)模式:使用单个模块,支持批量执行单条命令。 ad-hoc 命令是一种可以快速输入的命令,而且不需要保存起来的命令。就相当于bash中的一句话shell。
·playbook(剧本)模式:是Ansible主要管理方式,也是Ansible功能强大的关键所在。playbook通过多个task集合完成一类功能,如Web服务的安装部署、数据库服务器的批量备份等。可以简单地把playbook理解为通过组合多条ad-hoc操作作的配置文件。
6、Ansible命令执行过程
1)加载自己的配置文件 默认``/etc/ansible/ansible``.cfg
2)查找对应的主机配置文件,找到要执行的主机或者组
3)加载自己对应的模块文件,如``command
4)通过ansible将模块或命令生成对应的临时py文件,并将该文件传输至远程服务器端对应执行用户的家目录的.ansible``/tmp/XXX/XXX``.PY文件
5)给文件+x执行
6)执行并返回结果
7)删除临时py文件,``sleep` `0退出
执行状态:
绿色:执行成功并且不需要做改变的操作
黄色:执行成功并且对目标主机做变更
红色:执行失败

实战一:安装ansible 及指令讲解
1、安装ansible
ansible安装常用两种方式,yum安装和pip程序安装
这里提供二种安装方式,任选一种即可
(1)使用yum 安装
# yum install ansible –y
(2)使用pip :pip是安装Python包的管理器,类似yum
pip ``install` `ansible 如果没pip,需先安装pip.yum可直接安装:``yum ``install` `python-pip ``pip ``install` `ansible
确认安装: ansible --version 查询版本
2、Ansible配置文件
Ansible 配置文件/etc/ansible/ansible.cfg (一般保持默认)
[defaults]``#inventory = /etc/ansible/hosts # 主机列表配置文件``#library = /usr/share/my_modules/ # 库文件存放目录``#remote_tmp = $HOME/.ansible/tmp #临时py命令文件存放在远程主机目录``#local_tmp = $HOME/.ansible/tmp # 本机的临时命令执行目录``#forks = 5 # 默认并发数``#sudo_user = root # 默认sudo用户``#ask_sudo_pass = True #每次执行ansible命令是否询问ssh密码``#ask_pass = True``#remote_port = 22 ``#host_key_checking = False # 检查对应服务器的host_key,建议取消注释``#log_path=/var/log/ansible.log #日志文件``#module_name = command #默认模块
① sudo_user:
这是设置默认执行命令的用户,也可以在playbook中重新设置这个参数。配置实例如下:
sudo_user = root
② remote_port:
这是指定连接被管节点的管理端口,默认是22。除非设置了特殊的SSH端口,不然这个参数一般是 不需要修改的。配置实例如下:
remote_port = 22
③ host_key_checking:
这是设置是否检查SSH主机的密钥。可以设置为True或False,关闭后第一次连接没有提示配置实例
host_key_checking = False
④ timeout:
这是设置SSH连接的超时间隔,单位是秒。配置实例如下:
timeout = 60
log_path:Ansible系统默认是不记录日志的,如果想把Ansible系统的输出记录到日志文件中,需要设置log_path 来指定一个存储Ansible日志的文件。配置实例如下:
log_path = /var/log/ansible.log
另外需要注意,执行Ansible的用户需要有写入日志的权限,模块将会调用被管节点的syslog来记录
3、配置文件、程序及命令:
配置文件
/etc/ansible/ansible.cfg 主配置文件,配置ansible工作特性
/etc/ansible/hosts主机清单
/etc/ansible/roles/存放角色的目录
程序
/usr/bin/ansible` `主程序,临时命令执行工具
/usr/bin/ansible-doc` `查看配置文档,模块功能查看工具
/usr/bin/ansible-galaxy` `下载/上传优秀代码或Roles模块的官网平台
/usr/bin/ansible-playbook` `定制自动化任务,编排剧本工具``/usr/bin/ansible-pull` `远程执行命令的工具
/usr/bin/ansible-vault` `文件加密工具
/usr/bin/ansible-console` `基于Console界面与用户交互的执行工具
ansible系列命令
ansible
ansible-doc
ansible-playbook 定制任务,编排剧本
ansible-galaxy
连接 https://galaxy.ansible.com 下载相应的roles
列出所有已安装的galaxy
ansible-galaxy list
安装galaxy
ansible-galaxy install
geerlingguy.redis
删除galaxy
ansible-galaxy remove geerlingguy.redis
ansible-vault
功能:管理加密解密yml文件
ansible-vault [create|decrypt|edit|encrypt|rekey|view]
ansible-vault encrypt hello.yml 加密
ansible-vault decrypt hello.yml 解密
ansible-vault view hello.yml 查看
ansible-vault edit hello.yml 编辑加密文件
ansible-vault rekey hello.yml 修改口令
ansible-vault create new.yml 创建新文件
ansible-console: 2.0+新增,可交互执行命令,支持tab
root@``test` `(2)[f:10] $
执行用户@当前操作的主机组 (当前组的主机数量)[f:并发数]$
设置并发数: forks n 例如: forks 10
切换组: ``cd` `主机组 例如: ``cd` `web
列出当前组主机列表: list
列出所有的内置命令: ?或help
示例:
root@all (2)[f:5]$ list
root@all (2)[f:5]$ ``cd` `appsrvs
root@appsrvs (2)[f:5]$ list
root@appsrvs (2)[f:5]$ yum name=httpd state=present
root@appsrvs (2)[f:5]$ service name=httpd state=started
ansible-pull 推送命令至远程,效率无限提升,对运维要求较高
ansible-doc: 显示模块帮助
ansible-doc [options] [module...]
-a 显示所有模块的文档
-l, --list 列出可用模块
-s, --snippet显示指定模块的playbook片段
示例:
ansible-doc –l 列出所有模块
ansible-doc ``ping` `查看指定模块帮助用法
ansible-doc –s ``ping` `查看指定模块帮助用法
ansible通过ssh实现配置管理、应用部署、任务执行等功能,建议配置ansible端能基于密钥认证的方式联系各被管理节点
ansible
--version 显示版本
-m module 指定模块,默认为``command
-``v` `详细过程 –vv -vvv更详细
--list-hosts 显示主机列表,可简写 --list
-k, --ask-pass 提示输入``ssh``连接密码,默认Key验证
-K, --ask-become-pass 提示输入``sudo``时的口令
-C, --check 检查,并不执行
-T, --timeout=TIMEOUT 执行命令的超时时间,默认10s
-u, --user=REMOTE_USER 执行远程执行的用户
-b, --become 代替旧版的``sudo` `切换
--become-user=USERNAME 指定``sudo``的runas用户,默认为root
4、ansible的Host-pattern
匹配主机的列表
All :表示所有Inventory中的所有主机
- ansible all -m ping
* :通配符
- ansible “” -m ping # 其中代表的意思就是all,所有的IP地址
- ansible 192.168.1.* -m ping # 匹配1.*的IP地址
- ansible “*srvs” -m ping
或关系
- ansible “websrvs:appsrvs” -m ping # 或关系,取IP地址的并集
- ansible “192.168.1.10:192.168.1.20” -m ping
- ansible的Host-pattern
逻辑与
- ansible “websrvs:&dbsrvs” -m ping # 与关系,取IP地址的交集
- 在websrvs组并且在dbsrvs组中的主机
逻辑非
- ansible ‘websrvs:!dbsrvs’ -m ping # 在websrvs中,取dbsrvs的反
- 在websrvs组,但不在dbsrvs组中的主机
- 注意:此处为单引号
综合逻辑
- ansible ‘websrvs:dbsrvs:&appsrvs:!ftpsrvs’ -m ping
正则表达式
- ansible “websrvs:&dbsrvs” -m ping
- ansible “~(web|db).*.magedu.com” -m ping
ansible 常用模块
- shell:可以使用shell命令,支持特殊字符和管道等,需要在/etc/ansible/ansible.cfg配置文件中开启功能:module_name = shell
- command:使用普通命令,不支持特殊字符和管道
- script:可以批量执行脚本
- copy:可以将本地文件批量复制到远端主机上
- fetch:可以将远端主机的文件批量复制到本地
- file:创建文件或者目录
- hostname:批量修改主机名
- cron:批量创建定时任务
- yum:批量安装软件
- service:批量启动服务
- user:批量创建用户
- group:批量创建组
- setup:查机器的所有facts信息
5、ansible 使用前配置
(1)Ansible配置公私钥
配置ansible 使用公钥验证
虽然ansible支持其他主机认证方式,但是我们最常用的的还是基于秘钥的认证:
① 首先生成秘钥
ssh-keygen -t rsa -P " " -f /root/.ssh/id_rsa
② 然后向主机分发秘钥:
ssh-copy-id root@ #@后面跟主机名或者IP地址3、如果出现以下情况:
# ssh-copy-id -i root/.ssh/id_rsa.pub 10.1.6.72
-bash: ssh-copy-id: command not found
请尝试: yum -y install openssh-clientsansible
(2)直接执行脚本批量将本地公钥传递到对方主机:
vim iplist.txt  将对方的主机IP地址写入
192.168.34.102
192.168.34.103
192.168.34.105

3
4
5
6
7
8
9
10
11
12
13
14
15
16

#!/bin/bash  书写批量执行脚本
user=root
password=centos
ssh-keygen -t rsa -P "" -f /root/.ssh/id_rsa

while read ip ;do
expect <<EOF
set timeout 10
spawn ssh-copy-id -i /root/.ssh/id_rsa.pub $user@$ip
expect {
"yes/no" { send "yes\\n";exp_continue }
"password" { send "$password\\n" }
}
expect eof
EOF
done < iplist.txt
实战二:ad-hoc(点对点)常用模块
vim /etc/ansible/hosts  在最底部写入两个组的内容,分别写入远程主机的IP地址

[webs]
192.168.34.102
192.168.34.103

[apps]
192.168.34.103
192.168.34.105
定义hosts 有3类:
① Ex 1:未分组的主机,在任何组头之前指定
② Ex 2:有组的主机,一组属于"webservers"组的主机
③ Ex 3:和数据库有关的,"dbservers"组中的数据库服务器集合
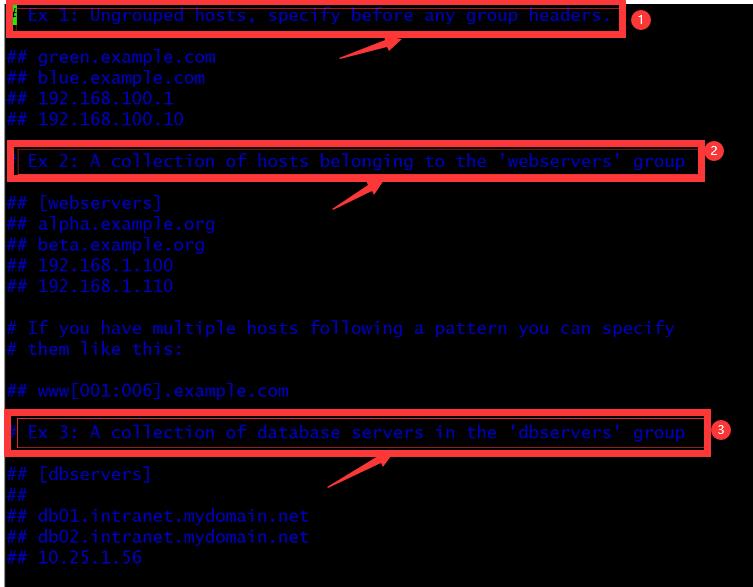
在最底部写入远程主机的IP地址:
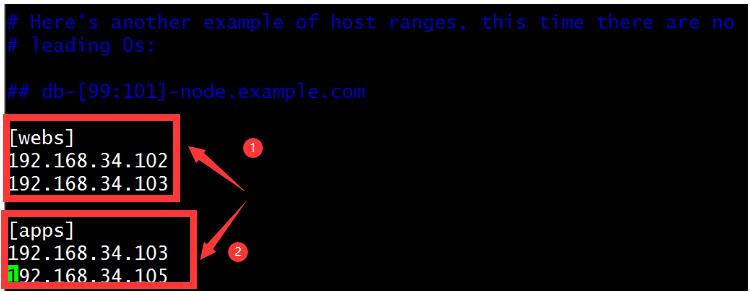
2、ping 模块,主机连通性测试
[root@ansibale~]#ansible all -m ping  尝试ping对方主机地址,由于是基于key验证,此时已经不需要输入密码。
192.168.34.102 | SUCCESS => {
    "ansible_facts": {
        "discovered_interpreter_python": "/usr/bin/python"
    },
    "changed": false,
    "ping": "pong"
}
192.168.34.103 | SUCCESS => {
    "ansible_facts": {
        "discovered_interpreter_python": "/usr/bin/python"
    },
    "changed": false,
    "ping": "pong"
}
192.168.34.105 | SUCCESS => {
    "ansible_facts": {
        "discovered_interpreter_python": "/usr/bin/python"
    },
    "changed": false,
    "ping": "pong"
}
3、Command 模块
(1)介绍
命令模块接受命令名称,后面是空格分隔的列表参数。给定的命令将在所有选定的节点上执行,(此时command模块是默认模块,可忽略-m选项)。
它不会通过shell进行处理,比如$HOME和操作如"小于"<",">", "|", ";","&"\' 工作(需要使用(shell)模块实现这些功能)。
(2)选项
chdir   ``# 在执行命令之前,先切换到该目录
creates ``# 一个文件名,当这个文件存在,则该命令不执行,可以用来做判断
removes    ``# 一个文件名,这个文件不存在,则该命令不执行,与creates相反的判断
executable  ``# 切换shell来执行命令,需要使用命令的绝对路径(不常用,常用下面shell 模块)
free_form  ``# 要执行的Linux指令,一般使用Ansible的-a参数代替(不常用,常用下面shell 模块)
(3)实例
ansible webs -m command -a \'chdir=/data ls\'
[root@ansibaledata]#ansible webs -m command -a "chdir=/data ls"  可以切换到data目录下执行ls命令
192.168.34.103 | CHANGED | rc=0 >>
f1

192.168.34.102 | CHANGED | rc=0 >>
f2
lost+found
ansible webs -m command -a \'creates=/data/f1 touch /data/f2\'
[root@ansibaledata]#ansible webs -m command -a "creates=/data/f1  touch /data/f1"  #在webs组主机里,如果两个主机data下都有f1,就不会在data下创建f1
 [WARNING]: Consider using the file module with state=touch rather than running \'touch\'.  If you need to use command
because file is insufficient you can add \'warn: false\' to this command task or set \'command_warnings=False\' in
ansible.cfg to get rid of this message.

192.168.34.102 | CHANGED | rc=0 >>


192.168.34.103 | SUCCESS | rc=0 >>
skipped, since /data/f1 exists

[root@ansibaledata]#ansible webs -m command -a "chdir=/data ls" #IP102的主机data下没有f1,就会创建f1.
192.168.34.102 | CHANGED | rc=0 >>
f1
f2
lost+found

192.168.34.103 | CHANGED | rc=0 >>
f1
ansible webs -m command -a \'removes=/data/f1 touch /data/f2\' data下有f1文件就会创建f2文件
[root@ansibaledata]#ansible webs  -a "removes=/data/f1 touch  /data/f2"  #如果有f1文件就会进行创建f2
 [WARNING]: Consider using the file module with state=touch rather than running \'touch\'.  If you need to use command
because file is insufficient you can add \'warn: false\' to this command task or set \'command_warnings=False\' in
ansible.cfg to get rid of this message.

192.168.34.102 | CHANGED | rc=0 >>

192.168.34.103 | CHANGED | rc=0 >>

[root@ansibaledata]#ansible webs -a "chdir=/data/ ls"  查询之前有f1,此时已经查到创建f2的结果
192.168.34.102 | CHANGED | rc=0 >>
f1
f2

192.168.34.103 | CHANGED | rc=0 >>
f1
f2
4、shell 模块
shell模块在远程主机上调用shell解释器运行命令,支持shell的各种功能,例如管道、echo等
在配置文件中将模块进行修改,就不需要输入-m shell选项,修改位置:
vim /etc/ansible/ansible.cfg
module_name = shell
(1)实例:
ansible webs -m shell -a \'cat /etc/passwd |grep root\'
[root@ansibaledata]#ansible webs -m shell -a "getent passwd | grep root"
192.168.34.102 | CHANGED | rc=0 >>
root:x:0:0:root:/root:/bin/bash
operator:x:11:0:operator:/root:/sbin/nologin

192.168.34.103 | CHANGED | rc=0 >>
root:x:0:0:root:/root:/bin/bash
operator:x:11:0:operator:/root:/sbin/nologin

[root@ansibaledata]#ansible webs  -a "getent passwd | grep root"  由于是默认的shell模块,不需要加-m shell
192.168.34.102 | CHANGED | rc=0 >>
root:x:0:0:root:/root:/bin/bash
operator:x:11:0:operator:/root:/sbin/nologin

192.168.34.103 | CHANGED | rc=0 >>
root:x:0:0:root:/root:/bin/bash
operator:x:11:0:operator:/root:/sbin/nologin
5、script 模块
在指定节点运行服务端的脚本
(1)示例,书写脚本:
[root@Ansible ~]#vim test.sh
#/bin/bash
touch /data/test  #创建/data/test
df -h  >> /data/test   #将df内容追加到/data/test文件中
测试效果
# ansible webs -m script -a \'/data/test.sh\'             # 在远程被控制的机器执行脚本
# ansible webs -m command -a "chdir=/data ls"    # 查看文件生成
# ansible webs -m shell -a "cat /data/test              # 查看文件内容正确
执行脚本:
[root@ansibaledata]#ansible webs -m  script  -a "/data/test.sh" 通过脚本创建文件及追加文件内容
192.168.34.102 | CHANGED => {
    "changed": true,
    "rc": 0,
    "stderr": "Shared connection to 192.168.34.102 closed.\\r\\n",
    "stderr_lines": [
        "Shared connection to 192.168.34.102 closed."
    ],
    "stdout": "",
    "stdout_lines": []
}
192.168.34.103 | CHANGED => {
    "changed": true,
    "rc": 0,
    "stderr": "Shared connection to 192.168.34.103 closed.\\r\\n",
    "stderr_lines": [
        "Shared connection to 192.168.34.103 closed."
    ],
    "stdout": "",
    "stdout_lines": []
}
[root@ansibaledata]#ansible webs -m command -a "chdir=/data/ cat test"  查询test文件内容
192.168.34.102 | CHANGED | rc=0 >>
Filesystem      Size  Used Avail Use% Mounted on
/dev/sda2        96G  913M   91G   1% /
tmpfs           743M     0  743M   0% /dev/shm
/dev/sda1       976M   33M  892M   4% /boot
/dev/sda3        48G   52M   46G   1% /data

192.168.34.103 | CHANGED | rc=0 >>
Filesystem      Size  Used Avail Use% Mounted on
/dev/sda2       100G  1.2G   99G   2% /
devtmpfs        791M     0  791M   0% /dev
tmpfs           802M     0  802M   0% /dev/shm
tmpfs           802M  9.6M  792M   2% /run
tmpfs           802M     0  802M   0% /sys/fs/cgroup
/dev/sda3        50G   33M   50G   1% /data
/dev/sda1      1014M  127M  888M  13% /boot
tmpfs           161M     0  161M   0% /run/user/0
6、copy模块
copy:复制文件到远程主机,可以改权限等
(1)用法:
① 复制文件
-a "src= dest= "
② 给定内容生成文件
-a "content= dest= "
(2)相关选项如下:
src:源,被复制到远程主机的本地文件,可以是绝对路径,也可以是相对路径。如果路径是一个目录,它将递归复制。在这种情况下,如果路径使用“/”来结尾,则只复制目录里的内容,如果没有使用“/”来结尾,则包含目录在内的整个内容全部复制,类似于``rsync``。
dest:目标,必选项。要将源文件复制到的远程主机的绝对路径,如果源文件是一个目录,那么该路径也必须是个目录
backup:被管理的远程主机已经有文件了,在覆盖之前,将源文件备份,备份文件包含时间信息。有两个选项:``yes``|no
content:用于替代“src”,可以直接设定指定文件的值
directory_mode:递归设定目录的权限,默认为系统默认权限
force:如果目标主机包含该文件,但内容不同,如果设置为``yes``,则强制覆盖,如果为no,则只有当目标主机的目标位置不存在该文件时,才复制。默认为``yes
others:所有的``file``模块里的选项都可以在这里使用
示例:
[root@ansibaledata]#ansible all -m copy -a "src=/etc/issue dest=/data/fstab owner=nobody mode=600 backup=yes"  将src(源)/etc/issue文件复制到dest(目标)的data目录下,起名叫fstab,所有者为nobody,权限为600,如果有此文件,进行备份。
192.168.34.102 | CHANGED => {
    "ansible_facts": {
        "discovered_interpreter_python": "/usr/bin/python"
    },
    "backup_file": "/data/fstab.23704.2019-11-04@15:19:19~",
    "changed": true,
    "checksum": "5c76e3b565c91e21bee303f15c728c71e6b39540",
    "dest": "/data/fstab",
    "gid": 0,
    "group": "root",
    "md5sum": "f078fe086dfc22f64b5dca2e1b95de2c",
    "mode": "0600",
    "owner": "nobody",
    "size": 23,
    "src": "/root/.ansible/tmp/ansible-tmp-1572851957.62-86571596767189/source",
    "state": "file",
    "uid": 99
}
192.168.34.103 | CHANGED => {
    "ansible_facts": {
        "discovered_interpreter_python": "/usr/bin/python"
    },
    "backup_file": "/data/fstab.21512.2019-11-04@23:19:19~",
    "changed": true,
    "checksum": "5c76e3b565c91e21bee303f15c728c71e6b39540",
    "dest": "/data/fstab",
    "gid": 0,
    "group": "root",
    "md5sum": "f078fe086dfc22f64b5dca2e1b95de2c",
    "mode": "0600",
    "owner": "nobody",
    "size": 23,
    "src": "/root/.ansible/tmp/ansible-tmp-1572851957.67-211672525698804/source",
    "state": "file",
    "uid": 99
}
192.168.34.105 | CHANGED => {
    "ansible_facts": {
        "discovered_interpreter_python": "/usr/bin/python"
    },
    "backup_file": "/data/fstab.5430.2019-11-04@15:19:17~",
    "changed": true,
    "checksum": "5c76e3b565c91e21bee303f15c728c71e6b39540",
    "dest": "/data/fstab",
    "gid": 0,
    "group": "root",
    "md5sum": "f078fe086dfc22f64b5dca2e1b95de2c",
    "mode": "0600",
    "owner": "nobody",
    "size": 23,
    "src": "/root/.ansible/tmp/ansible-tmp-1572851957.69-65920362365645/source",
    "state": "file",
    "uid": 99
}
[root@ansibaledata]#ansible all -m shell -a "ls -l /data/"   查看复制后的结果。
192.168.34.102 | CHANGED | rc=0 >>
total 12
-rw-r--r-- 1 root   root   0 Nov  4 14:35 f1
-rw-r--r-- 1 root   root   0 Nov  4 14:35 f2
-rw------- 1 nobody root  23 Nov  4 15:19 fstab
-rw------- 1 nobody root 595 Nov  4 15:16 fstab.23704.2019-11-04@15:19:19~  此文件为备份文件
-rw-r--r-- 1 root   root 224 Nov  4 14:58 test

192.168.34.105 | CHANGED | rc=0 >>
total 20
-rw------- 1 nobody root   23 Nov  4 15:19 fstab
-rw------- 1 nobody root  595 Nov  4 15:16 fstab.5430.2019-11-04@15:19:17~ 此文件为备份文件
drwxr-xr-x 7 root   root 4096 Oct 29 15:51 fulliso
drwxr-xr-x 4 root   root 4096 Oct 29 14:17 iso
-rw-r--r-- 1 root   root 1400 Oct 30 20:14 ks7_mini.cfg

192.168.34.103 | CHANGED | rc=0 >>
total 12
-rw-r--r-- 1 root   root   0 Nov  4 22:35 f1
-rw-r--r-- 1 root   root   0 Nov  4 22:35 f2
-rw------- 1 nobody root  23 Nov  4 23:19 fstab
-rw------- 1 nobody root 595 Nov  4 23:16 fstab.21512.2019-11-04@23:19:19~ 此文件为备份文件
-rw-r--r-- 1 root   root 413 Nov  4 22:58 test
copy复制目录:
[root@ansibaledata]#ansible webs -m copy -a "src=/data dest=/data/newdata"  复制/data/下的目录,并起名叫newdata
192.168.34.102 | CHANGED => {
    "changed": true,
    "dest": "/data/newdata/",
    "src": "/data"
}
192.168.34.103 | CHANGED => {
    "changed": true,
    "dest": "/data/newdata/",
    "src": "/data"
}
[root@ansibaledata]#ansible webs -m shell -a "ls -l /data/"
192.168.34.102 | CHANGED | rc=0 >>
total 16
drwxr-xr-x 3 root   root 4096 Nov  4 15:27 newdata
-rw-r--r-- 1 root   root  224 Nov  4 14:58 test

192.168.34.103 | CHANGED | rc=0 >>
total 12
drwxr-xr-x 3 root   root  18 Nov  4 23:27 newdata
-rw-r--r-- 1 root   root 413 Nov  4 22:58 test
content用法:
[root@ansibaledata]#ansible all -m copy -a \'content="[test]\\nbaseurl=file:///mnt\\ngpgcheck=0" dest=/etc/yum.repos.d/test.repo\' 对被控制端进行新建yum源,并起名叫test.repo
[root@ansibaledata]#ansible all -m shell -a "ls /etc/yum.repos.d/" 查看新建的yum源文件
192.168.34.103 | CHANGED | rc=0 >>
test.repo

192.168.34.102 | CHANGED | rc=0 >>
test.repo

192.168.34.105 | CHANGED | rc=0 >>
base.repo
test.repo

[root@ansibaledata]#ansible all -m shell -a "cat /etc/yum.repos.d/test.repo"  查询新建的yum源文件内容
192.168.34.102 | CHANGED | rc=0 >>
[test]
baseurl=file:///mnt
gpgcheck=0

192.168.34.103 | CHANGED | rc=0 >>
[test]
baseurl=file:///mnt
gpgcheck=0

192.168.34.105 | CHANGED | rc=0 >>
[test]
baseurl=file:///mnt
gpgcheck=0
7、fetch 模块
(1)介绍
从远程某主机获取文件到本地:
dest:用来存放文件的目录,例如存放目录为backup,源文件名称为/etc/profile
在主机pythonserver中,那么保存为/backup/pythonserver/etc/profile
Src:在远程拉取的文件,并且必须是一个file,不能是目录
注意:从远程获取到本地的文件,会保存到以远程主机的IP 为名的目录中,且保存目录结构
示例:
[root@ansibaledata]#ansible webs -m fetch -a "src=/etc/hosts  dest=/data"  将远处的/etc/hosts文件复制到本机的/data/目录下
[root@ansibaledata]#ll 复制的文件目录以IP地址形式显示
total 48
-rw-r---w- 1 root root  90 Nov  3 22:05 1
drwxr-xr-x 3 root root  17 Nov  4 15:43 192.168.34.102
drwxr-xr-x 3 root root  17 Nov  4 15:43 192.168.34.103
[root@ansibaledata]#tree  查看复制过来的文件
.
├── 1
├── 192.168.34.102
│   └── etc
│       └── hosts
├── 192.168.34.103
│   └── etc
│       └── hosts

[root@ansibaledata]#ansible webs -m shell -a "tar -cvf /root/data.tar /data"  可以将data目录下的文件打包到root下起名叫data.tar  打包之后就可以用fetch复制此打包文件。
 [WARNING]: Consider using the unarchive module rather than running \'tar\'.  If you need to use command because
unarchive is insufficient you can add \'warn: false\' to this command task or set \'command_warnings=False\' in
ansible.cfg to get rid of this message.

[root@ansibaledata]#ansible webs -m shell -a "ls -l /root/" 查看root下的打包文件
192.168.34.102 | CHANGED | rc=0 >>
total 68
-rw-------. 1 root root  1125 Nov  2 23:04 anaconda-ks.cfg
-rw-r--r--  1 root root 30720 Nov  4 15:50 data.tar
-rw-r--r--. 1 root root 16911 Nov  2 23:04 install.log
-rw-r--r--. 1 root root  5820 Nov  2 23:03 install.log.syslog
-rw-r--r--  1 root root   420 Nov  4 14:56 test

192.168.34.103 | CHANGED | rc=0 >>
total 44
-rw-------. 1 root root  1636 Nov  3 07:08 anaconda-ks.cfg
-rw-r--r--  1 root root 30720 Nov  4 23:50 data.tar
-rw-------. 1 root root  1385 Nov  3 07:08 original-ks.cfg
-rw-r--r--  1 root root   740 Nov  4 22:56 test
8、file 模块
设置文件属性
创建目录:-a "path= state=directory"
创建链接文件:-a "path= src= state=link"
删除文件:-a "path= state=absent"
(1)选项
(2)实例:
① ansible webs -m file -a "path=/data/f4 state=directory" 在被控制端,创建f4 目录
force:需要在两种情况下强制创建软链接,一种是源文件不存在,但之后会建立的情况下;另一种是目标软链接已存在,需要先取消之前的软链,然后创建新的软链,有两个选项:yes|no
group:定义文件/目录的属组 mode:定义文件/目录的权限
owner:定义文件/目录的属主 path:必选项,定义文件/目录的路径
recurse:递归设置文件的属性,只对目录有效 src:被链接的源文件路径,只应用于state=link的情况
dest:被链接到的路径,只应用于state=link的情况
state=:
 directory:如果目录不存在,就创建目录
 file:即使文件不存在,也不会被创建
 link:创建软链接
 hard:创建硬链接
 touch:如果文件不存在,则会创建一个新的文件,如果文件或目录已存在,则更新其最后修改时间
 absent:删除目录、文件或者取消链接文件
ansible webs -m command -a "chdir=/data ls" 查看/data 目录
[root@ansibaledata]#ansible webs -m file -a "path=/data/f4 state=directory"  在data目录下新建f4目录
[root@ansibaledata]#ansible webs -m command -a "chdir=/data ls -l"  查询新建的结果
192.168.34.102 | CHANGED | rc=0 >>
total 20
-rw-r--r-- 1 root   root    0 Nov  4 14:35 f1
-rw-r--r-- 1 root   root    0 Nov  4 14:35 f2
drwxr-xr-x 2 root   root 4096 Nov  4 16:12 f4   新建的f4目录


192.168.34.103 | CHANGED | rc=0 >>
total 12
-rw-r--r-- 1 root   root   0 Nov  4 22:35 f1
-rw-r--r-- 1 root   root   0 Nov  4 22:35 f2
drwxr-xr-x 2 root   root   6 Nov  5 00:12 f4  新建的f4目录
(3)示例:
删除目录下的文件
ansible webs -m file -a "path=/data/f4 state=absent" 删除data目录下的f4
ansible webs -m file -a "path=/data/ state=absent" 删除data目录下的文件
[root@ansibaledata]#ansible webs -m file -a "path=/data/f4 state=absent"  删除data目录下的f4
[root@ansibaledata]#ansible webs -m command -a "chdir=/data ls -l"  查看此时data目录下已经没有f4目录
192.168.34.102 | CHANGED | rc=0 >>
total 16
-rw-r--r-- 1 root   root    0 Nov  4 14:35 f1
-rw-r--r-- 1 root   root    0 Nov  4 14:35 f2

192.168.34.103 | CHANGED | rc=0 >>
total 12
-rw-r--r-- 1 root   root   0 Nov  4 22:35 f1
-rw-r--r-- 1 root   root   0 Nov  4 22:35 f2
(4)示例;
创建软链接和硬链接
ansible webs -m file -a "src=/data/fstab path=/data/fstab.link state=link" 将/data/fstab 创建软链接为/data/fstab.link
ansible webs -m file -a "src=/data/fstab path=/data/fstab1.link state=hard" 将/data/fstab创建硬链接为/data/fstab1.link
1、创建软链接:
[root@ansibaledata]#ansible webs -m file -a "src=/data/fstab path=/data/fstab.link state=link"
192.168.34.102 | CHANGED => {
[root@ansibaledata]#ansible webs -m shell -a "ls -l /data/"
192.168.34.102 | CHANGED | rc=0 >>
total 16

lrwxrwxrwx 1 root   root   11 Nov  4 16:24 fstab.link -> /data/fstab  创建成功的软链接

192.168.34.103 | CHANGED | rc=0 >>
total 12

lrwxrwxrwx 1 root   root  11 Nov  5 00:24 fstab.link -> /data/fstab  创建成功的软链接
2、创建硬链接:
[root@ansibaledata]#ansible webs -m file -a "src=/data/fstab path=/data/fstab1.link state=hard"
[root@ansibaledata]#ansible webs -m shell -a "ls -l /data/"
192.168.34.102 | CHANGED | rc=0 >>
total 20
-rw------- 2 nobody root   23 Nov  4 15:19 fstab
-rw------- 2 nobody root   23 Nov  4 15:19 fstab1.link

192.168.34.103 | CHANGED | rc=0 >>
total 16
-rw------- 2 nobody root  23 Nov  4 23:19 fstab
-rw------- 2 nobody root  23 Nov  4 23:19 fstab1.link
9、hostname:管理主机名
示例:
ansible 192.168.34.102 -m hostname -a "name=centos102" 修改为centos102
ansible 192.168.34.102 -a "hostname" 查看当前修改后的主机名
[root@ansibaledata]#ansible 192.168.34.102  -m hostname -a "name=centos102"
192.168.34.102 | CHANGED => {
    "ansible_facts": {
        "ansible_domain": "",
        "ansible_fqdn": "centos102",
        "ansible_hostname": "centos102",
        "ansible_nodename": "centos102",
        "discovered_interpreter_python": "/usr/bin/python"
    },
    "changed": true,
    "name": "centos102"
}
[root@ansibaledata]#ansible 192.168.34.102 -a "hostname"
192.168.34.102 | CHANGED | rc=0 >>
centos102
10、cron 模块
管理cron计划任务;-a "": 设置管理节点生成定时任务
(1)选项:
① action:
cron backup=   #如果设置,创建一个crontab备份 【yes|no】
cron_file=    #如果指定, 使用这个文件cron.d,而不是单个用户
② crontab
  day=     #日应该运行的工作( 1-31, *, */2, )
  hour=   # 小时 ( 0-23, *, */2, )
  minute=    #分钟( 0-59, *, */2, )
  month=     #月( 1-12, *, /2, )
  weekday   # 周 ( 0-6 for Sunday-Saturday,, )
  job=       #指明运行的命令是什么
  name=   #定时任务描述
  reboot    # 任务在重启时运行,不建议使用,建议使用special_time
  special_time   #特殊的时间范围,参数:reboot(重启时),annually(每年),monthly(每月),weekly(每周),daily(每天),hourly(每小时)
  state   #指定状态,present表示添加定时任务,也是默认设置,absent表示删除定时任务
  user    #以哪个用户的身份执行
(1)示例:
开启计划任务:
[root@ansibaledata]#ansible webs -m  cron -a  "minute=*/5 weekday=0,6 job="/usr/sbin/update 192.168.34.101 &> /dev/null" name=synctime"  只在周六周日每五分钟将时间与192.168.34.101进行同步,起名叫synctime
[root@ansibaledata]#ansible webs -a "crontab -l"查询当前执行的任务结果。
禁用计划任务:
[root@ansibaledata]#ansible webs -m  cron -a  "minute=*/5 weekday=0,6 job="/usr/sbin/update 192.168.34.101 &> /dev/null" name=synctime disabled=ture"  只在周六周日每五分钟将时间与192.168.34.101进行同步计划任务进行禁用
[root@ansibaledata]#ansible webs -a "crontab -l"查询当前执行的任务结果。
(2)示例:
在远程主机上,定义每5分钟,清空一次防火墙
① ansible web -m cron -a "name=\'Clear the iptable\' minute=*/5 job=\'/sbin/iptables -F\'"
ansible web -m shell -a "crontab -l" 查看
[root@ansibaledata]#ansible webs -m cron -a "name=\'Clean the iptable\' minute=*/5 job=\'/sbin/iptables -F &> /dev/full\'"
192.168.34.102 | CHANGED => {
    "ansible_facts": {
        "discovered_interpreter_python": "/usr/bin/python"
    },
    "changed": true,
    "envs": [],
    "jobs": [
        "Clean the iptable"
    ]
}
192.168.34.103 | CHANGED => {
    "ansible_facts": {
        "discovered_interpreter_python": "/usr/bin/python"
    },
    "changed": true,
    "envs": [],
    "jobs": [
        "Clean the iptable"
    ]
}
[root@ansibaledata]#ansible webs -a "crontab -l"
192.168.34.102 | CHANGED | rc=0 >>
#Ansible: Clean the iptable
*/5 * * * * /sbin/iptables -F

192.168.34.103 | CHANGED | rc=0 >>
#Ansible: Clean the iptable
*/5 * * * * /sbin/iptables -F
(3)启动当前的计划任务
[root@ansibaledata]#ansible webs -m cron -a "name=\'Clean the iptable\' minute=*/5 job=\'/sbin/iptables -F disabled=false\'" 开启当前的计划任务,起名叫Clean the  iptable
192.168.34.102 | CHANGED => {
    "ansible_facts": {
        "discovered_interpreter_python": "/usr/bin/python"
    },
    "changed": true,
    "envs": [],
    "jobs": [
        "Clean the iptable"
    ]
}
192.168.34.103 | CHANGED => {
    "ansible_facts": {
        "discovered_interpreter_python": "/usr/bin/python"
    },
    "changed": true,
    "envs": [],
    "jobs": [
        "Clean the iptable"
    ]
}
[root@ansibaledata]#ansible webs -a "crontab -l"
192.168.34.102 | CHANGED | rc=0 >>
#Ansible: Clean the iptable
*/5 * * * * /sbin/iptables -F disabled=false  开启结果

192.168.34.103 | CHANGED | rc=0 >>
#Ansible: Clean the iptable
*/5 * * * * /sbin/iptables -F disabled=false
(4)删除计划任务:
[root@ansibaledata]#ansible webs -m cron -a "name=\'Clean the iptable\' state=absent"  删除计划任务,只需要将对应的计划任务名称删掉即可。
192.168.34.102 | CHANGED => {
    "ansible_facts": {
        "discovered_interpreter_python": "/usr/bin/python"
    },
    "changed": true,
    "envs": [],
    "jobs": []
}
192.168.34.103 | CHANGED => {
    "ansible_facts": {
        "discovered_interpreter_python": "/usr/bin/python"
    },
    "changed": true,
    "envs": [],
    "jobs": []
}
[root@ansibaledata]#ansible webs -a "crontab -l"  查询结果,此时已经没有计划任务
192.168.34.102 | CHANGED | rc=0 >>


192.168.34.103 | CHANGED | rc=0 >>
11、yum 模块
(1)选项
conf_file    #设定远程yum安装时所依赖的配置文件。如配置文件没有在默认的位置。
disable_gpg_check   #是否禁止GPG checking,只用于`present‘ or `latest’。
disablerepo   #临时禁止使用yum库。 只用于安装或更新时。
enablerepo   #临时使用的yum库。只用于安装或更新时。
name=    #所安装的包的名称
state=     #present安装, latest安装最新的, absent 卸载软件。
update_cache    #强制更新yum的缓存。
(2)示例
①i安装dstat 包,忽略gpg_check
ansible webs -m yum -a "name=dstat "
卸载dstat 包
ansible webs -m yum -a "name=dstat state=absent"
安装多个包:
ansible webs -m yum -a "name=httpd,vsftpd,memacahe"
卸载多个包;
ansible webs -m yum -a "name=httpd,vsftpd,memacahe,state=absent"
[root@ansibaledata]#ansible webs -m yum -a "name=dstat"  安装dstat包
192.168.34.102 | CHANGED => {
    "ansible_facts": {
        "discovered_interpreter_python": "/usr/bin/python"
    },
    "changed": true,
    "changes": {
        "installed": [
            "dstat"
        ]
    },
    "msg": "Repository \'base\' is missing name in configuration, using id\\n",
    "rc": 0,
    "results": [
        "Loaded plugins: fastestmirror, security\\nSetting up Install Process\\nLoading mirror speeds from cached hostfile\\nResolving Dependencies\\n--> Running transaction check\\n---> Package dstat.noarch 0:0.7.0-3.el6 will be installed\\n--> Finished Dependency Resolution\\n\\nDependencies Resolved\\n\\n================================================================================\\n Package         Arch             Version                  Repository      Size\\n================================================================================\\nInstalling:\\n dstat           noarch           0.7.0-3.el6              base           146 k\\n\\nTransaction Summary\\n================================================================================\\nInstall       1 Package(s)\\n\\nTotal download size: 146 k\\nInstalled size: 665 k\\nDownloading Packages:\\nRunning rpm_check_debug\\nRunning Transaction Test\\nTransaction Test Succeeded\\nRunning Transaction\\n\\r  Installing : dstat-0.7.0-3.el6.noarch                                     1/1 \\n\\r  Verifying  : dstat-0.7.0-3.el6.noarch                                     1/1 \\n\\nInstalled:\\n  dstat.noarch 0:0.7.0-3.el6                                                    \\n\\nComplete!\\n"
    ]
}
192.168.34.103 | CHANGED => {
    "ansible_facts": {
        "discovered_interpreter_python": "/usr/bin/python"
    },
    "changed": true,
    "changes": {
        "installed": [
            "dstat"
        ]
    },
    "msg": "Repository \'base\' is missing name in configuration, using id\\n",
    "rc": 0,
    "results": [
        "Loaded plugins: fastestmirror\\nLoading mirror speeds from cached hostfile\\nResolving Dependencies\\n--> Running transaction check\\n---> Package dstat.noarch 0:0.7.2-12.el7 will be installed\\n--> Finished Dependency Resolution\\n\\nDependencies Resolved\\n\\n================================================================================\\n Package         Arch             Version                  Repository      Size\\n================================================================================\\nInstalling:\\n dstat           noarch           0.7.2-12.el7             base           163 k\\n\\nTransaction Summary\\n================================================================================\\nInstall  1 Package\\n\\nTotal download size: 163 k\\nInstalled size: 752 k\\nDownloading packages:\\nRunning transaction check\\nRunning transaction test\\nTransaction test succeeded\\nRunning transaction\\n  Installing : dstat-0.7.2-12.el7.noarch                                    1/1 \\n  Verifying  : dstat-0.7.2-12.el7.noarch                                    1/1 \\n\\nInstalled:\\n  dstat.noarch 0:0.7.2-12.el7                                                   \\n\\nComplete!\\n"
    ]
}
[root@ansibaledata]#ansible webs -a "rpm -q dstat"   查看此包是否安装成功
 [WARNING]: Consider using the yum, dnf or zypper module rather than running \'rpm\'.  If you need to use command
because yum, dnf or zypper is insufficient you can add \'warn: false\' to this command task or set
\'command_warnings=False\' in ansible.cfg to get rid of this message.

192.168.34.102 | CHANGED | rc=0 >>
dstat-0.7.0-3.el6.noarch

192.168.34.103 | CHANGED | rc=0 >>
dstat-0.7.2-12.el7.noarch

[root@ansibaledata]#ansible webs -m yum -a "name=dstat state=absent"  卸载dstat包
[root@ansibaledata]#ansible webs -a "rpm -q dstat"  查看当前的包是否还存在
 [WARNING]: Consider using the yum, dnf or zypper module rather than running \'rpm\'.  If you need to use command
because yum, dnf or zypper is insufficient you can add \'warn: false\' to this command task or set
\'command_warnings=False\' in ansible.cfg to get rid of this message.

192.168.34.102 | FAILED | rc=1 >>
package dstat is not installednon-zero return code

192.168.34.103 | FAILED | rc=1 >>
package dstat is not installednon-zero return code
(3)示例:
ansible webs -m yum -a "name=dstat **update_cache**=yes" 更新缓存
12、service 模块
服务程序管理
(1)选项
arguments   #命令行提供额外的参数
enabled   #设置开机启动。
name=     #服务名称
runlevel    #开机启动的级别,一般不用指定。
sleep    #在重启服务的过程中,是否等待。如在服务关闭以后等待2秒再启动。
state     #started启动服务, stopped停止服务, restarted重启服务, reloaded重载配置
(2)实例
1、远程安装httpd服务
ansible all -m yum -a "name=httpd"
2、远程开启httpd服务:
ansible all -m service -a "name=httpd state=started" 远程操作开启服务
ansible all -m service -a "name=httpd state=enabled" 开机设置启动服务
[root@ansibaledata]#ansible all -m yum -a "name=httpd"  安装http服务
[root@ansibaledata]#ansible all -m service -a "name=httpd state=started"  打开http服务端口
[root@ansibaledata]#ansible all -a "ss -nlt"  查看当前的服务端口
192.168.34.102 | CHANGED | rc=0 >>
State      Recv-Q Send-Q        Local Address:Port          Peer Address:Port
<strong>LISTEN     0      128                      :::80                      :::*
</strong>LISTEN     0      128                      :::22                      :::*
LISTEN     0      128                       *:22                       *:*
LISTEN     0      100                     ::1:25                      :::*
LISTEN     0      100               127.0.0.1:25                       *:*

192.168.34.103 | CHANGED | rc=0 >>
State      Recv-Q Send-Q Local Address:Port               Peer Address:Port
LISTEN     0      128          *:22                       *:*
LISTEN     0      100    127.0.0.1:25                       *:*
<strong>LISTEN     0      128         :::80                      :::* </strong>
LISTEN     0      128         :::22                      :::*
LISTEN     0      100        ::1:25                      :::*

192.168.34.105 | CHANGED | rc=0 >>
State      Recv-Q Send-Q        Local Address:Port          Peer Address:Port
LISTEN     0      128               127.0.0.1:6010                     *:*
LISTEN     0      128                     ::1:6010                    :::*
LISTEN     0      128                      :::111                     :::*
LISTEN     0      128                       *:111                      *:*
<strong>LISTEN     0      128                      :::80                      :::*   </strong>
LISTEN     0      128                       *:44404                    *:*
LISTEN     0      128                      :::58453                   :::*
LISTEN     0      128                      :::22                      :::*
LISTEN     0      128                       *:22                       *:*
LISTEN     0      64                       :::23                      :::*
LISTEN     0      128               127.0.0.1:631                      *:*
LISTEN     0      128                     ::1:631                     :::*
LISTEN     0      100                     ::1:25                      :::*
LISTEN     0      100               127.0.0.1:25                       *:*
(3)远程关闭服务:
ansible all -m service -a "name=httpd state=stopped"
[root@ansibaledata]#ansible all -m service -a "name=httpd state=stopped"  关闭http服务
[root@ansibaledata]#ansible all -a "ss -nlt"  查此时的80端口已经没有了
192.168.34.102 | CHANGED | rc=0 >>
State      Recv-Q Send-Q        Local Address:Port          Peer Address:Port
LISTEN     0      128                      :::22                      :::*
LISTEN     0      128                       *:22                       *:*
LISTEN     0      100                     ::1:25                      :::*
LISTEN     0      100               127.0.0.1:25                       *:*

192.168.34.103 | CHANGED | rc=0 >>
State      Recv-Q Send-Q Local Address:Port               Peer Address:Port
LISTEN     0      128          *:22                       *:*
LISTEN     0      100    127.0.0.1:25                       *:*
LISTEN     0      128         :::22                      :::*
LISTEN     0      100        ::1:25                      :::*

192.168.34.105 | CHANGED | rc=0 >>
State      Recv-Q Send-Q        Local Address:Port          Peer Address:Port
LISTEN     0      128               127.0.0.1:6010                     *:*
LISTEN     0      128                     ::1:6010                    :::*
LISTEN     0      128                      :::111                     :::*
LISTEN     0      128                       *:111                      *:*
LISTEN     0      128                       *:44404                    *:*
LISTEN     0      128                      :::58453                   :::*
LISTEN     0      128                      :::22                      :::*
LISTEN     0      128                       *:22                       *:*
LISTEN     0      64                       :::23                      :::*
LISTEN     0      128               127.0.0.1:631                      *:*
LISTEN     0      128                     ::1:631                     :::*
LISTEN     0      100                     ::1:25                      :::*
LISTEN     0      100               127.0.0.1:25                       *:*
13、user 模块
用户模块,管理用户帐号
(1)选项
comment        # 用户的描述信息
createhome    # 是否创建家目录
force      # 在使用state=absent是, 行为与userdel -force一致.
group     # 指定基本组
groups   # 指定附加组,如果指定为(groups=)表示删除所有组
home     # 指定用户家目录
move_home    # 如果设置为home=时, 试图将用户主目录移动到指定的目录
name     # 指定用户名
non_unique     # 该选项允许改变非唯一的用户ID值
password       # 指定用户密码,若指定的是明文密码,是不能用的,需用md5加密过后的密码
remove   # 在使用state=absent时, 行为是与userdel -remove一致
shell      # 指定默认shell
state      # 设置帐号状态,不指定为创建,指定值为absent表示删除
system  # 当创建一个用户,设置这个用户是系统用户。这个设置不能更改现有用户
uid     # 指定用户的uid
update_password    # 更新用户密码
示例:
-
- ansible all -m user -a \'name=test comment="test  user" uid=200 home=/data/testhome group=root groups=bin,nobody  shell=/sbin/nologin\' 创建一个test用户的详细信息

- ansible all -m user -a "name=test state=absent" 删除用户信息,但是不会删除用户家目录的文件信息
- ansible all -a "getent passwd test" 查看当前创建的用户信息
- ansiable all -a "name=test state=absent remove=yes" 跟上后面的remove=yes就会删除家目录信息
测试效果
[root@ansibaledata]#ansible all -m user -a \'name=test comment="test user" uid=200 home=/data/testhome group=root groups=bin,nobody shell=/sbin/nologin\'  创建一个test用户的详细信息
[root@ansibaledata]#ansible all -a "getent passwd test"
192.168.34.102 | CHANGED | rc=0 >>
test:x:200:0:test user:/data/testhome:/sbin/nologin
192.168.34.103 | CHANGED | rc=0 >>
test:x:200:0:test user:/data/testhome:/sbin/nologin
192.168.34.105 | CHANGED | rc=0 >>
test:x:200:0:test user:/data/testhome:/sbin/nologin
[root@ansibaledata]#ansible all -m user -a "name=test state=absent"  删除用户文件信息
[root@ansibaledata]#ansible all -a "getent passwd test"   查看用户文件信息
192.168.34.102 | FAILED | rc=2 >>
non-zero return code
192.168.34.103 | FAILED | rc=2 >>
non-zero return code
192.168.34.105 | FAILED | rc=2 >>
non-zero return code
14、group模块
(1)选项
gid         # 设置组的GID号
name=  # 管理组的名称
state     # 指定组状态,默认为创建,设置值为absent为删除
system  # 设置值为yes,表示为创建系统组
(2)示例:
-
-  ansible webs -m group -a "name=testgroup system=yes“ 创建系统组
-  ansible webs -m group -a "name=testgroup state=absent" 删除组
15、setup 模块
查机器的所有facts信息
(1)介绍
① facts 组件是Ansible 用于采集被管机器设备信息的一个功能,我们可以使用setup 模块查机器的所有facts信息,可以使用filter来查看指定信息。整个facts信息被包装在一个JSON格式的数据结构中,ansible_facts是最上层的值。
② facts就是变量,内建变量 。每个主机的各种信息,cpu颗数、内存大小等。会存在facts中的某个变量中。调用后返回很多对应主机的信息,在后面的操作中可以根据不同的信息来做不同的操作。如redhat系列用yum安装,而debian系列用apt来安装软件。
③ setup模块,主要用于获取主机信息,在playbooks里经常会用到的一个参数gather_facts就与该模块相关。
④ setup模块下经常使用的一个参数是filter 参数,查询的是全部信息,很多,filter 相当于匹配筛选。
示例:
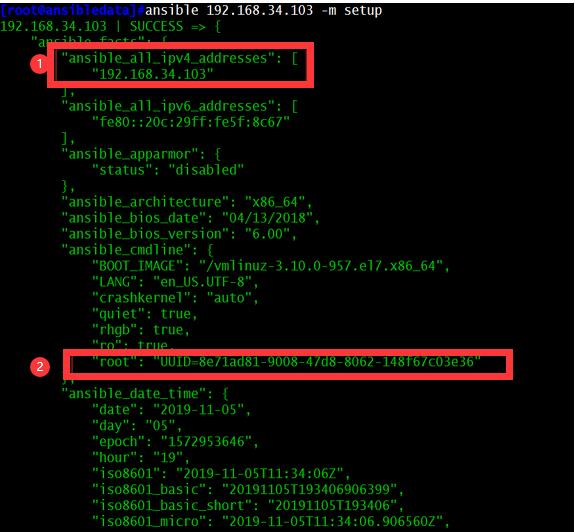
(1)查询当前机器的全部信息:
ansible 192.168.34.103 -m setup
(2) 查看当前主机的总内存大小:
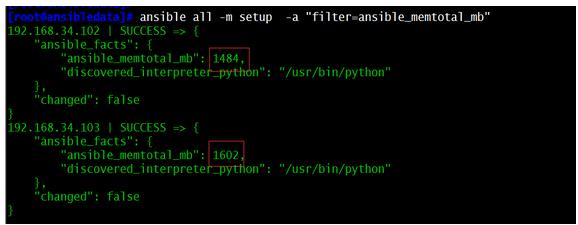
ansible all -m setup -a "filter=ansible_memtotal_mb" 其中filter是过滤的含义。
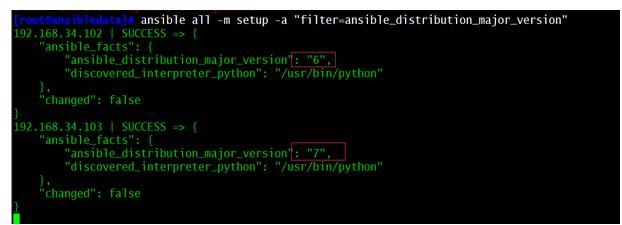
(3)查看每个主机的centos版本号
ansible all -m setup -a "filter=ansible_distribution_major_version"
实验三:Ansible playbook 的使用
1、介绍
(1)理解
① playbook是ansible用于配置,部署,和管理被控节点的剧本。
② 通过playbook的详细描述,执行其中的一系列tasks,可以让远端主机达到预期的状态。playbook就像Ansible控制器给被控节点列出的的一系列to-do-list,而被控节点必须要完成。
③ 也可以这么理解,playbook 字面意思,即剧本,现实中由演员按照剧本表演,在Ansible中,这次由计算机进行表演,由计算机安装,部署应用,提供对外服务,以及组织计算机处理各种各样的事情
(2)Ansible playbook 使用场景
① 执行一些简单的任务,使用ad-hoc命令可以方便的解决问题,但是有时一个设施过于复杂,需要大量的操作时候,执行的ad-hoc命令是不适合的,这时最好使用playbook。
② 就像执行shell命令与写shell脚本一样,也可以理解为批处理任务,不过playbook有自己的语法格式。
③ 使用playbook你可以方便的重用这些代码,可以移植到不同的机器上面,像函数一样,最大化的利用代码。在你使用Ansible的过程中,你也会发现,你所处理的大部分操作都是编写playbook。可以把常见的应用都编写成playbook,之后管理服务器会变得十分简单。
(2)特性
YAML的可读性好
YAML和脚本语言的交互性好
YAML使用实现语言的数据类型
YAML有一个一致的信息模型
YAML易于实现
YAML可以基于流来处理
YAML表达能力强,扩展性好
2、Ansible playbook 格式
(1)介绍
① playbook由YMAL语言编写。YAML( /ˈjæməl/ )参考了其他多种语言,包括:XML、C语言、Python、Perl以及电子邮件格式RFC2822,Clark Evans在2001年5月在首次发表了这种语言,另外Ingy döt Net与Oren Ben-Kiki也是这语言的共同设计者。
② YMAL格式是类似于JSON的文件格式,便于人理解和阅读,同时便于书写。首先学习了解一下YMAL的格式,对我们后面书写playbook很有帮助。以下为playbook常用到的YMAL格式。
(2)语法介绍
 1、在单一档案中,可用连续三个连字号(---)区分多个档案。另外,还有选择性的连续三个点号( ... )用来表示档案结尾
 2、次行开始正常写Playbook的内容,一般建议写明该Playbook的功能
 3、使用#号注释代码
 4、缩进必须是统一的,不能空格和tab混用
 5、缩进的级别也必须是一致的,同样的缩进代表同样的级别,程序判别配置的级别是通过缩进结合换行来实现的
 6、YAML文件内容是区别大小写的,k/v的值均需大小写敏感
 7、k/v的值可同行写也可换行写。同行使用:分隔
 8、v可是个字符串,也可是另一个列表
 9、一个完整的代码块功能需最少元素需包括 name: task
 10、一个name只能包括一个task
 11、YAML文件扩展名通常为yml或yaml
(3)Playbooks 配置文件的基础组件
① hosts:运行指定任务的目标主机;使用hosts指示使用哪个主机或主机组来运行下面的tasks,每个playbook都必须指定hosts,hosts也可以使用通配符格式。主机或主机组在inventory清单中指定,可以使用系统默认的/etc/ansible/hosts,也可以自己编辑,在运行的时候加上-i选项,指定清单的位置即可。在运行清单文件的时候,-list-hosts选项会显示那些主机将会参与执行task的过程中。
② remoute_user: 在远程主机上执行任务的用户;指定远端主机中的哪个用户来登录远端系统,在远端系统执行task的用户,可以任意指定,也可以使用sudo,但是用户必须要有执行相应task的权限。
③ sudo_user:
④ tasks:任务列表;指定远端主机将要执行的一系列动作。tasks的核心为ansible的模块,前面已经提到模块的用法。
 tasks:包含name和要执行的模块,name是可选的,只是为了便于用户阅读,不过还是建议加上去,模块是必须的,同时也要给予模块相应的参数。
⑤ templates:包含了模板语法的文本文件;
⑥ variables 变量
⑦ handlers:由特定条件触发的任务;
(4)注意:shell和command模块后面直接跟命令,而非key=value类的参数列表;
① 某任务的状态在运行后为changed时,可通过"notify"通知给相应的handlers,两个文件名称要一致;

② 任务可以通过"tags"打标签,而后可在ansible-以上是关于ansible用法的主要内容,如果未能解决你的问题,请参考以下文章