Linux PPPOE 服务搭建测试
Posted
tags:
篇首语:本文由小常识网(cha138.com)小编为大家整理,主要介绍了Linux PPPOE 服务搭建测试相关的知识,希望对你有一定的参考价值。
最近服务器那边需要搭建一套PPPOE拨号上网,网上找了好几次都感觉不能使用,我在基础上做了修改,可以使用了,作为资料共享给大家,共同学习。
文件版本: | V1.0 | 文件编号: | R&D0030 |
发布日期: | 2017-01-17 | 编 制: | xxxxxx |
审 批: |
PPPOE服务器
xxx 版权所有
目录
修订记录
版本号 | 发布日期 | 拟制人 | 修订描述 |
V1.0 | 2017-01-17 | xxx | 首次发布 |
PPPOE服务器
与传统的接入方式相比,PPPoE具有较高的性能价格比,它在包括小区组网建设等一系列应用中被广泛采用,目前流行的宽带接入方式ADSL 就使用了PPPoE协议。
1. 系统部署基础
服务器的ip规划
机器 | IP2 | 网关 | 系统 | 作用 |
PPPOE server | 192.168.10.109 192.168.5.109 |
192.168.5.1 | Linux Centos 6.8 x64 | PPPOE 服务端 |
PPPOE Client | 192.168.10.90 | Xp sp3 x86 | PPPOE客户端 |
1.1 服务端搭建
查看是否安装所需要的包。
[[email protected] ppp]# rpm -qa |grep rp-pppoe
rp-pppoe-3.10-16.el6.x86_64
配置文件目录在/etc/ppp下
[[email protected] ppp]# cp chap-secrets chap-secrets.ori
[[email protected] ppp]# cp pppoe-server-options pppoe-server-options.ori
[[email protected] ppp]# ll
total 64
-rw-------  1 root root  189 Jan 16 19:09 chap-secrets
-rw-------  1 root root   78 Jan 16 18:33 chap-secrets.ori
-rwxr-xr-x. 1 root root 2276 May 11  2016 firewall-masq
-rwxr-xr-x. 1 root root  978 May 11  2016 firewall-standalone
-rwxr-xr-x. 1 root root  386 Apr 12  2016 ip-down
-rwxr-xr-x. 1 root root 3262 Apr 12  2016 ip-down.ipv6to4
-rwxr-xr-x. 1 root root  430 Apr 12  2016 ip-up
-rwxr-xr-x. 1 root root 6517 Apr 12  2016 ip-up.ipv6to4
-rwxr-xr-x. 1 root root 1687 Apr 12  2016 ipv6-down
-rwxr-xr-x. 1 root root 3196 Apr 12  2016 ipv6-up
-rw-r--r--. 1 root root    5 Mar 16  2015 options
-rw-------. 1 root root   77 Mar 16  2015 pap-secrets
drwxr-xr-x. 2 root root 4096 Jul 13  2016 peers
-rw-r--r--  1 root root  140 Jan 16 18:33 pppoe-server-options
-rw-r--r--  1 root root  104 Jan 16 18:32 pppoe-server-options.ori
chap-secrets.ori和pppoe-server-options.ori 是我手动备份的文件,主要修改这两个配置文件
修改配置文件
配置文件pppoe-server-options修改如下:
# PPP options for the PPPoE server
# LIC: GPL
#require-pap
require-chap #验证方式,如果选pap的话,就到pap-secrets文件中增加用户。
login
lcp-echo-interval 10
lcp-echo-failure 2
ms-dns 202.106.0.20
ms-dns 8.8.8.8
具体操作如下
[[email protected] ppp]# cat pppoe-server-options
# PPP options for the PPPoE server
# LIC: GPL
require-chap
login
lcp-echo-interval 10
lcp-echo-failure 2
ms-dns 202.106.0.20
ms-dns 8.8.8.8
添加用户,设置账户和密码
[[email protected] ppp]# cat chap-secrets
# Secrets for authentication using CHAP
# clientserversecretIP addresses
cmz              *      cmz                      *
cmz2             *      cmz2                    192.168.10.3
#可以指定客户端的地址也可以不指定
开启内核ip转发
[[email protected] ppp]# sed -i "s#net.ipv4.ip_forward = 0#net.ipv4.ip_forward = 1#g" /etc/sysctl.conf
[[email protected] ppp]# sysctl -p
net.ipv4.ip_forward = 1
防火墙设置,设置局域网内机器共享上网
[[email protected] ppp]# iptables -t nat -A POSTROUTING -o eth0 -j MASQUERADE
[[email protected] ppp]# iptables -t nat -nL
Chain PREROUTING (policy ACCEPT)
target     prot opt source               destination

Chain POSTROUTING (policy ACCEPT)
target     prot opt source               destination
MASQUERADE  all  --  0.0.0.0/0            0.0.0.0/0

Chain OUTPUT (policy ACCEPT)
target     prot opt source               destination
解释
# 1. eth0为出口的网卡,就是可以和外网连通的那块。到现在这个pppoe服务器就可以工作了。
# 2. 这不做,就会产生,拨号成功,但是上不了。
启动pppoe服务
[[email protected] ppp]# pppoe-server -I eth1 -L 192.168.10.109 192.168.10.2 -N 20
I:指定响应PPPOE请求的端口,现在使用的eth1,也就是内网的
L:PPPOE服务器的IP地址,客户端连接可以看到的服务器地址
R:这是分配给客户端的地址池起始地址,本例中从192.168.10.2开始
N:地址池的IP地址递增几个,本例中添增10,也就是从192.168.10.2开始分配,一共分配20个IP地址
设置来及启动开机启动
[[email protected] ppp]#
echo "pppoe-server -I eth1 -L 192.168.10.109 192.168.10.2 -N 20" >> /etc/rc.d/rc.local

[[email protected] ppp]# ifconfig
eth0      Link encap:Ethernet  HWaddr 00:0C:29:87:F2:BF
          inet addr:192.168.5.109  Bcast:192.168.5.255  Mask:255.255.255.0
          inet6 addr: fe80::20c:29ff:fe87:f2bf/64 Scope:Link
          UP BROADCAST RUNNING MULTICAST  MTU:1500  Metric:1
          RX packets:15648 errors:0 dropped:0 overruns:0 frame:0
          TX packets:10539 errors:0 dropped:0 overruns:0 carrier:0
          collisions:0 txqueuelen:1000
          RX bytes:16369623 (15.6 MiB)  TX bytes:982976 (959.9 KiB)

eth1      Link encap:Ethernet  HWaddr 00:0C:29:87:F2:C9
          inet addr:192.168.10.109  Bcast:192.168.10.255  Mask:255.255.255.0
          inet6 addr: fe80::20c:29ff:fe87:f2c9/64 Scope:Link
          UP BROADCAST RUNNING MULTICAST  MTU:1500  Metric:1
          RX packets:6002 errors:0 dropped:0 overruns:0 frame:0
          TX packets:814 errors:0 dropped:0 overruns:0 carrier:0
          collisions:0 txqueuelen:1000
          RX bytes:453691 (443.0 KiB)  TX bytes:60473 (59.0 KiB)

lo        Link encap:Local Loopback
          inet addr:127.0.0.1  Mask:255.0.0.0
          inet6 addr: ::1/128 Scope:Host
          UP LOOPBACK RUNNING  MTU:65536  Metric:1
          RX packets:23 errors:0 dropped:0 overruns:0 frame:0
          TX packets:23 errors:0 dropped:0 overruns:0 carrier:0
          collisions:0 txqueuelen:0
          RX bytes:2160 (2.1 KiB)  TX bytes:2160 (2.1 KiB)

ppp0      Link encap:Point-to-Point Protocol
          inet addr:192.168.10.109  P-t-P:192.168.1.3  Mask:255.255.255.255
          UP POINTOPOINT RUNNING NOARP MULTICAST  MTU:1480  Metric:1
          RX packets:2184 errors:0 dropped:0 overruns:0 frame:0
          TX packets:471 errors:0 dropped:0 overruns:0 carrier:0
          collisions:0 txqueuelen:3
          RX bytes:130073 (127.0 KiB)  TX bytes:28127 (27.4 KiB)
1.2 客户端Windows测试
客户端拨号流程
1. 拨号之前检查
2. 拨号
在XP系统中选择宽带连接,输入正确的账号和密码,之前服务端已经设置好了,账号和密码都是cmz。
选择客户端拨号登录
此时说明拨号已经ok了,检查是否能上网。
3. 拨号之后检查
拨号成功后检后检查客户端是否能正常上网。
以下是dos命令行,详细测试过程:

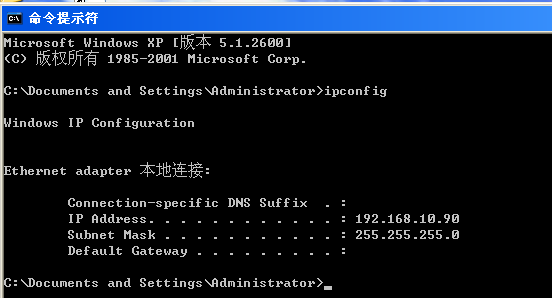
没有拨号之前操作

Microsoft Windows XP [版本 5.1.2600]
(C) 版权所有 1985-2001 Microsoft Corp.

C:\Documents and Settings\Administrator>ipconfig

Windows IP Configuration


Ethernet adapter 本地连接:

        Connection-specific DNS Suffix  . :
        IP Address. . . . . . . . . . . . : 192.168.10.90   #本地就是之前内网的地址
        Subnet Mask . . . . . . . . . . . : 255.255.255.0
        Default Gateway . . . . . . . . . :

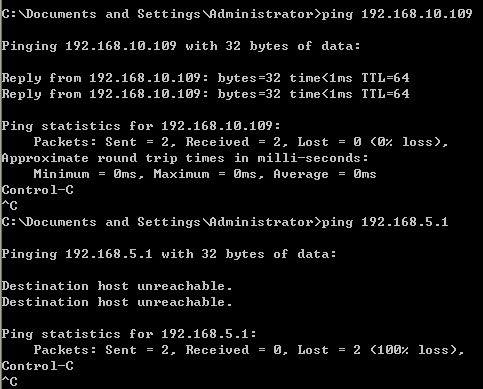
C:\Documents and Settings\Administrator>ping 192.168.10.109  #可以ping通pppoe服务器端内网的地址

Pinging 192.168.10.109 with 32 bytes of data:

Reply from 192.168.10.109: bytes=32 time<1ms TTL=64
Reply from 192.168.10.109: bytes=32 time<1ms TTL=64

Ping statistics for 192.168.10.109:
    Packets: Sent = 2, Received = 2, Lost = 0 (0% loss),
Approximate round trip times in milli-seconds:
    Minimum = 0ms, Maximum = 0ms, Average = 0ms
Control-C
^C
C:\Documents and Settings\Administrator>ping 192.168.5.1   #虽然能ping通pppoe内网地址但是ping不同pppoe服务端外网地址网关地址,此时还没有拨号

Pinging 192.168.5.1 with 32 bytes of data:

Destination host unreachable.
Destination host unreachable.

Ping statistics for 192.168.5.1:
    Packets: Sent = 2, Received = 0, Lost = 2 (100% loss),
Control-C
^C
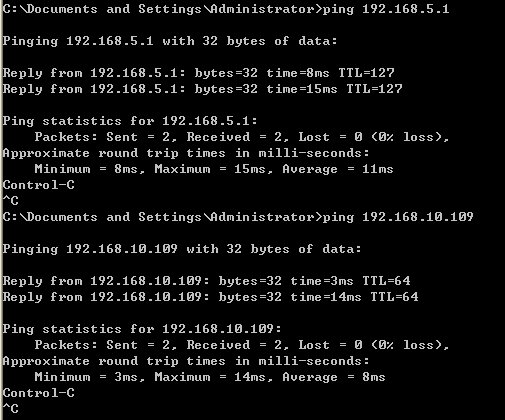
没有拨号之后操作

C:\Documents and Settings\Administrator>ping 192.168.5.1

Pinging 192.168.5.1 with 32 bytes of data:

Reply from 192.168.5.1: bytes=32 time=8ms TTL=127
Reply from 192.168.5.1: bytes=32 time=15ms TTL=127

Ping statistics for 192.168.5.1:
    Packets: Sent = 2, Received = 2, Lost = 0 (0% loss),
Approximate round trip times in milli-seconds:
    Minimum = 8ms, Maximum = 15ms, Average = 11ms
Control-C
^C
C:\Documents and Settings\Administrator>ping 192.168.10.109

Pinging 192.168.10.109 with 32 bytes of data:

Reply from 192.168.10.109: bytes=32 time=3ms TTL=64
Reply from 192.168.10.109: bytes=32 time=14ms TTL=64

Ping statistics for 192.168.10.109:
    Packets: Sent = 2, Received = 2, Lost = 0 (0% loss),
Approximate round trip times in milli-seconds:
    Minimum = 3ms, Maximum = 14ms, Average = 8ms
Control-C
^C
C:\Documents and Settings\Administrator>ipconfig

Windows IP Configuration


Ethernet adapter 本地连接:

        Connection-specific DNS Suffix  . :
        IP Address. . . . . . . . . . . . : 192.168.10.90
        Subnet Mask . . . . . . . . . . . : 255.255.255.0
        Default Gateway . . . . . . . . . :

PPP adapter 宽带连接:                       #拨号成功后就会发现有个ppp客户端产生,拨号之前是没有的

        Connection-specific DNS Suffix  . :
        IP Address. . . . . . . . . . . . : 10.67.15.18
        Subnet Mask . . . . . . . . . . . : 255.255.255.255
        Default Gateway . . . . . . . . . : 10.67.15.18

C:\Documents and Settings\Administrator>ping baidu.com  #拨号成功后,可以正常上网

Pinging baidu.com [180.149.132.47] with 32 bytes of data:

Reply from 180.149.132.47: bytes=32 time=41ms TTL=54
Ping statistics for 180.149.132.47:
    Packets: Sent = 1, Received = 1, Lost = 0 (0% loss),
Approximate round trip times in milli-seconds:
    Minimum = 41ms, Maximum = 41ms, Average = 41ms
Control-C
^C
1.3 客户端Linux测试
客户端选择centos,拨号上网,操作过程如下:
拨号之前操作检查
[[email protected] ~]# cat /etc/issue
CentOS release 6.8 (Final)
Kernel \r on an \m

[[email protected] ~]# uname -a
Linux mfsdata01 2.6.32-642.6.2.el6.x86_64 #1 SMP Wed Oct 26 06:52:09 UTC 2016 x86_64 x86_64 x86_64 GNU/Linux

[[email protected] ~]# ifconfig
eth0      Link encap:Ethernet  HWaddr 00:0C:29:F1:FB:05
          inet addr:192.168.10.80  Bcast:192.168.10.255  Mask:255.255.255.0
          inet6 addr: fe80::20c:29ff:fef1:fb05/64 Scope:Link
          UP BROADCAST RUNNING MULTICAST  MTU:1500  Metric:1
          RX packets:30766 errors:0 dropped:0 overruns:0 frame:0
          TX packets:9953 errors:0 dropped:0 overruns:0 carrier:0
          collisions:0 txqueuelen:1000
          RX bytes:18534315 (17.6 MiB)  TX bytes:638381 (623.4 KiB)

lo        Link encap:Local Loopback
          inet addr:127.0.0.1  Mask:255.0.0.0
          inet6 addr: ::1/128 Scope:Host
          UP LOOPBACK RUNNING  MTU:65536  Metric:1
          RX packets:8 errors:0 dropped:0 overruns:0 frame:0
          TX packets:8 errors:0 dropped:0 overruns:0 carrier:0
          collisions:0 txqueuelen:0
          RX bytes:480 (480.0 b)  TX bytes:480 (480.0 b)
此时只可以ping通pppoeserver内网的地址,如下:
[[email protected] ~]# ping 192.168.10.109 -c 1
PING 192.168.10.109 (192.168.10.109) 56(84) bytes of data.
64 bytes from 192.168.10.109: icmp_seq=1 ttl=64 time=0.300 ms

--- 192.168.10.109 ping statistics ---
1 packets transmitted, 1 received, 0% packet loss, time 0ms
rtt min/avg/max/mdev = 0.300/0.300/0.300/0.000 ms
[[email protected] ~]# ping 192.168.5.1 -c 1
connect: Network is unreachable
[[email protected] ~]# ping baidu.com -c 1
ping: unknown host baidu.com
建立PPPoE连接:
[[email protected] ~]# adsl-setup  # < 建立ADSL连接我的是第二次重新配置
Welcome to the PPPoE client setup.  First, I will run some checks on
your system to make sure the PPPoE client is installed properly...

The following DSL config was found on your system:

  Device:      Name:
  ppp0         DSLppp0

Please enter the device if you want to configure the present DSL config
(default ppp0) or enter ‘n‘ if you want to create a new one: n

LOGIN NAME

Enter your Login Name: cmz #输入ADSL连接的用户名

INTERFACE

Enter the Ethernet interface connected to the PPPoE modem
For Solaris, this is likely to be something like /dev/hme0.
For Linux, it will be ethX, where ‘X‘ is a number.
(default eth0):  #指定网络设备

Do you want the link to come up on demand, or stay up continuously?
If you want it to come up on demand, enter the idle time in seconds
after which the link should be dropped.  If you want the link to
stay up permanently, enter ‘no‘ (two letters, lower-case.)
NOTE: Demand-activated links do not interact well with dynamic IP
addresses.  You may have some problems with demand-activated links.
Enter the demand value (default no):  #接受默认设置

DNS

Please enter the IP address of your ISP‘s primary DNS server.
If your ISP claims that ‘the server will provide dynamic DNS addresses‘,
enter ‘server‘ (all lower-case) here. #输入DNS地址,不输入不能解析
If you just press enter, I will assume you know what you are
doing and not modify your DNS setup.
Enter the DNS information here: 114.114.114.114
Please enter the IP address of your ISP‘s secondary DNS server.
If you just press enter, I will assume there is only one DNS server.
Enter the secondary DNS server address here: 8.8.8.8

PASSWORD

Please enter your Password:          #此时输入ADSL账号cmz对应的密码 也是cmz
Please re-enter your Password:       #再输入一次

USERCTRL

Please enter ‘yes‘ (three letters, lower-case.) if you want to allow
normal user to start or stop DSL connection (default yes): no #填入NO,不允许一般的用户连接PPPoE

FIREWALLING

Please choose the firewall rules to use.  Note that these rules are
very basic.  You are strongly encouraged to use a more sophisticated
firewall setup; however, these will provide basic security.  If you
are running any servers on your machine, you must choose ‘NONE‘ and
set up firewalling yourself.  Otherwise, the firewall rules will deny
access to all standard servers like Web, e-mail, ftp, etc.  If you
are using SSH, the rules will block outgoing SSH connections which
allocate a privileged source port.

The firewall choices are:
0 - NONE: This script will not set any firewall rules.  You are responsible
          for ensuring the security of your machine.  You are STRONGLY
          recommended to use some kind of firewall rules.
1 - STANDALONE: Appropriate for a basic stand-alone web-surfing workstation
2 - MASQUERADE: Appropriate for a machine acting as an Internet gateway
                for a LAN
Choose a type of firewall (0-2): 0  #输入0,不在这里设置防火墙

Start this connection at boot time

Do you want to start this connection at boot time?
Please enter no or yes (default no):yes #填yes,系统启动自动连接ADSL

** Summary of what you entered **

Ethernet Interface: eth0
User name:          cmz
Activate-on-demand: No
Primary DNS:        114.114.114.114
Secondary DNS:      8.8.8.8
Firewalling:        NONE
User Control:       no
Accept these settings and adjust configuration files (y/n)? y
Adjusting /etc/sysconfig/network-scripts/ifcfg-ppp1
Adjusting /etc/resolv.conf
  (But first backing it up to /etc/resolv.conf.bak)
Adjusting /etc/ppp/chap-secrets and /etc/ppp/pap-secrets
  (But first backing it up to /etc/ppp/chap-secrets.bak)
  (But first backing it up to /etc/ppp/pap-secrets.bak)


Congratulations, it should be all set up!

Type ‘/sbin/ifup ppp1‘ to bring up your xDSL link and ‘/sbin/ifdown ppp1‘
to bring it down.
Type ‘/sbin/pppoe-status /etc/sysconfig/network-scripts/ifcfg-ppp1‘
to see the link status.

[[email protected] ~]# adsl-start   #启动adsl
[[email protected] ~]#       #← 稍等片刻后若启动成功后出现提示符(无任何提示即意味着连接成功)

这时,通过“ifconfig”命令可以看到各网络接口的信息(IP地址等等)。
[email protected] ~]# ifconfig
eth0      Link encap:Ethernet  HWaddr 00:0C:29:F1:FB:05
          inet addr:192.168.10.80  Bcast:192.168.10.255  Mask:255.255.255.0
          inet6 addr: fe80::20c:29ff:fef1:fb05/64 Scope:Link
          UP BROADCAST RUNNING MULTICAST  MTU:1500  Metric:1
          RX packets:31553 errors:0 dropped:0 overruns:0 frame:0
          TX packets:10328 errors:0 dropped:0 overruns:0 carrier:0
          collisions:0 txqueuelen:1000
          RX bytes:18597215 (17.7 MiB)  TX bytes:688437 (672.3 KiB)

lo        Link encap:Local Loopback
          inet addr:127.0.0.1  Mask:255.0.0.0
          inet6 addr: ::1/128 Scope:Host
          UP LOOPBACK RUNNING  MTU:65536  Metric:1
          RX packets:8 errors:0 dropped:0 overruns:0 frame:0
          TX packets:8 errors:0 dropped:0 overruns:0 carrier:0
          collisions:0 txqueuelen:0
          RX bytes:480 (480.0 b)  TX bytes:480 (480.0 b)

ppp0      Link encap:Point-to-Point Protocol
          inet addr:10.67.15.20  P-t-P:192.168.10.109  Mask:255.255.255.255
          UP POINTOPOINT RUNNING NOARP MULTICAST  MTU:1492  Metric:1
          RX packets:3 errors:0 dropped:0 overruns:0 frame:0
          TX packets:11 errors:0 dropped:0 overruns:0 carrier:0
          collisions:0 txqueuelen:3
          RX bytes:30 (30.0 b)  TX bytes:1086 (1.0 KiB)

[[email protected] ~]# ping baidu.com
PING baidu.com (180.149.132.47) 56(84) bytes of data.
64 bytes from 180.149.132.47: icmp_seq=1 ttl=54 time=29.6 ms
64 bytes from 180.149.132.47: icmp_seq=2 ttl=54 time=34.8 ms
^C
--- baidu.com ping statistics ---
2 packets transmitted, 2 received, 0% packet loss, time 1630ms
rtt min/avg/max/mdev = 29.611/32.248/34.885/2.637 ms
1.4 资料
Pppoe服务端的安装后的压缩打包。
以上是关于Linux PPPOE 服务搭建测试的主要内容,如果未能解决你的问题,请参考以下文章


