Android Studio 项目上传到Jcenter完全攻略
Posted 小向往
tags:
篇首语:本文由小常识网(cha138.com)小编为大家整理,主要介绍了Android Studio 项目上传到Jcenter完全攻略相关的知识,希望对你有一定的参考价值。
Jcenter作为最大的远程仓库,下面来了解下如果将自己的类库发布到jcenter供别人使用。
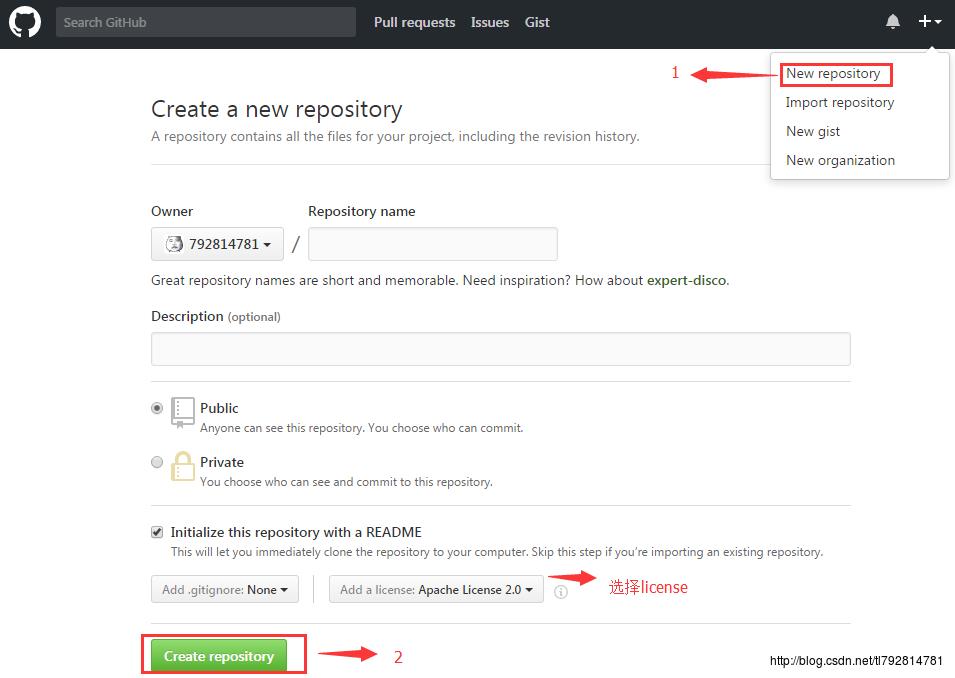
Step1 创建github仓库
在github上面创建一个项目仓库:

Step2 创建studio项目
用studio创建一个普通项目,并且新建一个module与之关联,我们需要上传到jcenter的是module,后面的一些配置也是在module中的build.gradle。
目录结构如下:

Step3 将项目上传至Github
studio使用git必须在设置里配置git安装目录,然后提交至第一步创建的github仓库地址,有些不用上传的文件夹或者文件添加到.gitignore中,例如build文件夹、local.properties文件等
Step4 注册bintray ,创建Package
注册bintray 账号
因为jcenter()属于bintray旗下的一个仓库。所以必须注册bintray账号来获取必要的信息,注册地址:https://bintray.com/signup/oss,不是https://bintray.com/signup
我们一般注册的应该是个人版:

这里需要注意的是:邮箱地址不能是qq邮箱和163邮箱,最好用gmail邮箱。我们也可以直接使用github账号登录,但是github的账号也同样不能是qq等邮箱。
创建Package
创建的Package必须是个人里面的,不能是组织里面的。
如下图所示:
查看个人信息

创建Repositories

输入填写必要信息

然后创建新的包名

根据图中填入相关信息即可

Step5 配置build.gradle
1、在module中的build.gradle上面添加一下代码。
一般项目依赖写法规则是: compile ‘publishedGroupId : artifact : libraryVersion ‘
ext
    bintrayRepo = 'project_name' //bintray 上面 Package名字
    bintrayName = 'AnimationTextView'//bintray 上面项目名

    publishedGroupId = 'com.totcy.widget'//groupId
    libraryName = 'AnimationTextView'
    artifact = 'animationtext'

    libraryDescription = 'animation textview'

    siteUrl = 'https://github.com/792814781/AnimationTextView'
    gitUrl = 'https://github.com/792814781/AnimationTextView.git'

    libraryVersion = '1.0.0'//版本号

    developerId = 'intotcy'
    developerName = 'flok.tu'
    developerEmail = 'intotcy@gmail.com'

    licenseName = 'The Apache Software License, Version 2.0'
    licenseUrl = 'http://www.apache.org/licenses/LICENSE-2.0.txt'
    allLicenses = ["Apache-2.0"]
2、在此文件的末尾再添加以下两句
apply from: 'https://raw.githubusercontent.com/nuuneoi/JCenter/master/installv1.gradle'
apply from: 'https://raw.githubusercontent.com/nuuneoi/JCenter/master/bintrayv1.gradle'
3、在根目录的build.gradle文件中添加以下:
maven-gradle-plugin这个插件的github地址点这里
网上很多教程都写着1.3的版本,这个版本已经不可用了,导致了下面的错误。
 dependencies
        classpath 'com.android.tools.build:gradle:2.2.3'

        // NOTE: Do not place your application dependencies here; they belong
        // in the individual module build.gradle files

        //1.3会报错 :No service of type Factory<LoggingManagerInternal> available in
        //ProjectScopeServices.

        classpath 'com.github.dcendents:android-maven-gradle-plugin:1.4.1'
        classpath 'com.jfrog.bintray.gradle:gradle-bintray-plugin:1.6'
3.1、对项目库中的中文注释需要保留的需在根目录的build.gradle文件中添加以下,否则上传到bintray的时候会报编码错误;当然还有的办法就是注释全部使用英文的。
allprojects
    repositories
        jcenter()

    //保留中文注释
    tasks.withType(Javadoc)
        options
            encoding "UTF-8"
            charSet 'UTF-8'
            links "http://docs.oracle.com/javase/7/docs/api"
4、配置bintray 的账号和apikey
添加到项目根目录的local.properties文件中。
注意:为了账户安全考虑,这个文件应该添加到.gitignore中,避免上传到git
bintray.user=你的bintray用户名
bintray.apikey=你的bintray apikey
apikey查看在bintray网站上编辑个人信息界面:

执行上传命令
打开studio的 Terminal;
输入:
gradlew install出现BUILD SUCCESSFUL就没问题
在终端输入:
gradlew bintrayUpload成功后可以在bintray上面看到上传的版本信息。

到这里就上传完成了,审核完成后add to Jcenter按钮就会消失。
审核通过前使用方法:
在app目录build.gradle文件中添加依赖:
compile 'com.totcy.widget:textviewlibrary:1.0.1'在需要依赖的项目根目录build.gradle文件中,对应位置添加maven地址;审核通过后就可以去除了。

allprojects
    repositories
        jcenter()
        maven  url 'https://dl.bintray.com/intotcy/project_name'
参考
http://www.androidchina.net/6416.html
http://blog.csdn.net/wangdong20/article/details/50098535
https://github.com/bintray/gradle-bintray-plugin
http://stackoverflow.com/questions/39960614/http-1-1-401-unauthorized-when-uploading-binary-on-bintray(bug解决方法)
以上是关于Android Studio 项目上传到Jcenter完全攻略的主要内容,如果未能解决你的问题,请参考以下文章