在Linux系统中运行并简单的测试RabbitMq容器
Posted 天天向上518
tags:
篇首语:本文由小常识网(cha138.com)小编为大家整理,主要介绍了在Linux系统中运行并简单的测试RabbitMq容器相关的知识,希望对你有一定的参考价值。
以前使用的是Windows下面的RabbitMq,需要先安装 Erlang的语言环境等,这次直接在Linux中的Docker容器来测试一下
1:docker配置RabbitMq的指令
docker run -d --hostname myrabbit --restart=always --name rabbitmq -p 5672:5672 -p 15672:15672
-e RABBITMQ_DEFAULT_USER=fengge -e RABBITMQ_DEFAULT_PASS=qqlove rabbitmq:3-management
指令的含义应该都看得明白,这里不在描述了
2:查看RbbitMq容器已经启起来

3:代码:
Product生产者测试代码:

 1 using System;
 2 using System.Collections.Generic;
 3 using System.ComponentModel;
 4 using System.Data;
 5 using System.Drawing;
 6 using System.Linq;
 7 using System.Text;
 8 using System.Threading.Tasks;
 9 using System.Windows.Forms;
10
11 namespace WindowsForms
12 {
13     using RabbitMQ.Client;
14     using RabbitMQ;
15     using RabbitMQ.Client.Framing.Impl;
16     using RabbitMQ.Util;
17     using RabbitMQ.Client.Framing;
18     using RabbitMQ.Client.Events;
19
20     public partial class RbbitMqSendMsg : Form
21     {
22         private static readonly string queueName = "insert_to_person";
23         private static readonly string exchangeName = "Insert";
24         private static readonly string ruterKey = "router.Insert";
25
26
27         /*
28          direct,fanout,topic,headers
29             直接,    扇出,主题, 标题
30              */
31         private static readonly string exchangeType = "direct";
32         private static readonly ConnectionFactory rabitFactory = new ConnectionFactory
33         {
34             UserName = "fengge",
35             Password = "F88",
36             RequestedHeartbeat = 0,
37             Endpoint = new AmqpTcpEndpoint(new Uri("amqp://192.168.***.***:5672/"))
38         };
39         public RbbitMqSendMsg()
40         {
41             InitializeComponent();
42         }
43         private void SimpelMQ()
44         {
45             try
46             {
47                 //创建一个连接的工厂
48                 using (var conn = rabitFactory.CreateConnection())
49                 {
50                     //类似创建一个管道
51                     using (var channel = conn.CreateModel())
52                     {
53                         //声明一个队列,设置队列是否持久化,排他性,与自动删除
54                         channel.ExchangeDeclare(exchangeName, exchangeType);
55                         channel.QueueDeclare(queueName, true, false, false);
56                         // 绑定消息队列,交换器,routingkey
57                         channel.QueueBind(queueName, exchangeName,routingKey: queueName);
58                         IBasicProperties propertity = channel.CreateBasicProperties();
59                         propertity.Persistent = true;//队列持久化
60                         for (int i = 0; i < 100; i++)
61                         {
62                             byte[] bymsg = Encoding.UTF8.GetBytes($"我是风格{i},现在时间是:{DateTime.Now.ToString("yyyy-MM-dd HH:mm:ss ffff")}");
63                             channel.BasicPublish(exchangeName, ruterKey, propertity, bymsg);
64                         }
65                     }
66                 }
67             }
68             catch (Exception e)
69             {
70                 throw new Exception(e.Message);
71             }
72         }
73
74         private void SampleTypeSend_Click(object sender, EventArgs e)
75         {
76             SimpelMQ();
77         }
78     }
79 }
Consumer消费者测试代码:

 1 using System;
 2 using System.Collections.Generic;
 3 using System.ComponentModel;
 4 using System.Data;
 5 using System.Drawing;
 6 using System.Linq;
 7 using System.Text;
 8 using System.Threading.Tasks;
 9 using System.Windows.Forms;
10
11 namespace WindowsForms02
12 {
13     using RabbitMQ.Client;
14     public partial class Form1 : Form
15     {
16         private static readonly string queueName = "insert_to_person";
17         private static readonly string exchangeName = "Insert";
18         private static readonly string ruterKey = "router.Insert";
19
20
21         /*
22          direct,fanout,topic,headers
23             直接,    扇出,主题, 标题
24              */
25         private static readonly string exchangeType = "direct";
26         private static readonly ConnectionFactory rabitFactory = new ConnectionFactory
27         {
28             UserName = "fengge",
29             Password = "F88",
30             RequestedHeartbeat = 0,
31             Endpoint = new AmqpTcpEndpoint(new Uri("amqp://192.168.***.***:5672/")),
32         };
33         public Form1()
34         {
35             InitializeComponent();
36             System.Threading.Thread t2 = new System.Threading.Thread(() => {
37                 ConsumerMsgSimpleMq();
38             });
39             t2.IsBackground = true; t2.Start();
40         }
41
42
43         private void ConsumerMsgSimpleMq()
44         {
45             //创建一个连接的工厂
46             using (var conn = rabitFactory.CreateConnection())
47             {
48                 //类似创建一个管道
49                 using (var channel = conn.CreateModel())
50                 {
51                     channel.ExchangeDeclare(exchangeName, exchangeType);
52                     //声明一个队列,设置队列是否持久化,排他性,与自动删除
53                     channel.QueueDeclare(queueName, true, false, false);
54                     // 绑定消息队列,交换器,routingkey
55                     channel.QueueBind(queueName, exchangeName, ruterKey);
56                     ////定义这个队列的消费者
57                     //QueueingBasicConsumer consumer = new QueueingBasicConsumer(channel);
58                     ////false为手动应答,true为自动应答
59                     //channel.BasicConsume(queueName, false, consumer);
60                     while (true)
61                     {
62                         try
63                         {
64                             BasicGetResult result = channel.BasicGet(queueName, false);
65                             if (result != null)
66                             {
67                                 byte[] by = result.Body;
68                                 string messageStr = Encoding.UTF8.GetString(by);
69                                 //如果是自动应答,下下面这句代码不用写啦。
70                                 Console.WriteLine("---->" + messageStr);
71                                 if (!string.IsNullOrEmpty(messageStr))
72                                 {
73                                     channel.BasicAck(result.DeliveryTag, false);
74                                 }
75                             }
76                         }
77                         catch (Exception)
78                         {
79                         }
80                     }
81                 }
82             }
83         }
84     }
85 }
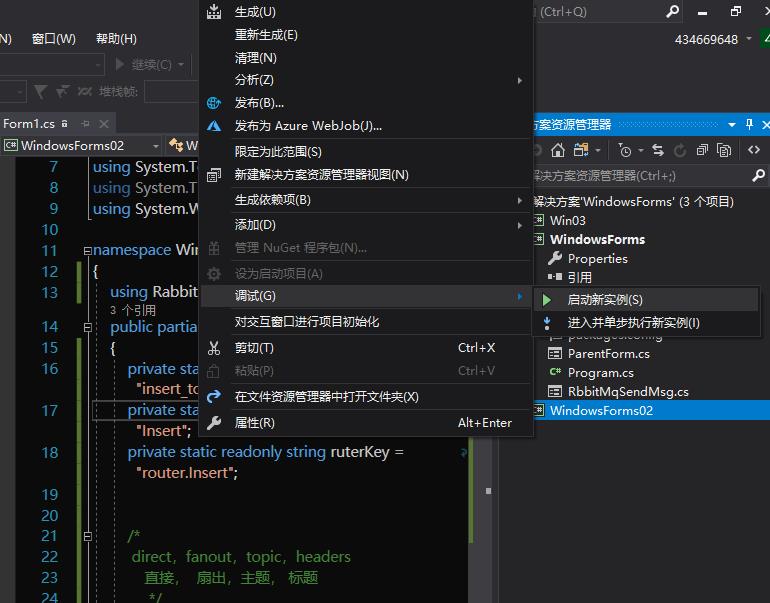
4:启动多个客服端,其他的启动我们可以以调试的模式打开客服端

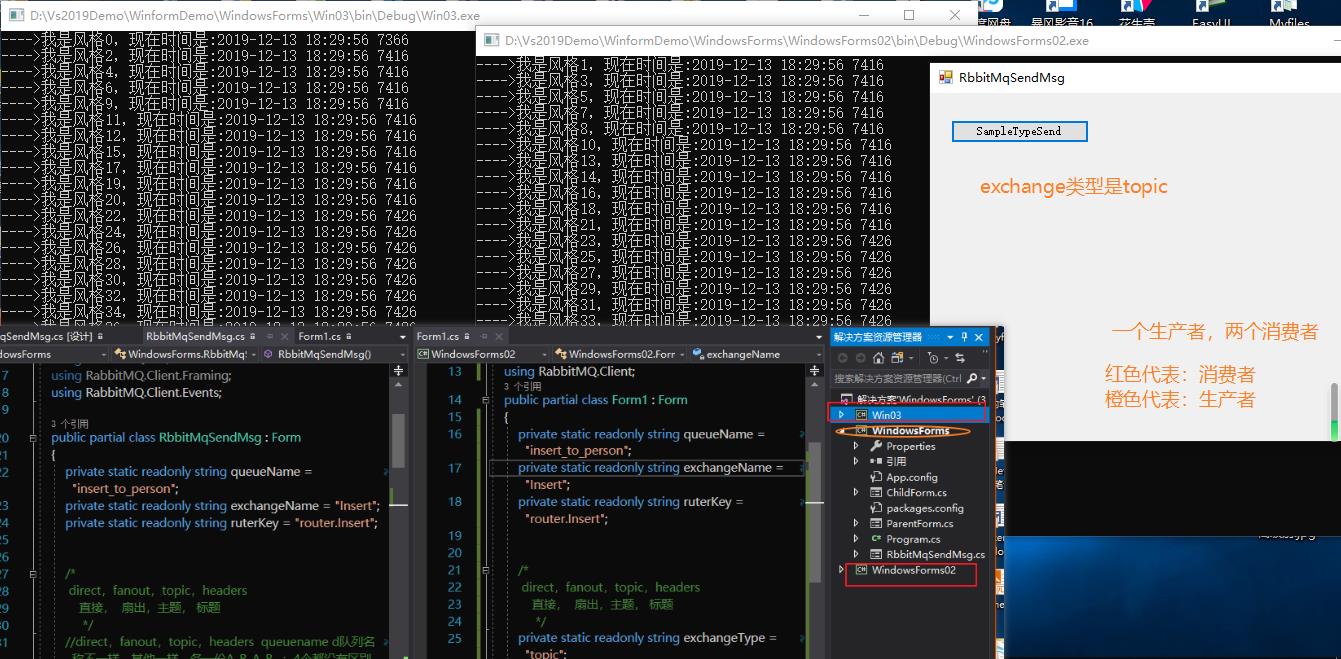
5:测试的效果:

以上是关于在Linux系统中运行并简单的测试RabbitMq容器的主要内容,如果未能解决你的问题,请参考以下文章
