Nginx服务优化之隐藏版本号修改用户与组配置页面缓存与时间日志分割以及设置连接超时
Posted
tags:
篇首语:本文由小常识网(cha138.com)小编为大家整理,主要介绍了Nginx服务优化之隐藏版本号修改用户与组配置页面缓存与时间日志分割以及设置连接超时相关的知识,希望对你有一定的参考价值。
nginx服务优化之隐藏版本号、修改用户与组、配置页面缓存与时间、日志分割以及设置连接超时前言
? 在企业信息化应用环境中,服务器的安全性和响应速度需要根据实际情况进行相应参数配置,以达到最优的用户体验。
? 默认的nginx安装参数只能提供最基本的服务,还需要调整如网页缓存时间、连接超时、网页压缩等相应参数,才能发挥出服务器的最大作用。
一、隐藏版本号
? 我们为什么要隐藏版本号?
? 我们一定要有一个意识:对于软件或者说服务,其安全性必然不可能是无懈可击的,总会或多或少地存在各种bug或者漏洞,那么这就会成为或者存有恶意的人所的一个方向,所有隐藏版本号可以在一定程度上增强该软件或者服务的安全性。
? 那么对于nginx的版本号如何进行隐藏设置呢?下面我们对此进行配置说明。
? 下面所有的操作都是在进行了手工编译完好的nginx的基础上开始进行的操作。
1.使用curl命令查看nginx的版本号
[root@localhost ~]# which curl
/usr/bin/curl
[root@localhost ~]# curl -I http://192.168.68.145/
HTTP/1.1 200 OK
Server: nginx/1.12.2
Date: Wed, 25 Dec 2019 10:31:46 GMT
Content-Type: text/html
Content-Length: 631
Last-Modified: Wed, 25 Dec 2019 10:04:25 GMT
Connection: keep-alive
ETag: "5e033429-277"
Accept-Ranges: bytes
2.配置隐藏版本号,然后进行启动,再检测 (第一种方法)
[root@localhost ~]# vim /usr/local/nginx/conf/nginx.conf
[root@localhost ~]# sed -n ‘16,20p‘ /usr/local/nginx/conf/nginx.conf

http {
    include       mime.types;
    default_type  application/octet-stream;
    server_tokens off;

[root@localhost ~]# service nginx stop
[root@localhost ~]# service nginx start
[root@localhost ~]# curl -I http://192.168.68.145/
HTTP/1.1 200 OK
Server: nginx
Date: Wed, 25 Dec 2019 11:45:58 GMT
Content-Type: text/html
Content-Length: 631
Last-Modified: Wed, 25 Dec 2019 10:04:25 GMT
Connection: keep-alive
ETag: "5e033429-277"
Accept-Ranges: bytes
3.利用源码文件伪造版本号
[root@localhost ~]# vim /usr/local/nginx/conf/nginx.conf
[root@localhost ~]# sed -n ‘16,20p‘ /usr/local/nginx/conf/nginx.conf

http {
    include       mime.types;
    default_type  application/octet-stream;
    server_tokens on;
[root@localhost ~]# cd /opt/nginx-1.12.2/src/
[root@localhost src]# ls
core  event  http  mail  misc  os  stream
[root@localhost src]# cd core/
[root@localhost core]# ls
nginx.c           ngx_cycle.h            ngx_output_chain.c    ngx_rwlock.c
nginx.h           ngx_file.c             ngx_palloc.c          ngx_rwlock.h
ngx_array.c       ngx_file.h             ngx_palloc.h          ngx_sha1.c
ngx_array.h       ngx_hash.c             ngx_parse.c           ngx_sha1.h
ngx_buf.c         ngx_hash.h             ngx_parse.h           ngx_shmtx.c
ngx_buf.h         ngx_inet.c             ngx_parse_time.c      ngx_shmtx.h
ngx_conf_file.c   ngx_inet.h             ngx_parse_time.h      ngx_slab.c
ngx_conf_file.h   ngx_list.c             ngx_proxy_protocol.c  ngx_slab.h
ngx_config.h      ngx_list.h             ngx_proxy_protocol.h  ngx_spinlock.c
ngx_connection.c  ngx_log.c              ngx_queue.c           ngx_string.c
ngx_connection.h  ngx_log.h              ngx_queue.h           ngx_string.h
ngx_core.h        ngx_md5.c              ngx_radix_tree.c      ngx_syslog.c
ngx_cpuinfo.c     ngx_md5.h              ngx_radix_tree.h      ngx_syslog.h
ngx_crc32.c       ngx_module.c           ngx_rbtree.c          ngx_thread_pool.c
ngx_crc32.h       ngx_module.h           ngx_rbtree.h          ngx_thread_pool.h
ngx_crc.h         ngx_murmurhash.c       ngx_regex.c           ngx_times.c
ngx_crypt.c       ngx_murmurhash.h       ngx_regex.h           ngx_times.h
ngx_crypt.h       ngx_open_file_cache.c  ngx_resolver.c
ngx_cycle.c       ngx_open_file_cache.h  ngx_resolver.h
[root@localhost core]# vim nginx.h
[root@localhost core]# sed -i ‘15p‘ nginx.h
[root@localhost core]# vim nginx.h
[root@localhost core]# sed -n ‘15p‘ nginx.h

[root@localhost core]# vim nginx.h
[root@localhost core]# sed -n ‘13p‘ nginx.h
#define NGINX_VERSION      "1.12.2"
注意!可以将上面的1.12.2改为其他版本,但是需要重新手工编译安装,所以该方法适合最初的时候进行设置
二、修改用户和组
nginx运行时进程需要有用户和组的支持,用以实现对网站文件读取时进行访问控制。主进程由root创建,子进程由指定的用户与组创建。nginx默认使用nobody用户账号与组账号,一般也需要修改。? 因此,一般我们在手工编译安装nginx的时候是设置了用户和组,另一种方法就是修改配置文件来指定用户与组。
[root@localhost src]# sed -n ‘2p‘ /usr/local/nginx/conf/nginx.conf
#user  nobody;
将改行取消注释,改为user nginx nginx;
重启服务即可。
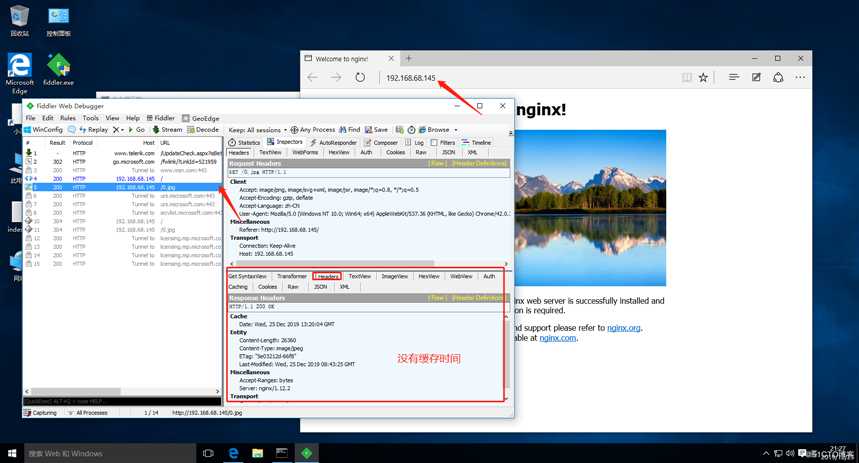
三、配置页面缓存时间
目的:为了减缓服务器的负担,优化连接请求。
[root@promote html]# vim /usr/local/nginx/conf/nginx.conf
[root@promote html]# sed -n ‘57,59p‘ /usr/local/nginx/conf/nginx.conf
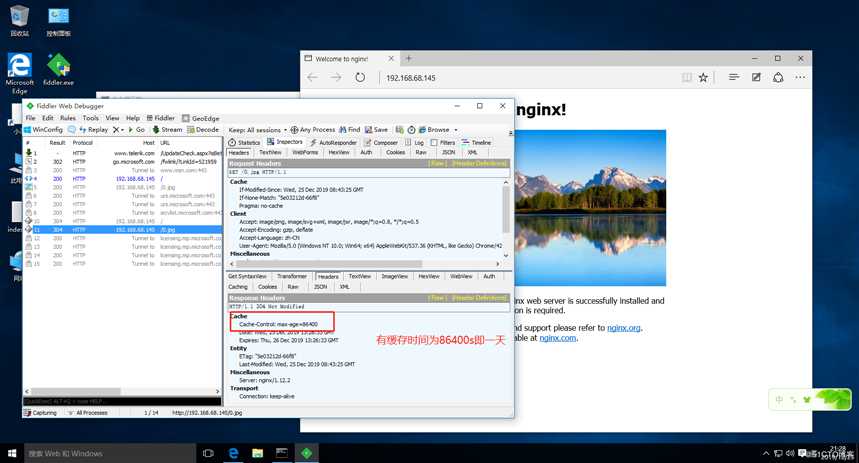
location ~*.(jpg|gif|swf)$ {
root html;
expires 1d;
[root@promote html]# service nginx stop
[root@promote html]# service nginx start
[root@promote html]# ls
0.jpg 50x.html error.png index.html
[root@promote html]# sed -n ‘14,16p‘ index.html
<h1>Welcome to nginx!</h1>
<img src="0.jpg"/>
<p>If you see this page, the nginx web server is successfully installed and
测试验证结果如下:
四、日志分割
写一个脚本之后可以使用crontab来进行周期任务执行该脚本
[root@promote ~]# vim /opt/fenge.sh
[root@promote ~]# cat /opt/fenge.sh
#!/bin/bash
d=$(date -d "-1 day" "+%Y%m%d")  #显示一天前的时间
logs_path="/var/log/nginx"
pid_path="/usr/local/nginx/logs/nginx.pid"
[ -d $logs_path ] || mkdir -p $logs_path
mv /usr/local/nginx/logs/access.log ${logs_path}/test.com-access.log-$d
kill -USR1 $(cat $pid_path)
find $logs_path -mtime +30 | xargs rm -rf
[root@promote ~]# chmod +x /opt/fenge.sh
[root@promote ~]# ls /opt/fenge.sh
/opt/fenge.sh
[root@promote ~]# cd /opt/
[root@promote opt]# ./fenge.sh
[root@promote opt]# cd /var/log/nginx/
[root@promote nginx]# ls
test.com-access.log-20191224
五、设置连接超时
什么是连接超时?
当服务器建立的连接没有接收处理请求时,可以在指定的时间内让它超时自动退出
连接超时的作用
(1) 将无用的连接设置为尽快超时,可以保护服务器的系统资源(CPU、内存、磁盘)
(2) 当连接很多时,及时断掉那些建立好的但又长时间不做事的连接,以减少其占用的服务器资源
(3) 如果**,会不断地和服务器建立连接,因此设置连接超时以防止大量消耗服务器的资源
(4) 如果用户请求了动态服务,则 Nginx 就会建立连接,请求 FastCGI 服务以及后端 mysql 服务,设置连接超时,使得在用户容忍的时间内返回数据
设置连接超时
(1) keepalive_timeout :该参数用于设置客户端连接保持会话的超时时间,超过这个时间服务器会关闭该连接
(2) client_header_timeout :该参数用于设置读取客户端请求头数据的超时时间,如果超时客户端还没有发送完整的 header 数据,服务器将返回 "Request time out (408)" 错误
(3) client_body_timeout :该参数用于设置读取客户端请求主体数据的超时时间,如果超时客户端还没有发送完整的主体数据,服务器将返回 "Request time out (408)" 错误
(4) send_timeout :用于指定响应客户端的超时时间,如果超过这个时间,客户端没有任何活动,Nginx 将会关闭连接
(5) tcp_nodelay :默认情况下当数据发送时,内核并不会马上发送,可能会等待更多的字节组成一个数据包,这样可以提高 I/O 性能,但是,在每次只发送很少字节的业务场景中,使用 tcp_nodelay 功能,等待时间会比较长
基本配置实例:可以使用抓包工具测试
[root@promote conf]# vim nginx.conf
[root@promote conf]# sed -n ‘32,34p‘ nginx.conf
    keepalive_timeout  65 180;
    client_header_timeout 80;
    client_body_timeout 80;
[root@promote conf]# service nginx stop
[root@promote conf]# service nginx start
总结
本文主要是对nginx相关配置参数进行优化,从安全、用户、缓存、日志以及连接这五个方面进行优化。
以上是关于Nginx服务优化之隐藏版本号修改用户与组配置页面缓存与时间日志分割以及设置连接超时的主要内容,如果未能解决你的问题,请参考以下文章