linux基础22iptables layer7 实现七层应用过滤
Posted
tags:
篇首语:本文由小常识网(cha138.com)小编为大家整理,主要介绍了linux基础22iptables layer7 实现七层应用过滤相关的知识,希望对你有一定的参考价值。
一、iptables layer7简介
iptables layer7模块根据应用层协议对访问请求进行过滤
iptables工作于二,三,四层,本身不具备7层过滤功能,第三方开发者为iptables新增了layer7模块,能检测每一个报文的内部应用层协议是什么,并根据协议对请求进行过滤,但不支持对应用层协议的方法进行过滤。
需要对内核中的netfilter打layer7补丁并重新编译内核,对iptables打补丁,补上layer7模块并重新编译iptables
项目官网:http://l7-filter.sourceforge.net/
官网很久没更新了,最新版是:netfilter-layer7-v2.22.tar.gz 对内核只支持到2.6.30.5,不使用于centos6,本次实验所用的包是www.magedu.com提供的。
二、diff和path文本操作工具
diff 补丁生成工具
path 打补丁工具
diff是Unix系统的一个很重要的工具程序,它用来比较两个文本文件的差异,是代码版本管理的核心工具之一,其用法非常简单
diff [-c|-u] <变动前的文件> <变动后的文件>
path [-p|-R] [变动前的文件] [补丁文件]
path p[num] < patchfile
由于历史原因,diff有三种格式:
          * 正常格式(normal diff)
          * 上下文格式(context diff)
          * 合并格式(unified diff)

1、正常格式的diff
     例如,对file1(变动前的文件)和file2(变动后的文件)进行比较可使用如下命令:

     显示结果中,第一行是一个提示,用来说明变动位置。它分成三个部分:前面的数字,表示file1的第n行有变化;中间的"c"表示变动的模式是内容改变(change),其他模式还有"增加"(a,代表addition)和"删除"(d,代表deletion);

2、上下文格式的diff
     上个世纪80年代初,加州大学伯克利分校推出BSD版本的Unix时,觉得diff的显示结果太简单,最好加入上下文,便于了解发生的变动。因此,推出了上下文格式的diff。它的使用方法是加入-c选项(即context)。

     结果分成四个部分。第一部分的两行,显示两个文件的基本情况:文件名和时间信息,"***"表示变动前的文件,"---"表示变动后的文件。第二部分是15个星号,将文件的基本情况与变动内容分割开。第三部分显示变动前的文件,即file1。
    另外,文件内容的每一行最前面,还有一个标记位。如果为空,表示该行无变化;如果是感叹号(!),表示该行有改动;如果是减号(-),表示该行被删除;如果是加号(+),表示该行为新增。
    第四部分显示变动后的文件,即file2。

3、合并格式的diff
     如果两个文件相似度很高,那么上下文格式的diff,将显示大量重复的内容,很浪费空间。1990年,GNU diff率先推出了"合并格式"的diff,将f1和f2的上下文合并在一起显示。
     它的使用方法是加入u参数(代表unified)。

     其结果的第一部分,也是文件的基本信息。"---"表示变动前的文件,"+++"表示变动后的文件。第二部分,变动的位置用两个@作为起首和结束。第三部分是变动的具体内容。
除了有变动的那些行以外,也是上下文各显示3行。它将两个文件的上下文,合并显示在一起,所以叫做"合并格式"。每一行最前面的标志位,空表示无变动,减号表示第一个文件删除的行,加号表示第二个文件新增的行。[[email protected] src]# cat test.txt Hello world! I like linux I like python [[email protected] src]# cat test1.txt Hello world! I like linux too I like python hehe [[email protected] src]# diff test.txt test1.txt 2c2 < I like linux --- > I like linux too 3a4 > hehe [[email protected] src]# diff -c test.txt test1.txt *** test.txt 2017-01-02 10:31:27.808681328 +0800 --- test1.txt 2017-01-02 10:31:58.702543891 +0800 *************** *** 1,3 **** Hello world! ! I like linux I like python --- 1,4 ---- Hello world! ! I like linux too I like python + hehe [[email protected] src]# diff -u test.txt test1.txt --- test.txt 2017-01-02 10:31:27.808681328 +0800 +++ test1.txt 2017-01-02 10:31:58.702543891 +0800 @@ -1,3 +1,4 @@ Hello world! -I like linux +I like linux too I like python +hehe [[email protected] src]#
  patch

       尽管并没有指定patch和diff的关系,但通常patch都使用diff的结果来完成打补丁的工作,这和patch本身支持多种diff输出文件格式有很大关系。patch通过读入patch命令文件(可以从标准输入),对目标文件进行修改。通常先用diff命令比较新老版本,patch命令文件则采用diff的输出文件,从而保持原版本与新版本一致。

        patch的标准格式为:
            path [-p|-R] [变动前的文件] [补丁文件]

        如果patchfile为空则从标准输入读取patchfile内容;如果originalfile也为空,则从patchfile(肯定来自标准输入)中读取需要打补丁的文件名。因此,如果需要修改的是目录,一般都必须在patchfile中记录目录下的各个文件名。绝大多数情况下,patch都用以下这种简单的方式使用:
            path p[num] < patchfile

        patch命令可以忽略文件中的冗余信息,从中取出diff的格式以及所需要patch的文件名,文件名按照diff参数中的"源文件"、"目标文件"以及冗余信息中的"Index:"行中所指定的文件的顺序来决定。

        -p参数决定了是否使用读出的源文件名的前缀目录信息,不提供-p参数,则忽略所有目录信息,-p0(或者-p 0)表示使用全部的路径信息,-p1将忽略第一个"/"以前的目录,依此类推。如/usr/src/linux-2.4.15/Makefile这样的文件名,在提供-p3参数时将使用linux-2.4.15/Makefile作为所要patch的文件。

-R 根据新版本还原老版本[[email protected] src]# diff test.txt test1.txt > path.txt [[email protected] src]# cat path.txt 2c2 < I like linux --- > I like linux too 3a4 > hehe [[email protected] src]# patch test.txt < path.txt patching file test.txt [[email protected] src]# cat test.txt Hello world! I like linux too I like python hehe [[email protected] src]# patch -R test.txt < path.txt patching file test.txt [[email protected] src]# cat test.txt Hello world! I like linux I like python
三、iptables layer7 实现七层应用过滤
1、环境
[[email protected] ~]# rpm -q centos-release
centos-release-6-5.el6.centos.11.1.x86_64
[[email protected] ~]# uname -r
2.6.32-431.el6.x86_64
[[email protected] ~]# ls /tmp/src/netfilter-layer7-v2.23/       #内核的补丁文件
CHANGELOG                                       kernel-2.6.32-layer7-2.23.patch
iptables-1.4.3forward-for-kernel-2.6.20forward  README
[[email protected] netfilter-layer7-v2.23]# cd iptables-1.4.3forward-for-kernel-2.6.20forward/
[[email protected] iptables-1.4.3forward-for-kernel-2.6.20forward]# ls
libxt_layer7.c  libxt_layer7.man                         #iptables的补丁文件
[[email protected] ~]# ls kernel-2.6.32-358.el6.src.rpm         #所需的内核源码文件
注意:centos使用内核版本和kernel.org官网上的内核版本不一样,要使用在redhat官网上下载的内核源码文件
[[email protected] src]# ls iptables-1.4.20.tar.bz2             #iptables版本在1.3之后就可以
iptables-1.4.20.tar.bz2
[[email protected] src]# ls l7-protocols-2009-05-28.tar.gz      #识别各种协议的包
l7-protocols-2009-05-28.tar.gz
2、为内核打补丁,并重新编译
1)为内核源码打补丁
[[email protected] src]# ls kernel-2.6.32-431.5.1.el6.src.rpm   #需要先添加普通用户mockbuild
kernel-2.6.32-431.5.1.el6.src.rpm
[[email protected] src]# rpm -ivh kernel-2.6.32-431.5.1.el6.src.rpm
warning: kernel-2.6.32-431.5.1.el6.src.rpm: Header V3 RSA/SHA256 Signature, key ID fd431d51: NOKEY
   1:kernel                 ########################################### [100%]

[[email protected] ~]# ls /root/rpmbuild/SOURCES/linux-2.6.32-431.5.1.el6.tar.bz2
/root/rpmbuild/SOURCES/linux-2.6.32-431.5.1.el6.tar.bz2
[[email protected] SOURCES]# ls /usr/src
debug  kernels  linux  linux-3.16.1
[[email protected] SOURCES]# tar xf linux-2.6.32-431.5.1.el6.tar.bz2 -C /usr/src
[[email protected] SOURCES]# cd /usr/src
[[email protected] src]# ls
debug  kernels  linux  linux-2.6.32-431.5.1.el6  linux-3.16.1
[[email protected] src]# rm linux
rm:是否删除符号链接 "linux"?y
[[email protected] src]# ln -sv linux-2.6.32-431.5.1.el6/ linux
"linux" -> "linux-2.6.32-431.5.1.el6/"
[[email protected] src]# ls
debug  kernels  linux  linux-2.6.32-431.5.1.el6  linux-3.16.1
[[email protected] src]# cp /boot/config-2.6.32-431.el6.x86_64 .config                                       #复制内核编译的配置文件
[[email protected] src]# ls -a
.  ..  .config  debug  kernels  linux  linux-2.6.32-431.5.1.el6  linux-3.16.1

[[email protected] src]# ls /tmp/src/netfilter-layer7-v2.23        #查看补丁文件
CHANGELOG                                       kernel-2.6.32-layer7-2.23.patch
iptables-1.4.3forward-for-kernel-2.6.20forward  README
[[email protected] src]# cd linux      #使用patch < patchfile 格式打补丁一定要先进入原文件目录
[[email protected] linux]# ls
arch     Documentation  init      lib              net             security
block    drivers        ipc       MAINTAINERS      README          sound
COPYING  firmware       kabitool  Makefile         REPORTING-BUGS  tools
CREDITS  fs             Kbuild    Makefile.common  samples         usr
crypto   include        kernel    mm               scripts         virt

[[email protected] linux]# patch -p1 < /tmp/src/netfilter-layer7-v2.23/kernel-2.6.32-layer7-2.23.patch                                                 #打补丁
patching file net/netfilter/Kconfig
Hunk #1 succeeded at 894 (offset 99 lines).
patching file net/netfilter/Makefile
Hunk #1 succeeded at 96 (offset 12 lines).
patching file net/netfilter/xt_layer7.c
patching file net/netfilter/regexp/regexp.c
patching file net/netfilter/regexp/regexp.h
patching file net/netfilter/regexp/regmagic.h
patching file net/netfilter/regexp/regsub.c
patching file net/netfilter/nf_conntrack_core.c
Hunk #1 succeeded at 201 with fuzz 1.
patching file net/netfilter/nf_conntrack_standalone.c
Hunk #1 succeeded at 171 with fuzz 2 (offset 6 lines).
patching file include/net/netfilter/nf_conntrack.h
Hunk #1 succeeded at 123 (offset 5 lines).
patching file include/linux/netfilter/xt_layer7.h           #成功
2)配置内核
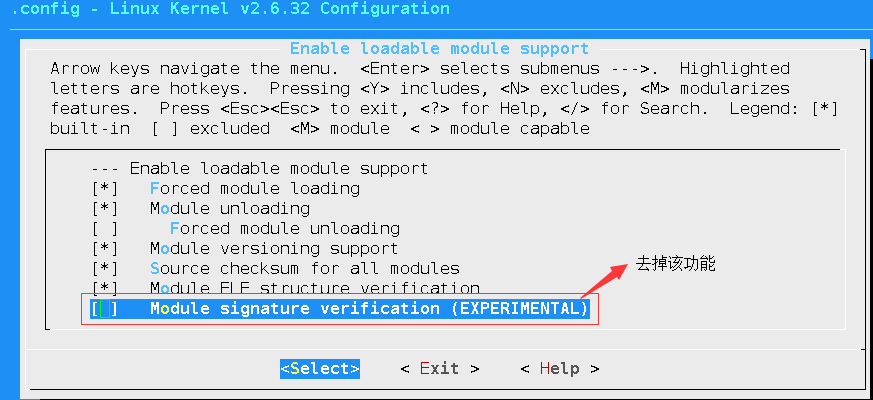
[[email protected] linux]# make menuconfig #配置内核
启用layer7模块:
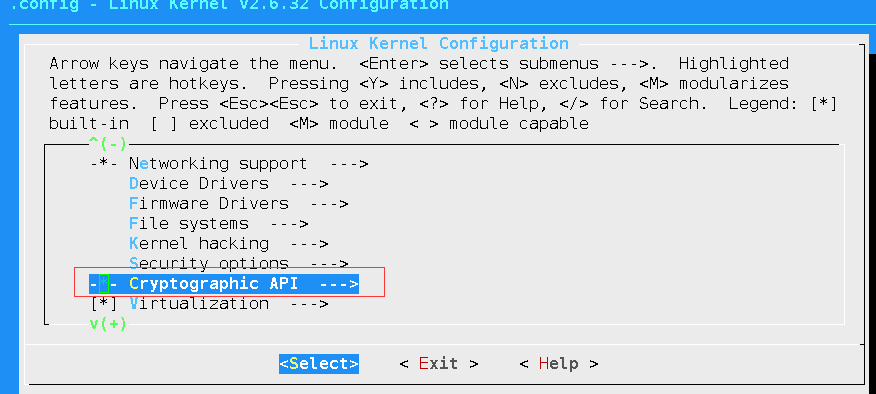
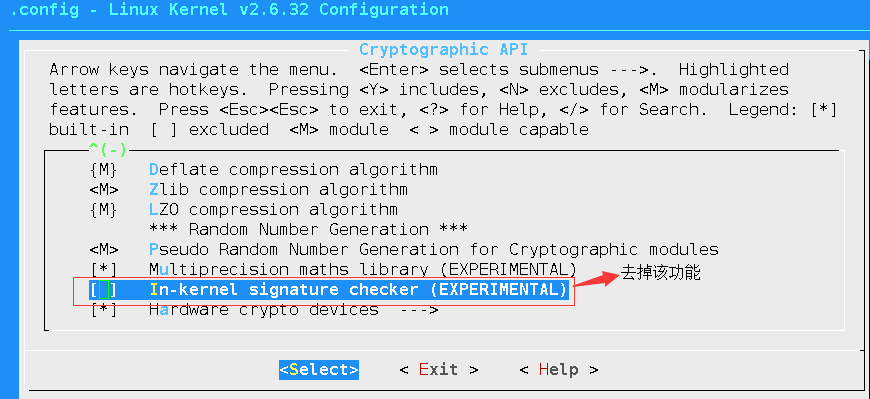
返回到配置主界面还需要将redhat的反盗版机制(内核编译时会做签名检查(检查密钥),如果源码作了修改将不通过,)去除,才能顺利编译:
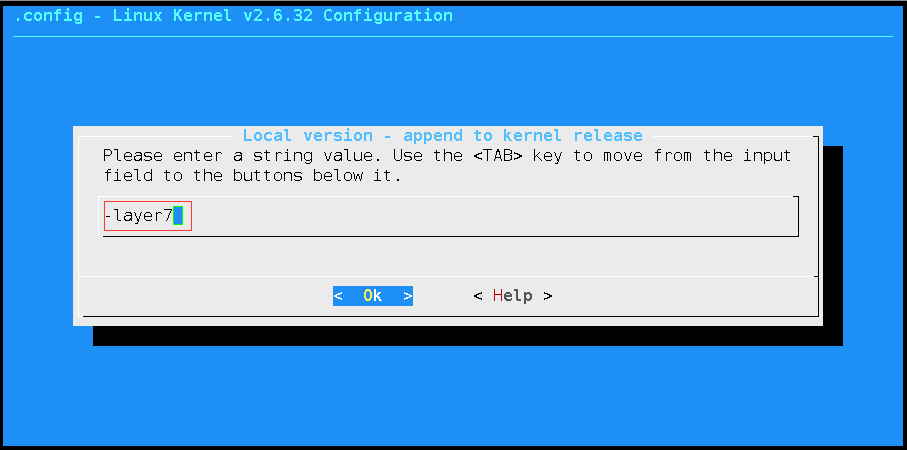
再次返回主界面:
为了区别内核版本,添加一点信息:
scripts/kconfig/mconf arch/x86/Kconfig
#
# configuration written to .config
#


*** End of Linux kernel configuration.
*** Execute ‘make‘ to build the kernel or try ‘make help‘.
3)编译内核
meke -j N
make modules_install
make install
编译完成后,重启系统,测试使用新的内核,没问题后,配置默认使用新内核:
[[email protected] ~]# ls /boot
config-2.6.32-431.el6.x86_64         System.map-2.6.32
efi                                  System.map-2.6.32-431.el6.x86_64
grub                                 System.map-2.6.32-layer7
initramfs-2.6.32-431.el6.x86_64.img  System.map-3.16.1
initramfs-2.6.32.img                 vmlinuz
initramfs-2.6.32-layer7.img          vmlinuz-2.6.32
initramfs-3.16.1.img                 vmlinuz-2.6.32-431.el6.x86_64
lost+found                           vmlinuz-2.6.32-layer7
symvers-2.6.32-431.el6.x86_64.gz     vmlinuz-3.16.1
System.map
[[email protected] ~]# uname -r
2.6.32-layer7
2、为iptables打补丁,并重新编译
1)卸载系统上的iptables
[[email protected] ~]# cp /etc/rc.d/init.d/iptables .        #复制iptables的服务脚步等下好用
[[email protected] ~]# cp /etc/sysconfig/iptables-config .   #复制iptables的配置文件
[[email protected] ~]# rpm -qa|grep iptables
iptables-1.4.7-11.el6.x86_64
iptables-ipv6-1.4.7-11.el6.x86_64
[[email protected] ~]# rpm -e iptables iptables-ipv6
error: Failed dependencies:
	libxtables.so.4()(64bit) is needed by (installed) iproute-2.6.32-31.el6.x86_64
	iptables >= 1.4.5 is needed by (installed) iproute-2.6.32-31.el6.x86_64
	iptables >= 1.2.8 is needed by (installed) system-config-firewall-base-1.2.27-5.el6.noarch
	iptables-ipv6 is needed by (installed) system-config-firewall-base-1.2.27-5.el6.noarch
[[email protected] ~]# rpm -e iptables iptables-ipv6 --nodeps
2)为iptables源码打补丁
[[email protected] src]# ls l7-protocols-2009-05-28.tar.gz
l7-protocols-2009-05-28.tar.gz
[[email protected] src]# tar xf iptables-1.4.20.tar.bz2
[[email protected] src]# cd iptables-1.4.20
[[email protected] iptables-1.4.20]# ls
aclocal.m4    config.h.in   extensions         iptables    m4           tests
autogen.sh    configure     include            libipq      Makefile.am  utils
build-aux     configure.ac  INCOMPATIBILITIES  libiptc     Makefile.in
COMMIT_NOTES  COPYING       INSTALL            libxtables  release.sh
[[email protected] iptables-1.4.20]# cp ../netfilter-layer7-v2.23/iptables-1.4.3forward-for-kernel-2.6.20forward/* extensions/      #将iptables的补丁文件复制到扩展目录下
3)编译iptables
[[email protected] iptables-1.4.20]# ./configure --prefix=/usr --with-ksource=/usr/src/linux
                                                 #需要指定内核源码文件目录
[[email protected] iptables-1.4.20]# make && make install

[[email protected] ~]# iptables --version
iptables v1.4.20
[[email protected] ~]# which iptables      #iptables命令原来的路径为/sbin/iptables,我们需要修改服务脚本
/usr/sbin/iptables
[[email protected] ~]# cp iptables /etc/rc.d/init.d/
[[email protected] ~]# cp iptables-config /etc/sysconfig
[[email protected] ~]# vim /etc/rc.d/init.d/iptables      #修改服务脚本,将其中的iptables命令的路径由/sbin/iptables改成/usr/sbin/iptables
[[email protected] ~]# service iptables restart
iptables:将链设置为政策 ACCEPT:filter                    [确定]
iptables:清除防火墙规则:                                 [确定]
iptables:正在卸载模块:                                   [确定]
iptables:应用防火墙规则:                                 [确定]
4)安装为layer7模块提供其所识别的协议特征码的包
[[email protected] src]# tar xf l7-protocols-2009-05-28.tar.gz
[[email protected] src]# cd l7-protocols-2009-05-28
[[email protected] l7-protocols-2009-05-28]# ls
CHANGELOG        extra       groups.sh  l7-protocols.spec  Makefile  protocols  testing
example_traffic  file_types  HOWTO      LICENSE            malware   README     WANTED
[[email protected] l7-protocols-2009-05-28]# make install
mkdir -p /etc/l7-protocols
cp -R * /etc/l7-protocols
[[email protected] l7-protocols-2009-05-28]# ls /etc/l7-protocols/
CHANGELOG        extra       groups.sh  l7-protocols.spec  Makefile  protocols  testing
example_traffic  file_types  HOWTO      LICENSE            malware   README     WANTED
[[email protected] l7-protocols-2009-05-28]# ls /etc/l7-protocols/protocols/
100bao.pat                hotline.pat           shoutcast.pat
aim.pat                   http.pat              sip.pat
aimwebcontent.pat         http-rtsp.pat         skypeout.pat
applejuice.pat            ident.pat             skypetoskype.pat
ares.pat                  imap.pat              smb.pat
armagetron.pat            imesh.pat             smtp.pat
battlefield1942.pat       ipp.pat               snmp.pat
battlefield2142.pat       irc.pat               socks.pat
battlefield2.pat          jabber.pat            soribada.pat
bgp.pat                   kugoo.pat             soulseek.pat
biff.pat                  live365.pat           ssdp.pat
bittorrent.pat            liveforspeed.pat      ssh.pat
chikka.pat                lpd.pat               ssl.pat
cimd.pat                  mohaa.pat             stun.pat
ciscovpn.pat              msn-filetransfer.pat  subspace.pat
citrix.pat                msnmessenger.pat      subversion.pat
counterstrike-source.pat  mute.pat              teamfortress2.pat
cvs.pat                   napster.pat           teamspeak.pat
dayofdefeat-source.pat    nbns.pat              telnet.pat
dazhihui.pat              ncp.pat               tesla.pat
dhcp.pat                  netbios.pat           tftp.pat
directconnect.pat         nntp.pat              thecircle.pat
dns.pat                   ntp.pat               tonghuashun.pat
doom3.pat                 openft.pat            tor.pat
edonkey.pat               pcanywhere.pat        tsp.pat
fasttrack.pat             poco.pat              unknown.pat
finger.pat                pop3.pat              unset.pat
freenet.pat               pplive.pat            uucp.pat
ftp.pat                   qq.pat                validcertssl.pat
gkrellm.pat               quake1.pat            ventrilo.pat
gnucleuslan.pat           quake-halflife.pat    vnc.pat
gnutella.pat              radmin.pat            whois.pat
goboogy.pat               rdp.pat               worldofwarcraft.pat
gopher.pat                replaytv-ivs.pat      x11.pat
guildwars.pat             rlogin.pat            xboxlive.pat
h323.pat                  rtp.pat               xunlei.pat
halflife2-deathmatch.pat  rtsp.pat              yahoo.pat
hddtemp.pat               runesofmagic.pat      zmaap.pat
                                                                #包含了各种协议的特征码
5)测试
内核和iptables就都打好补丁并重新编译好了,现在提供环境来测试layer7模块的作用:
提供一台windows 7的内网客户机来测试:window 7的ip为192.168.10.9/24不能连外网,通过node3做SNAT上午,node3 eth0:192.168.10.3/24为内网ip,eth1 192.168.100.4/24为外网ip
windows 7上设置ip,网关,DNS:
访问外网不通:
浏览器和QQ也都使用不了。
node3上SNAT:
[[email protected] ~]# cat /proc/sys/net/ipv4/ip_forward
1
[[email protected] ~]# iptables -L -nv
Chain INPUT (policy ACCEPT 1898 packets, 180K bytes)
 pkts bytes target     prot opt in     out     source               destination

Chain FORWARD (policy ACCEPT 0 packets, 0 bytes)
 pkts bytes target     prot opt in     out     source               destination

Chain OUTPUT (policy ACCEPT 848 packets, 127K bytes)
 pkts bytes target     prot opt in     out     source               destination

Chain HECHAIN (0 references)
 pkts bytes target     prot opt in     out     source               destination
[[email protected] ~]# iptables -t nat -L -nv
Chain PREROUTING (policy ACCEPT 110 packets, 26044 bytes)
 pkts bytes target     prot opt in     out     source               destination

Chain POSTROUTING (policy ACCEPT 5 packets, 653 bytes)
 pkts bytes target     prot opt in     out     source               destination

Chain OUTPUT (policy ACCEPT 5 packets, 653 bytes)
 pkts bytes target     prot opt in     out     source               destination
此时windows 7可以访问外网了:
浏览器和qq也都可以正常使用。
在node3上使用layer7模块:
使用layer7模块前,需要启用内核中的ACCT功能
[[email protected] ~]# cat /proc/sys/net/netfilter/nf_conntrack_acct
0
[[email protected] ~]# echo 1 > /proc/sys/net/netfilter/nf_conntrack_acct
[[email protected] ~]# cat /proc/sys/net/netfilter/nf_conntrack_acct
1
注意:此内核参数需要装载了nf_conntrack模块后方能生效(一般都装载了)
lay7模块的使用语法:
iptables <specify table & chain> -m layer7 --l7proto <protocol name> -j <action>
禁止使用QQ:
[[email protected] ~]# iptables -A FORWARD -m layer7 --l7proto qq -j REJECT
[[email protected] ~]# iptables -L -nv
Chain INPUT (policy ACCEPT 74 packets, 6314 bytes)
 pkts bytes target     prot opt in     out     source               destination

Chain FORWARD (policy ACCEPT 5265 packets, 4101K bytes)
 pkts bytes target     prot opt in     out     source               destination
    0     0 REJECT     all  --  *      *       0.0.0.0/0            0.0.0.0/0           LAYER7 l7proto qq  reject-with icmp-port-unreachable

Chain OUTPUT (policy ACCEPT 31 packets, 3572 bytes)
 pkts bytes target     prot opt in     out     source               destination

Chain HECHAIN (0 references)
 pkts bytes target     prot opt in     out     source               destination
[[email protected] ~]# iptables -L -nv
Chain INPUT (policy ACCEPT 78 packets, 6578 bytes)
 pkts bytes target     prot opt in     out     source               destination

Chain FORWARD (policy ACCEPT 5278 packets, 4101K bytes)
 pkts bytes target     prot opt in     out     source               destination
    5   875 REJECT     all  --  *      *       0.0.0.0/0            0.0.0.0/0           LAYER7 l7proto qq  reject-with icmp-port-unreachable

Chain OUTPUT (policy ACCEPT 41 packets, 5663 bytes)
 pkts bytes target     prot opt in     out     source               destination

Chain HECHAIN (0 references)
 pkts bytes target     prot opt in     out     source               destination
此时windows 7上退出QQ再重新登录登录不上了(已登录的QQ不受影响,其它的应用不受影响):
需要限制其它的应用访问外网继续添加7层规则就可以了。
补充iptables 的日志功能:
-j LOG
-j LOG 不会允许访问也不会拒绝访问
如果想实现既拒绝访问又记录日志,-j LOG需要定义在拒绝之前
系统默认不会记录iptables的日志:
[[email protected] ~]# tail -3 /var/log/messages
Jan  2 18:02:37 Note3 dhclient[1453]: DHCPREQUEST on eth1 to 192.168.100.1 port 67 (xid=0x535542b1)
Jan  2 18:02:37 Note3 dhclient[1453]: DHCPACK from 192.168.100.1 (xid=0x535542b1)
Jan  2 18:02:39 Note3 dhclient[1453]: bound to 192.168.100.4 -- renewal in 3451 seconds.

[[email protected] ~]# iptables -I FORWARD -m layer7 --l7proto qq -j LOG --log-prefix "from iptables: "
                 #--log-frefix 表示日志中的前缀,用来标识,这是iptables产生的日志

[[email protected] ~]# service iptables status
表格:filter
Chain INPUT (policy ACCEPT)
num  target     prot opt source               destination

Chain FORWARD (policy ACCEPT)
num  target     prot opt source               destination
1    LOG        all  --  0.0.0.0/0            0.0.0.0/0           LAYER7 l7proto qq  LOG flags 0 level 4 prefix "from iptables: "
2    REJECT     all  --  0.0.0.0/0            0.0.0.0/0           LAYER7 l7proto qq  reject-with icmp-port-unreachable

Chain OUTPUT (policy ACCEPT)
num  target     prot opt source               destination

Chain HECHAIN (0 references)
num  target     prot opt source               destination

表格:nat
Chain PREROUTING (policy ACCEPT)
num  target     prot opt source               destination

Chain POSTROUTING (policy ACCEPT)
num  target     prot opt source               destination
1    MASQUERADE  all  --  192.168.10.0/24      0.0.0.0/0

Chain OUTPUT (policy ACCEPT)
num  target     prot opt source               destination

表格:mangle
Chain PREROUTING (policy ACCEPT)
num  target     prot opt source               destination

Chain INPUT (policy ACCEPT)
num  target     prot opt source               destination

Chain FORWARD (policy ACCEPT)
num  target     prot opt source               destination

Chain OUTPUT (policy ACCEPT)
num  target     prot opt source               destination

Chain POSTROUTING (policy ACCEPT)
num  target     prot opt source               destination

[[email protected] ~]#
[[email protected] ~]# tail -3 /var/log/messages
Jan  2 18:25:38 Note3 kernel: from iptables: IN=eth0 OUT=eth1 SRC=192.168.10.9 DST=125.39.205.34 LEN=40 TOS=0x00 PREC=0x00 TTL=127 ID=12400 DF PROTO=TCP SPT=50761 DPT=80 WINDOW=0 RES=0x00 ACK RST URGP=0
Jan  2 18:25:40 Note3 kernel: from iptables: IN=eth0 OUT=eth1 SRC=192.168.10.9 DST=123.151.40.188 LEN=40 TOS=0x00 PREC=0x00 TTL=127 ID=12401 DF PROTO=TCP SPT=50772 DPT=443 WINDOW=0 RES=0x00 ACK RST URGP=0
Jan  2 18:25:40 Note3 kernel: from iptables: IN=eth0 OUT=eth1 SRC=192.168.10.9 DST=123.151.40.188 LEN=40 TOS=0x00 PREC=0x00 TTL=127 ID=12402 DF PROTO=TCP SPT=50771 DPT=80 WINDOW=0 RES=0x00 ACK RST URGP=0
以上是关于linux基础22iptables layer7 实现七层应用过滤的主要内容,如果未能解决你的问题,请参考以下文章


![~`RJJO7ULUD[1IEFW{]%6KR.png 技术分享](http://s4.51cto.com/wyfs02/M00/8C/51/wKiom1hqHwaQlCAWAAAOXZGKUO4155.png)

![]{]JP~A4_@5KSLYE9C0JHO4.png 技术分享](http://s3.51cto.com/wyfs02/M02/8C/4E/wKioL1hqH_egIKtRAAB1FSmPqP0931.png)
![M0RU4{VSP0%DHUD@G28K]L1.png 技术分享](http://s1.51cto.com/wyfs02/M00/8C/4E/wKioL1hqKLeALIpEAAMyqejYMyc413.png)