basys3利用microblaze连接Pmod OLEDrgb
Posted 只是有点小怂
tags:
篇首语:本文由小常识网(cha138.com)小编为大家整理,主要介绍了basys3利用microblaze连接Pmod OLEDrgb相关的知识,希望对你有一定的参考价值。
-
首先要导入basys3的板卡文件,这样方便连接Pmod vivado2018.3根据板卡Boards直接创建工程(比如basys3和Arty A7)
-
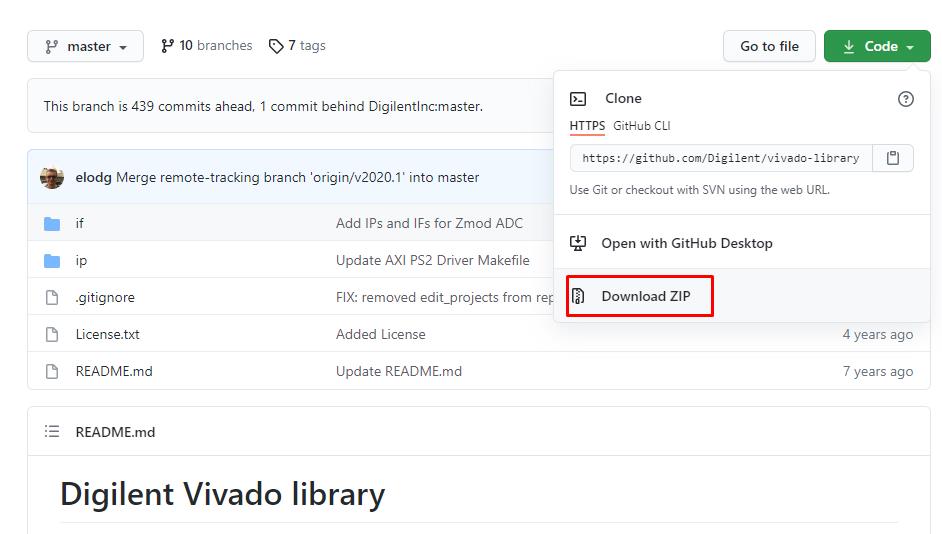
首先导入Pmod IP核,这可以在gayhub下载zip文件 https://github.com/Digilent/vivado-library,解压后把整个master文件添加至工程 vivado2018.3添加IP库
-
注意是这整个project

-
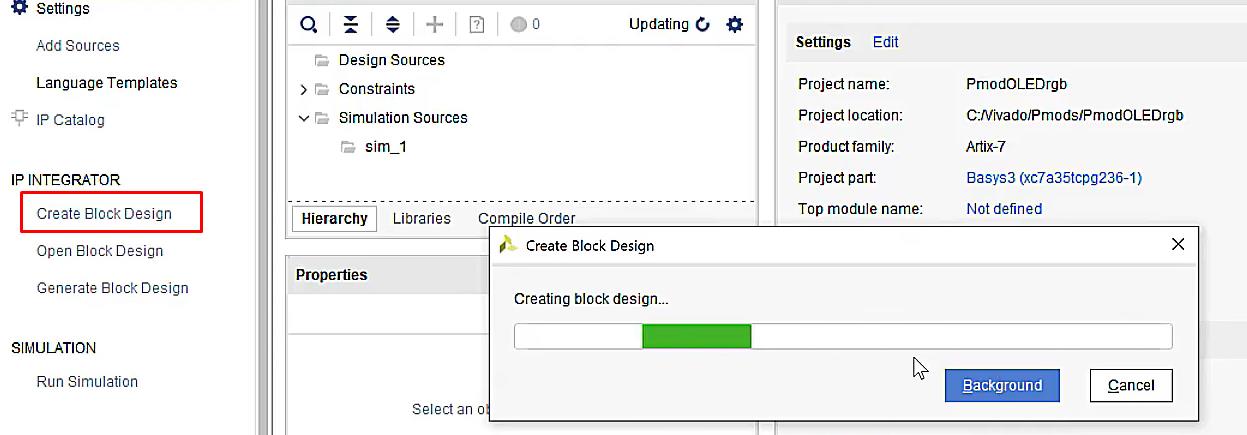
然后创建block design
-
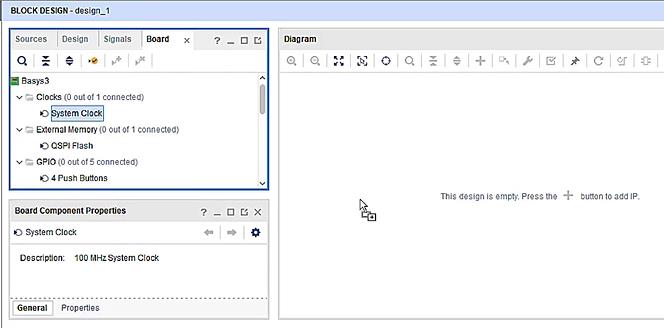
点击Board,把System Clock拖到Diagram创建系统时钟
-
添加microblaze并点击run block automation把Local Memory修改为128KB

-
双击Connector JB,选择需要连接的接口PmodOLEDrgb

-
顺便把uart拖进来

-
配置时钟IP双击,打勾clk_out2并修改为50然后点击OK

-
将PmodOLEDrgb的est_spi_clk连接到50MHz的输出端口

-
因为PmodOLEDrgb是需要配置外部的50M时钟的,可以在一下链接查看 https://reference.digilentinc.com/learn/programmable-logic/tutorials/pmod-ips/2018.2

-
点击run connection automation自动布线

-
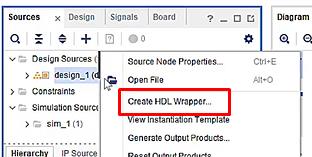
在sources窗口下点击生成顶层文件
-
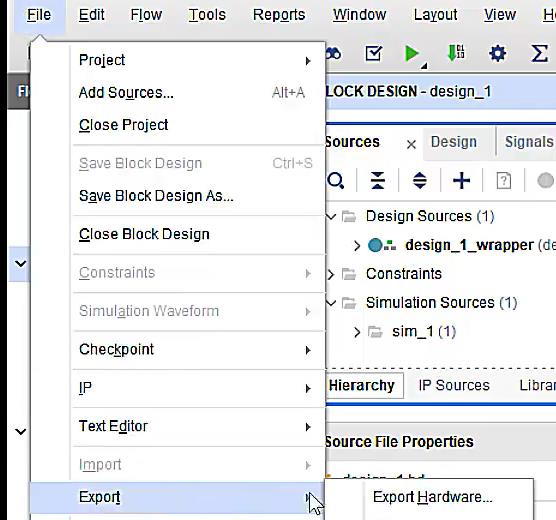
生成比特流,碰见警告直接OK,导入硬件并打开SDK
-
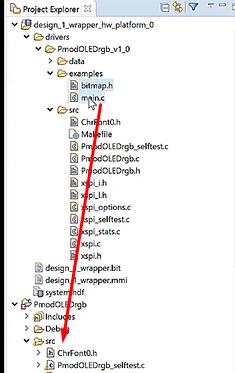
SDK下新建一个空白文件,把驱动示例复制进src

-
还有examples的函数也复制进去,打开main.c就是运行的程序
-
把pmod插入JB口,progam fpga并run,最后可以看见pmodrgb亮起

-
以上步骤和zynq开发很类似,有些地方省略写了,只为记录过程,具体可以参考视频
-
main函数代码,有空可以研究一下
/******************************************************************************/
/*                                                                            */
/* main.c -- Demo project for the PmodOLEDrgb IP                              */
/*                                                                            */
/******************************************************************************/
/* Author: Thomas Kappenman                                                   */
/* Copyright 2016, Digilent Inc.                                              */
/******************************************************************************/
/* File Description:                                                          */
/*                                                                            */
/* This demo project initializes and uses the PmodOLEDrgb to display strings  */
/* of different colors and a BMP image.                                       */
/*                                                                            */
/******************************************************************************/
/* Revision History:                                                          */
/*                                                                            */
/*    02/08/2016(TommyK):   Created                                           */
/*    08/25/2017(artvvb):   Added proper cache management functions           */
/*    11/11/2017(atangzwj): Validated for Vivado 2016.4                       */
/*    02/17/2018(atangzwj): Validated for Vivado 2017.4                       */
/*                                                                            */
/******************************************************************************/

#include "bitmap.h"
#include "PmodOLEDrgb.h"
#include "sleep.h"
#include "xil_cache.h"
#include "xparameters.h"

void DemoInitialize();
void DemoRun();
void DemoCleanup();
void EnableCaches();
void DisableCaches();

PmodOLEDrgb oledrgb;

u8 rgbUserFont[] =
   0x00, 0x04, 0x02, 0x1F, 0x02, 0x04, 0x00, 0x00, // 0x00
   0x0E, 0x1F, 0x15, 0x1F, 0x17, 0x10, 0x1F, 0x0E, // 0x01
   0x00, 0x1F, 0x11, 0x00, 0x00, 0x11, 0x1F, 0x00, // 0x02
   0x00, 0x0A, 0x15, 0x11, 0x0A, 0x04, 0x00, 0x00, // 0x03
   0x07, 0x0C, 0xFA, 0x2F, 0x2F, 0xFA, 0x0C, 0x07  // 0x04
; // This table defines 5 user characters, although only one is used

int main(void)
   DemoInitialize();
   DemoRun();
   DemoCleanup();
   return 0;


void DemoInitialize()
   EnableCaches();
   OLEDrgb_begin(&oledrgb, XPAR_PMODOLEDRGB_0_AXI_LITE_GPIO_BASEADDR,
         XPAR_PMODOLEDRGB_0_AXI_LITE_SPI_BASEADDR);


void DemoRun()
   char ch;

   // Define the user definable characters
   for (ch = 0; ch < 5; ch++)
      OLEDrgb_DefUserChar(&oledrgb, ch, &rgbUserFont[ch * 8]);

   while(1)
   OLEDrgb_SetCursor(&oledrgb, 2, 1);
   OLEDrgb_PutString(&oledrgb, "Digilent"); // Default color (green)
   OLEDrgb_SetCursor(&oledrgb, 4, 4);
   OLEDrgb_SetFontColor(&oledrgb, OLEDrgb_BuildRGB(0, 0, 255)); // Blue font
   OLEDrgb_PutString(&oledrgb, "OledRGB");

   OLEDrgb_SetFontColor(&oledrgb, OLEDrgb_BuildRGB(200, 200, 44));
   OLEDrgb_SetCursor(&oledrgb, 1, 6);
   OLEDrgb_PutChar(&oledrgb, 4);

   OLEDrgb_SetFontColor(&oledrgb, OLEDrgb_BuildRGB(200, 12, 44));
   OLEDrgb_SetCursor(&oledrgb, 5, 6);
   OLEDrgb_PutString(&oledrgb, "Demo");
   OLEDrgb_PutChar(&oledrgb, 0);

//   sleep(5); // Wait 5 seconds
//
//   OLEDrgb_DrawBitmap(&oledrgb, 0, 0, 95, 63, (u8*) tommy);


void DemoCleanup()
   DisableCaches();


void EnableCaches()
#ifdef __MICROBLAZE__
#ifdef XPAR_MICROBLAZE_USE_ICACHE
   Xil_ICacheEnable();
#endif
#ifdef XPAR_MICROBLAZE_USE_DCACHE
   Xil_DCacheEnable();
#endif
#endif


void DisableCaches()
#ifdef __MICROBLAZE__
#ifdef XPAR_MICROBLAZE_USE_DCACHE
   Xil_DCacheDisable();
#endif
#ifdef XPAR_MICROBLAZE_USE_ICACHE
   Xil_ICacheDisable();
#endif
#endif
以上是关于basys3利用microblaze连接Pmod OLEDrgb的主要内容,如果未能解决你的问题,请参考以下文章