[Material Design] 打造简单朴实的CheckBox
Posted Qiujuer
tags:
篇首语:本文由小常识网(cha138.com)小编为大家整理,主要介绍了[Material Design] 打造简单朴实的CheckBox相关的知识,希望对你有一定的参考价值。
========================================================
作者:qiujuer
博客:blog.csdn.net/qiujuer
网站:www.qiujuer.net
开源库:Genius-Android
转载请注明出处:http://blog.csdn.net/qiujuer/article/details/42399129
========================================================
序
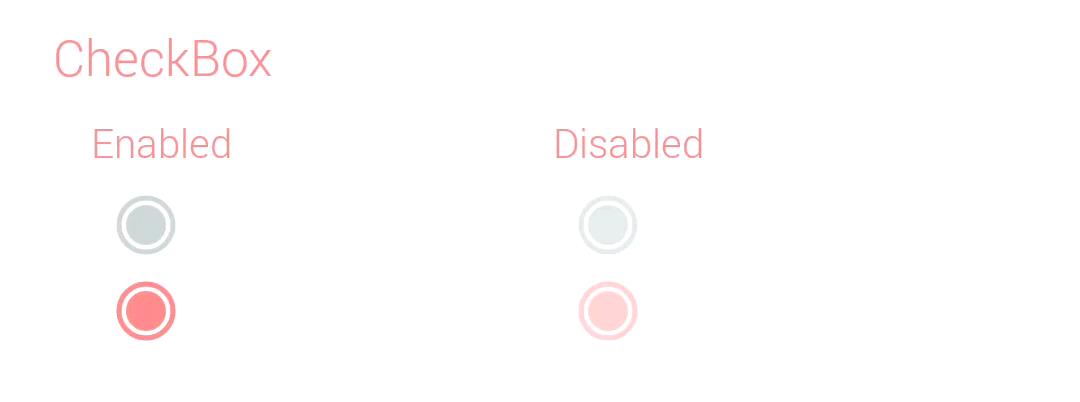
就系统的 CheckBox 而言稍显累赘;原因无他,很多时候我们使用 CheckBox 只是为了能记录是否选中而已,很多时候用不到文字等复杂的布局。今天打造了一款 Material Design 风格的 CheckBox 控件,该控件简单,朴实,效率不错。
结构
在开始前,我们先看看系统的 CheckBox 的结构:
public class CheckBox extends CompoundButton
java.lang.Object
↳android.view.View
↳android.widget.TextView
↳android.widget.Button
↳android.widget.CompoundButton
↳android.widget.CheckBox
今天打造一款直接继承 View 的 CheckBox ;当然直接继承,则会少去很多中间控件的属性,但是就我使用来看是值得的。
效果

分析
- 首先我们点击后需要绘制的地方无非就是两个地方:圆圈、圆弧
- 圆圈在动画开始的时候是颜色逐渐进行渐变
- 圆弧在动画开始的时候是在原有的圆弧上再绘制一个圆弧,圆弧的长度随着时间变化
- 由于是继承View所以enable和checked属性需要自己实现
- 同样Checked属性变化回掉依然需要自己实现
- 另外需要注意的是未实现Text属性,要的是简单,如需要可以自己绘制
代码
全局变量
    private static final Interpolator ANIMATION_INTERPOLATOR = new DecelerateInterpolator();
    private static final ArgbEvaluator ARGB_EVALUATOR = new ArgbEvaluator();
    private static final int THUMB_ANIMATION_DURATION = 250;
    private static final int RING_WIDTH = 5;
    private static final int[] DEFAULT_COLORS = new int[]
            Color.parseColor("#ffc26165"), Color.parseColor("#ffdb6e77"),
            Color.parseColor("#ffef7e8b"), Color.parseColor("#fff7c2c8"),
            Color.parseColor("#ffc2cbcb"), Color.parseColor("#ffe2e7e7");
    public static final int AUTO_CIRCLE_RADIUS = -1;
我们定义了动画为逐渐变慢,颜色渐变,动画时间为 250 毫秒,圆弧宽度 5 像素,静态颜色(颜色其是是我的控件的属性,在这里就静态化了),圆心宽度默认值。
动画变量
    // Animator
    private AnimatorSet mAnimatorSet;
    private float mSweepAngle;
    private int mCircleColor;

    private int mUnCheckedPaintColor = DEFAULT_COLORS[4];
    private int mCheckedPaintColor = DEFAULT_COLORS[2];

    private RectF mOval;
    private Paint mCirclePaint;
private Paint mRingPaint;动画形状
    private float mCenterX, mCenterY;
    private boolean mCustomCircleRadius;
    private int mCircleRadius = AUTO_CIRCLE_RADIUS;
private int mRingWidth = RING_WIDTH;基础属性
    private boolean mChecked;
    private boolean mIsAttachWindow;
    private boolean mBroadcasting;
private OnCheckedChangeListener mOnCheckedChangeListener;初始化
    public GeniusCheckBox(Context context)
        super(context);
        init(null, 0);


    public GeniusCheckBox(Context context, AttributeSet attrs)
        super(context, attrs);
        init(attrs, 0);


    public GeniusCheckBox(Context context, AttributeSet attrs, int defStyle)
        super(context, attrs, defStyle);
        init(attrs, defStyle);


    private void init(AttributeSet attrs, int defStyle)
        // Load attributes
        boolean enable = isEnabled();
        boolean check = isChecked();

        if (attrs != null)
            // Load attributes
            final TypedArray a = getContext().obtainStyledAttributes(
                    attrs, R.styleable.GeniusCheckBox, defStyle, 0);

            // getting custom attributes
            mRingWidth = a.getDimensionPixelSize(R.styleable.GeniusCheckBox_g_ringWidth, mRingWidth);
            mCircleRadius = a.getDimensionPixelSize(R.styleable.GeniusCheckBox_g_circleRadius, mCircleRadius);
            mCustomCircleRadius = mCircleRadius != AUTO_CIRCLE_RADIUS;

            check = a.getBoolean(R.styleable.GeniusCheckBox_g_checked, false);
            enable = a.getBoolean(R.styleable.GeniusCheckBox_g_enabled, true);

            a.recycle();

        // To check call performClick()
        setOnClickListener(null);

        // Refresh display with current params
        refreshDrawableState();

        // Init
        initPaint();
        initSize();
        initColor();

        // Init
        setEnabled(enable);
        setChecked(check);


    private void initPaint()
        if (mCirclePaint == null)
            mCirclePaint = new Paint(ANTI_ALIAS_FLAG);
            mCirclePaint.setStyle(Paint.Style.FILL);
            mCirclePaint.setAntiAlias(true);
            mCirclePaint.setDither(true);


        if (mRingPaint == null)
            mRingPaint = new Paint();
            mRingPaint.setStrokeWidth(mRingWidth);
            mRingPaint.setStyle(Paint.Style.STROKE);
            mRingPaint.setStrokeJoin(Paint.Join.ROUND);
            mRingPaint.setStrokeCap(Paint.Cap.ROUND);
            mRingPaint.setAntiAlias(true);
            mRingPaint.setDither(true);


    private void initSize()
        int paddingLeft = getPaddingLeft();
        int paddingTop = getPaddingTop();
        int paddingRight = getPaddingRight();
        int paddingBottom = getPaddingBottom();

        int contentWidth = getWidth() - paddingLeft - paddingRight;
        int contentHeight = getHeight() - paddingTop - paddingBottom;

        if (contentWidth > 0 && contentHeight > 0)
            int center = Math.min(contentHeight, contentWidth) / 2;
            int areRadius = center - (mRingWidth + 1) / 2;
            mCenterX = center + paddingLeft;
            mCenterY = center + paddingTop;

            if (mOval == null)
                mOval = new RectF(mCenterX - areRadius, mCenterY - areRadius, mCenterX + areRadius, mCenterY + areRadius);
            else
                mOval.set(mCenterX - areRadius, mCenterY - areRadius, mCenterX + areRadius, mCenterY + areRadius);


            if (!mCustomCircleRadius)
                mCircleRadius = center - mRingWidth * 2;
            else if (mCircleRadius > center)
                mCircleRadius = center;

            // Refresh view
            if (!isInEditMode())
                invalidate();


    private void initColor()
        if (isEnabled())
            mUnCheckedPaintColor = DEFAULT_COLORS[4];
            mCheckedPaintColor = DEFAULT_COLORS[2];
         else
            mUnCheckedPaintColor = DEFAULT_COLORS[5];
            mCheckedPaintColor = DEFAULT_COLORS[3];

        setCircleColor(isChecked() ? mCheckedPaintColor : mUnCheckedPaintColor);


    @Override
    protected void onMeasure(int widthMeasureSpec, int heightMeasureSpec)
        super.onMeasure(widthMeasureSpec, heightMeasureSpec);
        // Init this Layout size
        initSize();
另外初始化中除了实例化的时候会触发以外在 onMeasure 方法中有调用,目的是为了适应控件使用中变化时自适应。
在初始化大小中就进行了是否自定义判断,是否使用自定义值还是使用运算后的值,另外运算出 XY 坐标等操作;这些操作之所以不放在 onDraw() 中就是为了让动画尽量的流畅。
OnAttachWindow
    @Override
    protected void onAttachedToWindow()
        super.onAttachedToWindow();
        mIsAttachWindow = true;


    @Override
    protected void onDetachedFromWindow()
        super.onDetachedFromWindow();
        mIsAttachWindow = false;
自定义设置
    public void setRingWidth(int width)
        if (mRingWidth != width)
            mRingWidth = width;
            mRingPaint.setStrokeWidth(mRingWidth);
            initSize();


    public void setCircleRadius(int radius)
        if (mCircleRadius != radius)
            if (radius < 0)
                mCustomCircleRadius = false;
            else
                mCustomCircleRadius = true;
                mCircleRadius = radius;

            initSize();
回调接口
    public void setOnCheckedChangeListener(OnCheckedChangeListener listener)
        mOnCheckedChangeListener = listener;


    /**
     * Interface definition for a callback to be invoked when the checked state
     * of a compound button changed.
     */
    public static interface OnCheckedChangeListener
        /**
         * Called when the checked state of a compound button has changed.
         *
         * @param checkBox  The compound button view whose state has changed.
         * @param isChecked The new checked state of buttonView.
         */
        void onCheckedChanged(GeniusCheckBox checkBox, boolean isChecked);
实现Checkable接口
/**
 * Created by Qiujuer
 * on 2014/12/29.
 */
public class GeniusCheckBox extends View implements Checkable

    @Override
    public boolean performClick()
        toggle();
        return super.performClick();


    @Override
    public void setEnabled(boolean enabled)
        if (enabled != isEnabled())
            super.setEnabled(enabled);
            initColor();


    @Override
    public boolean isChecked()
        return mChecked;


    @Override
    public void toggle()
        setChecked(!mChecked);


    @TargetApi(Build.VERSION_CODES.KITKAT)
    @Override
    public void setChecked(boolean checked)
        if (mChecked != checked)
            mChecked = checked;
            refreshDrawableState();

            // To Animator
            if ((Build.VERSION.SDK_INT >= Build.VERSION_CODES.KITKAT && isAttachedToWindow() && isLaidOut())
                    || (mIsAttachWindow && mOval != null))
                animateThumbToCheckedState(checked);
             else
                // Immediately move the thumb to the new position.
                cancelPositionAnimator();
                setCircleColor(checked ? mCheckedPaintColor : mUnCheckedPaintColor);
                setSweepAngle(checked ? 360 : 0);


            // Avoid infinite recursions if setChecked() is called from a listener
            if (mBroadcasting)
                return;

            mBroadcasting = true;
            if (mOnCheckedChangeListener != null)
                mOnCheckedChangeListener.onCheckedChanged(this, checked);

            mBroadcasting = false;
在实现的setChecked 方法中实现开启,取消动画操作。
动画部分
    private void setSweepAngle(float value)
        mSweepAngle = value;
        invalidate();


    private void setCircleColor(int color)
        mCircleColor = color;
        invalidate();


    @Override
    protected void onDraw(Canvas canvas)
        super.onDraw(canvas);

        if (isInEditMode())
            initSize();


        mCirclePaint.setColor(mCircleColor);
        canvas.drawCircle(mCenterX, mCenterY, mCircleRadius, mCirclePaint);

        if (mOval != null)
            mRingPaint.setColor(mUnCheckedPaintColor);
            canvas.drawArc(mOval, 225, 360, false, mRingPaint);
            mRingPaint.setColor(mCheckedPaintColor);
            canvas.drawArc(mOval, 225, mSweepAngle, false, mRingPaint);


    /**
     * =============================================================================================
     * The Animate
     * =============================================================================================
     */

    private void animateThumbToCheckedState(boolean newCheckedState)
        ObjectAnimator sweepAngleAnimator = ObjectAnimator.ofFloat(this, SWEEP_ANGLE, newCheckedState ? 360 : 0);
        if (Build.VERSION.SDK_INT >= Build.VERSION_CODES.JELLY_BEAN_MR2)
            sweepAngleAnimator.setAutoCancel(true);

        ObjectAnimator circleColorAnimator = newCheckedState ? ObjectAnimator.ofObject(this, CIRCLE_COLOR, ARGB_EVALUATOR, mUnCheckedPaintColor, mCheckedPaintColor) :
                ObjectAnimator.ofObject(this, CIRCLE_COLOR, ARGB_EVALUATOR, mCheckedPaintColor, mUnCheckedPaintColor);
        if (Build.VERSION.SDK_INT >= Build.VERSION_CODES.JELLY_BEAN_MR2)
            circleColorAnimator.setAutoCancel(true);

        mAnimatorSet = new AnimatorSet();
        mAnimatorSet.playTogether(
                sweepAngleAnimator,
                circleColorAnimator
        );
        // set Time
        mAnimatorSet.setDuration(THUMB_ANIMATION_DURATION);
        mAnimatorSet.setInterpolator(ANIMATION_INTERPOLATOR);
        mAnimatorSet.start();


    private void cancelPositionAnimator()
        if (mAnimatorSet != null)
            mAnimatorSet.cancel();


    /**
     * =============================================================================================
     * The custom properties
     * =============================================================================================
     */

    private static final Property<GeniusCheckBox, Float> SWEEP_ANGLE = new Property<GeniusCheckBox, Float>(Float.class, "sweepAngle")
        @Override
        public Float get(GeniusCheckBox object)
            return object.mSweepAngle;


        @Override
        public void set(GeniusCheckBox object, Float value)
            object.setSweepAngle(value);

    ;
    private static final Property<GeniusCheckBox, Integer> CIRCLE_COLOR = new Property<GeniusCheckBox, Integer>(Integer.class, "circleColor")
        @Override
        public Integer get(GeniusCheckBox object)
            return object.mCircleColor;


        @Override
        public void set(GeniusCheckBox object, Integer value)
            object.setCircleColor(value);

;动画采用属性动画,并把属性动画打包为一个 Set 进行控制,弧度 0~360 之间变化;颜色就是选择与不选择颜色之间的变化。
自定义属性
    <!-- GeniusCheckBox -->
    <declare-styleable name="GeniusCheckBox">
        <attr name="g_ringWidth" format="dimension" />
        <attr name="g_circleRadius" format="dimension" />

        <attr name="g_checked" format="boolean" />
        <attr name="g_enabled" format="boolean" />
    </declare-styleable>
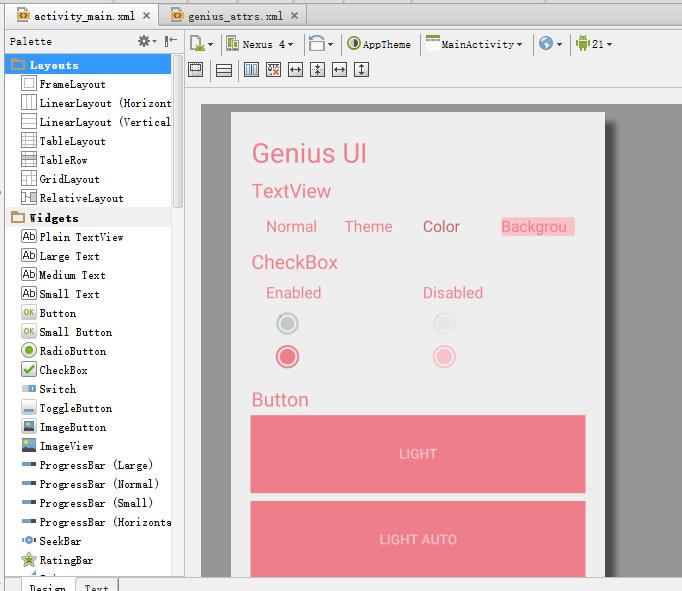
成果
代码
        xmlns:genius="http://schemas.android.com/apk/res-auto"
        <!-- CheckBox -->
        <net.qiujuer.genius.widget.GeniusTextView
            android:id="@+id/title_checkbox"
            android:layout_width="match_parent"
            android:layout_height="wrap_content"
            android:layout_marginLeft="5dip"
            android:layout_marginTop="10dip"
            android:gravity="center_vertical"
            android:maxLines="1"
            android:text="CheckBox"
            android:textSize="20sp"
            genius:g_textColor="main" />

        <LinearLayout
            android:layout_width="match_parent"
            android:layout_height="wrap_content"
            android:layout_margin="5dip"
            android:paddingLeft="10dip"
            android:paddingRight="10dip"
            android:weightSum="2">

            <LinearLayout
                android:layout_width="0dp"
                android:layout_height="wrap_content"
                android:layout_weight="1"
                android:orientation="vertical">

                <net.qiujuer.genius.widget.GeniusTextView
                    android:layout_width="match_parent"
                    android:layout_height="wrap_content"
                    android:layout_margin="5dip"
                    android:gravity="center_vertical"
                    android:text="Enabled"
                    android:textSize="16dip"
                    genius:g_textColor="main" />

                <LinearLayout
                    android:layout_width="match_parent"
                    android:layout_height="wrap_content"
                    android:layout_marginLeft="10dip"
                    android:orientation="vertical">

                    <net.qiujuer.genius.widget.GeniusCheckBox
                        android:id="@+id/checkbox_enable_blue"
                        android:layout_width="match_parent"
                        android:layout_height="24dp"
                        android:layout_gravity="center"
                        android:layout_margin="5dip"
                        genius:g_theme="@array/ScubaBlue" />

                    <net.qiujuer.genius.widget.GeniusCheckBox
                        android:id="@+id/checkbox_enable_strawberryIce"
                        android:layout_width="match_parent"
                        android:layout_height="24dp"
                        android:layout_gravity="center"
                        android:layout_margin="5dip"
                        genius:g_checked="true"
                        genius:g_ringWidth="2dp"
                        genius:g_theme="@array/StrawberryIce" />

                </LinearLayout>

            </LinearLayout>

            <LinearLayout
                android:layout_width="0dp"
                android:layout_height="wrap_content"
                android:layout_weight="1"
                android:orientation="vertical">

                <net.qiujuer.genius.widget.GeniusTextView
                    android:layout_width="match_parent"
                    android:layout_height="wrap_content"
                    android:layout_margin="5dip"
                    android:gravity="center_vertical"
                    android:text="Disabled"
                    android:textSize="16dip"
                    genius:g_textColor="main" />

                <LinearLayout
                    android:layout_width="match_parent"
                    android:layout_height="wrap_content"
                    android:layout_marginLeft="10dip"
                    android:orientation="vertical">

                    <net.qiujuer.genius.widget.GeniusCheckBox
                        android:id="@+id/checkbox_disEnable_blue"
                        android:layout_width="match_parent"
                        android:layout_height="24dp"
                        android:layout_gravity="center"
                        android:layout_margin="5dip"
                        genius:g_enabled="false"
                        genius:g_theme="@array/ScubaBlue" />

                    <net.qiujuer.genius.widget.GeniusCheckBox
                        android:id="@+id/checkbox_disEnable_strawberryIce"
                        android:layout_width="match_parent"
                        android:layout_height="24dp"
                        android:layout_gravity="center"
                        android:layout_margin="5dip"
                        genius:g_checked="true"
                        genius:g_enabled="false"
                        genius:g_ringWidth="2dp"
                        genius:g_theme="@array/StrawberryIce" />

                </LinearLayout>

            </LinearLayout>
        </LinearLayout>
效果

话说,写一篇这个好累的;光是写就花了我3个小时,汗!包括动画图片制作等。
总的源码太长就不贴出来了,上面已经拆分的弄出来了,如果要请点击这里。
——学之开源,用于开源;初学者的心态,与君共勉!
========================================================
作者:qiujuer
博客:blog.csdn.net/qiujuer
网站:www.qiujuer.net
开源库:Genius-Android
转载请注明出处:http://blog.csdn.net/qiujuer/article/details/42399129
========================================================
以上是关于[Material Design] 打造简单朴实的CheckBox的主要内容,如果未能解决你的问题,请参考以下文章