Android通知栏版本兼容解决方案
Posted 古月书斋
tags:
篇首语:本文由小常识网(cha138.com)小编为大家整理,主要介绍了Android通知栏版本兼容解决方案相关的知识,希望对你有一定的参考价值。
原文:http://blog.csdn.net/u012124438/article/details/53054994
Android通知栏是我们在APP中几乎必须使用到的,自定义通知栏给我们带来很多拓展性,但是我们在使用自定义通知栏时往往会遇到自定义通知栏和系统本身颜色、字体等不兼容的问题,本篇博客就重点讲解如何解决android自定义通知栏在各Android系统的适配问题。
概述:
众所周知,Android通知有两种,默认通知与自定义通知。
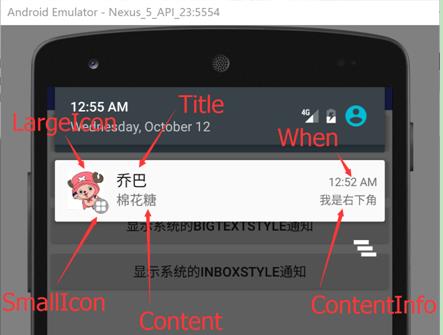
默认通知栏通过调用系统接口就能实现,代码如下:
new NotificationCompat.Builder(this)
//状态栏显示的icon,尺寸建议是24x24(尺寸太大,在某些系统,如:4.x.x就会只显示图片的中间一部分),必须设置,否则报异常
.setSmallIcon(R.mipmap.notification_status_bar_icon)
.setTicker("新通知提醒")
.setLargeIcon(BitmapFactory.decodeResource(getResources(), R.mipmap.chopper))
.setContentTitle("乔巴")
.setContentText("棉花糖")
.setWhen(System.currentTimeMillis())
// .setShowWhen(false) //是否显示时间
.setContentInfo("我是右下角")
// .setNumber(1000) //与setContentInfo()设置的内容冲突
.setDefaults(Notification.DEFAULT_ALL)
.setAutoCancel(true)
.setDeleteIntent(getDeletePendingIntent())
.setContentIntent(getClickPendingIntent())
- 1
- 2
- 3
- 4
- 5
- 6
- 7
- 8
- 9
- 10
- 11
- 12
- 13
- 14
- 15
- 16
- 17
- 18
- 19
- 1
- 2
- 3
- 4
- 5
- 6
- 7
- 8
- 9
- 10
- 11
- 12
- 13
- 14
- 15
- 16
- 17
- 18
- 19
展现的效果如下:
自定义通知就稍微麻烦一些,需要定义一个layout文件,使用RemoteViews加载它并设置一些点击事件,再设置到builder,代码如下:
RemoteViews notifactionView = new RemoteViews(mContext.getPackageName(),
R.layout.cl_screen_notification)
mBuilder.setContent(notifactionView)
notifactionView.setOnClickPendingIntent(R.id.cl_screen_notification, pendingIntent)
Bitmap pluginIcon = drawableToBitmap(pluginDrawable)
LogUtils.d("myl", "获得icon" + pluginIcon)
notifactionView.setImageViewBitmap(R.id.cl_plugin_icon, pluginIcon)
notifactionView.setTextViewText(R.id.dl_plugin_msg, pluginContent)
Notification notification = mBuilder.build()
int id = 199
LogUtils.d(TAG, "创建通知")
mNotificationManager.notify(id, notification)
通知栏版本兼容问题
为什么会存在版本适配问题?在默认通知栏是不存在样式适配的问题的,因为默认通知的布局、颜色、背景什么的都是系统的,系统总会正确的显示默认通知。
但自定义通知就不同了,因为我们可以自定义设置任何背景、颜色。Android通知栏的背景各种各样,不同的ROM有不同的背景,白色、黑色、透明等。不同的Android版本通知栏背景也不一样,一旦我们为自定义通知上的元素设置了特定背景或颜色,就肯定会带来兼容性问题(主要是文本啦)。
如何解决版本兼容问题?
有以下几种解决方法:
解决方法1:自定义布局的时候,把背景颜色也给自定义了
详尽的说就是:为自定义通知设置固定的背景(上图中的360卫士就这么干的),比如黑色。那么内容自然就是白色或近似白色。这样,在所有的手机上都能正常显示,不会出现在黑色背景通知栏上显示良好,到了白色背景通知栏上就几乎啥也看不见。优缺点如下:
优点:简单粗暴,无需考虑版本兼容问题
缺点:整体可能与系统通知风格迥异
效果如下:

解决方法2:
通过读取系统的通知栏样式文件,获取到title和content的颜色,进而将这个颜色设置到自定义通知上。读取通知栏样式文件本身有兼容性问题,不同Android版本的样式文件有变,拿到title和content的颜色后,还可以通过算法(后面细说)判断这个颜色是近似白色还是近似黑色,进而能判断出通知栏的背景是近似黑色还是近似白色,这样就能根据不同的通知栏背景加载不同的自定义通知布局。进而做到良好的适配。
根据不同版本和targetSdkVersion使用对应的系统TextAppearance
运行环境Android 4.4及以下版本 or 运行环境Android 5.0,但targetSdkVersion <=19:
Title字体@android:style/TextAppearance.StatusBar.EventContent.Title
Content字体@android:style/TextAppearance.StatusBar.EventContent
Android 5.0及以上版本:
Title字体@android:style/TextAppearance.Material.Notification.Title
Content字体@android:style/TextAppearance.Material.Notification.Line2
范例如下:
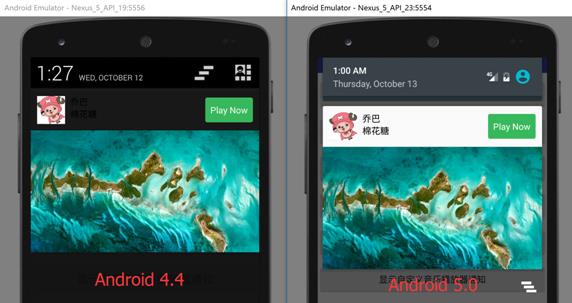
- 版本5.0以下:
通知的背景默认系统背景,
字体颜色@style/TextAppearance.StatusBar.EventContent.
TextAppearance.StatusBar.EventContent, 顾名思义StatusBar的事件内容文本样式. 在系统中, 会默认匹配, 如灰色等.
<?xml version="1.0" encoding="utf-8"?>
<RelativeLayout
    xmlns:android="http://schemas.android.com/apk/res/android"
    xmlns:tool="http://schemas.android.com/tools"
    android:layout_width="match_parent"
    android:layout_height="64dp"
    android:gravity="center_vertical">
    ...
    <LinearLayout
        android:layout_width="match_parent"
        android:layout_height="match_parent"
        android:layout_toEndOf="@+id/notification_iv_portrait"
        android:layout_toRightOf="@+id/notification_iv_portrait"
        android:gravity="center_vertical"
        android:orientation="vertical">

        <TextView
            android:layout_width="wrap_content"
            android:layout_height="wrap_content"
            android:text="@string/notification_widget_title"
            android:textAppearance="@style/TextAppearance.StatusBar.EventContent"
            android:textSize="@dimen/d14sp"/>

        <TextView
            android:id="@+id/notification_tv_calories"
            android:layout_width="wrap_content"
            android:layout_height="wrap_content"
            android:textAppearance="@style/TextAppearance.StatusBar.EventContent"
            android:textSize="@dimen/d20sp"
            tool:text="10步 | 20大卡"/>
    </LinearLayout>
</RelativeLayout>
- 1
- 2
- 3
- 4
- 5
- 6
- 7
- 8
- 9
- 10
- 11
- 12
- 13
- 14
- 15
- 16
- 17
- 18
- 19
- 20
- 21
- 22
- 23
- 24
- 25
- 26
- 27
- 28
- 29
- 30
- 31
- 32
- 33
- 1
- 2
- 3
- 4
- 5
- 6
- 7
- 8
- 9
- 10
- 11
- 12
- 13
- 14
- 15
- 16
- 17
- 18
- 19
- 20
- 21
- 22
- 23
- 24
- 25
- 26
- 27
- 28
- 29
- 30
- 31
- 32
- 33
- 版本5.0及以上
新建layout-v21, 表面5.0版本以后使用.
@android:style/TextAppearance.Material.Notification.Title通知栏标题.
@android:style/TextAppearance.Material.Notification.Line2通知栏内容.
这样就可以完全匹配系统颜色.
<?xml version="1.0" encoding="utf-8"?>

<RelativeLayout
    xmlns:android="http://schemas.android.com/apk/res/android"
    xmlns:tool="http://schemas.android.com/tools"
    android:layout_width="match_parent"
    android:layout_height="64dp"
    android:gravity="center_vertical">

    <ImageView
        android:id="@+id/notification_iv_portrait"
        android:layout_width="70dp"
        android:layout_height="64dp"
        android:paddingBottom="8dp"
        android:paddingTop="8dp"
        android:scaleType="centerInside"
        tool:src="@drawable/widget_normal"/>

    <LinearLayout
        android:layout_width="match_parent"
        android:layout_height="match_parent"
        android:layout_toRightOf="@+id/notification_iv_portrait"
        android:gravity="center_vertical"
        android:orientation="vertical">

        <TextView
            android:layout_width="wrap_content"
            android:layout_height="wrap_content"
            android:text="@string/notification_widget_title"
            android:textAppearance="@android:style/TextAppearance.Material.Notification.Title"
            android:textSize="14sp"/>

        <TextView
            android:id="@+id/notification_tv_calories"
            android:layout_width="wrap_content"
            android:layout_height="wrap_content"
            android:textAppearance="@android:style/TextAppearance.Material.Notification.Line2"
            android:textSize="20sp"
            tool:text="10步 | 20大卡"/>
    </LinearLayout>
</RelativeLayout>
- 1
- 2
- 3
- 4
- 5
- 6
- 7
- 8
- 9
- 10
- 11
- 12
- 13
- 14
- 15
- 16
- 17
- 18
- 19
- 20
- 21
- 22
- 23
- 24
- 25
- 26
- 27
- 28
- 29
- 30
- 31
- 32
- 33
- 34
- 35
- 36
- 37
- 38
- 39
- 40
- 41
- 42
- 1
- 2
- 3
- 4
- 5
- 6
- 7
- 8
- 9
- 10
- 11
- 12
- 13
- 14
- 15
- 16
- 17
- 18
- 19
- 20
- 21
- 22
- 23
- 24
- 25
- 26
- 27
- 28
- 29
- 30
- 31
- 32
- 33
- 34
- 35
- 36
- 37
- 38
- 39
- 40
- 41
- 42
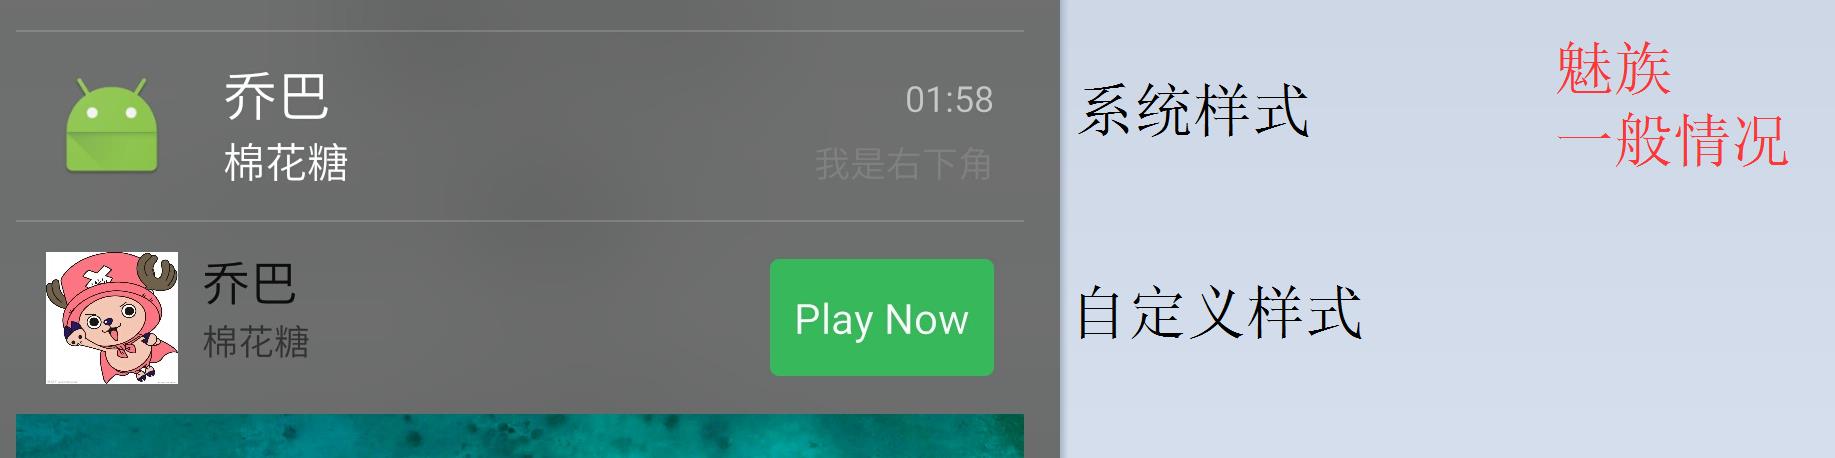
效果如下:
优点:整体与系统通知风格基本一致
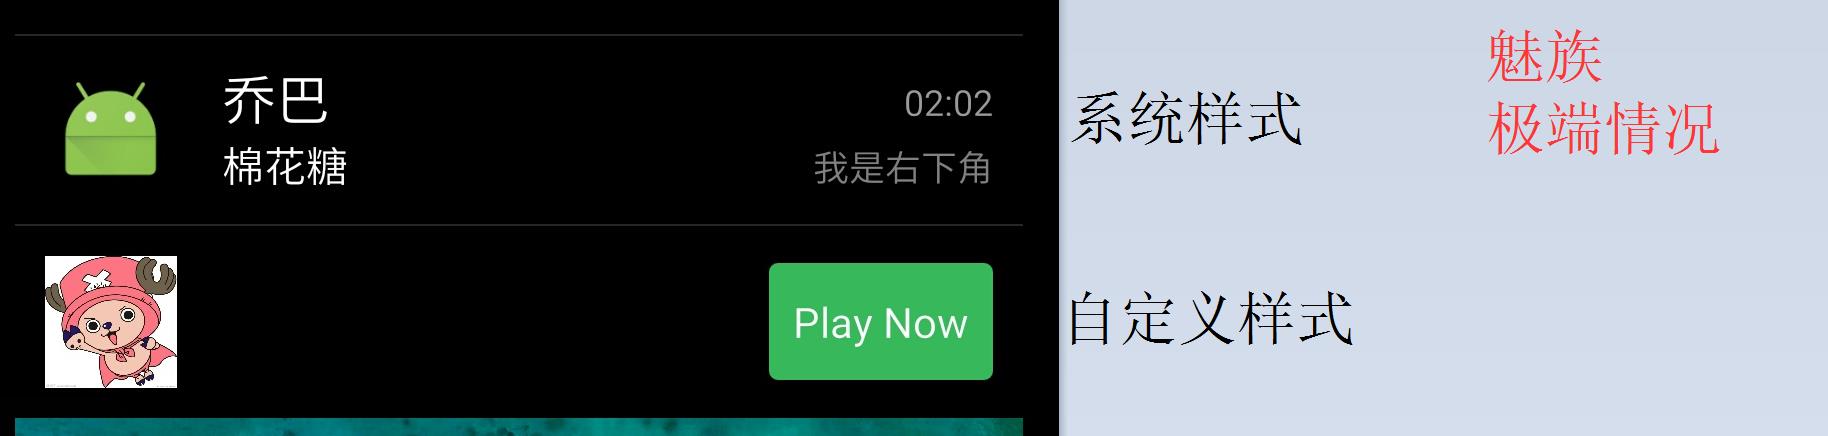
缺点:不能很好地兼容某些魔改的系统,例如魅族的系统就无法兼容,效果如下:
解决方法3:
-
从一个系统默认样式的Notification实例中获取其中的contentView(RemoteViews)实例
-
调用contentView的apply方法把默认样式的Notification的整个布局绑定一个FrameLayout中
-
从这个FrameLayout把显示Title的TextView实例找出来
-
调用TextView的getCurrentTextColor()方法把默认样式的Title的颜色值取出来,赋给对应的自定义View
范例如下:
public static SystemNotifictionBean getNotificationTitleColor(Context context)
if (context == null || sSystemNotificationBean != null)
return sSystemNotificationBean;
NotificationCompat.Builder builder = new NotificationCompat.Builder(context);
builder.setContentTitle(TITLE_STRING);
builder.setContentText(TITLE_CONTENT);
Notification notification = builder.build();
ViewGroup rootVG = (ViewGroup) notification.contentView.apply(context, new FrameLayout(context));
iteratorView(rootVG, new Filter()
@Override
public void filter(View view)
if (view instanceof TextView)
TextView textView = (TextView) view;
if (TITLE_STRING.equals(textView.getText().toString()))
if (sSystemNotificationBean == null)
sSystemNotificationBean = new SystemNotifictionBean();
sSystemNotificationBean.mTitleColor = textView.getCurrentTextColor();
);
iteratorView(rootVG, new Filter()
@Override
public void filter(View view)
if (view instanceof TextView)
TextView textView = (TextView) view;
if (TITLE_CONTENT.equals(textView.getText().toString()))
if (sSystemNotificationBean == null)
sSystemNotificationBean = new SystemNotifictionBean();
sSystemNotificationBean.mContentColor = textView.getCurrentTextColor();
);
return sSystemNotificationBean;
private static void iteratorView(View view, Filter filter)
if (view == null || filter == null)
return;
filter.filter(view);
if (view instanceof ViewGroup)
ViewGroup container = (ViewGroup) view;
for (int i = 0, j = container.getChildCount(); i < j; i++)
iteratorView(container.getChildAt(i), filter);
- 1
- 2
- 3
- 4
- 5
- 6
- 7
- 8
- 9
- 10
- 11
- 12
- 13
- 14
- 15
- 16
- 17
- 18
- 19
- 20
- 21
- 22
- 23
- 24
- 25
- 26
- 27
- 28
- 29
- 30
- 31
- 32
- 33
- 34
- 35
- 36
- 37
- 38
- 39
- 40
- 41
- 42
- 43
- 44
- 45
- 46
- 47
- 48
- 49
- 50
- 51
- 52
- 53
- 54
- 55
- 56
- 57
- 58
- 59