燃起来 ESP32移植LVGL最新版本8.2
Posted Wireless_Link
tags:
篇首语:本文由小常识网(cha138.com)小编为大家整理,主要介绍了燃起来 ESP32移植LVGL最新版本8.2相关的知识,希望对你有一定的参考价值。
零. 声明
本专栏文章我们会以连载的方式持续更新,本专栏计划更新内容如下:
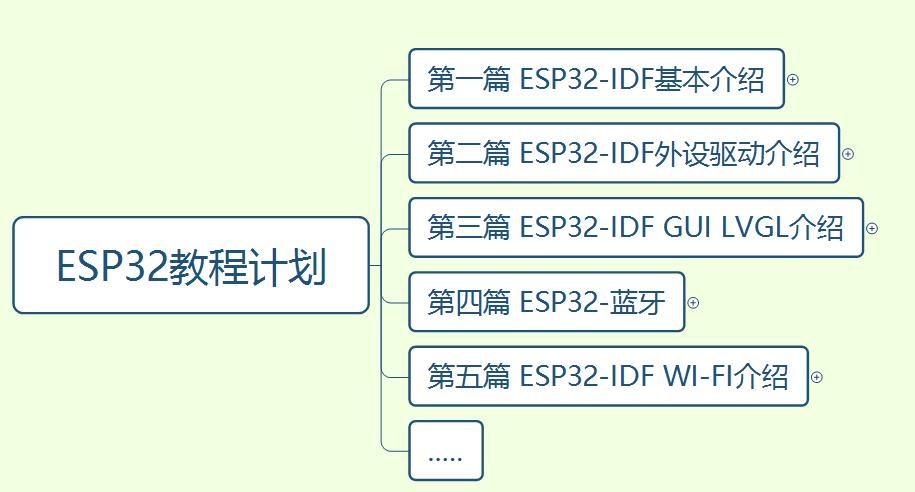
第一篇:ESP-IDF基本介绍,主要会涉及模组,芯片,开发板的介绍,环境搭建,程序编译下载,启动流程等一些基本的操作,让你对ESP-IDF开发有一个总体的认识,比我们后续学习打下基础!
第二篇:ESP32-IDF外设驱动介绍,主要会根据esp-idf现有的driver,提供各个外设的驱动,比如LED,OLED,SPI LCD,TOUCH,红外,Codec ic等等,在这一篇中,我们不仅仅来做外设驱动,还会对常用的外设总线做一个介绍,让大家知其然又知其所以然!
第三篇:目前比较火热的GUI LVGL介绍,主要会设计LVGL7.1,LVGL8的移植介绍,并且也会介绍各个组件,知道原理后,最后,我们会推出一款组态软件来构建我们的GUI,来提升我们的效率!
第四篇:ESP32-蓝牙,熟悉我的,应该都知道,我即使从事蓝牙协议栈的开发的,所以这个是我们独有的优势,在这一篇章,我们会提供不仅仅是蓝牙应用方法的知识,也会应用结合蓝牙底层协议栈的理论,让你彻底从上到下打通蓝牙任督二脉!
第五篇:Wi-Fi介绍,熟悉我的,应该也知道,我们也做过一款sdio wifi的驱动教程板子,所以在wifi这方面我们也是有独有的优势,在这一篇章,我们同样不仅仅提供Wi-Fi应用方面的知识,也会结合底层理论,让你对Wi-Fi有一个清晰的认知!
另外,我们的教程包括但是不局限于以上篇章,为了给你一个更好的导航,以下信息尤其重要,请详细查看!!
------------------------------------------------------------------------------------------------------------------------------------------
蓝牙交流扣扣群:539357317
微信公众号↓↓↓↓↓↓↓↓↓↓↓↓↓↓↓↓↓↓↓↓↓↓↓↓↓↓↓↓↓↓↓↓↓↓↓↓↓↓↓↓↓↓↓↓↓↓↓↓↓↓↓↓↓↓↓↓↓↓↓↓↓↓↓↓↓↓↓↓↓↓↓↓↓↓↓

------------------------------------------------------------------------------------------------------------------------------------------
一.创建基于ESP32的LVGL工程
步骤1)我们把https://github.com/sj15712795029/esp32_study/tree/main/1_base_project/template-app这里面我们创建的模板工程复制出来,放到esp32_study\\3_lvgl\\1_lvgl8_2_porting 文件夹中
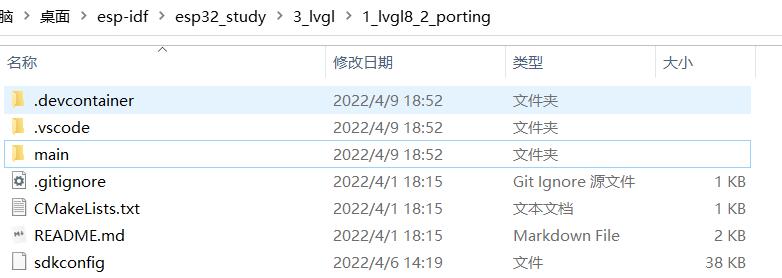
步骤2)打开vscode中ESP32插件的terminal

步骤3)执行命令 mkdir components 创建一个components的文件夹,用于存在lvgl
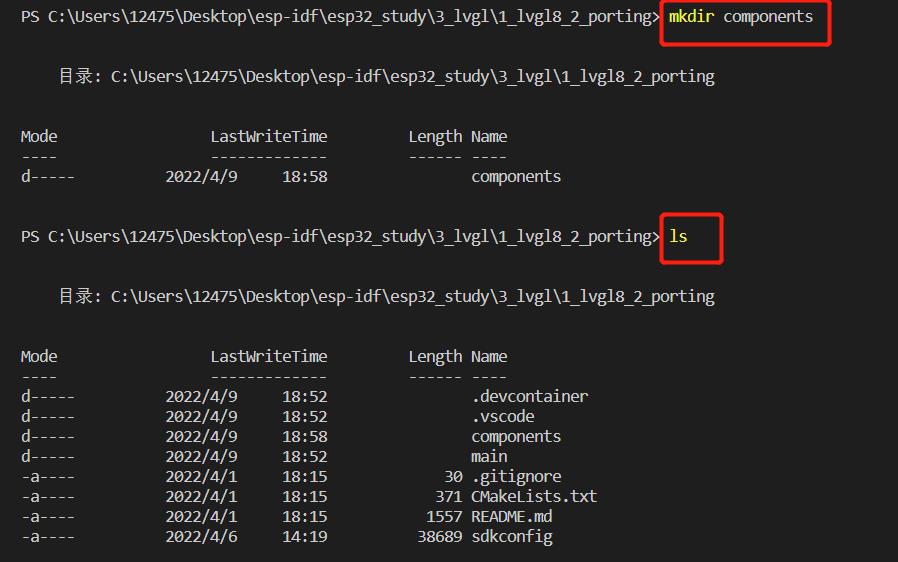
步骤4)通过cd ./components 进入components路径

步骤5)在terminal敲命令行
git clone -b release/v8.2 https://gitee.com/my_lvgl/lvgl
下载lvgl 8.2版本的代码

当然你也可以在github来clone,命令行如下:
git clone -b release/v8.2 https://github.com/lvgl/lvgl
但是github网站不稳定,所以还是推荐gitee
步骤6)在terminal敲命令行
git clone https://gitee.com/my_lvgl/lvgl_esp32_drivers
下载ESP32的驱动

当然你也可以在github来clone,命令行如下:
git clone https://github.com/lvgl/lvgl_esp32_drivers
但是github网站不稳定,所以还是推荐gitee
整个完毕后目录如下:
├─.devcontainer
├─.vscode
├─components
│ ├─lvgl
│ └─lvgl_esp32_drivers
└─main
二.编译代码
此时我们仅仅是从git拉下来代码,没有写应用程序,也没有修改过代码,直接编译,我们看到会遇到编译错误
错误1:
../components/lvgl_esp32_drivers/lvgl_helpers.h:57:25: error: 'LV_HOR_RES_MAX' undeclared (first use in this function); did you mean 'LV_HOR_RES'?
解决方法:
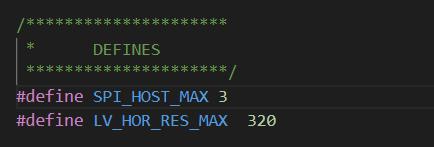
在esp32_study\\3_lvgl\\1_lvgl8_2_porting\\components\\lvgl_esp32_drivers文件夹中的lvg_helpers.h中定义一个宏#define LV_HOR_RES_MAX 320,顺便加上另外一个宏定义

错误2:
../components/lvgl_esp32_drivers/lvgl_helpers.c:157:28: error: 'SPI_HOST_MAX' undeclared (first use in this function); did you mean 'GPIO_PORT_MAX'?
解决方法:
在esp32_study\\3_lvgl\\1_lvgl8_2_porting\\components\\lvgl_esp32_drivers文件夹中的lvg_helpers.h中定义一个宏
#define SPI_HOST_MAX 3
三. 配置LCD Display的引脚
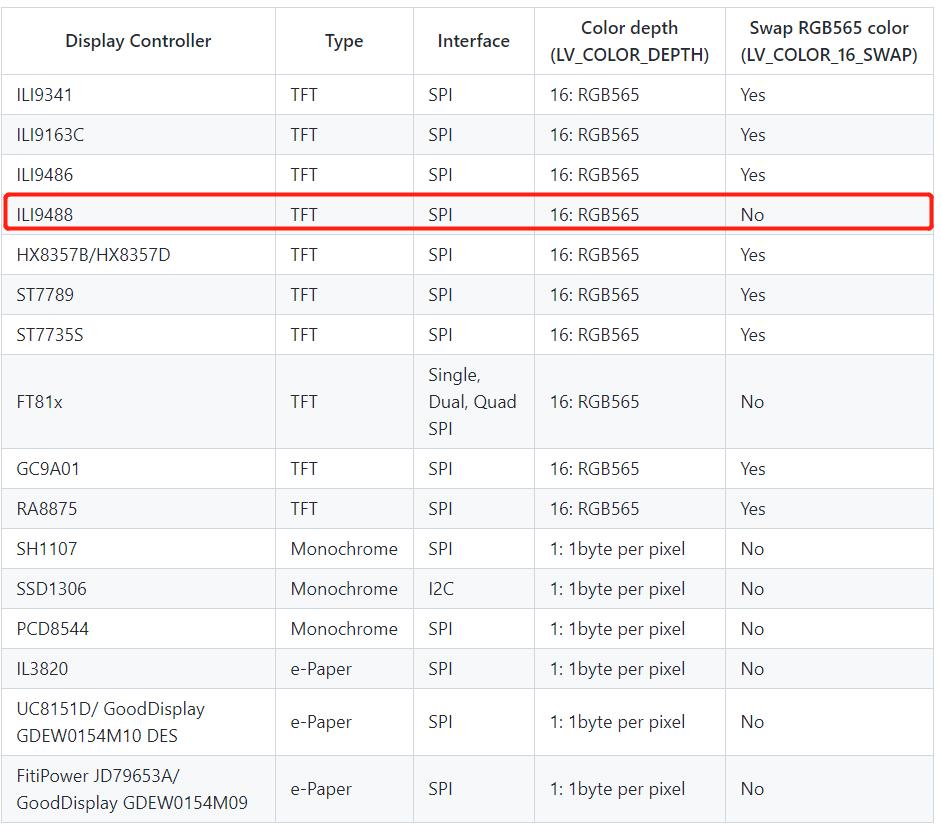
我们看到lvgl_esp32_drivers支持的LCD display controller型号有如下几种,而我们的开发板是用的ILI9488,所以我们不需要额外的去写驱动,只需要menuconfig配置一下就可以了。
1.LCD display相关的原理图
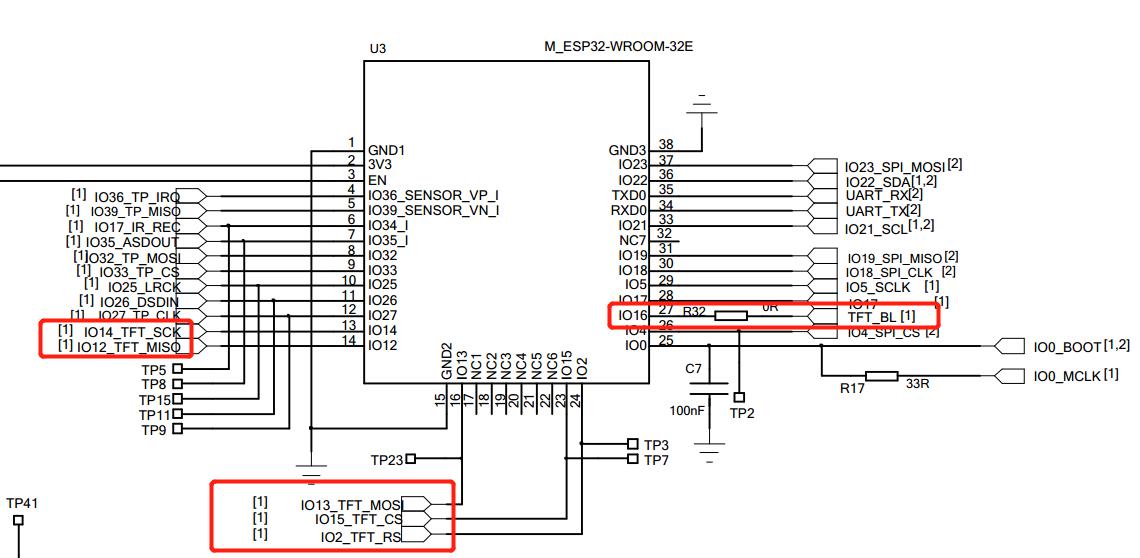
ESP32 MCU的原理图如下:
LCD的接口如下:
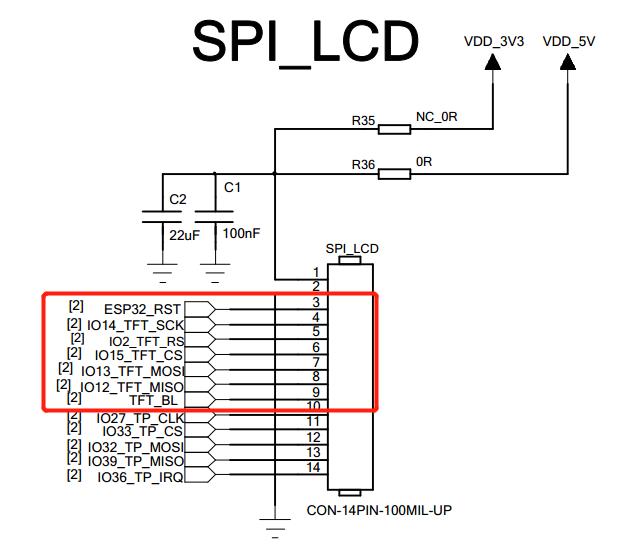
| ESP32引脚 | LCD display引脚 | 作用 |
| ESP32复位引脚 | ESP32_RST | LCD复位引脚,跟随ESP32复位而复位 |
| IO14 | IO14_TFT_SCK | LCD display SPI的时钟引脚 |
| IO2 | IO2_TFT_RS | 也叫做DC引脚,主要用于区分是data数据还是command数据 |
| IO15 | IO15_TFT_CS | LCD display的SPI片选引脚 |
| IO13 | IO13_TFT_MOSI | LCD Display SPI的主角色发送,从角色接收引脚 |
| IO12 | IO12_TFT_MISO | LCD Display SPI的主角色接收,从角色发送引脚 |
| IO16 | TFT_BL | LCD Display的背光引脚 |
2.配置menuconfig LCD display部分
打开menuconfig配置,拉到LVGL ESP32 driver部分,选择TFF display controller

然后按照我们如下配置

以上引脚有两个注意的点:
1)我们不选择reset的gpio,因为我们的LCD是跟随ESP32 reset
2)背光的1是电量LCD的背光
四. 配置LCD Touch的引脚
我们看到lvgl_esp32_drivers支持的LCD touch 型号有如下几种,而我们的开发板是用的XPT2046,所以我们不需要额外的去写驱动,只需要menuconfig配置一下就可以了。

1.LCD touch相关的原理图
ESP32 MCU的原理图如下:

LCD的接口如下:

| ESP32引脚 | LCD touch引脚 | 作用 |
| IO27 | IO27_TP_CLK | LCD touch的SPI时钟引脚 |
| IO33 | IO33_TP_CS | LCD touch的SPI片选引脚 |
| IO32 | IO32_TP_MOSI | LCD Touch SPI的主角色发送,从角色接收引脚 |
| IO39 | IO39_TP_MISO | LCD Touch SPI的主角色接收,从角色发送引脚 |
| IO36 | IO36_TP_IR | LCD Touch的中断引脚 |
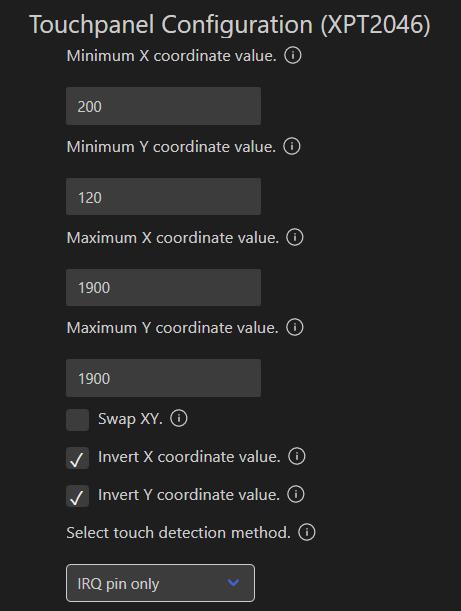
2.配置menuconfig LCD Touch部分
打开menuconfig配置,拉到LVGL ESP32 driver部分,选择TFT Touch controller

然后按照我们如下配置

五.使能一个Demo
1.使能music palyer demo
我们使能一个music palyer的demo,到时候来增加效果
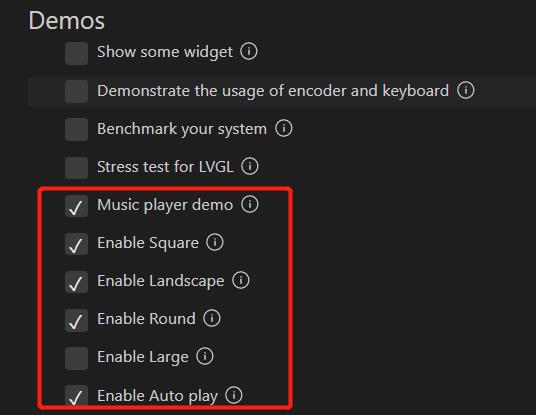
2.使能music palyer demo使用的字体

3.开启刷屏帧率以及CPU loading

六.编写APP
/* LVGL Example project
 *
 * Basic project to test LVGL on ESP32 based projects.
 *
 * This example code is in the Public Domain (or CC0 licensed, at your option.)
 *
 * Unless required by applicable law or agreed to in writing, this
 * software is distributed on an "AS IS" BASIS, WITHOUT WARRANTIES OR
 * CONDITIONS OF ANY KIND, either express or implied.
 */
#include <stdbool.h>
#include <stdio.h>
#include <stdlib.h>
#include <string.h>

#include "freertos/FreeRTOS.h"
#include "freertos/task.h"
#include "esp_freertos_hooks.h"
#include "freertos/semphr.h"
#include "esp_system.h"
#include "driver/gpio.h"

/* Littlevgl specific */
#ifdef LV_LVGL_H_INCLUDE_SIMPLE
#include "lvgl.h"
#include "demos/lv_demos.h"
#else
#include "lvgl/lvgl.h"
#include "lvgl/demos/lv_demos.h"
#endif


#include "lvgl_helpers.h"

/*********************
 *      DEFINES
 *********************/
#define TAG "demo"
#define LV_TICK_PERIOD_MS 1

/**********************
 *  STATIC PROTOTYPES
 **********************/
static void lv_tick_task(void *arg);
static void guiTask(void *pvParameter);
static void create_demo_application(void);

/**********************
 *   APPLICATION MAIN
 **********************/
void app_main()


    /* If you want to use a task to create the graphic, you NEED to create a Pinned task
     * Otherwise there can be problem such as memory corruption and so on.
     * NOTE: When not using Wi-Fi nor Bluetooth you can pin the guiTask to core 0 */
    xTaskCreatePinnedToCore(guiTask, "gui", 4096 * 2, NULL, 0, NULL, 1);


/* Creates a semaphore to handle concurrent call to lvgl stuff
 * If you wish to call *any* lvgl function from other threads/tasks
 * you should lock on the very same semaphore! */
SemaphoreHandle_t xGuiSemaphore;

static void guiTask(void *pvParameter)


    (void)pvParameter;
    xGuiSemaphore = xSemaphoreCreateMutex();

    lv_init();

    /* Initialize SPI or I2C bus used by the drivers */
    lvgl_driver_init();

    lv_color_t *buf1 = heap_caps_malloc(DISP_BUF_SIZE * sizeof(lv_color_t), MALLOC_CAP_DMA);
    assert(buf1 != NULL);

    /* Use double buffered when not working with monochrome displays */
#ifndef CONFIG_LV_TFT_DISPLAY_MONOCHROME
    lv_color_t *buf2 = heap_caps_malloc(DISP_BUF_SIZE * sizeof(lv_color_t), MALLOC_CAP_DMA);
    assert(buf2 != NULL);
#else
    static lv_color_t *buf2 = NULL;
#endif

    static lv_disp_draw_buf_t disp_buf;

    uint32_t size_in_px = DISP_BUF_SIZE;

#if defined CONFIG_LV_TFT_DISPLAY_CONTROLLER_IL3820 || defined CONFIG_LV_TFT_DISPLAY_CONTROLLER_JD79653A || defined CONFIG_LV_TFT_DISPLAY_CONTROLLER_UC8151D || defined CONFIG_LV_TFT_DISPLAY_CONTROLLER_SSD1306
    size_in_px *= 8;
#endif

    /* Initialize the working buffer depending on the selected display.
     * NOTE: buf2 == NULL when using monochrome displays. */
    lv_disp_draw_buf_init(&disp_buf, buf1, buf2, size_in_px);

    lv_disp_drv_t disp_drv;
    lv_disp_drv_init(&disp_drv);
    disp_drv.flush_cb = disp_driver_flush;

    /* When using a monochrome display we need to register the callbacks:
     * - rounder_cb
     * - set_px_cb */
#ifdef CONFIG_LV_TFT_DISPLAY_MONOCHROME
    disp_drv.rounder_cb = disp_driver_rounder;
    disp_drv.set_px_cb = disp_driver_set_px;
#endif

    disp_drv.draw_buf = &disp_buf;
    disp_drv.hor_res = LV_HOR_RES_MAX;
    disp_drv.ver_res = LV_VER_RES_MAX;
    lv_disp_drv_register(&disp_drv);

    /* Register an input device when enabled on the menuconfig */
#if CONFIG_LV_TOUCH_CONTROLLER != TOUCH_CONTROLLER_NONE
    lv_indev_drv_t indev_drv;
    lv_indev_drv_init(&indev_drv);
    indev_drv.read_cb = touch_driver_read;
    indev_drv.type = LV_INDEV_TYPE_POINTER;
    lv_indev_drv_register(&indev_drv);
#endif

    /* Create and start a periodic timer interrupt to call lv_tick_inc */
    const esp_timer_create_args_t periodic_timer_args =
        .callback = &lv_tick_task,
        .name = "periodic_gui",
    ;
    esp_timer_handle_t periodic_timer;
    ESP_ERROR_CHECK(esp_timer_create(&periodic_timer_args, &periodic_timer));
    ESP_ERROR_CHECK(esp_timer_start_periodic(periodic_timer, LV_TICK_PERIOD_MS * 1000));

    /* Create the demo application */
    create_demo_application();

    while (1)

        /* Delay 1 tick (assumes FreeRTOS tick is 10ms */
        vTaskDelay(pdMS_TO_TICKS(10));

        /* Try to take the semaphore, call lvgl related function on success */
        if (pdTRUE == xSemaphoreTake(xGuiSemaphore, portMAX_DELAY))

            lv_task_handler();
            xSemaphoreGive(xGuiSemaphore);


    /* A task should NEVER return */
    free(buf1);
#ifndef CONFIG_LV_TFT_DISPLAY_MONOCHROME
    free(buf2);
#endif
    vTaskDelete(NULL);


static void create_demo_application(void)

    lv_demo_music();


static void lv_tick_task(void *arg)

    (void)arg;

    lv_tick_inc(LV_TICK_PERIOD_MS);
我们先确保编译通过,待会再讲解程序,
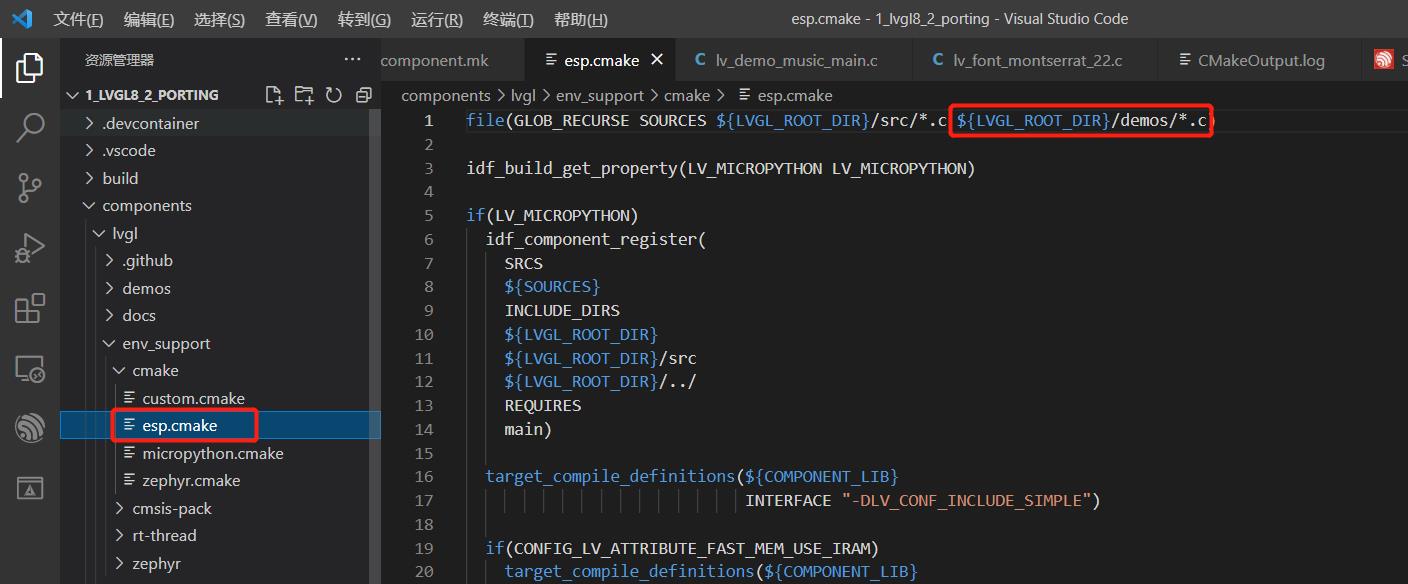
我们编译的时候遇到了一个错误,就是lv_demo_music没有定义
问题原因:是因为lvgl中的demo没有编译进来
解决方法:在lvgl/env_support/cmake/esp.cmake中增加$LVGL_ROOT_DIR/demos/*.c,如图
如果你们还有更好的方法可以给我说
OK,到了程序讲解时间了,整个程序很简单,我们从几个维度来说明一下
我们来看下官方的初始化过程,连接如下:Set up a project — LVGL documentation
- Call lv_init().
- Initialize your drivers.
- Register the display and input devices drivers in LVGL. Learn more about Display and Input device registration.
- Call lv_tick_inc(x) every x milliseconds in an interrupt to report the elapsed time to LVGL. Learn more.
- Call lv_timer_handler() every few milliseconds to handle LVGL related tasks. Learn more.
具体的buffer & display & touch部分的移植我们在后面介绍!!
七.运行程序
我们在运行程序中经常会遇到这个问题
E (895) esp_image: Image length xxxx doesn't fit in partition length 1048576
从而导致esp32会一直不断重启!错误如下图所示:
E (895) esp_image: Image length xxxx doesn't fit in partition length 1048576
E (900) boot: Factory app partition is not bootable
E (906) boot: No bootable app partitions in the partition table

解决问题:
1.看我们app的大小
我们出现问题的这个app的image size是:~2083013 bytes (.bin may be padded larger),也就是1.98M,如下图所示:

NOTED:人家备注很清楚,bin文件的话可能更大!
而我们的板子的模组是16M的,所以我们为了保险起见,我们就弄4M吧!
2.选择自定义分区表
我们在menuconfig中选择custom partition table csv

我们保存后,直接编译,发现报错:
-- Build files have been written to: C:/Users/12475/Desktop/esp-idf/esp32_study/3_lvgl/1_lvgl8_2_porting/build
ninja: error: '../partitions.csv', needed by 'partition_table/partition-table.bin', missing and no known rule to make it
终端进程“C:\\Windows\\System32\\WindowsPowerShell\\v1.0\\powershell.exe -Command ninja ”已终止,退出代码: 1。
是因为我们还没有创建partition table分区文件呢!
3.创建分区文件
工具工具,esp-idf的插件太好用了,只要你能想到的工具,他基于都嵌入到vscode中,
我们在查看->命令面板 搜索partition table,出来以下画面,我们打开分区编辑器UI

出来以下画面,我们点击Add New Row分别添加
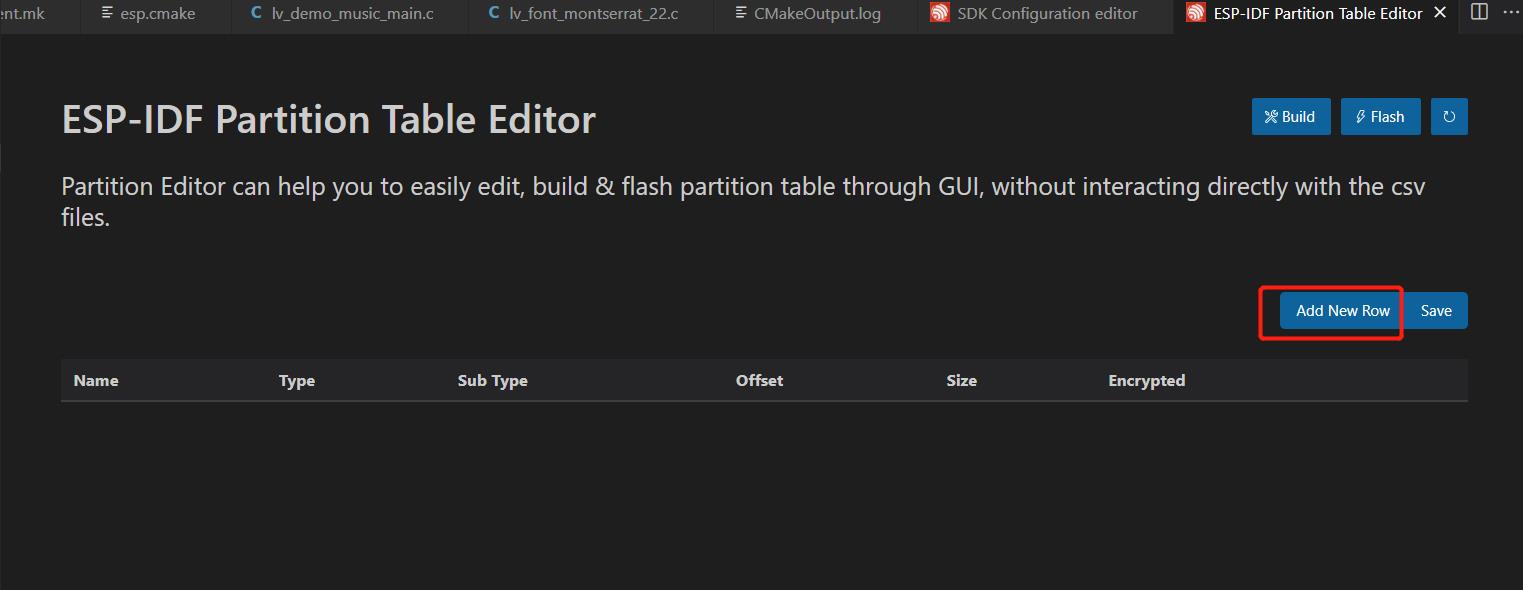
编辑成下图这个样子,然后点击save保存就可以了

4.修改flash大小
正常添加分区表后,我们开始编译,发现报错,错误信息为:
Partitions defined in 'C:/Users/12475/Desktop/esp-idf/esp32_study/3_lvgl/1_lvgl8_2_porting/partitions.csv' occupy 4.1MB of flash (4259840 bytes) which does not fit in configured flash size 2MB. Change the flash size in menuconfig under the 'Serial Flasher Config' menu.
简单!原因是我们把app大小定位为4M,但是flash大小没有修改,我们继续修改
在menuconfig中搜索flash,根据你的flash大小修改,我们的开发板flash是16M的,所以我们修改成16M,如图
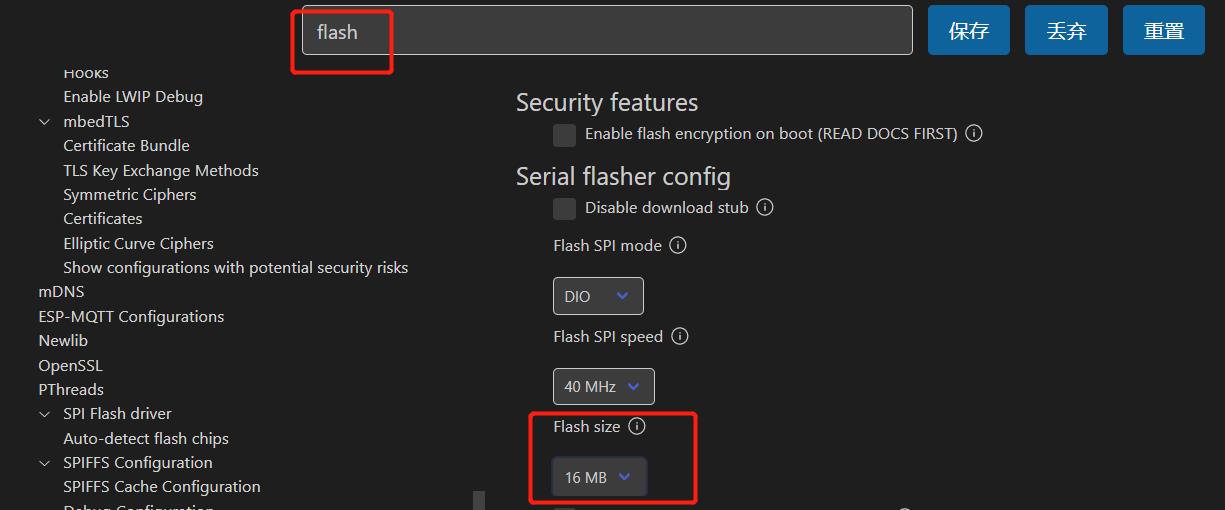
如果想更多的了解分区的理论,参照我的另外一篇文章:
esp_image: Image length xxxx doesn‘t fit in partition length 1048576问题解决思路_Wireless_Link的博客-CSDN博客
程序运行效果:
ESP32 SPI LCD运行LVGL 8.2 music demo_哔哩哔哩_bilibili
TODO List:
优化帧率!!!有愿意讨论的小伙伴一起讨论下
以上是关于燃起来 ESP32移植LVGL最新版本8.2的主要内容,如果未能解决你的问题,请参考以下文章