极智AI | python and cpp 实现 TensorRT elementWise Layer
Posted 极智视界
tags:
篇首语:本文由小常识网(cha138.com)小编为大家整理,主要介绍了极智AI | python and cpp 实现 TensorRT elementWise Layer相关的知识,希望对你有一定的参考价值。
欢迎关注我的公众号 [极智视界],获取我的更多笔记分享
大家好,我是极智视界,本文介绍一下 python 和 cpp 实现 TensorRT elementWise 层。
elementWise 算子指的是需要逐位运行的 op,具有十分丰富的元素间计算,如元素加、元素点乘、元素减、取极值等。这里结合 TensorRT 的实现来说,主要包括 python 实现 和 cpp 实现。
文章目录
1 elementWise Layer python TensorRT 构建
来看接口:
elementWise_Layer = network.add_elementwise(input0, input1, trt.ElementWiseOperation)
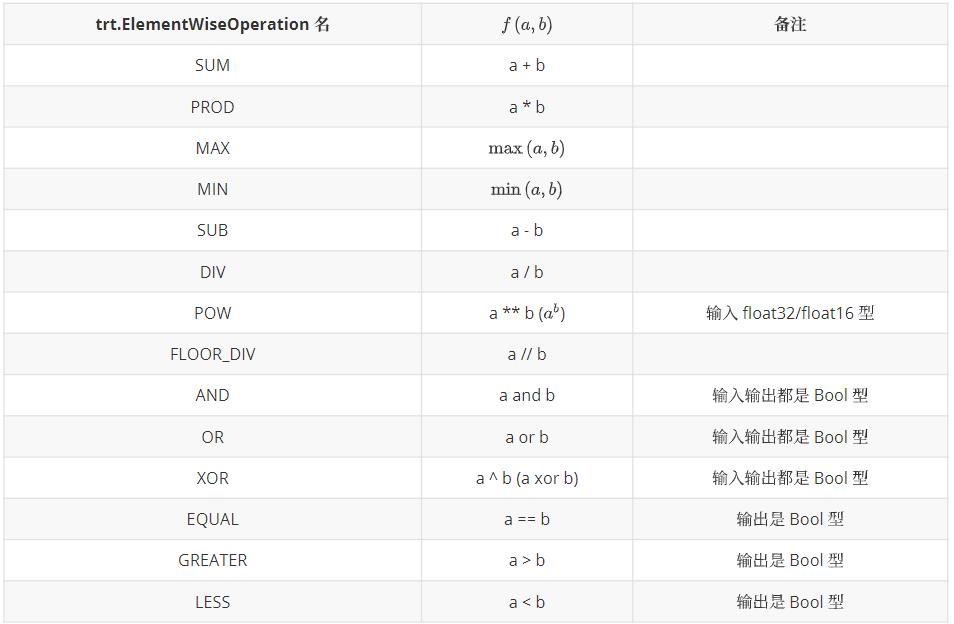
前两个传参比较好理解,就是输出操作的两个张量。第三个传参是 elementWise 的具体操作方式,这个可供选择的方式十分丰富,如下:

下面用一个示例代码进行 python elementWise Layer 的 TensorRT 搭建:
import numpy as np
from cuda import cudart
import tensorrt as trt

nIn, cIn, hIn, wIn = 1, 3, 4, 5  # 输入张量 NCHW
data0 = np.full([nIn, cIn, hIn, wIn], 1, dtype=np.float32).reshape(nIn, cIn, hIn, wIn)  # 输入数据
data1 = np.full([nIn, cIn, hIn, wIn], 2, dtype=np.float32).reshape(nIn, cIn, hIn, wIn)
np.set_printoptions(precision=8, linewidth=200, suppress=True)
cudart.cudaDeviceSynchronize()
logger = trt.Logger(trt.Logger.ERROR)  # 构建 logger
builder = trt.Builder(logger)  # 构建 builder
network = builder.create_network(1 << int(trt.NetworkDefinitionCreationFlag.EXPLICIT_BATCH))  # 构建 network
config = builder.create_builder_config()  # 构建 config
inputT0 = network.add_input('input0', trt.DataType.FLOAT, (nIn, cIn, hIn, wIn))
inputT1 = network.add_input('input1', trt.DataType.FLOAT, (nIn, cIn, hIn, wIn))

elementwiseLayer = network.add_elementwise(input0, input1, trt.ElementWiseOperation.SUM) # 添加elementwise 算子
network.mark_output(elementwiseLayer.get_output(0)) # 设置输出

engineString = builder.build_serialized_network(network, config)
engine = trt.Runtime(logger).deserialize_cuda_engine(engineString)  # 反序列化
context = engine.create_execution_context()  # 构建 context
_, stream = cudart.cudaStreamCreate()
inputH0 = np.ascontiguousarray(data0.reshape(-1))
inputH1 = np.ascontiguousarray(data1.reshape(-1))
outputH0 = np.empty(context.get_binding_shape(2), dtype=trt.nptype(engine.get_binding_dtype(2)))

_, inputD0 = cudart.cudaMallocAsync(inputH0.nbytes, stream)
_, inputD1 = cudart.cudaMallocAsync(inputH1.nbytes, stream)
_, outputD0 = cudart.cudaMallocAsync(outputH0.nbytes, stream)

cudart.cudaMemcpyAsync(inputD0, inputH0.ctypes.data, inputH0.nbytes,
cudart.cudaMemcpyKind.cudaMemcpyHostToDevice, stream)
cudart.cudaMemcpyAsync(inputD1, inputH1.ctypes.data, inputH1.nbytes,
cudart.cudaMemcpyKind.cudaMemcpyHostToDevice, stream)
context.execute_async_v2([int(inputD0), int(inputD1), int(outputD0)], stream)
cudart.cudaMemcpyAsync(outputH0.ctypes.data, outputD0, outputH0.nbytes,
cudart.cudaMemcpyKind.cudaMemcpyDeviceToHost, stream)
cudart.cudaStreamSynchronize(stream)
cudart.cudaStreamDestroy(stream)

cudart.cudaFree(inputD0)
cudart.cudaFree(outputD0)
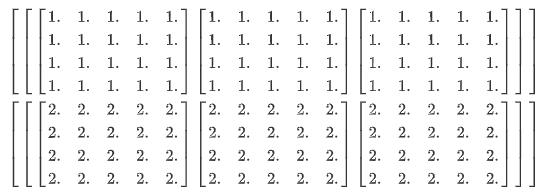
以上输入张量 shape 为 (1, 3, 4, 5):

两个输入张量进行逐元素相加,输出张量 shape 也为 (1, 3, 4, 5):

2 elementWise Layer cpp TensorRT 构建
接下来看 cpp 的实现,首先看接口:
//!
//! \\brief Add an elementwise layer to the network.
//!
//! \\param input1 The first input tensor to the layer.
//! \\param input2 The second input tensor to the layer.
//! \\param op The binary operation that the layer applies.
//!
//! The input tensors must have the same rank.
//! For each dimension, their lengths must match, or one of them must be one.
//! In the latter case, the tensor is broadcast along that axis.
//!
//! The output tensor has the same rank as the inputs.
//! For each dimension, its length is the maximum of the lengths of the
//! corresponding input dimension.
//!
//! \\see IElementWiseLayer
//! \\warning For shape tensors, ElementWiseOperation::kPOW is not a valid op.
//!
//! \\return The new elementwise layer, or nullptr if it could not be created.
//!
IElementWiseLayer* addElementWise(ITensor& input1, ITensor& input2, ElementWiseOperation op) noexcept

  return mImpl->addElementWise(input1, input2, op);
方法和传参等都可与 python 对应起来,不多说,那在 cpp 里怎么进行 elementWise Layer 的构建呢?看下面:
auto mode = ElementWiseOperation::kSUM;
if (eleMode == "SUM")      // mode 选择
  mode = ElementWiseOperation::kSUM;
else if (eleMode == "PROD")
  mode = ElementWiseOperation::kPROD;
else if (eleMode == "MAX")
  mode = ElementWiseOperation::kMAX;
else if (eleMode == "MIN")
  mode = ElementWiseOperation::kMIN;
else if(eleMode == "SUB")
  mode = ElementWiseOperation::kSUB;
else if (eleMode == "POW")
  mode = ElementWiseOperation::kPOW;
else if (eleMode == "FLOOR_DIV")
  mode = ElementWiseOperation::kFLOOR_DIV;
else if (eleMode == "AND")
  mode = ElementWiseOperation::kAND;
else if (eleMode == "OR")
  mode = ElementWiseOperation::kOR;
else if (eleMode == "XOR")
  mode = ElementWiseOperation::kXOR;
else if (eleMode == "EQUAL")
  mode = ElementWiseOperation::kEQUAL;
else if (eleMode == "GREATER")
  mode = ElementWiseOperation::kGREATER;
else if (eleMode == "LESS")
  mode = ElementWiseOperation::kLESS;

// elementWise Layer 构建
auto elementWise_Layer = m_network->addElementWise(*Layers[input0], *Layers[input1], mode);
// elementWise Layer 输出设置
Layers[layerName] = elementWise_Layer->getOutput(0);
很简单,以上就完成了 elementWise Layer cpp TensorRT 的构建。这里 cpp 里的搭建只展示了一个层的构建,没有 python 示例来的完整,要看整网构建的话可以参考 python 代码。
好了,以上分享了 python 和 cpp 实现 TensorRT elementWise Layer 的方法。希望我的分享能对你的学习有一点帮助。
【公众号传送】

扫描下方二维码即可关注我的微信公众号【极智视界】,获取我的更多经验分享,让我们用极致+极客的心态来迎接AI !
以上是关于极智AI | python and cpp 实现 TensorRT elementWise Layer的主要内容,如果未能解决你的问题,请参考以下文章