TensorRT 系列 C++ API 构建编译网络
Posted 洪流之源
tags:
篇首语:本文由小常识网(cha138.com)小编为大家整理,主要介绍了TensorRT 系列 C++ API 构建编译网络相关的知识,希望对你有一定的参考价值。
TensorRT的核心在于对模型算子的优化(合并算子、利用GPU特性选择特定核函数等多种策略),通过tensorRT,能够在Nvidia系列GPU上获得最好的性能,因此tensorRT的模型需要在目标GPU上实际运行的方式选择最优算法和配置,也因此tensorRT生成的模型只能在特定条件下运行(依赖于编译的trt版本、cuda版本、编译时的GPU型号)。TensorRT提供的C++、Python接口用于直接构建网络结构,本次主要介绍C++接口实现网络的构建与模型的编译,当然TensorRT也可以实现由其它框架的模型直接进行转换,如下是TensorRT工作流:

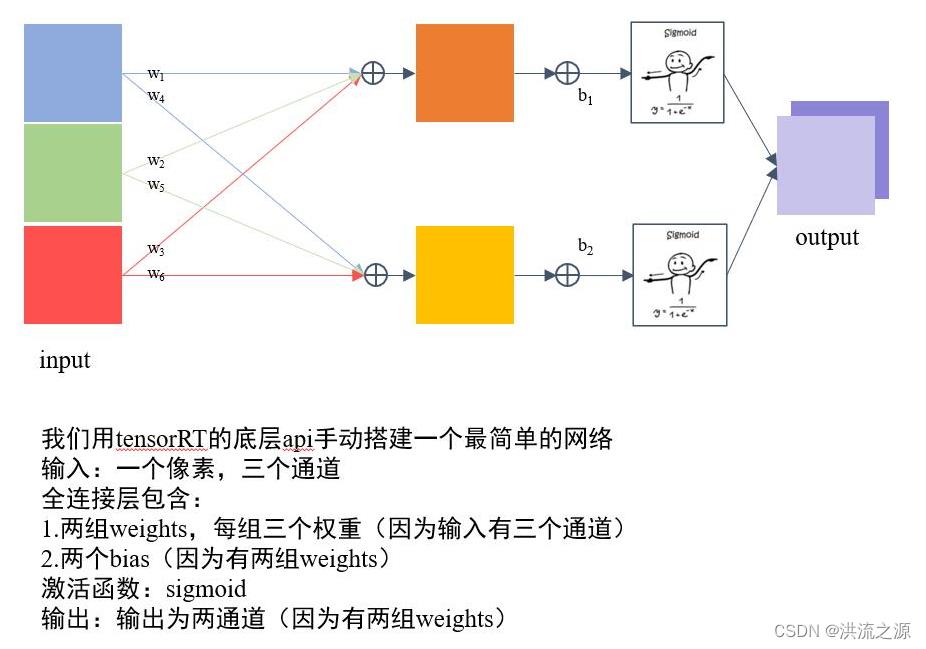
如下是通过C++ API要实现的网络结构:
示例代码如下:
// tensorRT include
#include <NvInfer.h>
#include <NvInferRuntime.h>

// cuda include
#include <cuda_runtime.h>

// system include
#include <stdio.h>

class TRTLogger : public nvinfer1::ILogger
public:
    virtual void log(Severity severity, nvinfer1::AsciiChar const* msg) noexcept override
        if(severity <= Severity::kVERBOSE)
            printf("%d: %s\\n", severity, msg);


;

nvinfer1::Weights make_weights(float* ptr, int n)
    nvinfer1::Weights w;
    w.count = n;
    w.type = nvinfer1::DataType::kFLOAT;
    w.values = ptr;
    return w;


int main()
    // 本代码主要实现一个最简单的神经网络 figure/simple_fully_connected_net.png

    TRTLogger logger; // logger是必要的,用来捕捉warning和info等

    // ----------------------------- 1. 定义 builder, config 和network -----------------------------
    // 这是基本需要的组件
    //形象的理解是你需要一个builder去build这个网络,网络自身有结构,这个结构可以有不同的配置
    nvinfer1::IBuilder* builder = nvinfer1::createInferBuilder(logger);

    // 创建一个构建配置,指定TensorRT应该如何优化模型,tensorRT生成的模型只能在特定配置下运行
    nvinfer1::IBuilderConfig* config = builder->createBuilderConfig();

    // 创建网络定义,其中createNetworkV2(1)表示采用显性batch size,新版tensorRT(>=7.0)时,不建议采用0非显性batch size
    // 因此贯穿以后,请都采用createNetworkV2(1)而非createNetworkV2(0)或者createNetwork
    nvinfer1::INetworkDefinition* network = builder->createNetworkV2(1);

    // 构建一个模型
    /*
        Network definition:

        image
          |
        linear (fully connected)  input = 3, output = 2, bias = True     w=[[1.0, 2.0, 0.5], [0.1, 0.2, 0.5]], b=[0.3, 0.8]
          |
        sigmoid
          |
        prob
    */

    // ----------------------------- 2. 输入,模型结构和输出的基本信息 -----------------------------
    const int num_input = 3;   // in_channel
    const int num_output = 2;  // out_channel
    float layer1_weight_values[] = 1.0, 2.0, 0.5, 0.1, 0.2, 0.5; // 前3个给w1的rgb,后3个给w2的rgb
    float layer1_bias_values[]   = 0.3, 0.8;

    //输入指定数据的名称、数据类型和完整维度,将输入层添加到网络
    nvinfer1::ITensor* input = network->addInput("image", nvinfer1::DataType::kFLOAT, nvinfer1::Dims4(1, num_input, 1, 1));
    nvinfer1::Weights layer1_weight = make_weights(layer1_weight_values, 6);
    nvinfer1::Weights layer1_bias   = make_weights(layer1_bias_values, 2);

    //添加全连接层
    auto layer1 = network->addFullyConnected(*input, num_output, layer1_weight, layer1_bias);      // 注意对input进行了解引用

    //添加激活层
    auto prob = network->addActivation(*layer1->getOutput(0), nvinfer1::ActivationType::kSIGMOID); // 注意更严谨的写法是*(layer1->getOutput(0)) 即对getOutput返回的指针进行解引用

    // 将我们需要的prob标记为输出
    network->markOutput(*prob->getOutput(0));

    printf("Workspace Size = %.2f MB\\n", (1 << 28) / 1024.0f / 1024.0f); // 256Mib
    config->setMaxWorkspaceSize(1 << 28);
    builder->setMaxBatchSize(1); // 推理时 batchSize = 1

    // ----------------------------- 3. 生成engine模型文件 -----------------------------
    //TensorRT 7.1.0版本已弃用buildCudaEngine方法,统一使用buildEngineWithConfig方法
    nvinfer1::ICudaEngine* engine = builder->buildEngineWithConfig(*network, *config);
    if(engine == nullptr)
        printf("Build engine failed.\\n");
        return -1;


    // ----------------------------- 4. 序列化模型文件并存储 -----------------------------
    // 将模型序列化,并储存为文件
    nvinfer1::IHostMemory* model_data = engine->serialize();
    FILE* f = fopen("engine.trtmodel", "wb");
    fwrite(model_data->data(), 1, model_data->size(), f);
    fclose(f);

    // 卸载顺序按照构建顺序倒序
    model_data->destroy();
    engine->destroy();
    network->destroy();
    config->destroy();
    builder->destroy();
    printf("Done.\\n");
    return 0;
Makefile :
cc        := g++
name      := pro
workdir   := workspace
srcdir    := src
objdir    := objs
stdcpp    := c++11
cuda_home := /home/liuhongyuan/miniconda3/envs/trtpy/lib/python3.8/site-packages/trtpy/trt8cuda112cudnn8
syslib    := /home/liuhongyuan/miniconda3/envs/trtpy/lib/python3.8/site-packages/trtpy/lib
cpp_pkg   := /home/liuhongyuan/miniconda3/envs/trtpy/lib/python3.8/site-packages/trtpy/cpp-packages
cuda_arch :=
nvcc      := $(cuda_home)/bin/nvcc -ccbin=$(cc)

# 定义cpp的路径查找和依赖项mk文件
cpp_srcs := $(shell find $(srcdir) -name "*.cpp")
cpp_objs := $(cpp_srcs:.cpp=.cpp.o)
cpp_objs := $(cpp_objs:$(srcdir)/%=$(objdir)/%)
cpp_mk   := $(cpp_objs:.cpp.o=.cpp.mk)

# 定义cu文件的路径查找和依赖项mk文件
cu_srcs := $(shell find $(srcdir) -name "*.cu")
cu_objs := $(cu_srcs:.cu=.cu.o)
cu_objs := $(cu_objs:$(srcdir)/%=$(objdir)/%)
cu_mk   := $(cu_objs:.cu.o=.cu.mk)

# 定义opencv和cuda需要用到的库文件
link_cuda      := cudart cudnn
link_trtpro    :=
link_tensorRT  := nvinfer
link_opencv    :=
link_sys       := stdc++ dl
link_librarys  := $(link_cuda) $(link_tensorRT) $(link_sys) $(link_opencv)

# 定义头文件路径,请注意斜杠后边不能有空格
# 只需要写路径,不需要写-I
include_paths := src              \\
    $(cuda_home)/include/cuda     \\
	$(cuda_home)/include/tensorRT \\
	$(cpp_pkg)/opencv4.2/include

# 定义库文件路径,只需要写路径,不需要写-L
library_paths := $(cuda_home)/lib64 $(syslib) $(cpp_pkg)/opencv4.2/lib

# 把library path给拼接为一个字符串,例如a b c => a:b:c
# 然后使得LD_LIBRARY_PATH=a:b:c
empty :=
library_path_export := $(subst $(empty) $(empty),:,$(library_paths))

# 把库路径和头文件路径拼接起来成一个,批量自动加-I、-L、-l
run_paths     := $(foreach item,$(library_paths),-Wl,-rpath=$(item))
include_paths := $(foreach item,$(include_paths),-I$(item))
library_paths := $(foreach item,$(library_paths),-L$(item))
link_librarys := $(foreach item,$(link_librarys),-l$(item))

# 如果是其他显卡,请修改-gencode=arch=compute_75,code=sm_75为对应显卡的能力
# 显卡对应的号码参考这里:https://developer.nvidia.com/zh-cn/cuda-gpus#compute
# 如果是 jetson nano,提示找不到-m64指令,请删掉 -m64选项。不影响结果
cpp_compile_flags := -std=$(stdcpp) -w -g -O0 -m64 -fPIC -fopenmp -pthread
cu_compile_flags  := -std=$(stdcpp) -w -g -O0 -m64 $(cuda_arch) -Xcompiler "$(cpp_compile_flags)"
link_flags        := -pthread -fopenmp -Wl,-rpath='$$ORIGIN'

cpp_compile_flags += $(include_paths)
cu_compile_flags  += $(include_paths)
link_flags        += $(library_paths) $(link_librarys) $(run_paths)

# 如果头文件修改了,这里的指令可以让他自动编译依赖的cpp或者cu文件
ifneq ($(MAKECMDGOALS), clean)
-include $(cpp_mk) $(cu_mk)
endif

$(name)   : $(workdir)/$(name)

all       : $(name)
run       : $(name)
	@cd $(workdir) && ./$(name) $(run_args)

$(workdir)/$(name) : $(cpp_objs) $(cu_objs)
	@echo Link $@
	@mkdir -p $(dir $@)
	@$(cc) $^ -o $@ $(link_flags)

$(objdir)/%.cpp.o : $(srcdir)/%.cpp
	@echo Compile CXX $<
	@mkdir -p $(dir $@)
	@$(cc) -c $< -o $@ $(cpp_compile_flags)

$(objdir)/%.cu.o : $(srcdir)/%.cu
	@echo Compile CUDA $<
	@mkdir -p $(dir $@)
	@$(nvcc) -c $< -o $@ $(cu_compile_flags)

# 编译cpp依赖项,生成mk文件
$(objdir)/%.cpp.mk : $(srcdir)/%.cpp
	@echo Compile depends C++ $<
	@mkdir -p $(dir $@)
	@$(cc) -M $< -MF $@ -MT $(@:.cpp.mk=.cpp.o) $(cpp_compile_flags)

# 编译cu文件的依赖项,生成cumk文件
$(objdir)/%.cu.mk : $(srcdir)/%.cu
	@echo Compile depends CUDA $<
	@mkdir -p $(dir $@)
	@$(nvcc) -M $< -MF $@ -MT $(@:.cu.mk=.cu.o) $(cu_compile_flags)

# 定义清理指令
clean :
	@rm -rf $(objdir) $(workdir)/$(name) $(workdir)/*.trtmodel

# 防止符号被当做文件
.PHONY : clean run $(name)

# 导出依赖库路径,使得能够运行起来
export LD_LIBRARY_PATH:=$(library_path_export)
执行make run可编译运行代码。
以上是关于TensorRT 系列 C++ API 构建编译网络的主要内容,如果未能解决你的问题,请参考以下文章