vue-cli 初始化创建 vue2.9.6 项目路由守卫封装axiosvuex
Posted 知其黑、受其白
tags:
篇首语:本文由小常识网(cha138.com)小编为大家整理,主要介绍了vue-cli 初始化创建 vue2.9.6 项目路由守卫封装axiosvuex相关的知识,希望对你有一定的参考价值。
阅读目录
- Vue如何封装Axios请求
- Vue 中的路由守卫
- 安装 vuex
- 快速认识 vuex
- 为什么 token 要存在 vuex 中还要存本地一份?
- 源码
- E:\\node\\vue296\\index.html 根文件 html
- E:\\node\\vue296\\src\\App.vue 根组件
- E:\\node\\vue296\\src\\main.js 入口文件
- E:\\node\\vue296\\src\\vuex\\store.js 状态管理模式,组件状态集中管理文件
- E:\\node\\vue296\\src\\utils\\request.js 封装的 axios 实例文件
- E:\\node\\vue296\\src\\router\\index.js 路由文件
- E:\\node\\vue296\\src\\components\\HelloWorld.vue 首页组件
- E:\\node\\vue296\\src\\components\\Login.vue 登陆组件
- E:\\node\\vue296\\src\\components\\Hello.vue 组件
- 预览示例的示例功能
Vue如何封装Axios请求
我使用的是 vue-cli 框架,vscode编辑器。
1 安装axios
在控制台通过 npm i axios --save 安装:
PS E:\\node\\vue296> npm i axios --save
npm WARN optional SKIPPING OPTIONAL DEPENDENCY: fsevents@2.3.2 (node_modules\\fsevents):
npm WARN notsup SKIPPING OPTIONAL DEPENDENCY: Unsupported platform for fsevents@2.3.2: wanted "os":"darwin","arch":"any" (current: "os":"win32","arch":"x64")
npm WARN optional SKIPPING OPTIONAL DEPENDENCY: fsevents@1.2.13 (node_modules\\watchpack-chokidar2\\node_modules\\fsevents):
npm WARN notsup SKIPPING OPTIONAL DEPENDENCY: Unsupported platform for fsevents@1.2.13: wanted "os":"darwin","arch":"any" (current: "os":"win32","arch":"x64")
npm WARN optional SKIPPING OPTIONAL DEPENDENCY: fsevents@1.2.13 (node_modules\\webpack-dev-server\\node_modules\\fsevents):
npm WARN notsup SKIPPING OPTIONAL DEPENDENCY: Unsupported platform for fsevents@1.2.13: wanted "os":"darwin","arch":"any" (current: "os":"win32","arch":"x64")

+ axios@0.27.2
added 5 packages from 4 contributors in 12.422s

PS E:\\node\\vue296>
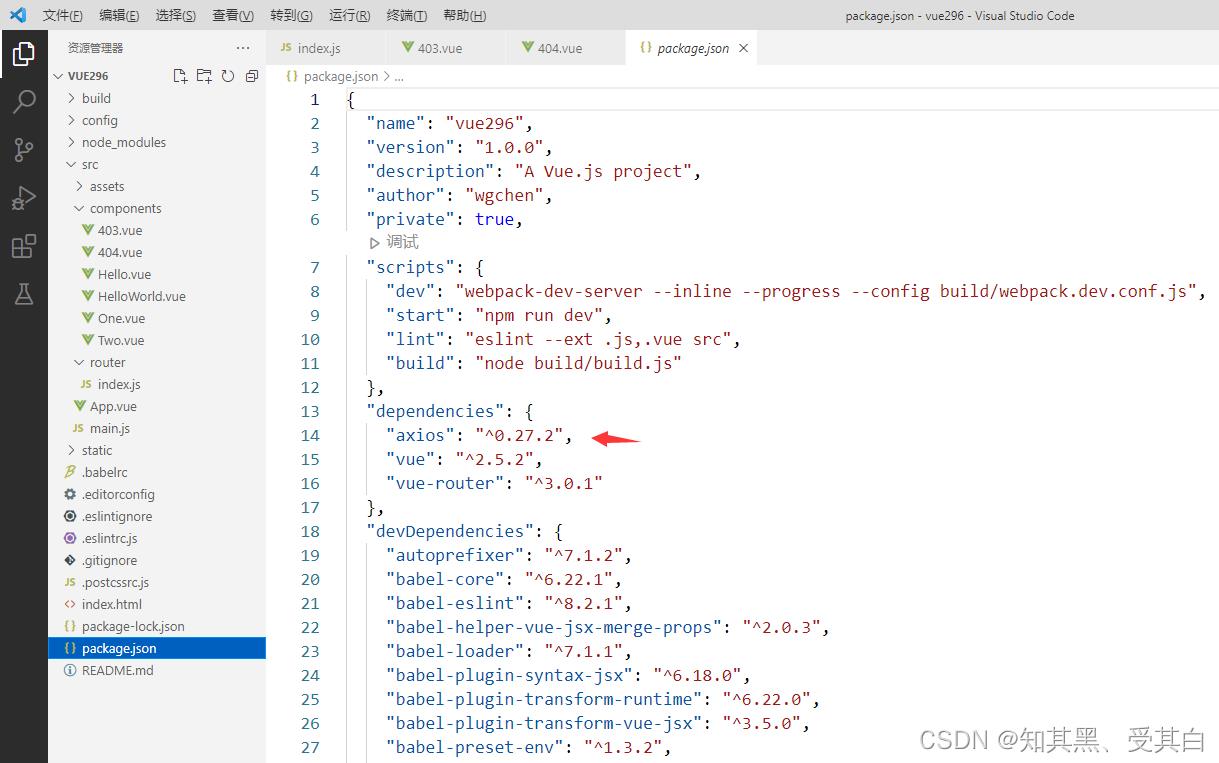
安装好之后,在 package.json 中检查,如图,如果有的话,就说明安装成功。
2 封装代码 axios
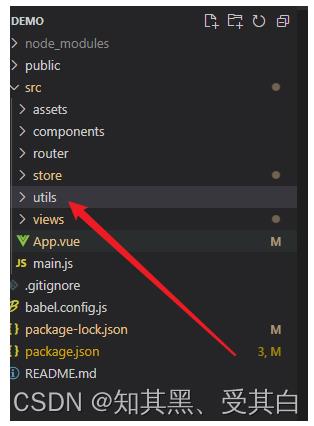
(1)首先在 src 目录下,新建一个 utils 文件夹,用来放置封装的代码文件。
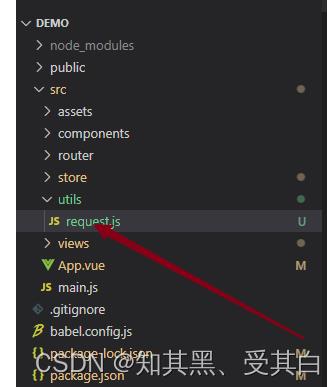
(2)在 utils 问价夹中新建一个 request.js 文件。
(3)在 request.js 中编写代码。
//引入axios
import axios from "axios"

//创建axios实例
const instance = axios.create(
  baseURL: 'http://tt.cc/testData/',//公共地址
  timeout: 1000,//请求超时时间
);

// 添加请求拦截器
instance.interceptors.request.use(function (config)
    // 在发送请求之前做些什么
    return config;
  , function (error)
    // 对请求错误做些什么
    return Promise.reject(error);
  );

// 添加响应拦截器
instance.interceptors.response.use(function (response)
    // 对响应数据做点什么
    return response;
  , function (error)
    // 对响应错误做点什么
    return Promise.reject(error);
  );

//导出axios实例
export default instance
应用方式
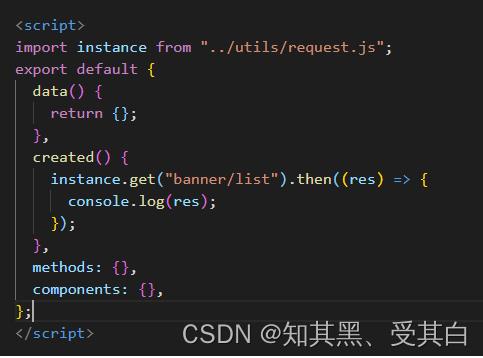
到这一步,封装基本完成,使用时,在 Vue 组件中引入即可,如图:
利用 async,await 对其进行进一步封装。
//引入 axios 实例
import instance from "./utils/request"

# 第一种应用方式
const ax = instance.get('text.php').then(function(response)
	localStorage.setItem("token", response.data.name);
	return response;
)

# 第一种应用方式
ax.then(res=>
	console.log(res.data);
	this.list = res.data;
);
# 第一种取值方式
setTimeout(() =>
	console.log(this.list.name);
, 300);
console.log(localStorage.getItem("token"))

# 第二种应用方式
async function getRotationChart()
		let data = await instance.get('text.php')
		console.log(data,"sadfasdfasdfs");
		return data

console.log(getRotationChart())
Vue 中的路由守卫
路由守卫的分类,Vue 中的路由守卫可以分为:
       全局的路由守卫;
单个路由独享的路由守卫;
     组件级的路由守卫;
1、vue-router 全局有三个守卫:
   router.beforeEach 全局前置守卫 进入路由之前
router.beforeResolve 全局解析守卫(2.5.0+) 在 beforeRouteEnter 调用之后调用
    router.afterEach 全局后置钩子 进入路由之后
2、vue-router 组件内的守卫:
 beforeRouteEnter 进入路由之前
beforeRouteUpdata (2.2新增) 路由更新时
 beforeRouteLeave 离开路由之前
3、vue-router 单个路由独享的守卫
beforeEnter
路由守卫钩子函数里面有三个参数
to,from,next 这三个参数:
to 和 from 是将要进入和将要离开的路由对象,路由对象指的是平时通过 this.$route 获取到的路由对象。
next:Function 这个参数是个函数,且必须调用,否则不能进入路由(页面空白)。
next() 进入该路由。
next(false): 取消进入路由,url 地址重置为 from 路由地址(也就是将要离开的路由地0址)。 next 跳转新路由,当前的导航被中断,重新开始一个新的导航。
使用演示
1 全局守卫
全局守卫写在路由的 js 文件内。如图。
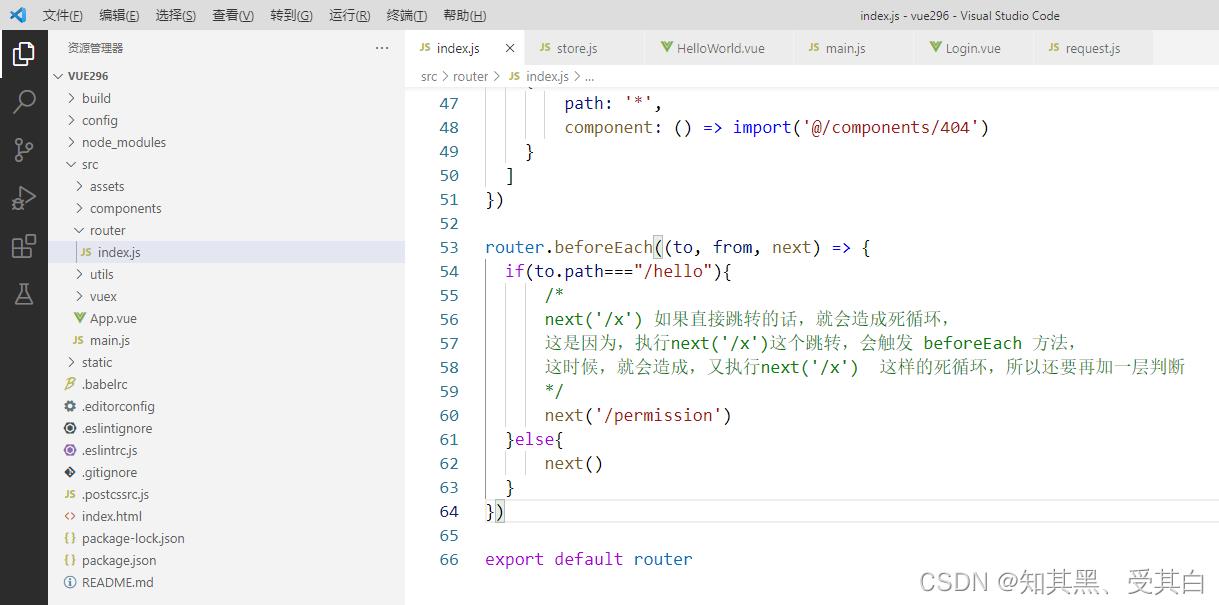
router.beforeEach 里在循环所有的路由地址。
2 组件级守卫
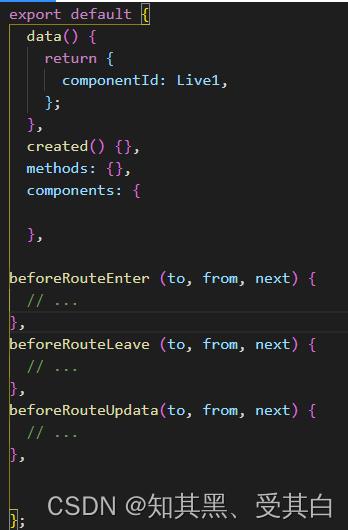
组件级的守卫写在页面组件中,与 data,methods 同级。
如图:这些与全局的方法,参数是一样的,里面写逻辑。
3 单个路由独享的守卫
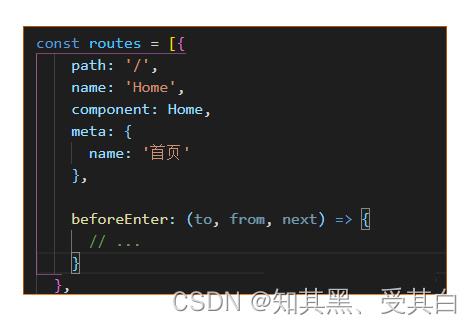
单个路由独享的守卫写在路由配置中,与path,name同级。如图。
4 官网整个路由守卫被触发流程的步骤:
1.导航被触发。
2.在失活的组件里调用离开守卫。
3.调用全局的 beforeEach 守卫。
4.在重用的组件里调用 beforeRouteUpdate 守卫 (2.2+)。
5.在路由配置里调用 beforeEnter。
6.解析异步路由组件。
7.在被激活的组件里调用 beforeRouteEnter。
8.调用全局的 beforeResolve 守卫 (2.5+)。
9.导航被确认。
10.调用全局的 afterEach 钩子。
11.触发 DOM 更新。
12.用创建好的实例调用 beforeRouteEnter 守卫中传给 next 的回调函数。
安装 vuex
PS E:\\node\\vue296> npm install --save vuex@3.6.2
npm WARN optional SKIPPING OPTIONAL DEPENDENCY: fsevents@2.3.2 (node_modules\\fsevents):
npm WARN notsup SKIPPING OPTIONAL DEPENDENCY: Unsupported platform for fsevents@2.3.2: wanted "os":"darwin","arch":"any" (current: "os":"win32","arch":"x64")
npm WARN optional SKIPPING OPTIONAL DEPENDENCY: fsevents@1.2.13 (node_modules\\webpack-dev-server\\node_modules\\fsevents):
npm WARN notsup SKIPPING OPTIONAL DEPENDENCY: Unsupported platform for fsevents@1.2.13: wanted "os":"darwin","arch":"any" (current: "os":"win32","arch":"x64")
npm WARN optional SKIPPING OPTIONAL DEPENDENCY: fsevents@1.2.13 (node_modules\\watchpack-chokidar2\\node_modules\\fsevents):
npm WARN notsup SKIPPING OPTIONAL DEPENDENCY: Unsupported platform for fsevents@1.2.13: wanted "os":"darwin","arch":"any" (current: "os":"win32","arch":"x64")

+ vuex@3.6.2
added 1 package from 1 contributor in 14.372s
PS E:\\node\\vue296>
注意版本问题:vue 的 2.x 版本对应 vuex 的 3.x 版本,vue 的 3.x 版本对应 vuex 的 4.x 版本。
1 Vuex 的基本使用
安装浏览器插件:devtools 方便调试
state:存放需要共享的状态信息,使用时通过 $store.state.count 即可拿到状态信息。
在 src 目录下新建 vuex 文件夹(文件夹名称可随意命名),创建 store.js 文件引入、安装、创建并导出 Vuex 对象。
E:\\node\\vue296\\src\\vuex\\store.js
import Vue from 'vue'
import Vuex from 'vuex'

// 1.安装插件
Vue.use(Vuex)

//2.创建对象
const store = new Vuex.Store(
  state:
    count: 0
  ,
  mutations:
    inscrease()
        this.state.count ++

  ,
  actions:
  ,
  getters:

  ,
  modules:


)

//3.导出使用
export default store
2 main.js 文件中挂载使用 vuex 对象
和 vue-router 的使用方式一样,在 main.js 文件中挂载使用。
E:\\node\\vue296\\src\\main.js
import Vue from 'vue'
import App from './App'
import router from './router'

// 引入store
import store from './vuex/store'

Vue.config.productionTip = false

/* eslint-disable no-new */
new Vue(
  el: '#app',
  router,
  store, // 全局注入
  components:  App ,
  template: '<App/>'
)
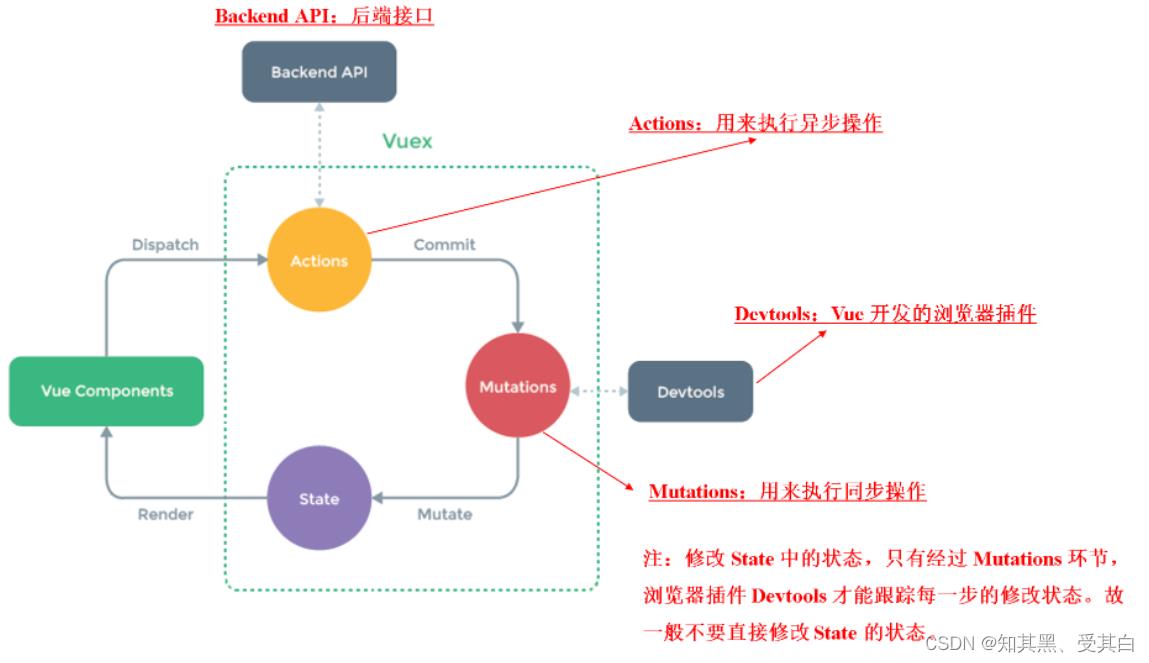
store 对象中存放的东西是固定的,主要有:state、mutations、actions、getters、modules。
下图是官方给出的vuex状态管理图例:
3 组件中应用 vuex
E:\\node\\vue296\\src\\components\\HelloWorld.vue
对 state 的状态信息进行修改:
先拿到 store 对象,然后通过 commit 提交 mutations 中的方法。
<template>
<div>
<p>导航 :
<router-link to="/">首页 msg </router-link> <br/>
<router-link to="/hello"> 单页 hello</router-link><br/>
<router-link to="/login"> 登陆 </router-link>
</p>
hello info component
<button type="button" @click="add()">添加</button>
</div>
</template>
<script>
import store from '../vuex/store.js'
export default
name: 'HelloWorld',
store,
data ()
return
msg: 'HelloWorld'
,
methods:
add()
console.log('add Event from info!')
store.commit('inscrease')
</script>
<!-- Add "scoped" attribute to limit CSS to this component only -->
<style scoped>
a
text-decoration:none;
</style>
E:\\node\\vue296\\src\\components\\Login.vue
<template>
    <div class="hello">
        <h1> msg </h1>
        <p>vuex  msg_vuex  </p>
        <button @click="goHome">回到首页</button>
    </div>
</template>
<script>
import store from '../vuex/store.js'

export default
    name:'Login',
    store,
    data ()
        return
            msg: 'Login Vuex test!',
            // 展示 vuex 的 store 里的 count
            msg_vuex : store.state.count

    ,
    methods:
        goHome()
            this.$router.push('/');


</script>
<style scoped>

</style>
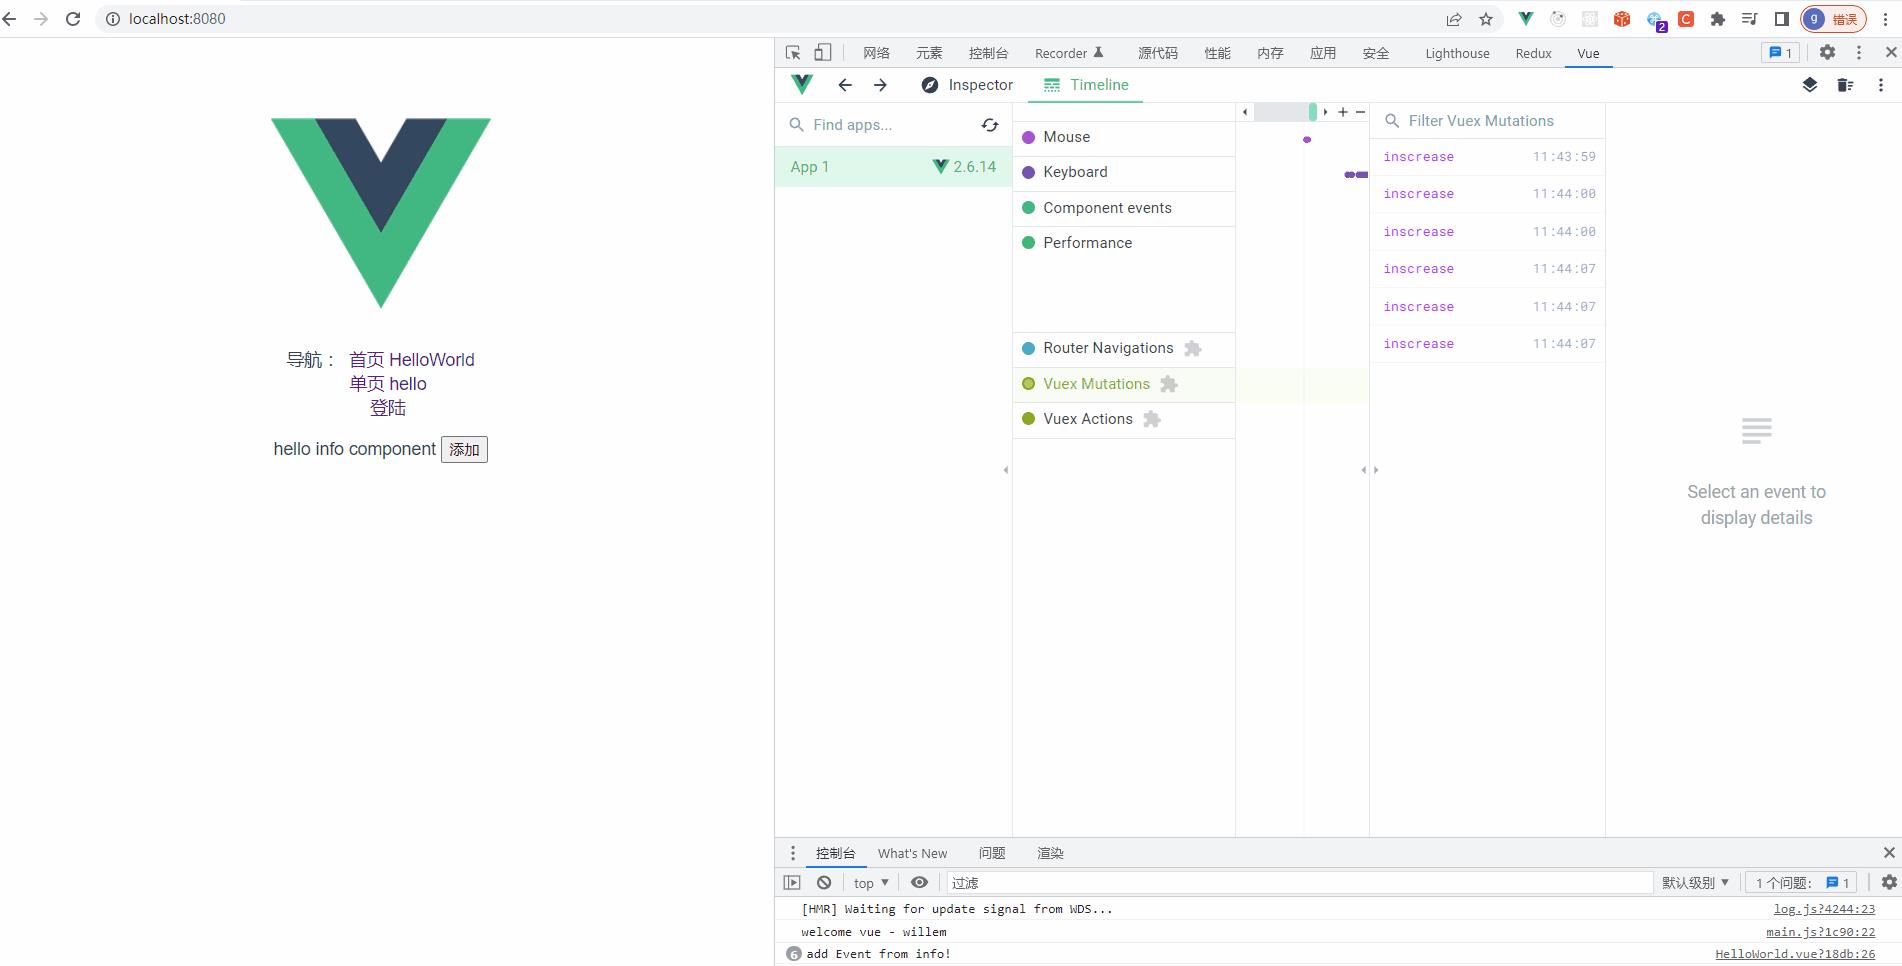
4 预览使用 devtools 调试界面,可以跟踪查看每一次事件操作。
快速认识 vuex
为什么要用Vuex?
首先我来引入一个概念,单向数据流的概念。
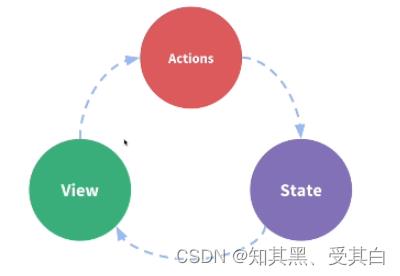
我们页面是有很多个视图 View 组成的,用户的操作 Actions 会带来视图上状态 State 变化,状态的变化又会驱动视图的更新,如果我们的页面没有采用这样的数据流方式开发的话,那么组件间的状态管理就会异常复杂。
我们常见的用 vuex 解决问题,多个视图依赖同一个状态的这样问题,比如菜单导航。
来自不同视图的行为需要改变同一状态的问题,比如评论的弹幕,当我们发出一条评论的时候,我们要去改变弹幕的状态,去给它新增一条弹幕或者说删除一条旧的弹幕。
什么是 vuex ?
vuex 就是为 vue.js 开发的 状态管理模式,组件状态集中管理,组件状态改变遵循统一的原则。
组件之间传值
目标:熟悉组件之间传值的各种情况(关注非父子之间传值)
父组件向子组件传值 props
子组件向父组件传值 $emit
非父子组件之间传值 : 爷孙;兄弟 (发布订阅模式(微博:大V----粉丝))
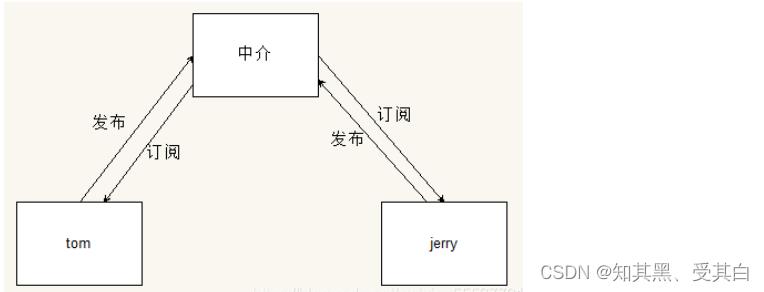
基于Vue实现发布订阅模式
// 相当于中介
const eventBus = new Vue()

// 订阅事件
eventBus.$on('event-b', (param) =>
  console.log(param) // 123
)

// 发布事件
eventBus.$emit('event-b', 123)
通过兄弟组件之间的传值进行验证。
总结:
1 少量的组件之间数据传递可以用这种模式
2 但是不建议大量的组件通信采用这种机制(代码比较乱,后期维护比较麻烦)
状态管理必要性分析
Vuex 是一个专为 Vue.js 应用程序开发的状态管理模式。
它采用集中式存储管理应用的所有组件的状态,并以相应的规则保证状态以一种可预测的方式发生变化。
如果使用了 Vuex,就可以非常方便的进行复杂的组件之间数据传递(非父子关系)
总结:
1 所有组件的数据进行统一管理(存储和变更),每个组件内部就不再需要维护这些数据了
2 数据变更时,统一修改 Store 中数据即可,组件中用到这个数据的组件会自动更新(数据是响应式的)
目标:熟悉 Vuex 是如何实现上述集中管理组件数据这种思想(模式)的。
Devtools 指的是浏览器的 Vue 插件调试工具,它可以监控到数据的所有变更操作。
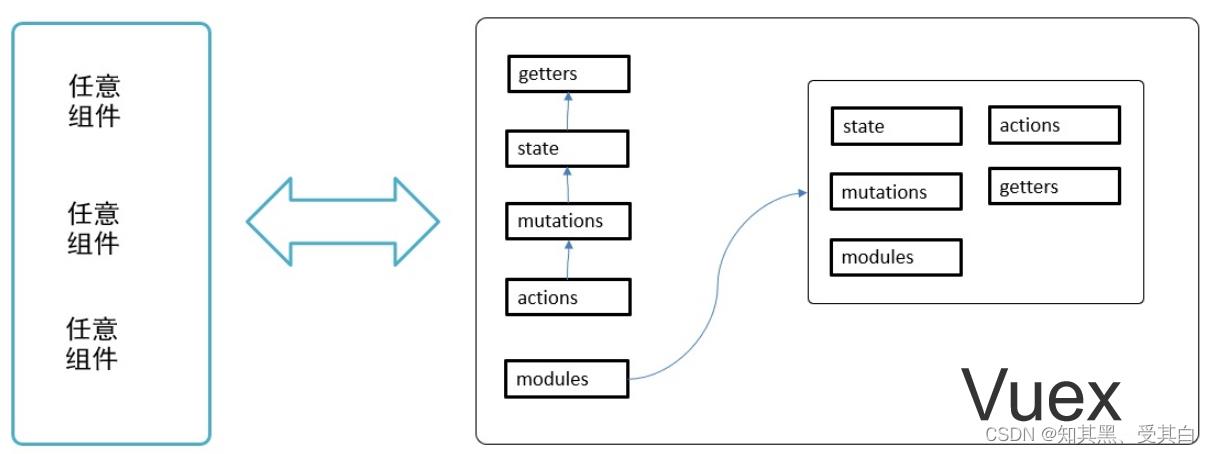
Vuex 的学习内容
- state: 统一定义公共数据(类似于data()return a:1, b:2,xxxxxx)
- mutations : 使用它来修改数据(类似于 methods ) 更改 state 中的数据必须使用mutations 来进行更改。
- getters: 类似于 computed ( 计算属性,对现有的状态进行计算得到新的数据—派生 )
- actions: 发起异步请求
- modules: 模块拆分
其中最为重要的内容是 state 和 mutations。
Vuex 在 Vue 项目使用 Vuex
情况1:在老项目中使用。 先额外安装 vuex 包,然后在配置。
情况2:在新项目中使用, 在配置 vue-cli 中创建项目时,就可以直接选中 vuex 项,这样就不用做任何配置了(脚手架会自动帮我们完成的)。
具体如下图示:

在旧项目中:
1、安装。它是一个独立的包,需要先安装。
2、配置 store/index.js
3、创建 Vuex.Store 实例
4、向 Vue 实例注入 store
5、使用,在组件中使用 store
实例化 store
与 router 一样,当我们在项目中使用 vuex 之后,为了方便代码维护,我们一般需要做特殊的目录调整,约定的结构如下:
|--src
|----- main.js
|----- store
|----------- index.js
在 store/index.js 中放置具体的代码,具体如下:
import Vue from 'vue'
import Vuex from 'vuex'

Vue.use(Vuex)

const store = new Vuex.Store(
  state:
    count: 0

)
export default store
向 Vue 实例注入 store。在 src/main.js 中:
// 省略其他
// 1. 导入store
import store from './store'

new Vue(
  // 省略其他...
  store // 2. 注入Vue实例
)
组件中使用 store
在任意组件中,通过 this.$store.state 来获取公共数据。
methods:
  add()
    console.log('add Event from info!')
    console.log(this.$store.state)
    console.log(this.$store.state.count)
    store.commit('inscrease')
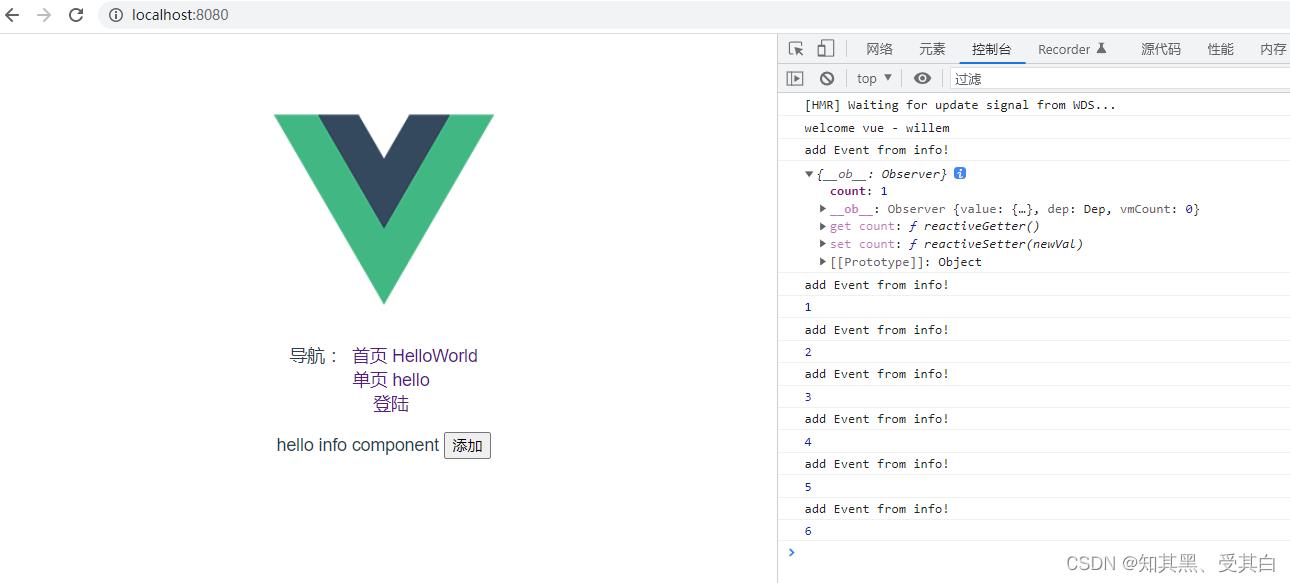
Vuex state 定义公共数据并在组件中使用
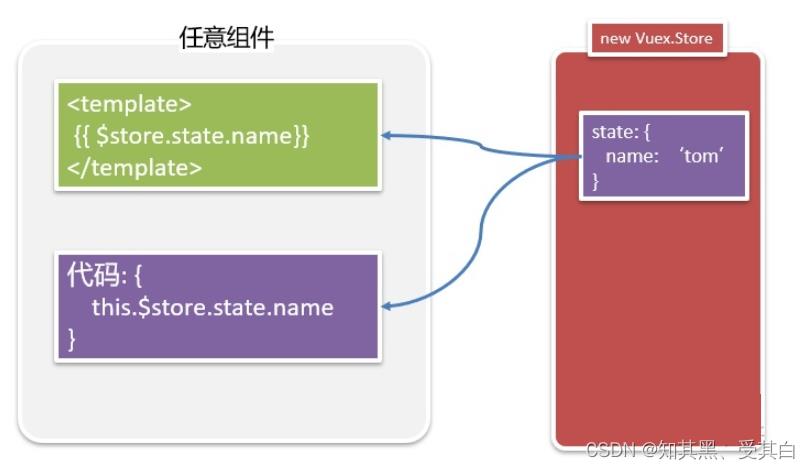
state 的作用:vuex 用它来保存公共数据。
定义公共数据
格式
new Vuex.store(
  state:
   	属性名: 属性值

)
示例
new Vuex.store(
  state:
    userInfo:
       name: 'tom',
	 skills: ['A站', 'B站', 'p站'],
    address: '武汉热干面',
       logo: 'https://vuejs.org/images/logo.svg'
       //  https://www.runoob.com/wp-content/uploads/2016/02/react.png


)
使用公共数据
格式:
在组件中:通过 this.$store.state. 属性名来访问。
在模板中:则可以省略 this 而直接写成: $store.state.属性名
Vuex 辅助函数 mapState 来使用公共数据
mapState 的使用步骤:
// 1. 导入辅助函数 mapState,它是在 vuex 中定义的一个工具函数。

//  es6 按需导入 import  mapState  from 'vuex'
import  mapState  from 'vuex'

computed:
   // 说明1: ...对象 是把对象展开,合并到 computed
   // 说明2: mapState是一个函数
   //  ['数据项1', '数据项2']
   ...mapState(['xxx']),
   ...mapState('新名字': 'xxx')


 js中使用:this.xxx
模板上使用:xxx
示例
// 步骤
// 1. 导入辅助函数 mapState,它是在vuex中定义的一个工具函数。
//  es6 按需导入 import  mapState  from 'vuex'
import  mapState  from 'vuex'

// 2. 在computed中使用 ...mapState(['books'])
// const res = mapState(['books'])
// res的结果是一个对象:  books: function()
// console.log('mapState', res)

export default
  computed:
    c1 ()
      return 'c1'
    ,
    // books: function()
    // ..res: 把res这个对象合并到comput以上是关于vue-cli 初始化创建 vue2.9.6 项目路由守卫封装axiosvuex的主要内容,如果未能解决你的问题,请参考以下文章