[小黄书后台]mongodb和用户管理
Posted 天地会珠海分舵
tags:
篇首语:本文由小常识网(cha138.com)小编为大家整理,主要介绍了[小黄书后台]mongodb和用户管理相关的知识,希望对你有一定的参考价值。
上一章我们介绍了如何通过nodemon,bunyan 以及最新的nodejs调试方式来让我们更高效的进行代码调试。
本章我们会引入数据库的使用,毕竟,我们小黄书的很多数据是需要存储在数据库中的。
1. Mongodb
这里我们假设大家对Mongodb已经有基本的了解,所以不会去详细介绍安装和基本使用之类的东西,更多的是关注到我们小黄书相关的实现上面来。
我自己安装的mongodb采取的基本都是默认的安装步骤,为了方面开发,也没有设置访问密码。
启动后输出如下:
appledeMBP:ngrok apple$ mongod
2017-05-12T14:05:21.200+0800 I CONTROL [initandlisten] MongoDB starting : pid=27151 port=27017 dbpath=/data/db 64-bit host=appledeMBP
2017-05-12T14:05:21.201+0800 I CONTROL [initandlisten] db version v3.2.0
2017-05-12T14:05:21.201+0800 I CONTROL [initandlisten] git version: 45d947729a0315accb6d4f15a6b06be6d9c19fe7
2017-05-12T14:05:21.201+0800 I CONTROL [initandlisten] allocator: system
2017-05-12T14:05:21.201+0800 I CONTROL [initandlisten] modules: none
2017-05-12T14:05:21.201+0800 I CONTROL [initandlisten] build environment:
2017-05-12T14:05:21.201+0800 I CONTROL [initandlisten] distarch: x86_64
2017-05-12T14:05:21.201+0800 I CONTROL [initandlisten] target_arch: x86_64
2017-05-12T14:05:21.201+0800 I CONTROL [initandlisten] options:
2017-05-12T14:05:21.203+0800 I - [initandlisten] Detected data files in /data/db created by the ‘wiredTiger’ storage engine, so setting the active storage engine to ‘wiredTiger’.
2017-05-12T14:05:21.203+0800 I STORAGE [initandlisten] wiredtiger_open config: create,cache_size=1G,session_max=20000,eviction=(threads_max=4),config_base=false,statistics=(fast),log=(enabled=true,archive=true,path=journal,compressor=snappy),file_manager=(close_idle_time=100000),checkpoint=(wait=60,log_size=2GB),statistics_log=(wait=0),
2017-05-12T14:05:23.093+0800 I CONTROL [initandlisten]
2017-05-12T14:05:23.093+0800 I CONTROL [initandlisten] WARNING: soft rlimits too low. Number of files is 256, should be at least 1000
2017-05-12T14:05:23.116+0800 I NETWORK [HostnameCanonicalizationWorker] Starting hostname canonicalization worker
2017-05-12T14:05:23.116+0800 I FTDC [initandlisten] Initializing full-time diagnostic data capture with directory ‘/data/db/diagnostic.data’
2017-05-12T14:05:23.118+0800 I NETWORK [initandlisten] waiting for connections on port 27017
启动后,mongodb默认会监听从27017端口进来的连接。
1.1 Mongoose
要更好的对Mongodb进行管理,Mongoose的使用基本上是个默认项了。
我们先编写一个通过Mongoose连接mongodb的库libs/mongodb.js:
const mongoose = require('mongoose');
const log = require('./logger');

log.info('Initialize MongoDB ...');
const url='mongodb://127.0.0.1:27017/xiaohuangshu';
mongoose.connect(url);

mongoose.Promise = global.Promise;

module.exports = mongoose;
整个建立的连接的代码基本上是教科书式的了,大家上mongoose的官网看下就知道了。
这里要说下的是promise那一行:
mongoose.Promise = global.Promise;
在比较新的Mongoose版本中,增删改这些操作都会返回一个Promise对象(查找find()虽然不是返回一个promise对象,但依然提供了then()方法来让调用者可以应用上yield(es6的generator用)和 async/await(es7))。
我们知道Promise的实现有很多不同的版本,比如比较流行的bluebird的实现, 而mongoose默认使用的是一个内置的叫做mpromise的版本。
但是这个默认的版本已经过时了,如果我们去掉上面那一行,进行save等数据库保存请求的话,将会出现以下的警告提示:
(node:23587) DeprecationWarning: Mongoose: mpromise (mongoose’s default promise library) is deprecated, plug in your own promise library instead: http://mongoosejs.com/docs/promises.html
那么我们必须为mongoose指定一个promise的实现,所以才有了上面的那一行代码。其中"global.Promise"实用的是ES6的原生Promise实现(如前几章提到的,我们用的是最新的Nodejs版本,里面很多ES6的特性都支持了,包括这里的Promise)。
当然,你也可以使用bluebird的实现,代码大概改成如下这样就好了:
mongoose.Promise = require('bluebird');
当然,bluebird你还是需要安装的。毕竟它不是nodejs原生的。
2. 小红书用户管理
我们既然已经连上了mongodb了,那么我们就创建一个用于给小黄书增删改查用户的功能吧,毕竟,如我们今后的后台管理等,我们需要管理员才能进行登录管理。
2.1. 定义用户模型
首先,我们在routes目录的统一层级增加一个叫做models的目录,然后在下面增加一个叫做User.js的文件,该文件用来定义用户的model。
'use strict';
const db = require('../libs/mongodb');

const UserSchema = new db.Schema(
  name:  type: String, required: true ,                          // User name
  password:  type: String, required: true ,                      // User password
  type:  type: String, required: true ,                          // User type, supports string: platform|user
  is_admin:  type: Boolean, required: true ,                      // Admin get full acess to all APIs
);

module.exports = db.model('User', UserSchema);
这里需要注意的是第一行‘use strict’:
strict, 表示严格模式,用来配置在存入数据库时,是否严格按照模型所约定的字段来,如果设置为false,则模型定义之外的字段也可以被存储。
2.2. 实现增加用户的路由
定义好model之后,我们需要在routes目录下增加一个叫做users.js的文件来实现用户增删改查需求的router,写法跟之前的helloworld差不多,我们这里先实现一个简单的增加用户的api.
const express = require('express');
const log = require('../libs/logger');
const User = require('../models/User.js');
const router = express.Router();

router.post('/', (req, res, next) =>
  try
    const user = new User(req.body);
    user.save((err,user) =>
      res.json(user);
    );
   catch (e)
    next(e);

);
这是一个很简单的增加用户的例子,我们甚至没有对用户post过来的数据做任何校验。
其实,既然mongoose的操作返回的是一个promise,我们这里完全可以用es7的await/async方式来对代码进行重构,这样代码看起来更直观:
router.post('/', async (req, res, next) =>
  try
    const user = new User(req.body);
    await user.save();
    res.json(user);
   catch (e)
    next(e);

);
然后我们通过Insomnia发送一个创建用户的请求:

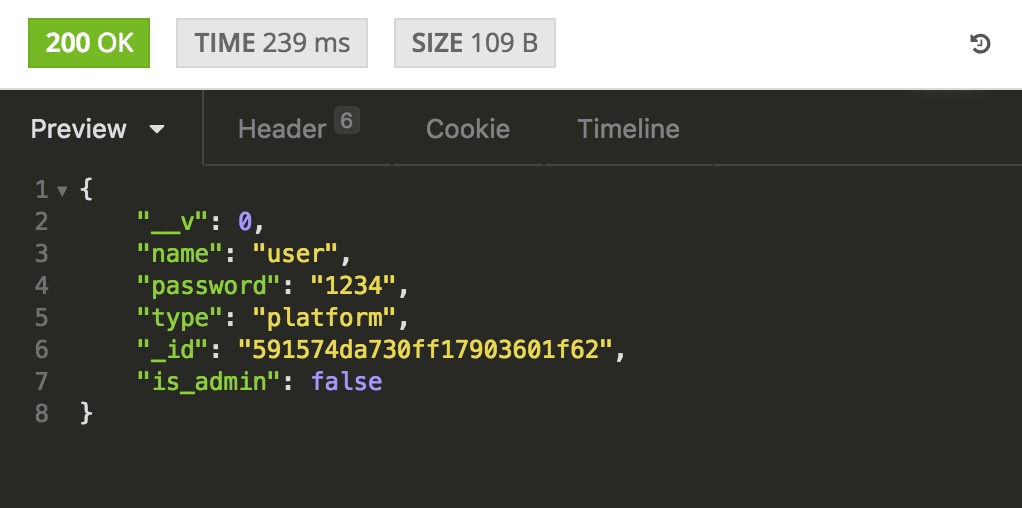
我们可以看到返回的结果如下:

可见用户已经创建成功。同时大家可以下载个Robomongo的mongodb可视化管理工具来查看,该工具还是很好用的,特别是做运维的时候。
但在这个返回中有个地方我们应该优化一下:
- __v这个内部Document版本号没有必要返回,对我们没有什么用。
- 我们在数据库中存储明文密码并在网络中进行传输是比较危险的,希望能存储加密的密码。
- 我们是否可以在Model里面实现一个用户密码校验的功能?
2.3. 用户模型隐藏Document的返回属性
要在返回时隐藏__v这个Document的属性,我们可以在用户的模型中加入以下代码:
UserSchema.options.toJSON =
  transform: (doc, ret) =>
    delete ret.__v;
    return ret;
  ,
;
我们的路由在通过res.send或者res.json将数据返回给客户端的时候,会先去调用UserSchema.options.toJSON.transform, 在就是我们改造返回结果的时机。详情请查看官方文档:
http://mongoosejs.com/docs/api.html#document_Document-toJSON
我也只是知其然而不知其所以然,希望了解整个机制的朋友能够用简单的语言在评论中将其描述清楚,以惠大众。
2.4. 保存前加密用户密码
网上这篇文章给出了一个通过bycrypt来进行密码加密存储的例子:
https://gist.github.com/timstermatic/5613771
var mongoose = require('mongoose'),
    Schema = mongoose.Schema,

const SALT_WORK_FACTOR = 10;

var bcrypt = require('bcrypt')

var UserSchema = new Schema(
    email: String,
    password: String
 )

// pre
UserSchema.pre('save', function(next)
    if(this.password)
        var salt = bcrypt.genSaltSync(SALT_WORK_FACTOR)
        this.password  = bcrypt.hashSync(this.password, salt)

    next()
)

mongoose.model('User', UserSchema);
其中SALT_WORK_FACTOR代表密码加密的计算强度,从1级到10级,强度越高,密码越复杂,计算时间也越长。
整个加密的时机是在我们要保存一个Document之前发生的。也就是我们调用User.save之后,真正存储到mongodb之前。
我们修改下,最终的代码会如下:
'use strict';
const db = require('../libs/mongodb');
const log = require('../libs/logger');
const bcrypt = require('bcrypt');
const SALT_WORK_FACTOR = 8;

const UserSchema = new db.Schema(
  name:  type: String, required: true ,                          // User name
  password:  type: String, required: true ,                      // User password
  type:  type: String, required: true ,                          // User type, supports string: platform|user
  is_admin:  type: Boolean, required: true, default: false ,                      // Admin get full acess to all APIs, the first created user would become an admin
);

UserSchema.options.toJSON =
  transform: (doc, ret) =>
    delete ret.__v;
    return ret;
  ,
;

UserSchema.pre('save', function(next)
  if(this.password)
    const salt = bcrypt.genSaltSync(SALT_WORK_FACTOR)
    this.password  = bcrypt.hashSync(this.password, salt)

  next()
)

module.exports = db.model('User', UserSchema);
2.5. 验证用户密码
那么将密码加密之后,我们该如何验证用户登录时提供的密码是否正确呢?
我们可以为UserSchema添加一个Authentication的方法:
UserSchema.methods =
  authenticate: function (plainPassword)
    return bcrypt.compareSync(plainPassword, this.password);

;
其接受一个客户端传过来的明文密码,然后通过bycrypt的compareSync方法和该用户保存在mongodb中的加密后的密码进行比较。估计里面的实现就是把明文密码像上面那样加密一次,然后再进行比较,我就不去扒它的实现源码了,谁有兴趣的就去看看吧。
2.6. 用户登录
那么上面实现的authenticate方法我们该如何调用呢?我们这里实现一个登录功能来体验下。
在routes文件夹下面增加一个叫做auth.js的文件,实现代码如下:
const express = require('express');
const User = require('../models/User');
const log = require('../libs/logger');

const router = express.Router();

router.post('/login', async (req, res, next) =>
  try
    const name, password = req.body;

    const user = await User.findOne(name)
        .select('password').exec();

    log.debug("user:", user);

    if (!user.authenticate(password))
      throw new Error("Authentication failed")
     else
      res.send('Authentication passed');


   catch (e)
    next(e);

);


module.exports = router;
这样我们就实现了一个粗糙版本的登录api了。我们可以通过insomnia等工具发送一个/auth/login的请求来测试一下。
3. 异常处理
在上面的登录代码中,如果密码不正确,代码会主动抛出一个异常:
throw new Error("Authentication failed")
下面的catch铺作到异常后会将错误next到错误处理路由。
如果将任何项传递到 next() 函数(除了字符串 ‘route’),那么 Express 会将当前请求视为处于错误状态,并跳过所有剩余的非错误处理路由和中间件函数。如果您希望以某种方式处理此错误,必须创建一个错误处理路由。
我们这里没有创建任何定制化的错误处理路由,使用的是express系统的默认的错误处理路由。默认会给客户端返回一个status会500的Internal server error.
但是,我们这里其实不应该返回500错误,因为这是客户端传递过来的密码不正确,更多是属于一个客户端的错误,且属于Unauthorized错误的范畴。我们查看下http的错误状态码:
https://en.wikipedia.org/wiki/List_of_HTTP_status_codes
401 Unauthorized (RFC 7235)
Similar to 403 Forbidden, but specifically for use when authentication is required and has failed or has not yet been provided. The response must include a WWW-Authenticate header field containing a challenge applicable to the requested resource. See Basic access authentication and Digest access authentication.[32]
401 semantically means “unauthenticated”,[33]
i.e. the user does not have the necessary credentials.
所以,我们应该指定错误的状态码为401:
      const error = new Error('Authentication failed');
      error. status = 401;
      throw error;
然后在发送错误的用户密码进行测试,会看到返回的状态将不再会是“500 INTERNAL SERVER ERROR":

但是这样代码不能共享,比如查询一个用户不存在时的错误,可能在很多地方都会用到,那么每个地方都需要重复这个状态码设置的代码,就显得冗余。
所以我们会将其抽出去成为一个独立的模块,且引入一个叫做create-error的模块来更好的对Error进行封装处理:
https://github.com/tgriesser/create-error
创建errors文件夹,并加入文件ClientError.js,编写代码如下:
const createError = require('create-error');

module.exports =
  InvalidLoginError: createError(Error, 'InvalidLoginError',  status: 401, code: 401001, message: 'Invalid username or password.' ),
;
往后有新的客户端需要处理,就在这里面增加就好了。
我们在login.js路由文件中引入上面的ClientError.js,然后就可以修改代码如下:
throw new ClientError.InvalidLoginError();
4. 结语
上面只是为了讲解方便展示了一部分代码,完整的代码请从github中获取。
- git clone https://github.com/zhubaitian/XiaoHuangShuServer.git
- cd XiaoHuangShuServer/
- git checkout CH04
- npm install
- gulp dev
这一系列文章其实我写了有段时间了,后来忙起来忘了发布了😓。
最后想推下我最近发布的一个小程序:三日清单,希望朋友们能多支持。.
以上是关于[小黄书后台]mongodb和用户管理的主要内容,如果未能解决你的问题,请参考以下文章