HCIA-AI_深度学习_图像分类
Posted Rain松
tags:
篇首语:本文由小常识网(cha138.com)小编为大家整理,主要介绍了HCIA-AI_深度学习_图像分类相关的知识,希望对你有一定的参考价值。
图像分类
4 图像分类
4.1 实验介绍
4.1.1 关于本实验
4.1.2 目标
- 加强对keras神经网络模型构建过程的理解
- 掌握加载预训练模型的方法
- 学习使用checkpoint功能
- 掌握如何使用训练好的模型进行预测
4.2 实验步骤
4.2.1 导入依赖包
import tensorflow as tf
from tensorflow import keras
from tensorflow.keras import layers,optimizers,datasets,Sequential
from tensorflow.keras.layers import Conv2D,Activation,MaxPooling2D,Dropout,Flatten,Dense
import os
import numpy as np
import matplotlib.pyplot as plt
4.2.2 数据预处理
# 下载数据集
(x_train, y_train),(x_test,y_test) = datasets.cifar10.load_data()
# 打印数据集尺寸
print(x_train.shape, y_train.shape, x_test.shape, y_test.shape)
print(y_train[0])

# 转换标签
num_classes = 10
y_train_onehot = keras.utils.to_categorical(y_train, num_classes)
y_test_onehot = keras.utils.to_categorical(y_test, num_classes)
y_train_onehot[0]
(50000, 32, 32, 3) (50000, 1) (10000, 32, 32, 3) (10000, 1)
[6]


array([0., 0., 0., 0., 0., 0., 1., 0., 0., 0.], dtype=float32)
# 生成图像标签列表
category_dict = 0:'airplane', 1:'automobile', 2:'bird', 3:'cat', 4:'deer',
                5:'dog', 6:'frog', 7:'horse', 8:'ship', 9:'truck'
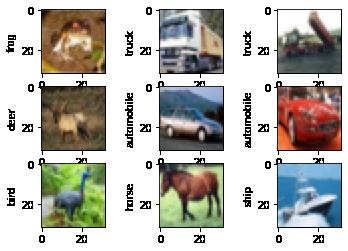
# 展示前9张图片和标签
plt.figure()
for i in range(9):
    plt.subplot(3, 3, i+1)
    plt.imshow(x_train[i])
    plt.ylabel(category_dict[y_train[i][0]])
plt.show()

# 像素归一化
x_train = x_train.astype('float32')/255
x_test = x_test.astype('float32')/255

4.2.3 模型构建
def CNN_classification_model(input_size = x_train.shape[1:]):
    model = Sequential()
    # 前两个模块中有两个卷积一个池化
    # 输入(32,32,3) W1=32 H1=32 D1=3
    # 卷积层 卷积核个数K=32 卷积核大小 w=3 h=3 步长S=1 P=0
    # 输出(30,30,32) W2=(W1-w+2P)/S+1=(32-3+0)/1+1=30 H2=30 D2=K=32
    # 参数个数=K*(w*h*D1+1)=32*(3*3*3+1)=896
    model.add(Conv2D(32, (3,3), padding='same',
                    input_shape=input_size))
    model.add(Activation('relu'))
    model.add(Conv2D(32, (3,3)))
    model.add(Activation('relu'))
    model.add(MaxPooling2D(pool_size=(2, 2), strides=1))

    model.add(Conv2D(64, (3,3), padding='same'))
    model.add(Activation('relu'))
    model.add(Conv2D(64, (3,3)))
    model.add(Activation('relu'))
    model.add(MaxPooling2D(pool_size=(2,2)))

    # 接入全连接之前要进行扁平化
    model.add(Flatten())
    model.add(Dense(128))
    model.add(Activation('relu'))
    model.add(Dropout(0.25))
    model.add(Dense(num_classes))
    model.add(Activation('softmax'))


    opt = optimizers.Adam(lr=0.0001)
    model.compile(loss='sparse_categorical_crossentropy', optimizer=opt,
                 metrics=['accuracy'])
    return model

model = CNN_classification_model()
model.summary()
Model: "sequential"
_________________________________________________________________
Layer (type)                 Output Shape              Param #
=================================================================
conv2d (Conv2D)              (None, 32, 32, 32)        896
_________________________________________________________________
activation (Activation)      (None, 32, 32, 32)        0
_________________________________________________________________
conv2d_1 (Conv2D)            (None, 30, 30, 32)        9248
_________________________________________________________________
activation_1 (Activation)    (None, 30, 30, 32)        0
_________________________________________________________________
max_pooling2d (MaxPooling2D) (None, 29, 29, 32)        0
_________________________________________________________________
conv2d_2 (Conv2D)            (None, 29, 29, 64)        18496
_________________________________________________________________
activation_2 (Activation)    (None, 29, 29, 64)        0
_________________________________________________________________
conv2d_3 (Conv2D)            (None, 27, 27, 64)        36928
_________________________________________________________________
activation_3 (Activation)    (None, 27, 27, 64)        0
_________________________________________________________________
max_pooling2d_1 (MaxPooling2 (None, 13, 13, 64)        0
_________________________________________________________________
flatten (Flatten)            (None, 10816)             0
_________________________________________________________________
dense (Dense)                (None, 128)               1384576
_________________________________________________________________
activation_4 (Activation)    (None, 128)               0
_________________________________________________________________
dropout (Dropout)            (None, 128)               0
_________________________________________________________________
dense_1 (Dense)              (None, 10)                1290
_________________________________________________________________
activation_5 (Activation)    (None, 10)                0
=================================================================
Total params: 1,451,434
Trainable params: 1,451,434
Non-trainable params: 0
_________________________________________________________________
4.2.4 模型训练
from tensorflow.keras.callbacks import ModelCheckpoint
model_name = 'final_cifar10.h5'
model_checkpoint = ModelCheckpoint(model_name, monitor='loss',
                                  verbose=1, save_best_only=True)

# 加载预训练模型
trained_weights_path = 'cifar10_weights.h5'
if os.path.exists(trained_weights_path):
    model.load_weights(trained_weights_path, by_name=True)

# 训练
model.fit(x_train,y_train, batch_size=32, epochs=10, callbacks=[model_checkpoint], verbose=1)
Epoch 1/10
1563/1563 [==============================] - ETA: 0s - loss: 1.6375 - accuracy: 0.4070
Epoch 00001: loss improved from inf to 1.63746, saving model to final_cifar10.h5
1563/1563 [==============================] - 187s 119ms/step - loss: 1.6375 - accuracy: 0.4070
Epoch 2/10
1563/1563 [==============================] - ETA: 0s - loss: 1.3156 - accuracy: 0.5308
Epoch 00002: loss improved from 1.63746 to 1.31557, saving model to final_cifar10.h5
1563/1563 [==============================] - 186s 119ms/step - loss: 1.3156 - accuracy: 0.5308
Epoch 3/10
1563/1563 [==============================] - ETA: 0s - loss: 1.1716 - accuracy: 0.5857
Epoch 00003: loss improved from 1.31557 to 1.17161, saving model to final_cifar10.h5
1563/1563 [==============================] - 188s 120ms/step - loss: 1.1716 - accuracy: 0.5857
Epoch 4/10
1563/1563 [==============================] - ETA: 0s - loss: 1.0639 - accuracy: 0.6249
Epoch 00004: loss improved from 1.17161 to 1.06385, saving model to final_cifar10.h5
1563/1563 [==============================] - 189s 121ms/step - loss: 1.0639 - accuracy: 0.6249
Epoch 5/10
1563/1563 [==============================] - ETA: 0s - loss: 0.9776 - accuracy: 0.6583
Epoch 00005: loss improved from 1.06385 to 0.97756, saving model to final_cifar10.h5
1563/1563 [==============================] - 188s 120ms/step - loss: 0.9776 - accuracy: 0.6583
Epoch 6/10
1563/1563 [==============================] - ETA: 0s - loss: 0.9035 - accuracy: 0.6839
Epoch 00006: loss improved from 0.97756 to 0.90353, saving model to final_cifar10.h5
1563/1563 [==============================] - 188s 120ms/step - loss: 0.9035 - accuracy: 0.6839
Epoch 7/10
1563/1563 [==============================] - ETA: 0s - loss: 0.8395 - accuracy: 0.7081
Epoch 00007: loss improved from 0.90353 to 0.83948, saving model to final_cifar10.h5
1563/1563 [==============================] - 199s 127ms/step - loss: 0.8395 - accuracy: 0.7081
Epoch 8/10
1563/1563 [==============================] - ETA: 0s - loss: 0.7853 - accuracy: 0.7267
Epoch 00008: loss improved from 0.83948 to 0.78526, saving model to final_cifar10.h5
1563/1563 [==============================] - 201s 129ms/step - loss: 0.7853 - accuracy: 0.7267
Epoch 9/10
1563/1563 [==============================] - ETA: 0s - loss: 0.7296 - accuracy: 0.7460
Epoch 00009: loss improved from 0.78526 to 0.72955, saving model to final_cifar10.h5
1563/1563 [==============================] - 197s 126ms/step - loss: 0.7296 - accuracy: 0.7460
Epoch 10/10
1563/1563 [==============================] - ETA: 0s - loss: 0.6787 - accuracy: 0.7635
Epoch 00010: loss improved from 0.72955 to 0.67875, saving model to final_cifar10.h5
1563/1563 [==============================] - 190s 122ms/step - loss: 0.6787 - accuracy: 0.7635


<tensorflow.python.keras.callbacks.History at 0x1b20188e5e0>
4.2.5 模型评估
new_model = CNN_classification_model()
new_model.load_weights(model_name)

new_model.evaluate(x_test, y_test, verbose=1)
313/313 [==============================] - 9s 27ms/step - loss: 0.8307 - accuracy: 0.7131


[0.8307360410690308, 0.713100016117096]
# 预测一张图片

# 输出每一类别的输出结果
new_model.predict(x_test[0:1])
array([[2.0661957e-04, 5.8463629e-04, 4.0328883e-02, 8.1551665e-01,
        5.9472341e-03, 8.8567801e-02, 3.8351275e-02, 3.9349191e-04,
        9.8961936e-03, 2.0709026e-04]], dtype=float32)
# 输出预测结果
new_model.predict_classes(x_test[0:1])
WARNING:tensorflow:From <ipython-input-11-3680f3a0a3c8>:2: Sequential.predict_classes (from tensorflow.python.keras.engine.sequential) is deprecated and will be removed after 2021-01-01.
Instructions for updating:
Please use instead:* `np.argmax(model.predict(x), axis=-1)`,   if your model does multi-class classification   (e.g. if it uses a `softmax` last-layer activation).* `(model.predict(x) > 0.5).astype("int32")`,   if your model does binary classification   (e.g. if it uses a `sigmoid` last-layer activation).


array([3], dtype=int64)
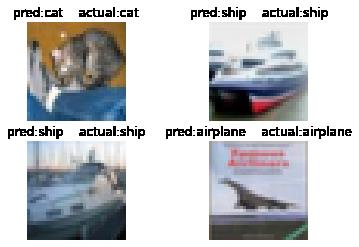
# 输出4张图片和预测结果
pred_list = []

plt.figure()
for i in range(0, 4):
    plt.subplot(2, 2, i+1)
    plt.imshow(x_test[i])
    pred = new_model.predict_classes(x_test[0:10])
    pred_list.append(pred)
    plt.title('pred:' + category_dict[pred[i]] + '    actual:' + category_dict[y_test[i][0]])
    plt.axis('off')
plt.show()

4.3 总结
以上是关于HCIA-AI_深度学习_图像分类的主要内容,如果未能解决你的问题,请参考以下文章
HCIA-AI_深度学习_利用TensorFlow进行手写数字识别
HCIA-AI_深度学习_利用TensorFlow进行手写数字识别