Android ColorFilter and Tint
Posted 小马识图
tags:
篇首语:本文由小常识网(cha138.com)小编为大家整理,主要介绍了Android ColorFilter and Tint相关的知识,希望对你有一定的参考价值。
概述
关于android ColorFilter 和 Tint之间的关系一直混淆不清。两者均是对显示的图片进行着色或者过滤。
ColorFilter: 色彩过滤
Tint: 着色
从英文原意上来讲,似乎有些相似,而从实际的效果来讲也是一致的。Android 向导文档似乎对此也是一笔带过,不愿深入,让人有些摸不着头脑:
With Android 5.0 (API level 21) and above, you can tint bitmaps and nine-patches defined as alpha masks. You can tint them with color resources or theme attributes that resolve to color sources (for example, ?android:attr/colorPrimary). Usually, you create these assets only once and color them automatically to match your theme.
You can apply a tint to BitmapDrawable or NinePatchDrawable objects with the
setTint()method. You can also set the tint color and mode in your layouts with theandroid:tintandandroid:tintModeattributes.
这段文字讲述的大意是:Tint 是 API 21之后才添加的功能,可以对BitmapDrawable和 NinePatchDrawable 应用Tint 效果。使用tint效果可以省去我们为不同theme创建同一张图片的多个版本的麻烦。紧接着第二段讲道如何使用tint, 有两种方法:
1 调用函数:
 class Drawable
     ...
     public void setTint (int tint);                       //Added in API 21
     public void setTintMode (PorterDuff.Mode tintMode);   //Added in API 21
     ...
2 XML Layout:
drawable file location: res/drawable/tintedrawable.xml
<nine-path xmlns:android="http://schemas.android.com/apk/res/android"
    android:src="@drawable/rawdrawable"
    android:tint="@color/what_ever_color"
    android:tintMode="multiply" />
layout file location: res/layout/layout_main.xml
<View
    android:id="@+id/my_view_id"
    android:layout_width="20dp"
    android:layout_height="10dp"
    android:background="@drawable/tintedrawable"/>
ImageView and Tint
class ImageView

    public final void setColorFilter (int color, PorterDuff.Mode mode); //Added in API 1
    public void setImageTintList (ColorStateList tint);                 //Added in API 21
    public void setImageTintMode (PorterDuff.Mode tintMode);            //Added in API 21
除了 ImageView 可以继续使用setColorFilter(int, PorterDuff.Mode), API 21 也给ImageView 添加了setImageTintList(), setImageTintMode(), android:tint, android:tintMode 等特性!
首先我们看一个Sample, 给一个ImageView 使用这三种不同方法来着色。
        <!-- 方法一使用setColorFilter -->
        <TextView
            android:layout_width="wrap_content"
            android:layout_height="wrap_content"
            android:text="setColorFilter" />

        <ImageView
            android:id="@+id/image1"
            android:layout_width="200dp"
            android:layout_height="50dp"
            android:layout_gravity="center_horizontal"
            android:src="@drawable/rawdrawable"
            android:scaleType="fitXY"/>

        <!--方法二使用setImageTintList -->
        <TextView
            android:layout_width="wrap_content"
            android:layout_height="wrap_content"
            android:text="setImageTintList" />

        <ImageView
            android:id="@+id/image2"
            android:layout_width="200dp"
            android:layout_height="50dp"
            android:layout_gravity="center_horizontal"
            android:src="@drawable/rawdrawable"
            android:scaleType="fitXY"/>

        <!--方法三使用XML android:tint 属性 -->
        <TextView
            android:layout_width="wrap_content"
            android:layout_height="wrap_content"
            android:text="android:tint" />

        <ImageView
            android:id="@+id/image3"
            android:layout_width="200dp"
            android:layout_height="50dp"
            android:layout_gravity="center_horizontal"
            android:src="@drawable/rawdrawable"
            android:scaleType="fitXY"
            android:tint="#673AB7"
            android:tintMode="multiply"/>
@Override
public View onCreateView(LayoutInflater inflater,
ViewGroup container, Bundle savedInstanceState)
View v = inflater.inflate(R.layout.tinting_fragment, null);
mImage1 = (ImageView) v.findViewById(R.id.image1);
mImage2 = (ImageView) v.findViewById(R.id.image2);
updateTint( Color.argb(0xFF, 0x67, 0x3A, 0xB7),
PorterDuff.Mode.MULTIPLY );
public void updateTint(int color, PorterDuff.Mode mode)
mImage1.setColorFilter(color, mode);
mImage2.setImageTintList(ColorStateList.valueOf(color));
mImage2.setImageTintMode(mode);
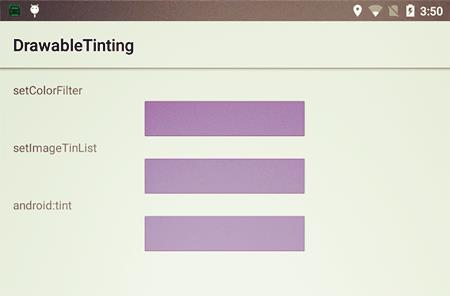
从上图可以看到, 其实对于ImageView 不管采用何种方法,其最终的结果都是一样的。
我们看到ImageView.setImageTintList(ColorStateList) 实际上是接受一个ColorStateList参数,上面我们android:tint="#673AB7"的tint值是一个单一的颜色,如果改成ColorStateList那效果如何呢?
1 res/color/custom_tint.xml
<selector xmlns:android="http://schemas.android.com/apk/res/android">
    <!-- Pressed state -->
    <item android:color="#ff0000" android:state_pressed="true" />
    <!-- Default -->
    <item android:color="#4aff48" />
</selector>
2 res/layout/layout_main.xml
 <ImageView
            android:id="@+id/image3"
            android:clickable="true"
            android:layout_width="200dp"
            android:layout_height="50dp"
            android:layout_gravity="center_horizontal"
            android:src="@drawable/rawdrawable"
            android:scaleType="fitXY"
            android:tint="@color/custom_tint"
            android:tintMode="multiply"/>
当点击最下面的ImageView 的时候, 颜色并没有随着状态的改变而改变。接着我们再把ImageView 改成ImageButton:
 <ImageButton
            android:id="@+id/image3"
            android:layout_width="200dp"
            android:layout_height="50dp"
            android:layout_gravity="center_horizontal"
            android:src="@drawable/rawdrawable"
            android:scaleType="fitXY"
            android:tint="@color/custom_tint"
            android:tintMode="multiply"/>
Drawable and Tint
文档里面明确讲明了tint的引入是为了对Drawable 进行着色支持。至少对于BitmapDrawable和 NinePatchDrawable 文档明确指明了支持 android:tint 和 android:tintMode 属性。这样的话我们对于android:tint的属性的支持就很容易从ImageView扩展到任何View, 只要将View的android:background指向我们自定义的drawable:
1 res/drawable/tintedrawable.xml
<bitmap xmlns="http://schemas.android.com/apk/res/android"
    android:src="@drawable/background_image"
    android:tint="@color/custom_tint"
    android:tintMode="multiply" />
2 res/layout/layout_main.xml
 <View
            android:id="@+id/image"
            android:layout_width="wrap_content"
            android:layout_height="wrap_content"
            android:layout_gravity="center_horizontal"
            android:background="@drawable/tintedrawable"/>
但是和上面的问题一样,使用这种方法不支持多状态的情形。而如果我们将xml layout 中的View 改成ImageButton并且将android:background 改成android:src问题就解决了:
 <ImageButton
            android:id="@+id/image"
            android:layout_width="wrap_content"
            android:layout_height="wrap_content"
            android:layout_gravity="center_horizontal"
            android:src="@drawable/tintedrawable"
            android:scaleType="centerInside"/>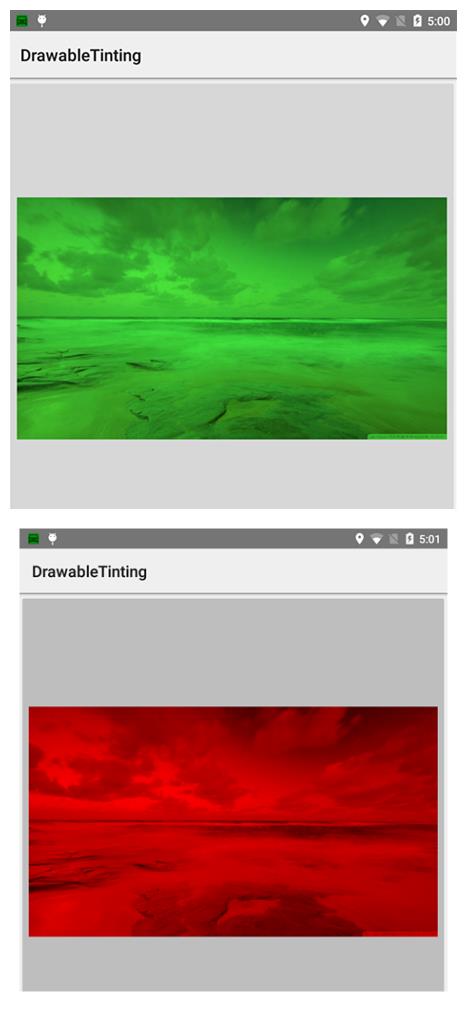
上面的两张图片分别是在默认状态和按下状态的ImageButton着色的效果。如果换成其他的View, 红色着色并不会出现,但是仍然会有绿色的着色效果。
通过以上的分析,发现对于tint在各个状态下自动改变着色色彩的支持仍然仅仅局限于ImageButton, 这里或许我们可以通过自定义View的方法来修正这个问题,但是如果能够做到系统原生的支持当然更好,期待读者能够提供更好的方法。
以上是关于Android ColorFilter and Tint的主要内容,如果未能解决你的问题,请参考以下文章