Android自定义View 自定义容器
Posted mChenys
tags:
篇首语:本文由小常识网(cha138.com)小编为大家整理,主要介绍了Android自定义View 自定义容器相关的知识,希望对你有一定的参考价值。
目录
一、什么是自定义容器
自定义容器本质上也是一个组件,常见的 LinearLayout、FrameLayout、GridLayout、ScrollView和 RelativeLayout 等等组件都是容器,容器除了有自己的外观,还能用来容纳各种组件,以一种特定的规则规定组件应该在什么位置、显示多大。
一般情况下,我们更关注自定义组件的外观及功能,但自定义容器则更关注其内的组件怎么排列和摆放,比如线性布局 LinearLayout 中的组件只能水平排列或垂直排列,帧布局FrameLayout中的组件可以重叠,相对布局 RelativeLayout 中的组件可以以某一个组件为参照定位自身的位 置……容器还关注组件与容器四个边框之间的距离(padding),或者容器内组件与组件之间的距离(margin)
事实上,容器是可以嵌套的,一个容器中,既可以是普通的子组件,也可以是另一个子容器。
容器类一般要继承 ViewGroup 类,ViewGroup 类同时也是 View 的子类,ViewGroup 又是一个抽象类,定义了 onLayout()等抽象方法。当然,根据需要,我们也可以让容器类继承自 FrameLayout 等 ViewGroup 的子类,比如 ListView 继承自 ViewGroup,而 ScrollView
水平滚动容器类则从 FrameLayout 派生。
1.1 ViewGroup类
ViewGroup作为容器类的父类,自然有他自己鲜明的特征,开发自定义容器必须先要了解ViewGroup。在ViewGroup 中,定义了一个 View[]类型的数组mChildren,该数组保存了容器中所有的子组件,负责维护组件的添加、移除、管理组件顺序等功能,另一个成员变量mChildrenCount 则保存了容器中子组件的数量。在布局文件(layout)中,容器中的子元素会根据顺序自动添加到mChildren数组中。
ViewGroup 具备了容器类的基本特征和运作流程,也定义了相关的方法用于访问容器内的组件,获取子View数量和子View的方法:
/**
 * 获取容器内的子组件的个数
 *
 * @return
 */
public int getChildCount();

/**
 * 容器内的所有子组件都存储在名为 mChildren的View[]数组中,该方法通过索引index找到指定位置的子组件
 *
 * @param index
 * @return
 */
public View getChildAt(int index);
添加View有如下方法:
public void addView(View child, int index, LayoutParams params);
public void addView(View child, LayoutParams params);
public void addView(View child, int index);
public void addView(View child);
向容器中添加新的子组件时,子组件不能有父容器,否则会抛出“The specified child already has a parent(该组件已有父容器)”的异常。
删除View有如下方法:
public void removeViewAt(int index);
public void removeView(View view);
public void removeViews(int start, int count);
测量View有如下方法:
// 测量给定的子组件的尺寸
protected void measureChild(View child, int parentWidthMeasureSpec, int parentHeightMeasureSpec);
// 测量所有子组件的尺寸
protected void measureChildren(int widthMeasureSpec, int heightMeasureSpec);
// 该方法从View类中继承,用于测量组件或容器自己的尺寸,参数widthMeasureSpec和heightMeasureSpec为0时表示按实际大小进行测量,将0传入方法常常会有奇效。
public final void measure(int widthMeasureSpec, int heightMeasureSpec);
ViewGroup 运行的基本流程大致为:
1)测量容器尺寸
重写 onMeasure()方法测量容器大小,和自定义View有所区别的是,在测量容器大小之前,必须先调用measureChildren()方法测量所有包含的子View的大小,不然结果永远为 0。
2)确定每个子组件的位置
重写 onLayout()方法确定每个子组件的位置(这个其实挺麻烦,也是定义容器的难点部分),在onLayout()方法中,调用View的layout()方法确定子组件的位置。
3)绘制容器
重写 onDraw()方法,其实ViewGroup类并没有重写onDraw()方法,除非有特别的要求,自定义容器也很少去重写。比如LinearLayout 重写了该方法用于绘制水平或垂直分割条,而FrameLayout则是重写了draw()方法,作用其实是一样的。
1.2 ViewGroup的工作原理
1.2.1 ViewGroup的onMeasure分析
ViewGroup作为View的子类,流程基本是相同的,但另一方面ViewGroup作为容器的父类,又有些差异,我们通过阅读源码来了解ViewGroup的工作原理,前面说到,重写ViewGroup的onMeasure()方法时,必须先调用measureChildren()方法测量子组件的尺寸,该方法源码如下:
protected void measureChildren(int widthMeasureSpec, int heightMeasureSpec)
    final int size = mChildrenCount;
    final View[] children = mChildren;
    for (int i = 0; i < size; ++i)
        final View child = children[i];
        if ((child.mViewFlags & VISIBILITY_MASK) != GONE)
        	// 测量指定子View
            measureChild(child, widthMeasureSpec, heightMeasureSpec);
measureChildren()方法中,循环遍历每一个子组件,如果当前子组件的可见性不为GONE也,就是没有隐藏则继续调用measureChild(child,widthMeasureSpec,heightMeasureSpec)方法测量当前子组件child的大小,我们继续进入measureChild()方法。
protected void measureChild(View child, int parentWidthMeasureSpec,
        int parentHeightMeasureSpec)
    final LayoutParams lp = child.getLayoutParams();
    // 计算子View测量模式
    final int childWidthMeasureSpec = getChildMeasureSpec(parentWidthMeasureSpec,
            mPaddingLeft + mPaddingRight, lp.width);
    final int childHeightMeasureSpec = getChildMeasureSpec(parentHeightMeasureSpec,
            mPaddingTop + mPaddingBottom, lp.height);
    // 调用子View的measure方法
    child.measure(childWidthMeasureSpec, childHeightMeasureSpec);
measureChild()方法结合父容器的 MeasureSpec、父容器的Padding和子组件LayoutParams 三个因素利用getChildMeasureSpec() 计算出子组件的尺寸模式和尺寸大小(可以跟踪到getChildMeasureSpec()方法中查看,前面基础篇也有介绍),并调用子组件的measure()方法进行尺寸测量measure()方法的实现如下:
public final void measure(int widthMeasureSpec, int heightMeasureSpec)
    ...
    // 最终触发子View的onMeasure方法
    onMeasure(widthMeasureSpec, heightMeasureSpec);
    ...
真相慢慢露出水面,View的measure()方法调用了 onMeasure(widthMeasureSpec,heightMeasureSpec)方法,该方法正是我们重写子View的用来测量组件尺寸的方法,至此,测量组件尺寸的工作已掌握到开发人员手中。
当measureChildren流程走完之后,该自定义容器内的所有子View就可以通过getMeasureWidth()和getMeasureHeight获取测量后的宽高了,然后容器自身就可以计算出最大宽度和高度来定义自身的宽高了。模板代码如下:
@Override
protected void onMeasure(int widthMeasureSpec, int heightMeasureSpec)
    // 1.先测量所有的子View
    measureChildren(widthMeasureSpec, heightMeasureSpec);

    // 然后测量自身宽高
    int widthMode = MeasureSpec.getMode(widthMeasureSpec);
    int heightMode = MeasureSpec.getMode(heightMeasureSpec);
    int width = MeasureSpec.getSize(widthMeasureSpec);
    int height = MeasureSpec.getSize(heightMeasureSpec);

    // 假设每一行只能放一个子控件,具体按照需求而定
    int maxWidth = 0;
    int totalHeight = 0;
    int count = getChildCount();
    for (int i = 0; i < count; i++)
        View child = getChildAt(i);
        // 记录每一行的最大宽度
        maxWidth = Math.max(maxWidth, child.getMeasuredWidth());
        totalHeight += child.getMeasuredHeight();


    if (widthMode != MeasureSpec.EXACTLY)
        width = Math.min(width, maxWidth);

    if (heightMode != MeasureSpec.EXACTLY)
        height = Math.min(height, totalHeight);


    // 2.设置父容器的宽高
    setMeasuredDimension(width,height);
1.2.2 ViewGroup的onLayout分析
分析完ViewGroup的onMeasure原理后,再来分析onLayout的原理,在 onLayout()方法中, 我们将调用子组件的 layout()方法,这里要一分为二,如果子组件是一个 View,定位流程到此结束,如果子组件又是一个容器呢?我们进入 layout()方法进行跟踪。
public void layout(int l, int t, int r, int b)
    ...
    int oldL = mLeft;
    int oldT = mTop;
    int oldB = mBottom;
    int oldR = mRight;

    boolean changed = isLayoutModeOptical(mParent) ?
            setOpticalFrame(l, t, r, b) : setFrame(l, t, r, b);

    if (changed || (mPrivateFlags & PFLAG_LAYOUT_REQUIRED) == PFLAG_LAYOUT_REQUIRED)
    	// 如果子View也是容器类,那么也会调用onLayout进行分发
        onLayout(changed, l, t, r, b);

       ...
如果子组件是一个容器,又会继续调用该容器的 onLayout()方法对孙组件进行定位,所以,onLayout()方法也是一个递归的过程。
举个例子,重写自定义容器的onLayout方法如下:
@Override
protected void onLayout(boolean changed, int l, int t, int r, int b)
    int childCount = getChildCount();
    int top = 0;
    for (int i = 0; i < childCount; i++)
        View child = getChildAt(i);
        // 布局子View
        child.layout(l, top, l + child.getMeasuredWidth(), top + child.getMeasuredHeight());
        // 假设一行只能放一个子View ,那么放完上一个后,需要下一个的top
        top += child.getMeasuredHeight();
1.2.3 ViewGroup的onDraw分析
onMeasure()方法和onLayout()方法调用完成后,该轮到onDraw()方法了,ViewGroup类并没有重写该方法,通常情况下重写onDraw是不会回调的,除非该自定义容器设置背景色或者背图,从第一章中我们都知道每一个组件在绘制时是会调用View的draw()方法的,我们进入draw()方法进行跟踪。
public void draw(Canvas canvas)
  ...

    /*
     * Draw traversal performs several drawing steps which must be executed
     * in the appropriate order:
     *
     *      1. Draw the background
     *      2. If necessary, save the canvas' layers to prepare for fading
     *      3. Draw view's content
     *      4. Draw children
     *      5. If necessary, draw the fading edges and restore layers
     *      6. Draw decorations (scrollbars for instance)
     *      7. If necessary, draw the default focus highlight
     */

    // Step 1, draw the background, if needed
    int saveCount;

    drawBackground(canvas);

    // skip step 2 & 5 if possible (common case)
    final int viewFlags = mViewFlags;
    boolean horizontalEdges = (viewFlags & FADING_EDGE_HORIZONTAL) != 0;
    boolean verticalEdges = (viewFlags & FADING_EDGE_VERTICAL) != 0;
    if (!verticalEdges && !horizontalEdges)
        // Step 3, draw the content
        onDraw(canvas);

        // Step 4, draw the children
        dispatchDraw(canvas);

        drawAutofilledHighlight(canvas);

        // Overlay is part of the content and draws beneath Foreground
        if (mOverlay != null && !mOverlay.isEmpty())
            mOverlay.getOverlayView().dispatchDraw(canvas);


        // Step 6, draw decorations (foreground, scrollbars)
        onDrawForeground(canvas);

        // Step 7, draw the default focus highlight
        drawDefaultFocusHighlight(canvas);

        if (isShowingLayoutBounds())
            debugDrawFocus(canvas);


        // we're done...
        return;

...
draw()方法中执行了语句dispatchDraw(canvas),但是,当我们跟踪到View类的dispatchDraw()方法时发现该方法是空的。
但对于ViewGroup来说,该方法的作用非同小可,因为ViewGroup重写了dispatchDraw()方法。并且该方法是一定会回调的,重写此方法后记得需要调用super.dispatchDraw,因为子View的绘制分发是在ViewGroup的dispatchDraw方法内的,如果不调用super.dispatchDraw,那么子View将不会绘制。
// ViewGroup.java

@Override
protected void dispatchDraw(Canvas canvas)
   ...
    final int childrenCount = mChildrenCount;
    final View[] children = mChildren;
    int flags = mGroupFlags;

    ...
    for (int i = 0; i < childrenCount; i++)
        while (transientIndex >= 0 && mTransientIndices.get(transientIndex) == i)
            final View transientChild = mTransientViews.get(transientIndex);
            if ((transientChild.mViewFlags & VISIBILITY_MASK) == VISIBLE ||
                    transientChild.getAnimation() != null)
                // 调用drawChild来触发子组件的绘制
                more |= drawChild(canvas, transientChild, drawingTime);

          ...


       ...

    ...
dispatchDraw()方法的作用是将绘制请求纷发到给子组件,并调用drawChild()方法来完成子组件的绘制,drawChild()方法的源码如下:
protected boolean drawChild(Canvas canvas, View child, long drawingTime)
    // 非常精简,就一行代码
    return child.draw(canvas, this, drawingTime);
继续看View的draw方法,注意是3个参数的draw方法
boolean draw(Canvas canvas, ViewGroup parent, long drawingTime)

    ...

    if (!drawingWithDrawingCache)
        if (drawingWithRenderNode)
            mPrivateFlags &= ~PFLAG_DIRTY_MASK;
            ((RecordingCanvas) canvas).drawRenderNode(renderNode);
         else
            // Fast path for layouts with no backgrounds
            if ((mPrivateFlags & PFLAG_SKIP_DRAW) == PFLAG_SKIP_DRAW)
                mPrivateFlags &= ~PFLAG_DIRTY_MASK;
                dispatchDraw(canvas);
             else
                // 关键代码,调用View的一个参数的draw方法,最终会触发onDraw方法
                draw(canvas);


    ...

    return more;
可以看到ViewGroup经过dispathDraw方法最终会回调子View的draw方法,而View的draw方法前面我们已经分析过了,最终会触发子View的onDraw方法。
二、综合案例
2.1 CornerLayout布局
CornerLayout 布局是一个自定义容器,用于将子组件分别显示在容器的4个角落,不接受超过4个子组件的情形,默认情况下,子组件按照从左往右、从上往下的顺序放置,但可以为子组件指定位置(左上角 left_top、右上角 right_top、左下角 left_bottom、右下角right_bottom)。CornerLayout并不具备实用价值,因为FrameLayout布局能轻易实现CornerLayout 的功能,但是,对于理解布局容器的开发却能提供一种非常清晰的方法和思路(这个才是最重要的,不是么?)。
2.1.1 分析容器的宽高
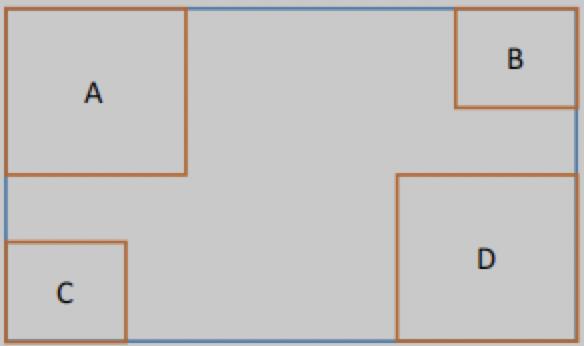
先画一个草图来帮助我们分析

上图中,蓝色框表示CornerLayout布局的区域A、B、C、D 是CornerLayout内的4个子组件,对于CornerLayout来说,首先要测量的是他的尺寸大小,当其layout_width为wrap_content时,它的宽度计算应该满足下面要求:
容器的最小宽度 = 容器的paddingLeft + 容器的paddingRight +
			   A或者C的最大leftMargin+rightMargin +
 			   A或者C的最大宽度 +
			   B或者D的最大宽度 +
               B或者D的最大leftMargin+rightMargin
当容器的layout_height为wrap_content时,它的高度计算应该满足下面要求:
容器的最小高度 = 容器的paddingTop + 容器的paddingBottom +
			   A或者B的最大topMargin+bottomMargin +
			   A或者B的最大高度 +
			   C或者D的最大高度 +
			   C或者D的最大topMargin+bottomMargin
这样才不至于子组件出现重叠,当然,如果layout_width 和 layout_height指定了具体值或者屏幕不够大的情况下设置为match_parent,子组件仍有可能会出现重叠现象。
2.1.2 分析容器的内边距
上面分析padding,View类已经提供了对应的方法获取上下左右的内边距了,如下所示:
public int getPaddingLeft();
public int getPaddingTop();
public int getPaddingRight();
public int getPaddingBottom();
2.1.3 分析子View的外边距
而对于子View外边距,我们只能通过MarginLayoutParams来获取,MarginLayoutParams是ViewGroup.LayoutParams的子类,它暴露了公共的属性可以获取View的四个方向的外边距
public static class MarginLayoutParams extends ViewGroup.LayoutParams

    public int leftMargin;
    public int topMargin;
    public int rightMargin;
    public int bottomMargin;
然而ViewGroup在添加子View的时候,使用的LayoutParams并不是MarginLayoutParams,这个可以查看其addView方法源码:
public void addView(View child, LayoutParams params)
    addView(child, -1, params);

public void addView(View child, int index, LayoutParams params)
    ...
    requestLayout();
    invalidate(true);
    addViewInner(child, index, params, false);
你可能会说这也看不出什么名堂啊, 我们来想一下我们定义在布局中的子View是如何被加载到父容器的,了解过Activity的setContentView源码的人就会知道布局的解析其实是通过LayoutInflate来完成,我们看看LayoutInflate的inflate方法
public View inflate(XmlPullParser parser, @Nullable ViewGroup root, boolean attachToRoot)
        ...
        final String name = parser.getName();
        if (TAG_MERGE.equals(name))
           ...
         else
            // Temp is the root view that was found in the xml 注意这句话Temp就是布局的根View
            final View temp = createViewFromTag(root, name, inflaterContext, attrs);
            ViewGroup.LayoutParams params = null;
            if (root != null)
                // 创建布局根View的布局参数
                params = root.generateLayoutParams(attrs);
                if (!attachToRoot)
                    temp.setLayoutParams(params);


		...
            // Inflate all children under temp against its context. 注意这句话,就是解析temp根容器下的所有子view
            rInflateChildren(parser, temp, attrs, true);
	...
    return result;

final void rInflateChildren(XmlPullParser parser, View parent, AttributeSet attrs, boolean finishInflate) throws XmlPullParserException, IOException
    // 一句话,看rInflate
    rInflate(parser, parent, parent.getContext(), attrs, finishInflate);


void rInflate(XmlPullParser parser, View parent, Context context,AttributeSet attrs, boolean finishInflate) throws XmlPullParserException, IOException
 	...
    while (((type = parser.next()) != XmlPullParser.END_TAG 以上是关于Android自定义View 自定义容器的主要内容,如果未能解决你的问题,请参考以下文章