数据库大作业—— Android studio连接SQLserver数据库登录界面
Posted Maynine丶
tags:
篇首语:本文由小常识网(cha138.com)小编为大家整理,主要介绍了数据库大作业—— Android studio连接SQLserver数据库登录界面相关的知识,希望对你有一定的参考价值。

一、android Studio连接SQLserver数据库
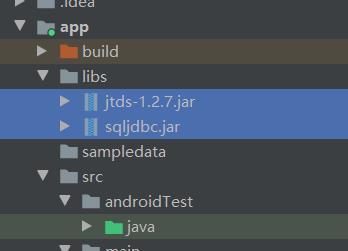
首先连接SQLserver需要向library中导入jdbc的jar包,将下载的jar包复制到libs中,右键包选择 add as library。

可以到官网自行下载,为了方便我也上传了资源。点击下载
接着我们创建一个DBUtil类,封装一个getSQLConnection(String ip, String user, String pwd, String db)类型的函数,用于获取Connection对象。
我们使用jdbc来连接数据库,jdbc获取数据库连接代码如下:
DriverManager.getConnection("jdbc:jtds:sqlserver://" + "你的ip" + ":1433/" + "数据库名" + ";charset=utf8", "数据库账户", "密码");
ip地址为当前连接网络的ip地址,可以在命令提示符(cmd)里输入ipconfig找到。
为了实现登录功能我们还要获取登录界面里EditText里输入的文本和Spinner里的选项,并把数据打包成Bundle,传给DBUtil类,判断账号密码是否正确。具体代码已经贴在了下面。
DBUtil具体代码如下:
public class DBUtil

    private  String name=null;
    private  String pass=null;

    public DBUtil(String m,String p)
        this.name=m;
        this.pass=p;

    private static Connection getSQLConnection(String ip, String user, String pwd, String db)

        Connection con = null;
        try

            Class.forName("net.sourceforge.jtds.jdbc.Driver");
            con = DriverManager.getConnection("jdbc:jtds:sqlserver://" + "你的ip" + ":1433/" + "SCsystem" + ";charset=utf8", "账户", "密码");
         catch (ClassNotFoundException e)

            e.printStackTrace();
         catch (SQLException e)

            e.printStackTrace();

        return con;


    public String QuerySQL(String name,String pass,String ut)

        String result = "";
        try

            Connection conn= getSQLConnection("你的ip", "账号", "密码", "数据库名称");//根据自己的数据库信息填写对应的值
            String sql=null;
            if(ut=="学生登录") sql = "select * from Student_login where Sno='"+name+"' and  Spassword='"+pass+"'";
            else if(ut=="教师登录") sql= "select * from Teacher_login where Tno='"+name+"' and  Tpassword='"+pass+"'";//加单引号!不然隐式转换会报错查询不出来
            System.out.println(sql);
            Statement stat = conn.createStatement();
            ResultSet rs = stat.executeQuery(sql);
            while (rs.next())

                result= "1" ;

            rs.close();
            conn.close();
         catch (SQLException e)

            e.printStackTrace();
            result += "查询数据异常!" + e.getMessage();

        return result;

    public static void main(String[] args)
MainActivity代码:
public class MainActivity extends AppCompatActivity

    private Spinner userSpinner=null;
    private Handler handler;

    @Override
    protected void onCreate(Bundle savedInstanceState)
        super.onCreate(savedInstanceState);
        setContentView(R.layout.activity_login);
        findViews();


    private void findViews()
        //Spinner
        userSpinner=(Spinner)findViewById(R.id.spin_1);
        String[] usertype="学生登录","教师登录";
        ArrayAdapter<String> adapter = new ArrayAdapter<String>(this,android.R.layout.simple_list_item_1,usertype);
        userSpinner.setAdapter(adapter);

        //EditText
        final EditText musername=(EditText) findViewById(R.id.edit_text_1);
        final EditText mpassword=(EditText) findViewById(R.id.edit_text_2);
        //button
        Button button1 = (Button) findViewById(R.id.button_1);
        WorkThread wt=new WorkThread();
        wt.start();
        button1.setOnClickListener(new View.OnClickListener()
            @Override
            public void onClick(View v)
                String ut = userSpinner.getSelectedItem().toString();
                String no = musername.getText().toString().trim();
                String pw = mpassword.getText().toString().trim();
                Message m=handler.obtainMessage();
                Bundle b=new Bundle();
                b.putString("name",no);
                b.putString("pass",pw);
                b.putString("ut",ut);
                m.setData(b);
                handler.sendMessage(m);


        );
        //隐藏标题栏
        ActionBar actionbar= getSupportActionBar();
        if(actionbar!=null)
            actionbar.hide();


    //登录查询
    class WorkThread extends  Thread
        @Override
        public  void run()
            Looper.prepare();
            handler=new Handler()
                @Override
                public  void handleMessage(Message m)
                    super.handleMessage(m);
                    Bundle b= m.getData();//得到与信息对用的Bundle
                    String name=b.getString("name");//根据键取值
                    String pass=b.getString("pass");
                    String ut=b.getString("ut");
                    DBUtil db=new DBUtil(name,pass);//调用数据库查询类
                    String ret=db.QuerySQL(name,pass,ut);//得到返回值
                    if (ret.equals("1"))//为1,页面跳转,登陆成功

                        Intent localIntent = new Intent();
                        localIntent.setClass(MainActivity.this, StudentView.class);
                        MainActivity.this.startActivity(localIntent);
                        Toast.makeText(MainActivity.this, "登录成功",Toast.LENGTH_SHORT).show();//显示提示框
                        return;

                    Toast.makeText(MainActivity.this, "用户名或密码错误", Toast.LENGTH_SHORT).show();


            ;
            Looper.loop();//Looper循环,通道中有数据执行,无数据堵塞
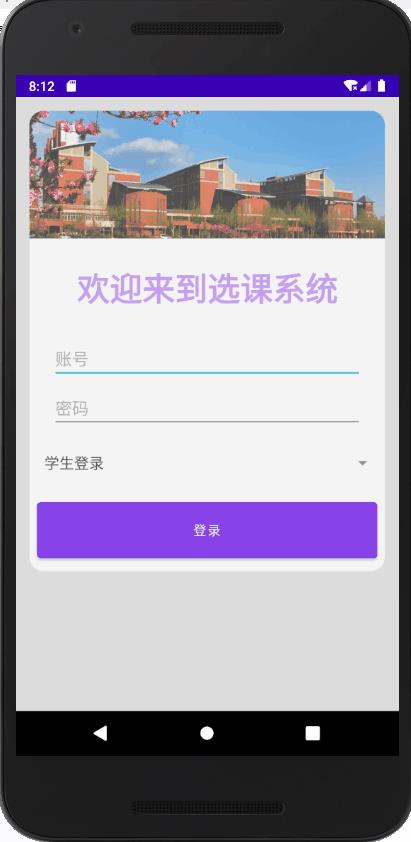
二、登录界面
这个界面经过来来回回地更改,也算是变得好看了点(CardView真好用)
没什么可说的就把布局文件贴出来好了
<?xml version="1.0" encoding="utf-8"?>
<LinearLayout xmlns:android="http://schemas.android.com/apk/res/android"
    xmlns:app="http://schemas.android.com/apk/res-auto"
    xmlns:tools="http://schemas.android.com/tools"
    android:orientation="vertical"
    android:layout_width="match_parent"
    android:layout_height="match_parent"
    android:background="#DCDCDC">


    <androidx.cardview.widget.CardView
        android:id="@+id/cardView"
        android:layout_width="match_parent"
        android:layout_height="wrap_content"
        android:layout_margin="15dp"
        android:alpha="0.7"
        app:cardCornerRadius="15dp"
        app:cardElevation="0dp"
        android:background="@drawable/school"
        app:cardBackgroundColor = "#FFFFFF">

        <LinearLayout
            android:layout_width="match_parent"
            android:layout_height="match_parent"
            android:orientation="vertical">
            <ImageView
                android:layout_width="match_parent"
                android:layout_height="137dp"
                android:background="@drawable/school1" />
            <TextView
                android:id="@+id/tv_college_name"
                android:layout_width="match_parent"
                android:layout_height="wrap_content"
                android:layout_marginTop="30dp"
                android:gravity="center"
                android:text="欢迎来到选课系统"
                android:textColor="@color/purple_200"
                android:textSize="35sp"
                android:textStyle="bold" />
            <EditText
                android:id="@+id/edit_text_1"
                android:layout_width="match_parent"
                android:layout_height="wrap_content"
                android:layout_marginStart="24dp"
                android:layout_marginTop="30dp"
                android:layout_marginEnd="24dp"
                android:hint="@string/prompt_id"
                android:inputType="number"
                android:selectAllOnFocus="true" />
            <EditText
                android:id="@+id/edit_text_2"
                android:layout_width="match_parent"
                android:layout_height="wrap_content"
                android:layout_marginStart="24dp"
                android:layout_marginTop="8dp"
                android:layout_marginEnd="24dp"

                android:hint="@string/prompt_password"
                android:inputType="textPassword"
                android:selectAllOnFocus="true" />
            <Spinner
                android:id="@+id/spin_1"
                android:layout_width="match_parent"
                android:layout_height="wrap_content"
                android:layout_marginTop="12dp"
                android:scrollbarSize="20sp"
                android:spinnerMode="dialog"
                android:text="选择账户类型" />
            <Button
                android:id="@+id/button_1"
                android:layout_width="match_parent"
                android:layout_height="72dp"
                android:layout_marginTop="12dp"
                android:layout_marginBottom="8dp"
                android:layout_marginStart="8dp"
                android:layout_marginEnd="8dp"
                android:layout_gravity="center"
                android:maxLines="1"
                android:shadowColor="#FFF94C87"
                android:text="登录" />
        </LinearLayout>
    </androidx.cardview.widget.CardView>
</LinearLayout>
三、小结
这个部分最难搞的主要还是怎么把数据库连接到SQLserver,自己去寻找方法还是比较头疼的一件事,网上关于如何连接SQLserver的教程其实也不少,但总会多多少少的有些问题,还是自己钻研了一下语句,才做出来的这个登录界面。
如果你也由连接数据库的问题,可以去看看下面这个文章,还是会有帮助的
Android APP连接电脑数据库(以SQL Server为例)
https://blog.csdn.net/qq_40399080/article/details/97630894
以上是关于数据库大作业—— Android studio连接SQLserver数据库登录界面的主要内容,如果未能解决你的问题,请参考以下文章
数据库大作业—— Android studio连接SQLserver数据库登录界面
数据库大作业—— Android studio连接SQLserver数据库登录界面