Docker实现SpringBoot项目的快速构建
Posted AdobePeng
tags:
篇首语:本文由小常识网(cha138.com)小编为大家整理,主要介绍了Docker实现SpringBoot项目的快速构建相关的知识,希望对你有一定的参考价值。
目录
前言:
最近在搞一个单机版项目,我要在linux环境中搞一套开发(DEV)环境,还要再搞一套测试(PRE)环境,上线后当然还要部署一套生成(PRD)环境。项目中要用到工程Jar、Redis、mysql等等
较蠢的办法当然是安装下载源文件、环境配置、工程打包、上传服务器、一个个启动有的进程启动还要有先后顺序,一套环境安装下来就得消耗半个运维。如果不止一个jar包而是微服务多个jar包,如果产品火了市场大卖,那公司得多准备些运维用来消耗
当然牛一点的运维为了保命学会了写sheel脚本,通过shell脚本去执行,效率直接翻倍。
不会shell脚本的运维默默的递交了辞职书

开发偷偷的跑到领导办公室

老板走到连shell都会写的运维面前

公开悄悄话:
别问我怎么知道的,问我我就说

文末有工程git地址,也有微信二维码,欢迎点赞收藏
技术栈:
本文涉及到的技术栈包括:Docker的常规操作、SpringBoot项目制作镜像(DockerFile)、Liquibase的使用
1.Docker图解
我刚接触也一脸闷逼,什么叫镜像,什么叫容器,什么叫数据卷

用一张图来给大家形象的比划一下,当然我们只需要理解一个每个名词的意思是什么,就没必要去搞懂什么一个镜像有多少层,每一层代表什么意思。如果有不准确的地方还望大家指出来。

2.Docker的安装以及使用
2.1.Docker的安装
大家可以参考官网的安装,官网的安装步骤还算详细,也可以直接看下面的步骤,只是对官网做了简单点翻译和删减。
直接复制、粘贴、回车,就搞定了。
2.1.1.卸载旧版本
较旧的Docker版本称为docker或docker-engine。如果已安装这些程序,请卸载它们以及相关的依赖项。
sudo yum remove docker \\
                  docker-client \\
                  docker-client-latest \\
                  docker-common \\
                  docker-latest \\
                  docker-latest-logrotate \\
                  docker-logrotate \\
                  docker-engine
2.1.2安装Docker
在新主机上首次安装Docker Engine之前,需要设置Docker存储库。之后,您可以从存储库安装和更新Docker。
设置存储库
安装yum-utils软件包(提供yum-config-manager 实用程序)并设置稳定的存储库
 sudo yum install -y yum-utils
 sudo yum-config-manager \\
    --add-repo \\
https://download.docker.com/linux/centos/docker-ce.repo安装最新版本的Docker Engine和容器
sudo yum install docker-ce docker-ce-cli containerd.io设置一下开机启动
systemctl enable docker安装完成,启动Docker
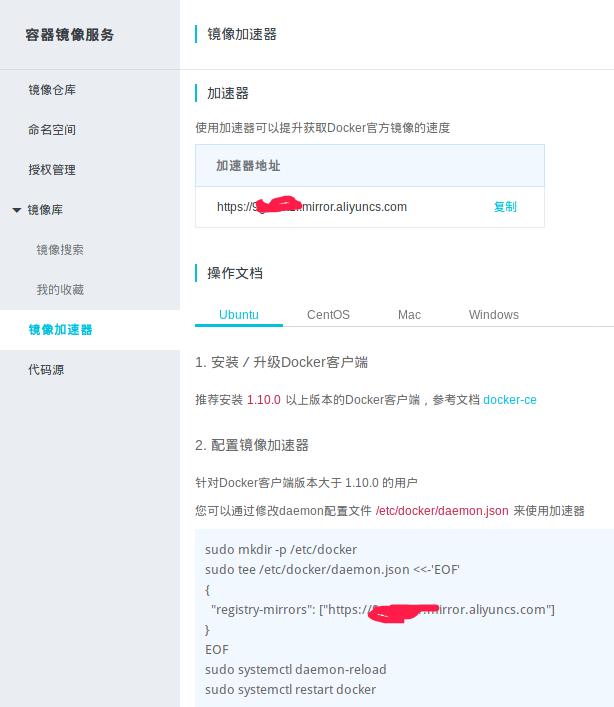
sudo systemctl start docker添加镜像加速,因为docker的镜像仓库在国外,很多镜像下起来贼慢,这里推荐使用阿里的镜像加速
- 访问 https://cr.console.aliyun.com/cn-hangzhou/mirrors,然后点击镜像加速器,会看到如下信息

- 修改/etc/docker/daemon.json 文件,没有的话新增一个如下:
-
[root@adobe2 docker]# touch daemon.json
[root@adobe2 docker]# ls
daemon.json  key.json
[root@adobe2 docker]# nano daemon.json
[root@adobe2 docker]# cat daemon.json

  "registry-mirrors": ["https://******.mirror.aliyuncs.com"]
通过运行hello-world 映像来验证是否正确安装了Docker Engine
sudo docker run hello-world出现如下则说明安装成功,可以看出首先没有找到image(镜像),没找到的情况下会去镜像仓库pull(下载)。
[root@adobe2 ~]#  sudo docker run hello-world
Unable to find image 'hello-world:latest' locally
latest: Pulling from library/hello-world
b8dfde127a29: Already exists
Digest: sha256:f2266cbfc127c960fd30e76b7c792dc23b588c0db76233517e1891a4e357d519
Status: Downloaded newer image for hello-world:latest

Hello from Docker!
This message shows that your installation appears to be working correctly.

To generate this message, Docker took the following steps:
 1. The Docker client contacted the Docker daemon.
 2. The Docker daemon pulled the "hello-world" image from the Docker Hub.
    (amd64)
 3. The Docker daemon created a new container from that image which runs the
    executable that produces the output you are currently reading.
 4. The Docker daemon streamed that output to the Docker client, which sent it
    to your terminal.

To try something more ambitious, you can run an Ubuntu container with:
 $ docker run -it ubuntu bash

Share images, automate workflows, and more with a free Docker ID:
 https://hub.docker.com/

For more examples and ideas, visit:
 https://docs.docker.com/get-started/
这时候输入命令>docker images就可以看到我们本地的镜像了
[root@adobe2 ~]# docker images
REPOSITORY    TAG       IMAGE ID       CREATED       SIZE
hello-world   latest    d1165f221234   7 weeks ago   13.3kB
[root@adobe2 ~]#
2.2.Docker的使用
2.2.1.Docker常用命令
下面列一些docker常用的命令,本文的重点不在这,想学的明白一点的可以自行去官网或者菜鸟教程学习
- docker images 查看本地镜像
- docker ps 查看已经启动的容器
- docker ps -a 查看所有容器
- docker ps -l 查看最近一次启动的容器
- docker run -d -p 80:80 --name "redis_name" --restart=always redis 启动redis,-d表示后台启动,-p标识端口映射(前是对外端口,后是容器内的端口),--name自定义容器名,--restart=always挂了自动重启,还有一个常用的-v命令数据库的挂载。
- docker exec -it redis_name bash 进入容器
- docker stop redis_name 停止容器
- docker rm -f redis_name 删除容器
2.2.2搞个容器玩玩
下载镜像可以到Docker Hub上去查找,拉取镜像。
我们来安装个nginx试试。
[root@adobe2 ~]# docker pull nginx
Using default tag: latest
latest: Pulling from library/nginx
f7ec5a41d630: Pull complete
aa1efa14b3bf: Pull complete
b78b95af9b17: Pull complete
c7d6bca2b8dc: Pull complete
cf16cd8e71e0: Pull complete
0241c68333ef: Pull complete
Digest: sha256:75a55d33ecc73c2a242450a9f1cc858499d468f077ea942867e662c247b5e412
Status: Downloaded newer image for nginx:latest
docker.io/library/nginx:latest
[root@adobe2 ~]# docker images
REPOSITORY    TAG       IMAGE ID       CREATED       SIZE
nginx         latest    62d49f9bab67   13 days ago   133MB
hello-world   latest    d1165f221234   7 weeks ago   13.3kB
可以看到镜像已经拉下来,我们启动一下。Nginx默认端口80,-d 后台运行,-p 80:80 后一个80就是nginx容器中默认访问Nginx的端口,前一个80端口就是通过宿主机暴露出来的端口。
[root@adobe2 ~]# docker run -d -p 80:80 --name nginx01 nginx
7ded1c1ba12ffce86a90153e7ecd3c024aa526c79fa86ec46337f0d8121a359e
[root@adobe2 ~]# docker ps
CONTAINER ID   IMAGE     COMMAND                  CREATED         STATUS         PORTS                               NAMES
7ded1c1ba12f   nginx     "/docker-entrypoint.…"   8 seconds ago   Up 5 seconds   0.0.0.0:80->80/tcp, :::80->80/tcp   nginx01
这时我们打开浏览器输入: <宿主机Ip>:80

可以看到已经启动成功,正好这里我们来将一下 -v 参数的使用
我们现在访问Nginx的这个页面是在Nginx容器中的index.html页面,我们可以通过docker inspect nginx01 查看这个容器的所有信息,里面有一个MergedDir参数就是对应的宿主机中的地址,当然我们正常通过进入到容器中查看
[root@adobe2 html]# docker exec -it nginx01 bash
root@7ded1c1ba12f:/# cd /usr/share/nginx/html/
root@7ded1c1ba12f:/usr/share/nginx/html# ls
50x.html  index.html
root@7ded1c1ba12f:/usr/share/nginx/html# cat index.html
<!DOCTYPE html>
<html>
<head>
<title>Welcome to nginx!</title>
<style>
    body
        width: 35em;
        margin: 0 auto;
        font-family: Tahoma, Verdana, Arial, sans-serif;

</style>
</head>
<body>
<h1>Welcome to nginx!</h1>
<p>If you see this page, the nginx web server is successfully installed and
working. Further configuration is required.</p>

<p>For online documentation and support please refer to
<a href="http://nginx.org/">nginx.org</a>.<br/>
Commercial support is available at
<a href="http://nginx.com/">nginx.com</a>.</p>

<p><em>Thank you for using nginx.</em></p>
</body>
</html>
这时候我们在本地本地根路径下,创建一个/nginx/index.html文件,内容为<h1>adobe 666</h1>,然后通过 -v 命令挂在到容器中/usr/share/nginx/html/这个文件夹下,然后看效果
[root@adobe2 html]# cd ~
[root@adobe2 ~]# ls
anaconda-ks.cfg  original-ks.cfg
[root@adobe2 ~]# mkdir nginx
[root@adobe2 ~]# ls
anaconda-ks.cfg  nginx  original-ks.cfg
[root@adobe2 ~]# cd nginx/
[root@adobe2 nginx]# echo "<h1>di li re ba ai shang wo</h1>" > index.html
[root@adobe2 nginx]# ls
index.html
[root@adobe2 nginx]# cat index.html
<h1>adobe 666</h1>
启动容器
[root@adobe2 nginx]# docker run -d --name nginx02 -p 81:80 -v /root/nginx/:/usr/share/nginx/html/ nginx
377685c7747b242d3eeba796421992fc14b9c633b7a60d31d2419304fbda06b2
[root@adobe2 nginx]#
打开浏览器输入: <宿主机Ip>:81

理解-v的意思了么?再生产中常用到的例如配置文件的挂载,日志的挂载等。

3.Spring Boot项目制作镜像
3.1.创建Springboot项目

该项目中用到的技术包括:mybatis-plus(加上代码生成器)、liquibase
Git代码奉上,请笑纳:
mybatis-plus这个讲就有点麻烦了,大家想用的话可以去学一学,贼好用
大家可能对liquibase有点陌生,这里就针对这个liquibase做个简单的解释
3.1.1.liquibase解释
引入pom
   <dependency>
      <groupId>org.liquibase</groupId>
      <artifactId>liquibase-core</artifactId>
      <version>4.3.1</version>
   </dependency>
application.yml配置,可以看到
liquibase:
change-log: classpath:db/changelog/master.xml
server:
  port: 8080
  servlet:
    context-path: /dockertest

spring:
  application:
    name: dockertest
  datasource:
    driver-class-name: com.mysql.cj.jdbc.Driver
    url: jdbc:mysql://127.0.0.1:3306/dockertest?serverTimezone=GMT%2B8&characterEncoding=utf8&useUnicode=true&useSSL=false
    username: root
    password: root
  jackson:
    date-format: yyyy-MM-dd HH:mm:ss
    time-zone: GMT+8
    serialization:
      write-dates-as-timestamps: false
  liquibase:
    change-log: classpath:db/changelog/master.xml


mybatis-plus:
  configuration:
    map-underscore-to-camel-case: true
    auto-mapping-behavior: full
    log-impl: org.apache.ibatis.logging.stdout.StdOutImpl
  mapper-locations: classpath*:mapper/**/*Mapper.xml
  global-config:
    # 逻辑删除配置
    db-config:
      # 删除前
      logic-not-delete-value: 1
      # 删除后
      logic-delete-value: 0
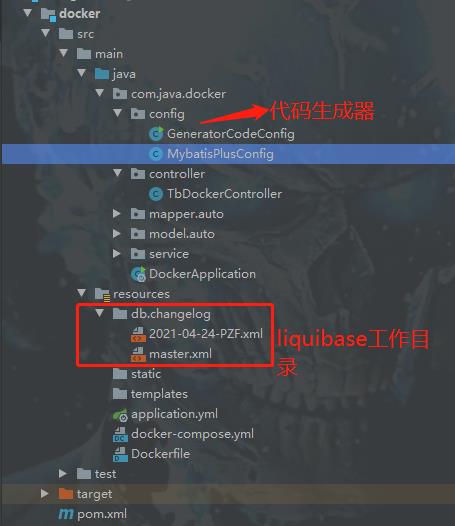
主目录是master.xml
然后你要有脚本的话就自己创建响应的XML文件,然后添加到master.xml中
例如我要初始化一个表tb_docker,我建一个文件 2021-04-24-PZF.xml
<?xml version="1.0" encoding="UTF-8"?>
<databaseChangeLog
        xmlns="http://www.liquibase.org/xml/ns/dbchangelog"
        xmlns:xsi="http://www.w3.org/2001/XMLSchema-instance"
        xsi:schemaLocation="http://www.liquibase.org/xml/ns/dbchangelog http://www.liquibase.org/xml/ns/dbchangelog/dbchangelog-3.1.xsd">

   <changeSet id="add table tb_docker" author="pengzf">
       <sql>
           CREATE TABLE `tb_docker` (
           `id` int(8) NOT NULL AUTO_INCREMENT,
           `name` varchar(16) DEFAULT NULL,
           `age` int(4) DEFAULT NULL,
           PRIMARY KEY (`id`)
           ) ENGINE=InnoDB DEFAULT CHARSET=utf8;
       </sql>
   </changeSet>
   <changeSet id="add data to tb_docker" author="pengzf">
        <sql>
            INSERT INTO tb_docker VALUES (1,"张三",32)
        </sql>
    </changeSet>
</databaseChangeLog>
然后将文件2021-04-24-PZF.xml添加到master.xml中
<?xml version="1.0" encoding="UTF-8" standalone="no"?>
<databaseChangeLog
    xmlns="http://www.liquibase.org/xml/ns/dbchangelog"
    xmlns:xsi="http://www.w3.org/2001/XMLSchema-instance"
    xsi:schemaLocation="http://www.liquibase.org/xml/ns/dbchangelog http://www.liquibase.org/xml/ns/dbchangelog/dbchangelog-3.1.xsd">

    <include file="2021-04-24-PZF.xml" relativeToChangelogFile="true"></include>

</databaseChangeLog>
搞定,就是这么easy

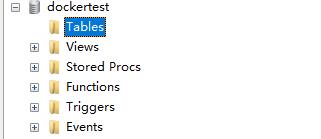
先看一下数据库原来的样子,没有任何表

启动项目之后,可以看到出现三个表,当然tb_docker里面有没有那条张三的记录呢?你猜

大家应该对liquibase有那么点了解了吧?例如我有多个环境,我就不需要每个环境手动执行初始化脚本了,还能保证手动执行带来的不确定性。
我敢打赌不会有问题,如果有问题的话,扫描下方二维码

3.2.制作Dockerfile文件
直接创建一个文件名为Dockerfile
# 指定父镜像,基于java:8运行,
FROM java:8
# 作者
MAINTAINER 15705116160@163.com

VOLUME /tmp
# 本地jar包拷贝到容器中,命名为mydockertest.jar
ADD dockertest.jar mydockertest.jar
# 容器创建时执行一段命令,构建镜像时执行的命令
RUN bash -c 'touch /mydockertest.jar'

ENTRYPOINT ["java","-Djava.-Djava.security.egd=file:/dev/./urandom","-jar","/mydockertest.jar"]
# 暴露出去的端口
EXPOSE 8080
3.3.制作镜像并运行
注意我们linux上面现在没有安装mysql,我们可以先将我们工程里面与数据源链接的地方都注释掉。修改启动文件
@SpringBootApplication(exclude=DataSourceAutoConfiguration.class, HibernateJpaAutoConfiguration.class)排除spring自动加载的数据源配置我在Controller里面写了一个方法
@RestController
@RequestMapping("/tb-docker")
public class TbDockerController
    @GetMapping("/testTwo")
    public String testTwo()
        return "Hello World";
打包,在linux的根路径下创建文件夹springboot,并将jar包和Dockerfile上传进去
[root@adobe2 nginx]# cd ~
[root@adobe2 ~]# ls
anaconda-ks.cfg  nginx  original-ks.cfg
[root@adobe2 ~]# mkdir springboot
[root@adobe2 ~]# cd springboot/
[root@adobe2 springboot]# rz -y

[root@adobe2 springboot]# rz -y
[root@adobe2 springboot]# ls
Dockerfile  dockertest.jar
[root@adobe2 springboot]#
在该文件夹中执行命令docker build -t dockertest:01 .
因为Dockerfile文件就在该文件夹下,所以可以直接运行,否则的话需要-f命令指定Doclerfile文件,容器命名为dockertest,tag为01
[root@adobe2 springboot]# docker build -t dockertest:01 .
Sending build context to Docker daemon  32.67MB
Step 1/7 : FROM java:8
8: Pulling from library/java
5040bd298390: Pull complete
fce5728aad85: Pull complete
76610ec20bf5: Pull complete
60170fec2151: Pull complete
e98f73de8f0d: Pull complete
11f7af24ed9c: Pull complete
49e2d6393f32: Pull complete
bb9cdec9c7f3: Pull complete
Digest: sha256:c1ff613e8ba25833d2e1940da0940c3824f03f802c449f3d1815a66b7f8c0e9d
Status: Downloaded newer image for java:8
 ---> d23bdf5b1b1b
Step 2/7 : MAINTAINER 15705116160@163.com
 ---> Running in ef6e7fd12ded
Removing intermediate container ef6e7fd12ded
 ---> 432a60519029
Step 3/7 : VOLUME /tmp
 ---> Running in 5dceb082dd7f
Removing intermediate container 5dceb082dd7f
 ---> 73ea411a2dba
Step 4/7 : ADD dockertest.jar mydockertest.jar
 ---> c9fb086ece70
Step 5/7 : RUN bash -c 'touch /mydockertest.jar'
 ---> Running in 25048e46dbe0
Removing intermediate container 25048e46dbe0
 ---> 68cb87e03377
Step 6/7 : ENTRYPOINT ["java","-Djava.-Djava.security.egd=file:/dev/./urandom","-jar","/mydockertest.jar"]
 ---> Running in da5ccbf7075b
Removing intermediate container da5ccbf7075b
 ---> dcc12fefa0a5
Step 7/7 : EXPOSE 8080
 ---> Running in 8d1abf6bc4e3
Removing intermediate container 8d1abf6bc4e3
 ---> 2c8c676d582e
Successfully built 2c8c676d582e
Successfully tagged dockertest:01
[root@adobe2 springboot]#
我们可以看到先去下载java8的镜像,后面制作镜像dockertest:01,通过命令docker images查看是否制作成功
[root@adobe2 springboot]# docker images
REPOSITORY    TAG       IMAGE ID       CREATED         SIZE
dockertest    01        2c8c676d582e   2 minutes ago   709MB
nginx         latest    62d49f9bab67   13 days ago     133MB
hello-world   latest    d1165f221234   7 weeks ago     13.3kB
java          8         d23bdf5b1b1b   4 years ago     643MB
[root@adobe2 springboot]#
看到了吧,镜像dockertest:01已经制作成功,那么我现在看看能不能正常启动
[root@adobe2 springboot]# docker run -d -p 8080:8080 dockertest:01
a0ca43ea5f3732cf4477156dec02465571c6a001b05ff2adbc416af4836af6d5
[root@adobe2 springboot]# docker ps
CONTAINER ID   IMAGE           COMMAND                  CREATED         STATUS         PORTS                                       NAMES
a0ca43ea5f37   dockertest:01   "java -Djava.-Djava.…"   5 seconds ago   Up 4 seconds   0.0.0.0:8080->8080/tcp, :::8080->8080/tcp   friendly_haibt
[root@adobe2 springboot]#
正常启动,访问页面方法:<宿主机Ip>:8080/dockertest/tb-docker/testTwo,返回正常

最后附上工程git地址,大家可以下载下来参考参考。
git地址:https://gitee.com/adobepzf/docker-test.git
微信:
以上是关于Docker实现SpringBoot项目的快速构建的主要内容,如果未能解决你的问题,请参考以下文章