我与solr--导入mysql数据库
Posted
tags:
篇首语:本文由小常识网(cha138.com)小编为大家整理,主要介绍了我与solr--导入mysql数据库相关的知识,希望对你有一定的参考价值。
步骤1:
在webapps中solrhome下新建一个文件夹名字叫做mynode(名字不固定,可以随便取,但是这个名字在后面的配置中会有所关联。)然后在mynode文件下新建一个名字叫做conf的文件夹(这个文件名字最后不要改。)然后把官网下下来的solr项目中solr-6.0.0\server\solr\configsets\data_driven_schema_configs\conf下的所有东西复制到conf中去。(注意不要复制错!)最后把solr-6.0\solr-6.0.0\example\example-DIH\solr\db\conf下的admin-extra.html, admin-extra.menu-bottom.html ,admin-extra.menu-top.html三个文件也复制到conf中去。
步骤2:
把mysql所需的jar包和solr-6.0\solr-6.0.0\dist下的solr-dataimporthandler-6.0.0.jar和solr-dataimporthandler-extras-6.0.0.jar都复制到项目WEB-INF\lib下。然后在solrconfig.xml文件中加入<lib dir="D:/编程工具/tomcat/apache-tomcat-8.0.32-windows-x64/apache-tomcat-8.0.32/webapps/solr/WEB-INF/lib/" regex=".*\.jar" />(就是把WEB-INF\lib里面的jar包配置到项目中,我这里用的是绝对地址。这段代码大约在solrconfig.xml的70多行处,前面有一堆类似的代码。)
记得将mysql驱动包mysql-connector-java-5.1.18-bin.jar加入到“/tomcat/apache-tomcat-8.0.32-windows-x64/apache-tomcat-8.0.32/webapps/solr/WEB-INF/lib/”目录下。
步骤3:
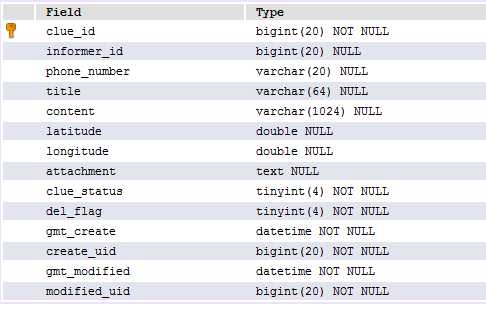
确定我们需要导入的mysql数据库表。

步骤4:
1、在conf下新建data-config.xml文件。里面内容如下
<?xml version="1.0" encoding="UTF-8"?>
<dataConfig>
    <dataSource name="source1" type="JdbcDataSource" driver="com.mysql.jdbc.Driver"
                url="jdbc:mysql://192.168.1.12:33060/in_gs_0809" user="admin" password="123456"
                batchSize="-1"/>

    <document>
        <entity name="clue" pk="clue_id" dataSource="source1"
                query="select * from  clue"
                deltaImportQuery="select * from clue where clue_id=‘${dih.delta.clue_id}‘"
                deltaQuery="select clue_id from clue where gmt_modified> ‘${dataimporter.last_index_time}‘">

            <field column="clue_id" name="id"/>
            <field column="informer_id" name="informer_id"/>
            <field column="title" name="title"/>
            <field column="content" name="content"/>

            <field column="latitude" name="latitude"/>
            <field column="longitude" name="longitude"/>
            <field column="attachment" name="attachment"/>
            <field column="clue_status" name="clue_status"/>

            <field column="del_flag" name="del_flag"/>
            <field column="gmt_create" name="gmt_create"/>
            <field column="create_uid" name="create_uid"/>
            <field column="gmt_modified" name="gmt_modified"/>
            <field column="modified_uid" name="modified_uid"/>
        </entity>

    </document>
</dataConfig>
说明:
dataSource是数据库数据源。Entity就是一张表对应的实体,pk是主键,query是查询语句。Field对应一个字段,column是数据库里的column名,后面的name属性对应着Solr的Filed的名字(clue_id对应的是schema.xml中的id)。其中solrdata是数据库名,clue是表名。
其中deltaQuery是增量索引,原理是从数据库中根据deltaQuery指定的SQL语句查询出所有需要增量导入的数据的ID号。然后根据deltaImportQuery指定的SQL语句返回所有这些ID的数据,即为这次增量导入所要处理的数据。核心思想是:通过内置变量“${dih.delta.clue_id}”和 “${dataimporter.last_index_time}”来记录本次要索引的id和最近一次索引的时间。
2、在solrconfig.xml的 <requestHandler name="/select" class="solr.SearchHandler">之上添加
<requestHandler name="/dataimport" class="org.apache.solr.handler.dataimport.DataImportHandler">
      <lst name="defaults">
         <str name="config">data-config.xml</str>
      </lst>
 </requestHandler>
3、在conf下面复制managed-schema文件,并重命名为"schema.xml"。修改如下内容:
<field name="id" type="long" indexed="true" stored="true" required="true"/>
    <field name="informer_id" type="long" indexed="true" stored="false"/>
    <field name="phone_number" type="string" indexed="true" stored="false"/>

    <field name="title" type="string" indexed="true" stored="true" />
    <field name="content" type="string" indexed="true" stored="true" />
    <field name="latitude" type="string" indexed="true" stored="true" />
    <field name="longitude" type="string" indexed="true" stored="true" />
    <field name="attachment" type="string" indexed="true" stored="true" />

    <field name="clue_status" type="int" indexed="true" stored="true" />
    <field name="del_flag" type="int" indexed="true" stored="true" />
    <field name="gmt_create" type="date" indexed="true" stored="true" />
    <field name="create_uid" type="long" indexed="true" stored="true" />
    <field name="gmt_modified" type="date" indexed="true" stored="true" />
    <field name="modified_uid" type="long" indexed="true" stored="true" />

    <!--<field name="id" type="string" indexed="true" stored="true"  multiValued="false" />-->
    <field name="_version_" type="long" indexed="true" stored="false"/><!--已存在-->
    <field name="_root_" type="string" indexed="true" stored="false" docValues="false" /><!--已存在-->
    <field name="_text_" type="text_general" indexed="true" stored="false" multiValued="true"/><!--已存在-->
PS:managed-schema是schema.xml文件的一个管理文件,schema.xml文件中的数据会被写入到managed-schema中去,如果出现运行异常的话(从日志中查看),可以检查该文件。
步骤5:
启动tomcat,并在URL中输入http://127.0.0.1:8080/solr/index.html路径。选择Core admin 输入如下设置:
将managed-schema改成schema.xml(应该是要改的)
设置好之后,点击Add Core按钮,进行设置,设置成功后,再core Selector选择刚刚添加的mynode。
选择刚刚添加的goods实体进行索引操作:我们这儿可以选择full-import或者delta-import(增量索引),选择增量索引需要把clean的勾给去掉,不然会清除之前的,增量的索引的初衷是对新增或者修改的记录重新索引,会追加到原有的索引文件当中。当我们选择full-import的时候,最好就是把原有的索引文件给清空重新索引。
索引成功如下如所示:
配置过程中出现的问题
1、找不到mysql驱动。解决方式:步骤2中加入mysql驱动包。
2、miss unqiue id 以及miss clue_id... 将data_config.xml里面的字段name与schema.xml里面字段对应,然后检查managed-schema里面的字段是否包含schema.xml中字段,是否存在重复。
3、数据导入进去却查询不出来,多重启几次服务器。
下一篇介绍查询与字段配置的东东。。科科。
以上是关于我与solr--导入mysql数据库的主要内容,如果未能解决你的问题,请参考以下文章


