Redis集群搭建完整流程演示
Posted
tags:
篇首语:本文由小常识网(cha138.com)小编为大家整理,主要介绍了Redis集群搭建完整流程演示相关的知识,希望对你有一定的参考价值。
Redis集群搭建完整流程演示前言
? 前面讲述了有关redis的编译安装流程以及其配置优化的部分内容,本文旨在本地模拟redis服务器集群搭建的流程演示。
Redis集群的作用是什么?
? 在实验部署开始前,我们需要明白为什么需要搭建Redis集群,其解决了什么样的问题?又有哪些优势。我们可以从单一的Redis服务器来探究这个问题。
单一Redis服务器存在的问题
? 如果部署过mysql主从复制读写分离以及MHA高可用的话,这里就非常容易想到单一Redis服务器所存在的问题,主要有以下几点:
1)存在单点故障;
2)不满足高并发的需求;
3)数据丢失引发灾难(容错率非常低);
...
而解决这样的问题,最容易想到的就是将存储备份,且进行横向扩展。这就需要我们搭建Redis集群来满足业务需求了。
Redis集群介绍简述
? Redis集群是一个提供在多个Redis间节点共享数据的程序集
? Redis集群并不支持多处理多个Keys的命令,应为这需要在不同节点间移动数据,从而达不到像Redis那样的性能,在高负载的情况下可能会导致不可预料的错误
? Redis集群通过分区来提供一定程度的可用性,在实际环境中档某个节点宕机或则不可达的情况下继续处理命令
Redis集群优势:
自动分割数据到不同节点上
整个集群的部分节点失败或不可达的情况下依旧可以处理业务指令
Redis集群的数据分片
? Redis集群没有使用一致性hash,而是引入了哈希槽的概念。Redis集群总共有16384个哈希槽(0-16383),每个Key通过CRC16校验后对16384取模来决定如何进行存放,集群的每个节点负责一部分的hash槽。
? 在Redis集群中,支持添加或者删除节点,且无需停止服务。
下面开始真正来模拟实现Redis集群搭建:
环境:Centos7.4两台,每台配置三张网卡(NAT模式)
模拟为master节点的ip:20.0.0.139 20.0.0.144 20.0.0.145
模拟为slave节点的ip:20.0.0.140 20.0.0.142 20.0.0.143
配置流程
master节点:
1、安装编译环境及所需依赖库
[root@localhost ~]# yum install cpp binutils glibc-kernheaders glibc-common glibc-devel gcc gcc-c++ make wget -y2、自行选择离线安装还是在线安装(离线安装前面的文章已有,此处选择在线安装)
[root@localhost ~]# wget http://download.redis.io/releases/redis-5.0.7.tar.gz  #下载安装包,这里是5.0.7版本的redis数据库

[root@localhost ~]# tar zxvf redis-5.0.7.tar.gz #解压
[root@localhost ~]# mv redis-5.0.7 /usr/local/redis #重命名
[root@localhost ~]# cd /usr/local/redis
[root@localhost redis]# make #编译
[root@localhost redis]# cd src/
[root@localhost src]# make install  #安装
3、修改配置文件
[root@localhost src]# cd ..
[root@localhost redis]# ls
00-RELEASENOTES  COPYING  Makefile   redis.conf       runtest-moduleapi  src
BUGS             deps     MANIFESTO  runtest          runtest-sentinel   tests
CONTRIBUTING     INSTALL  README.md  runtest-cluster  sentinel.conf      utils
[root@localhost redis]# vim redis.conf
#对下面的参数进行修改配置
bind 127.0.0.1  #注释第70行的监听127地址,表示监听所有地址
protected-mode no   #去掉第89行注释关闭安全保护
daemonize yes   #去掉第137行注释,以独立进程启动
cluster-enabled yes #去掉第833行注释,开启群集功能
cluster-config-file nodes-6379.conf #去掉第841行注释,群集名称文件设置
cluster-node-timeout 15000  #去掉第847行注释,群集超时时间设置
appendonly yes  #去掉第700行注释,开启aof持久化‘
4、优化配置并开启redis服务
[root@localhost redis]# mkdir -p /etc/redis
[root@localhost redis]# ln -s /usr/local/redis/redis.conf /etc/redis/6379.conf   #(在默认的配置文件路劲中放置配置文件)
[root@localhost redis]# ln -s /usr/local/redis/utils/redis_init_script /etc/init.d/redisd    #(将初始化文件配置到系统自启动的文件夹内,redisd为服务名,可自行修改)
[root@localhost redis]# service redisd start   #(开启redis服务,服务名为:redisd)
[root@localhost redis]# netstat -ntpl|grep redis
[root@localhost redis]# systemctl stop firewalld
[root@localhost redis]# setenforce 0
从服务器按照上述流程配置即可
下面对mater服务器继续配置
[root@localhost redis]# yum -y install ruby rubygems #安装redis集群控制软件工具

[root@localhost ~]# ls
anaconda-ks.cfg       redis-3.2.0.gem     模板  图片  下载  桌面
initial-setup-ks.cfg   公共   视频  文档  音乐

[root@localhost ~]# gem install redis --version 3.2.0
5、检查两台服务器的redis服务是否都开启,准备开始模拟创建集群
[root@localhost ~]# cd /usr/local/redis/src/
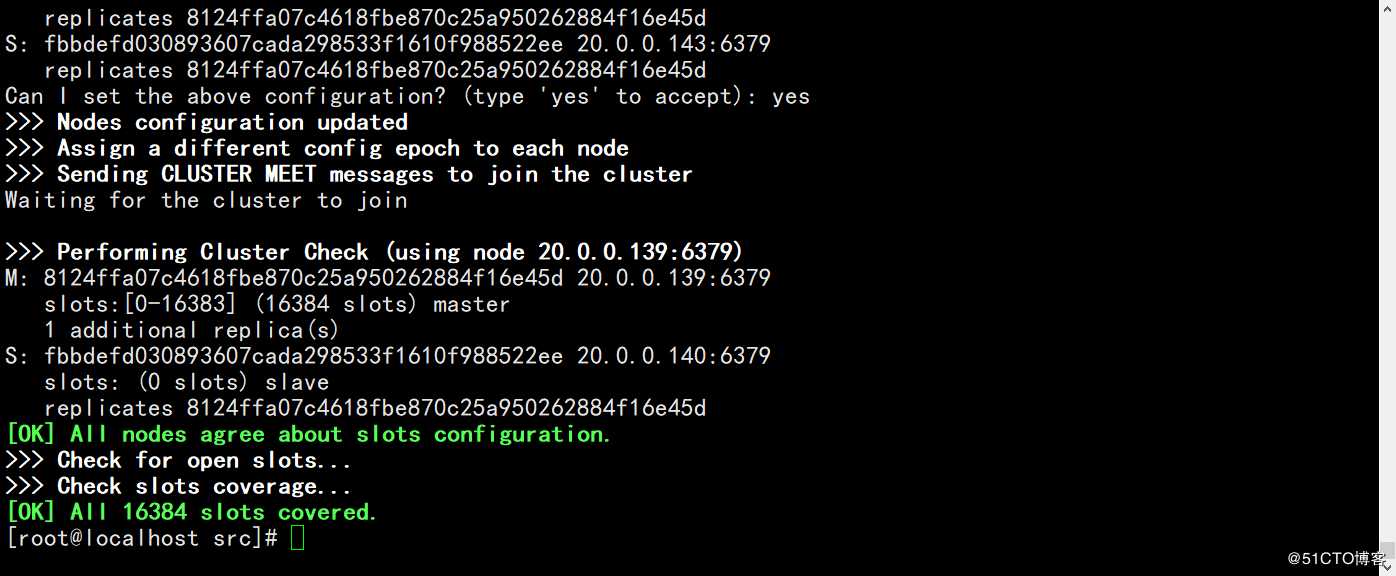
[root@localhost src]# redis-cli --cluster create 20.0.0.139:6379 20.0.0.144:6379 20.0.0.145:6379 20.0.0.140:6379 20.0.0.142:6379 20.0.0.143:6379 --cluster-replicas 1
>>> Performing hash slots allocation on 6 nodes...
Master[0] -> Slots 0 - 5460
Master[1] -> Slots 5461 - 10922
Master[2] -> Slots 10923 - 16383
Adding replica 20.0.0.142:6379 to 20.0.0.139:6379
Adding replica 20.0.0.143:6379 to 20.0.0.144:6379
Adding replica 20.0.0.140:6379 to 20.0.0.145:6379
M: 8124ffa07c4618fbe870c25a950262884f16e45d 20.0.0.139:6379
   slots:[0-16383] (5461 slots) master
M: 8124ffa07c4618fbe870c25a950262884f16e45d 20.0.0.144:6379
   slots:[0-16383] (5462 slots) master
M: 8124ffa07c4618fbe870c25a950262884f16e45d 20.0.0.145:6379
   slots:[0-16383] (5461 slots) master
S: fbbdefd030893607cada298533f1610f988522ee 20.0.0.140:6379
   replicates 8124ffa07c4618fbe870c25a950262884f16e45d
S: fbbdefd030893607cada298533f1610f988522ee 20.0.0.142:6379
   replicates 8124ffa07c4618fbe870c25a950262884f16e45d
S: fbbdefd030893607cada298533f1610f988522ee 20.0.0.143:6379
   replicates 8124ffa07c4618fbe870c25a950262884f16e45d
Can I set the above configuration? (type ‘yes‘ to accept): yes #这里输入yes即可
>>> Nodes configuration updated
>>> Assign a different config epoch to each node
>>> Sending CLUSTER MEET messages to join the cluster
Waiting for the cluster to join #几秒左右

>>> Performing Cluster Check (using node 20.0.0.139:6379)
M: 8124ffa07c4618fbe870c25a950262884f16e45d 20.0.0.139:6379
   slots:[0-16383] (16384 slots) master
   1 additional replica(s)
S: fbbdefd030893607cada298533f1610f988522ee 20.0.0.140:6379
   slots: (0 slots) slave
   replicates 8124ffa07c4618fbe870c25a950262884f16e45d
[OK] All nodes agree about slots configuration.
>>> Check for open slots...
>>> Check slots coverage...
[OK] All 16384 slots covered.
或参考下图

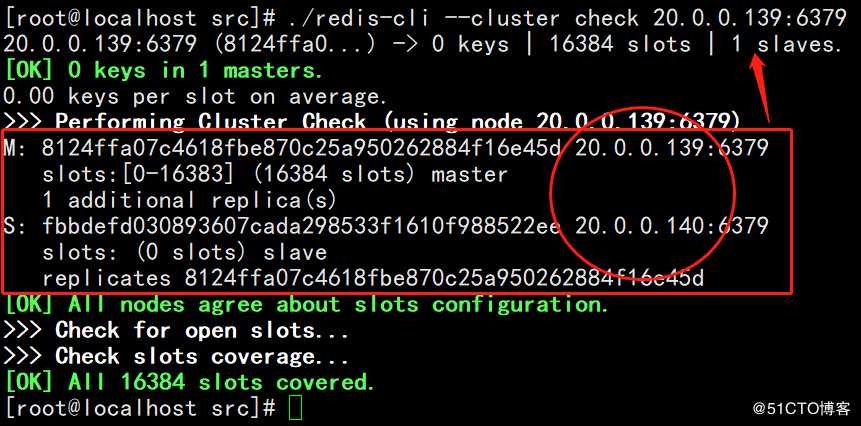
6、系统检查一下:

?
7、验证数据写入与读取
[root@localhost ~]# redis-cli -h 20.0.0.140 -p 6379 -c #远程登录
20.0.0.140:6379> set popda 5
-> Redirected to slot [13275] located at 20.0.0.139:6379
OK
20.0.0.139:6379> exit
[root@localhost ~]# redis-cli -h 20.0.0.142 -p 6379 -c
20.0.0.142:6379> get popda
-> Redirected to slot [13275] located at 20.0.0.139:6379
"5"
20.0.0.139:6379>
当然,部署Redis集群的方式方案还有很多,使用容器部署(如docker)已经成为大家所喜爱的一直方式了。
以上是关于Redis集群搭建完整流程演示的主要内容,如果未能解决你的问题,请参考以下文章