Java学习笔记网格袋布局
Posted 我们都曾拥有最美的时光
tags:
篇首语:本文由小常识网(cha138.com)小编为大家整理,主要介绍了Java学习笔记网格袋布局相关的知识,希望对你有一定的参考价值。
网格袋布局类似于Win8的Metro布局,用于将组件按大小比例放在不同位置的网格内,各组件的实际大小会随着窗口的改变而改变,但相对位置不变,能够很好的适应屏幕。
通过阅读《21天学通Java》这本书,发现了一个布局组件的很好的例子,遂摘录下来,供分享和复习。
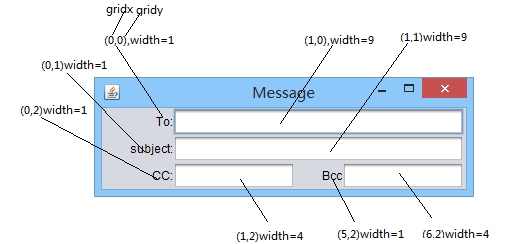
在这本书中,举了一个邮件窗口的例子,需要的布局规划如下:
其中,二维坐标表示网格相对位置,以(0,0)为网格的起点,横x竖y,后面的width指的是横向跨越的单元格数。注意,网格是由一个或多个单元格组成的整体。
常用属性有;
gridx gridy: 单元格位置,如果跨越多个格则为左上角位置
gridwidth gridheight: 组件水平、垂直方向跨越的格数
weightx weighty: 组件相对于同一行、列内其他组件的大小(相对权重)
fill: 水平或者垂直方向拉伸,可选属性如下(实质int)
GridBagConstraints内的常成员:NONE HORIZONTAL VERITAL BOTH
anchor: 对齐方式,可选属性如下(实质int)
GridBagConstraints内的常成员:WEST EAST 分别为向左、右单元格对齐
为了能够简化代码,可以制作一个布局方法,每次只需要调用方法遍完成一个组件的布局。示例代码如下:
import java.awt.*;
import javax.swing.*;

public class learn3 extends JFrame
    GridBagLayout gridbag = new GridBagLayout();
    public learn3()
        super("Message");
        setSize(380,120);
        setDefaultCloseOperation(JFrame.EXIT_ON_CLOSE);
        setLookAndFeel();
        setLayout(gridbag);
        JLabel toLabel = new JLabel("To:");
        JTextField to = new JTextField();
        JLabel subjectLabel = new JLabel("subject:");
        JTextField subject = new JTextField();
        JLabel ccLabel = new JLabel("CC:");
        JTextField cc = new JTextField();
        JLabel bccLabel = new JLabel("Bcc");
        JTextField bcc = new JTextField();
        addComponent(toLabel,0,0,1,1,10,100,GridBagConstraints.NONE,
        GridBagConstraints.EAST);
        addComponent(to,1,0,9,1,90,100,GridBagConstraints.HORIZONTAL,
        GridBagConstraints.WEST);
        addComponent(subjectLabel,0,1,1,1,10,100,GridBagConstraints.NONE,
        GridBagConstraints.EAST);
        addComponent(subject,1,1,9,1,90,100,GridBagConstraints.HORIZONTAL,
        GridBagConstraints.WEST);
        addComponent(ccLabel,0,2,1,1,10,100,GridBagConstraints.NONE,
        GridBagConstraints.EAST);
        addComponent(cc,1,2,4,1,40,100,GridBagConstraints.HORIZONTAL,
        GridBagConstraints.WEST);
        addComponent(bccLabel,5,2,1,1,10,100,GridBagConstraints.NONE,
        GridBagConstraints.EAST);
        addComponent(bcc,6,2,4,1,40,100,GridBagConstraints.HORIZONTAL,
        GridBagConstraints.WEST);
        setVisible(true);


   private void addComponent(Component comp,int gridx,int gridy
    ,int gridwidth, int gridheight, int weightx, int weighty,
    int fill, int anchor)

       GridBagConstraints constraint = new GridBagConstraints();
       constraint.gridx = gridx;
       constraint.gridy = gridy;
       constraint.gridwidth = gridwidth;
       constraint.gridheight = gridheight;
       constraint.weightx = weightx;
       constraint.weighty = weighty;
       constraint.fill = fill;
       constraint.anchor = anchor;
       gridbag.setConstraints(comp, constraint);
       add(comp);


    private void setLookAndFeel()
        try
            UIManager.setLookAndFeel(
            "com.sun.java.swing.plaf.nimbus.NimbusLookAndFeel"
            );
            SwingUtilities.updateComponentTreeUI(this);

        catch(Exception exc)
            //ignore error


public static void main(String[] args)
    learn3 learn = new learn3();
以上是关于Java学习笔记网格袋布局的主要内容,如果未能解决你的问题,请参考以下文章
