oracle rac搭建
Posted Xuwenxing
tags:
篇首语:本文由小常识网(cha138.com)小编为大家整理,主要介绍了oracle rac搭建相关的知识,希望对你有一定的参考价值。
一、安装前
- 软件及操作系统版本
虚拟机软件:VMware-12.5
操作系统:Centos6.8
Oracle软件:Oracle 11g R2
本篇所有安装介质和文档皆可以在文末关注微信公众号后回复:oraclerac获得
2.配置虚拟机
这里,我们需要在 VMware 的虚拟主机上创建两台虚拟机,其中每台
机器至少需要配置双网卡,一块网卡作为 Public,另一块作为 Private,建议 IP 地址均选择
手动配置,而不是 DHCP 动态分配,且要求指定的 IP 在网络里是唯一的。主机名也分别要求指定为唯一,避免冲突。主机名、IP 地址在前期规划要慎重,一经指定,最好不要轻易改变,避免一些不必要的麻烦。这里列出两台机器前期规划的主机名、IP 地址信息:

其中,每台机器至少需要配置 3 个 IP 地址,在安装操作系统的过程中,我们需要配置
公网 IP 和私有 IP 即可,虚拟 IP 在安装集群件时分配。Public IP、Virtual IP、SCAN IP 必
须配置在同一网段。SCAN IP 是 Oracle 11g 新推出的,在配置 11g RAC 时需要指定。我们
的 SCAN IP 通过配置 DNS 服务器来实现,在下文中将给出配置步骤。
3.创建虚拟机满足下列条件:
(1)双网卡
(2)2G内存
(3)2核CPU
(4)iSCSI格式20G硬盘
- 启动虚拟机安装操作系统:
正常装就行swap分区记得留大一点
node1主机名为oracle92
node2主机名为oralce93
- IP配置及配置hosts文件,双节点保持一致
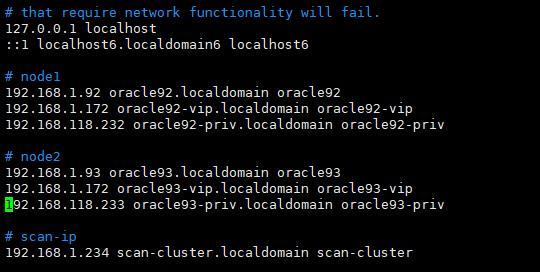
配置检查


此文档不配置DNS
- 建用户、改口令、修改用户配置文件:
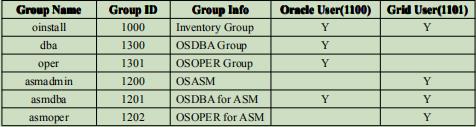
配置 11gR2 RAC 需要安装 Oracle Grid Infrastructure 软件、Oracle 数据库软件,其中 Grid软件等同于 Oracle 10g 的 Clusterware 集群件。Oracle 建议以不同的用户分别安装 Grid Infrastructure 软件、Oracle 数据库软件,我们这里以 grid 用户安装 Grid Infrastructure,oracle用户安装 Oracle 数据库软件。并且 grid、oracle 用户需要属于不同的用户组。在配置 RAC时,还要求这两个用户在 RAC 的不同节点上 uid、gid 要一致。用户、组的对应信息见下表:
执行一下脚本完成成用户、组的创建


 1 #!/bin/bash
 2 #Purpose:Create 6 groups named \'oinstall\',\'dba\',\'asmadmin\',\'asmdba\',\'asmoper\',\'oper\', plus 2 users named \'oracle\',\'grid\'.
 3 #Also setting the Environment
 4 #variable for oracle user.
 5 #variable for grid user.
 6 #Usage:Log on as the superuser(\'root\'),and then execute the command:#./1preusers.sh
 7 #Author:Asher Huang
 8 echo "Now create 6 groups named \'oinstall\',\'dba\',\'asmadmin\',\'asmdba\',\'asmoper\',\'oper\'"
 9 echo "Plus 2 users named \'oracle\',\'grid\',Also setting the Environment"
10 groupadd -g 1000 oinstall
11 groupadd -g 1200 asmadmin
12 groupadd -g 1201 asmdba
13 groupadd -g 1202 asmoper
14 useradd -u 1100 -g oinstall -G asmadmin,asmdba,asmoper,dba -d /home/grid -s /bin/bash -c "grid Infrastructure Owner" grid
15 echo "grid" | passwd --stdin grid
16 echo \'export PS1="`/bin/hostname -s`-> "\'>> /home/grid/.bash_profile
17 echo "export TMP=/tmp">> /home/grid/.bash_profile
18 echo \'export TMPDIR=$TMP\'>>/home/grid/.bash_profile
19 echo "export ORACLE_SID=+ASM1">> /home/grid/.bash_profile
20 echo "export ORACLE_BASE=/u01/app/grid">> /home/grid/.bash_profile
21 echo "export ORACLE_HOME=/u01/app/11.2.0/grid">> /home/grid/.bash_profile
22 echo "export ORACLE_TERM=xterm">> /home/grid/.bash_profile
23 echo "export NLS_DATE_FORMAT=\'yyyy/mm/dd hh24:mi:ss\'" >> /home/grid/.bash_profile
24 echo \'export TNS_ADMIN=$ORACLE_HOME/network/admin\' >> /home/grid/.bash_profile
25 echo \'export PATH=/usr/sbin:$PATH\'>> /home/grid/.bash_profile
26 echo \'export PATH=$ORACLE_HOME/bin:$PATH\'>> /home/grid/.bash_profile
27 echo \'export LD_LIBRARY_PATH=$ORACLE_HOME/lib:/lib:/usr/lib\'>>
28 /home/grid/.bash_profile
29 echo \'export CLASSPATH=$ORACLE_HOME/JRE:$ORACLE_HOME/jlib:$ORACLE_HOME/rdbms/jlib\'>> /home/grid/.bash_profile
30 echo "export EDITOR=vi" >> /home/grid/.bash_profile
31 echo "export LANG=en_US" >> /home/grid/.bash_profile
32 echo "export NLS_LANG=american_america.AL32UTF8" >> /home/grid/.bash_profile
33 echo "umask 022">> /home/grid/.bash_profile
34 groupadd -g 1300 dba
35 groupadd -g 1301 oper
36 useradd -u 1101 -g oinstall -G dba,oper,asmdba -d /home/oracle -s /bin/bash -c "Oracle Software Owner" oracle
37 echo "oracle" | passwd --stdin oracle
38 echo \'export PS1="`/bin/hostname -s`-> "\'>> /home/oracle/.bash_profile
39 echo "export TMP=/tmp">> /home/oracle/.bash_profile
40 echo \'export TMPDIR=$TMP\'>>/home/oracle/.bash_profile
41 echo "export ORACLE_HOSTNAME=oracle92.localdomain">> /home/oracle/.bash_profile
42 echo "export ORACLE_SID=devdb1">> /home/oracle/.bash_profile
43 echo "export ORACLE_BASE=/u01/app/oracle">> /home/oracle/.bash_profile
44 echo \'export ORACLE_HOME=$ORACLE_BASE/product/11.2.0/db_1\'>> /home/oracle/.bash_profile
45 echo "export ORACLE_UNQNAME=devdb">> /home/oracle/.bash_profile
46 echo \'export TNS_ADMIN=$ORACLE_HOME/network/admin\' >> /home/oracle/.bash_profile
47 echo "export ORACLE_TERM=xterm">> /home/oracle/.bash_profile
48 echo \'export PATH=/usr/sbin:$PATH\'>> /home/oracle/.bash_profile
49 echo \'export PATH=$ORACLE_HOME/bin:$PATH\'>> /home/oracle/.bash_profile
50 echo \'export LD_LIBRARY_PATH=$ORACLE_HOME/lib:/lib:/usr/lib\'>> /home/oracle/.bash_profile
51 echo \'export CLASSPATH=$ORACLE_HOME/JRE:$ORACLE_HOME/jlib:$ORACLE_HOME/rdbms/jlib\'>> /home/oracle/.bash_profile
52 echo "export EDITOR=vi" >> /home/oracle/.bash_profile
53 echo "export LANG=en_US" >> /home/oracle/.bash_profile
54 echo "export NLS_LANG=american_america.AL32UTF8" >> /home/oracle/.bash_profile
55 echo "export NLS_DATE_FORMAT=\'yyyy/mm/dd hh24:mi:ss\'" >> /home/oracle/.bash_profile
56 echo "umask 022">> /home/oracle/.bash_profile
57 echo "The Groups and users has been created"
58 echo "The Environment for grid,oracle also has been set successfully"
在节点oracle93 上执行该脚本时,需要将grid 用户环境变量ORACLE_SID 修改为+ASM2,
oracle 用户环境变量ORACLE_SID 修改为devdb2,
ORACLE_HOSTNAME 环境变量修改为oracle93.localdomain
[root@oracle92 shell]# id grid
uid=1100(grid) gid=1000(oinstall)
groups=1000(oinstall),1200(asmadmin),1201(asmdba),1202(asmoper)
[root@oracle92 shell]# id oracle
uid=1101(oracle) gid=1000(oinstall)
groups=1000(oinstall),1201(asmdba),1300(dba),1301(oper)
7.建路径、改权限:
关于 grid、oracle 用户的环境变量配置信息,见下述表格

执行下面脚本来完成相关路径、权限的配置。
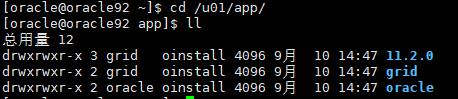
#!/bin/bash
#Purpose:Create the necessary directory for oracle,grid users and change the authention to oracle,grid users.
#Usage:Log on as the superuser(\'root\'),and then execute the command:#./2predir.sh
#Author:Asher Huang
echo "Now create the necessary directory for oracle,grid users and change the authention to oracle,grid users..."
mkdir -p /u01/app/grid
mkdir -p /u01/app/11.2.0/grid
mkdir -p /u01/app/oracle
chown -R oracle:oinstall /u01
chown -R grid:oinstall /u01/app/grid
chown -R grid:oinstall /u01/app/11.2.0
chmod -R 775 /u01
echo "The necessary directory for oracle,grid users and change the authention to oracle,grid users has been finished"
8.修改/etc/security/limits.conf,配置 oracle 、 grid 用户的
shell 限制:
执行下面脚本完成。
#!/bin/bash
#Purpose:Change the /etc/security/limits.conf.
#Usage:Log on as the superuser(\'root\'),and then execute the command:#./3prelimits.sh
#Author:Asher Huang
echo "Now modify the /etc/security/limits.conf,but backup it named /etc/security/limits.conf.bak before"
cp /etc/security/limits.conf /etc/security/limits.conf.bak
echo "oracle soft nproc 2047" >>/etc/security/limits.conf
echo "oracle hard nproc 16384" >>/etc/security/limits.conf
echo "oracle soft nofile 1024" >>/etc/security/limits.conf
echo "oracle hard nofile 65536" >>/etc/security/limits.conf
echo "grid soft nproc 2047" >>/etc/security/limits.conf
echo "grid hard nproc 16384" >>/etc/security/limits.conf
echo "grid soft nofile 1024" >>/etc/security/limits.conf
echo "grid hard nofile 65536" >>/etc/security/limits.conf
echo "Modifing the /etc/security/limits.conf has been succeed."
9.修改/etc/pam.d/login配置文件
#!/bin/bash
#Purpose:Modify the /etc/pam.d/login.
#Usage:Log on as the superuser(\'root\'),and then execute the command:#./4prelimits.sh
#Author:Asher Huang
echo "Now modify the /etc/pam.d/login,but with a backup named /etc/pam.d/login.bak"
cp /etc/pam.d/login /etc/pam.d/login.bak
echo "session required /lib/security/pam_limits.so" >>/etc/pam.d/login
echo "session required pam_limits.so" >>/etc/pam.d/login
echo "Modifing the /etc/pam.d/login has been succeed."
以上是关于oracle rac搭建的主要内容,如果未能解决你的问题,请参考以下文章