LINUX——关于mysql中较详细的,数据库的主从配置,自动备份以及读写分离的使用
Posted
tags:
篇首语:本文由小常识网(cha138.com)小编为大家整理,主要介绍了LINUX——关于mysql中较详细的,数据库的主从配置,自动备份以及读写分离的使用相关的知识,希望对你有一定的参考价值。
1.主从简介
数据在企业中是非常重要的一部分,存储数据的数据库多种多用样,但却都存在着一种隐患
·数据库数据丢失
·数据库访问人数较多时,一台数据库无法保证服务质量
2.主从的作用
·实时灾备,用于故障切换
·读写分离,提供查询服务
·备份,避免影响业务
3.主从形式
·一主一丛
·主主复制
·一主多从
·多主一丛
·联级复制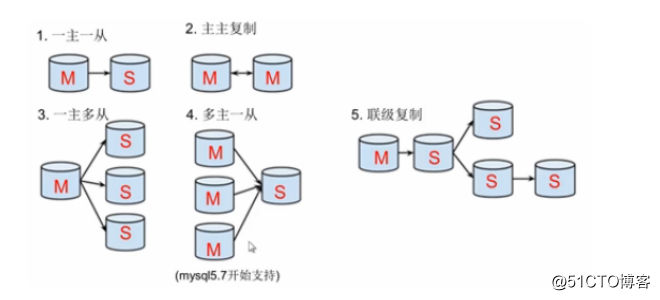
主从复制原理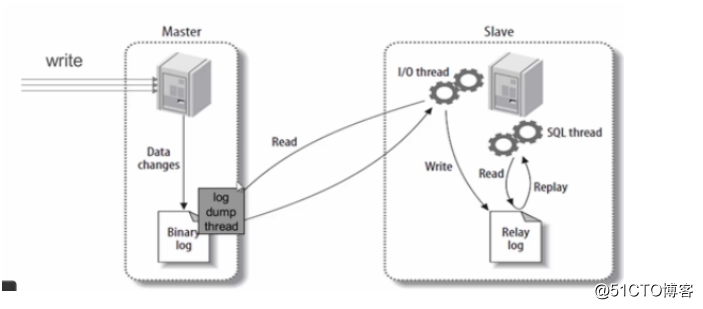
主从复制步骤
主库将所有写的操作记录到binlog日志(二进制日志)中并生成一个log dump线程,将binlog日志传给从库的I/O线程从库生成两个线程,一个I/O线程,一个SQL线程
·I/O线程去请求主库的binlog,并将得到的binlog日志写到relay log(中继日志)文件中
·SQl线程,会读取relay log 文件中的日志,并解析成具体操作,来实现主从的操作一致,达到最终数据一致的目的主从复制配置步骤:
1.确保从数据库与主数据库里的数据一样
2.在主数据库创建一个同步账号授权给从数据库使用
3.配置主数据库(修改配置文件)
4.配置从数据库(修改配置文件)
配置需求:
环境介绍:搭建两台mysql服务器,一台作为主服务器,一台作为从服务器,主服务器进行写操作,从服务器进行读操作
配置信息
主数据库 ip192.168.56.11 centos7 有数据
从数据库 ip192.168.56.138 centos7 无数据
主从同步设置
防火墙设置
[[email protected] ~]# systemctl stop firewalld
[[email protected] ~]# systemctl disable firewalld
[[email protected] ~]# sed -ri ‘s/(SELINUX=).*/1disabled/g‘ /etc/selinux/config
[[email protected] ~]# setenforce 0
下载二进制格式的mysql包
[[email protected] ~]# cd /usr/src/
[[email protected] src]# wget https://downloads.mysql.com/archives/get/file/mysql-5.7.22-linux-glibc2.12-x86_64.tar.gz
[[email protected] src]# ls
debug  kernels  mysql-5.7.22-linux-glibc2.12-x86_64.tar.gz
创建主和组
[[email protected] src]# groupadd -r mysql
[[email protected] src]# useradd -M -s /sbin/nologin -g mysql mysql
[[email protected] src]# tar xf mysql-5.7.22-linux-glibc2.12-x86_64.tar.gz -C /usr/local/
[[email protected] src]# cd /usr/local/
[[email protected] local]# ln -sv mysql-5.7.22-linux-glibc2.12-x86_64/ mysql
"mysql" -> "mysql-5.7.22-linux-glibc2.12-x86_64/"
//修改目录/usr/local/mysql的属主属组
[[email protected] local]# chown -R mysql.mysql /usr/local/mysql
[[email protected] local]# ll /usr/local/mysql -d
lrwxrwxrwx. 1 mysql mysql 36 9月   7 11:43 /usr/local/mysql -> mysql-5.7.22-linux-glibc2.12-x86_64/
//添加环境变量
[[email protected] local]# ls /usr/local/mysql
bin  COPYING  docs  include  lib  man  README  share  support-files
[[email protected] local]# echo ‘export PATH=/usr/local/mysql/bin:$PATH‘ > /etc/profile.d/mysql.sh
[[email protected] local]# . /etc/profile.d/mysql.sh
[[email protected] local]# echo $PATH
/usr/local/mysql/bin:/usr/local/sbin:/usr/local/bin:/usr/sbin:/usr/bin:/root/bin
//建立数据存放目录
[[email protected] local]# mkdir /opt/data
[[email protected] local]# chown -R mysql.mysql /opt/data/
[[email protected] local]# ll /opt/
总用量 0
drwxr-xr-x. 2 mysql mysql 6 9月   7 11:47 data
drwxr-xr-x. 2 root  root  6 3月  26 2015 rh
//初始化数据库
[[email protected] local]# /usr/local/mysql/bin/mysqld --initialize --user=mysql --datadir=/opt/data/
2018-09-07T03:48:13.790964Z 1 [Note] A temporary password is generated for [email protected]: n*Fsa&a+O1kN  /最后会生成一个临时密码
//从:数据库初始化,前面步骤一样,所以省略
[[email protected] local]# /usr/local/mysql/bin/mysqld --initialize --user=mysql --datadir=/opt/data/
2018-09-07T06:25:11.123940Z 1 [Note] A temporary password is generated for [email protected]: QR(XhNPpk6Qi
//生成配置文件/
[[email protected] ~]# cat > /etc/my.cnf <<EOF
[mysqld]
basedir = /usr/local/mysql
datadir = /opt/data
socket = /tmp/mysql.sock
port = 3306
pid-file = /opt/data/mysql.pid
user = mysql
skip-name-resolve
EOF
//配置服务启动脚本
[[email protected] ~]# cp -a /usr/local/mysql/support-files/mysql.server /etc/init.d/mysqld
[[email protected] ~]# sed -ri ‘s#^(basedir=).*#1/usr/local/mysql#g‘ /etc/init.d/mysqld
[[email protected] ~]# sed -ri ‘s#^(datadir=).*#1/opt/data#g‘ /etc/init.d/mysqld//启动mysql
[[email protected] ~]# /etc/init.d/mysqld start
[[email protected] ~]# ps -ef|grep mysql
[[email protected] ~]# ss -antl
LISTEN 0 80 :::3306 :::*
//修改密码
//使用临时密码登陆
[[email protected] ~]# /usr/local/mysql/bin/mysql -uroot -p
Enter password:
mysql>
//设置新密码
mysql> set password = password(‘guohui123‘);
以上是两台数据库服务器的配置,配置方式相同
主://查看主从库的备份
[[email protected] local]# mysql -uroot -pguohui123 -e ‘show databases;‘
mysql: [Warning] Using a password on the command line interface can be insecure.
+--------------------+
| Database           |
+--------------------+
| information_schema |
| mysql              |
| performance_schema |
| sys                |
创建一个库,表
mysql> use guohui
Database changed
mysql> create table student (id int(11) NOT NULL,name varchar(100) NOT NULL,age TINYINT(3));
Query OK, 0 rows affected (0.02 sec)
mysql> insert into student (id,name,age) value (1,‘tom‘,20);
Query OK, 1 row affected (0.05 sec)
mysql> desc student;
+-------+--------------+------+-----+---------+-------+
| Field | Type         | Null | Key | Default | Extra |
+-------+--------------+------+-----+---------+-------+
| id    | int(11)      | NO   |     | NULL    |       |
| name  | varchar(100) | NO   |     | NULL    |       |
| age   | tinyint(3)   | YES  |     | NULL    |       |
+-------+--------------+------+-----+---------+-------+
3 rows in set (0.01 sec)
mysql> select * from student;
+----+------+------+
| id | name | age  |
+----+------+------+
|  1 | tom  |   20 |
+----+------+------+
1 row in set (0.00 sec)

mysql> show databases;
+--------------------+
| Database           |
+--------------------+
| information_schema |
| guohui             |
| mysql              |
| performance_schema |
| sys                |
+--------------------+
5 rows in set (0.00 sec)
主://全备份主库
全备主库时需要另外开一个终端,给数据加上读锁,避免在备份期间有其他人在写入数据导致数据不一致,并且锁必须在备份完成后才能退出,退出则解锁
mysql> FLUSH TABLES WITH READ LOCK;
Query OK, 0 rows affected (0.01 sec)
主://备份主库并将文件传输到从库
[[email protected] ~]# mysqldump -uroot -pguohui123 --all-databases > /opt/all-20180907-1.sql
mysqldump: [Warning] Using a password on the command line interface can be insecure.
[[email protected] ~]# ls /opt
all-20180907-1.sql  data  rh//传输
[[email protected] ~]# scp /opt/all-20180907-1.sql [email protected]:/opt/
The authenticity of host ‘192.168.56.138 (192.168.56.138)‘ can‘t be established.
ECDSA key fingerprint is SHA256:by
E1DjsPUpqjJssSP+RcbkM7+wcjdzMkjW3u09KrSB8.
ECDSA key fingerprint is MD5:c6:d2:a1:34:73:2f:66:c9:ac:db:ca:2b:7a:78:4f:75.
Are you sure you want to continue connecting (yes/no)? yes
Warning: Permanently added ‘192.168.56.138‘ (ECDSA) to the list of known hosts.
[email protected]‘s password:1    //这里输入root密码
all-20180907-1.sql                                                  100%  783KB  19.2MB/s   00:00
主://接触锁表状态
mysql> quit
Bye
从://在从库上恢复主库的备份并查看有哪些库,确保与主库一致
//查看主备传过来的文件
[[email protected] ~]# ls /opt
all-20180907-1.sql  data  rh
将文件导入从数据库
[[email protected] ~]# mysql -uroot -pguohui123 < /opt/all-20180907-1.sql
mysql: [Warning] Using a password on the command line interface can be insecure.
//查看数据库
[[email protected] ~]# mysql -uroot -pguohui123 -e ‘show databases;‘
mysql: [Warning] Using a password on the command line interface can be insecure.
+--------------------+
| Database           |
+--------------------+
| information_schema |
| guohui             |
| mysql              |
| performance_schema |
| sys                |
+--------------------+
主://在主数据库里创建一个同步账号授权给从数据库使用
创建数据库用户guohui,密码:guohui123,只能在192.168.56.138上远程登陆
mysql> CREATE USER ‘guohui‘@‘192.168.56.138‘ IDENTIFIED BY ‘guohui123‘;
Query OK, 0 rows affected (0.00 sec)

赋予权限用户guohui,可以在192.168.56.138上访问本机所有数据库的所有表,无需密码:
mysql> GRANT REPLICATION SLAVE ON *.* TO ‘guohui‘@‘192.168.56.138‘;
Query OK, 0 rows affected (0.00 sec)

重新加载特权:
mysql> flush privileges;
Query OK, 0 rows affected (0.01 sec)

mysql>
主://配置主数据库
[[email protected] ~]# vim /etc/my.cnf
[mysqld]
basedir = /usr/local/mysql
datadir = /opt/data
socket = /tmp/mysql.sock
port = 3306
pid-file = /opt/data/mysql.pid
log-error = /opt/data/mysqld.log   //错误日志
user = mysql
skip-name-resolve
#
log-bin = mysql_bin   //启动binlog日志
server-id = 2   //数据库服务器唯一标识符,主库的server-id值必须比从库的大

启动
[[email protected] ~]# /etc/init.d/mysqld restart
ERROR! MySQL server PID file could not be found!
Starting MySQL.Logging to ‘/opt/data/mysqld.log‘.
. SUCCESS!

查看主库状态:

mysql> show master status;
mysql_bin,文件里写的二进制文件名字
000001  版本
Position  位置 154
+------------------+----------+--------------+------------------+-------------------+
| File             | Position | Binlog_Do_DB | Binlog_Ignore_DB | Executed_Gtid_Set |
+------------------+----------+--------------+------------------+-------------------+
| mysql_bin.000001 |      154 |              |                  |                   |
+------------------+----------+--------------+------------------+-------------------+
1 row in set (0.00 sec)
从://配置从数据库
[[email protected] ~]# vim /etc/my.cnf
[mysqld]
basedir = /usr/local/
mysqldatadir = /opt/data
socket = /tmp/mysql.sock
port = 3306
pid-file = /opt/data/mysql.pid
log-error = /opt/data/mysql.log
user = mysql
skip-name-resolve
#replication
server-id = 5  //设置从库的唯一标识符,从库的server-id值必须小于主库的该值
relay-log = mysql_relay_log    //启动中继日志relay-log启动

[[email protected] ~]# /etc/init.d/mysqld restart
Shutting down MySQL.. SUCCESS!
Starting MySQL.Logging to ‘/opt/data/mysql.log‘.
SUCCESS!
从://配置并启动主从复制
CHANGE MASTER TO                       指定的主服务器
MASTER_HOST=‘192.168.56.11‘,     指定的主服务器ip
MASTER_USER=‘guohui‘,
MASTER_PASSWORD=‘guohui123‘,  密码
MASTER_LOG_FILE=‘mysql-bin.000001‘,     二进制文件的名字与版本
MASTER_LOG_POS=154;                   位置 154

mysql> change master to master_host=‘192.168.56.11‘,master_user=‘guohui‘,master_password=‘guohui123‘,master_log_file=‘mysql_bin.000001‘,master_log_pos=154;
Query OK, 0 rows affected, 2 warnings (0.02 sec)

启动从服务的从服务
mysql> start slave;
Query OK, 0 rows affected (0.00 sec)
从://查看从服务器状态
mysql> show slave status G
*************************** 1. row ***************************
               Slave_IO_State: Waiting for master to send event
                  Master_Host: 192.168.56.11
                  Master_User: guohui
                  Master_Port: 3306
                Connect_Retry: 60
              Master_Log_File: mysql_bin.000002
          Read_Master_Log_Pos: 154
               Relay_Log_File: mysql_relay_log.000004
                Relay_Log_Pos: 367
        Relay_Master_Log_File: mysql_bin.000002
             Slave_IO_Running: Yes       //必须yes
            Slave_SQL_Running: Yes     //必须yes
mysql>
测试:
主://在数据库中插入数据
mysql> select * from student;
+----+------+------+
| id | name | age  |
+----+------+------+
|  1 | tom  |   20 |
+----+------+------+
1 row in set (0.00 sec)

mysql> insert into student value (1,‘jerry‘,23);
Query OK, 1 row affected (0.00 sec)

mysql> select * from student;
+----+-------+------+
| id | name  | age  |
+----+-------+------+
|  1 | tom   |   20 |
|  1 | jerry |   23 |
+----+-------+------+
2 rows in set (0.00 sec)

mysql>
从://查看测试结果
mysql> use guohui;
Reading table information for completion of table and column names
You can turn off this feature to get a quicker startup with -A
Database changed
mysql> select * from student;
+----+-------+------+
| id | name  | age  |
+----+-------+------+
|  1 | tom   |   20 |
|  1 | jerry |   23 |
+----+-------+------+
2 rows in set (0.00 sec)

mysql>
由此可见,数据库的主从功能,搭建成功
以上是关于LINUX——关于mysql中较详细的,数据库的主从配置,自动备份以及读写分离的使用的主要内容,如果未能解决你的问题,请参考以下文章