centos7.1上安装Mysql5.7.23
Posted qiyifeng
tags:
篇首语:本文由小常识网(cha138.com)小编为大家整理,主要介绍了centos7.1上安装Mysql5.7.23相关的知识,希望对你有一定的参考价值。
2018-09-05
8月底看到百度云做活动,30块钱半年我就买了一个,一开始我安装的是mysql5.6.22,结果百度云给我提示说高危漏洞让我把 Mysql最起码升级到5.7.23,下面就是安装的过程了。
下载MySQL:
1、下载MySQL:https://dev.mysql.com/downloads/mysql/5.7.html#download

2、网页需要向下滚一丢丢才能看到下载按钮,记得第一次来的时候以为必须要注册才可以下载,o(︶︿︶)o 唉

3、(1)选择 1 的话,使用命令下载:
[[email protected] ~]# wget https://dev.mysql.com/get/Downloads/MySQL-5.7/mysql-5.7.23-1.el7.x86_64.rpm-bundle.tar
(2)选择 2 的话,下载后用Xshell等远程连接工具放到linux上去
准备:
下载的过程别闲着,再开一个窗口来配置一下环境
1、 检测是否已经安装了mysql,使用下面命令查看
[[email protected] ~]# rpm -qa | grep mysql
如果已经安装了,将其卸载,如:
[[email protected] ~]# rpm -e --nodeps mysql-libs-5.1.71-1.el6.x86_64
2、查看一下 centos7自带的MariaDB数据库是否存在
[[email protected] ~]# rpm -qa | grep -i mariadb
mariadb-libs-5.5.56-2.el7.x86_64
安装mysql的时候可能会和MariaDB有冲突,所以需要将它干掉
[[email protected] ~]# rpm -e --nodeps mariadb-libs-5.5.56-2.el7.x86_64
3、mysql的server端需要perl支持,所以安装一下
[[email protected] ~]# yum install perl -y
4、mysql包应该下好了吧。。。先把压缩包复制到自己建的目录下,再解压一下会有12个rpm包
[[email protected] ~]# mkdir /usr/local/mysql
[[email protected] ~]# cd /usr/local/mysql
[[email protected] mysql]# cp  /root/mysql-5.7.23-1.el7.x86_64.rpm-bundle.tar /usr/local/mysql
[[email protected] mysql]# tar -xvf  mysql-5.7.23-1.el7.x86_64.rpm-bundle.tar
[[email protected] mysql]# ls
mysql-community-client-5.7.23-1.el7.x86_64.rpm
mysql-community-common-5.7.23-1.el7.x86_64.rpm
mysql-community-devel-5.7.23-1.el7.x86_64.rpm
mysql-community-embedded-5.7.23-1.el7.x86_64.rpm
mysql-community-embedded-compat-5.7.23-1.el7.x86_64.rpm
mysql-community-embedded-devel-5.7.23-1.el7.x86_64.rpm
mysql-community-libs-5.7.23-1.el7.x86_64.rpm
mysql-community-libs-compat-5.7.23-1.el7.x86_64.rpm
mysql-community-minimal-debuginfo-5.7.23-1.el7.x86_64.rpm
mysql-community-server-5.7.23-1.el7.x86_64.rpm
mysql-community-server-minimal-5.7.23-1.el7.x86_64.rpm
mysql-community-test-5.7.23-1.el7.x86_64.rpm
安装:
环境什么的都OK了之后就开始安装了:
因为解压出的这些rpm包之间有相互依赖的关系(gay里gay气的)所以要按照顺序去一个一个的安装
[[email protected] mysql]# rpm -ivh mysql-community-common-5.7.23-1.el7.x86_64.rpm
[[email protected] mysql]# rpm -ivh mysql-community-libs-5.7.23-1.el7.x86_64.rpm
[[email protected] mysql]# rpm -ivh mysql-community-client-5.7.23-1.el7.x86_64.rpm
[[email protected] mysql]# rpm -ivh mysql-community-server-5.7.23-1.el7.x86_64.rpm
安装前两个都好好的,后面第三个安装的时候报错了
[[email protected] mysql]# rpm -ivh mysql-community-client-5.7.23-1.el7.x86_64.rpm
warning: mysql-community-client-5.7.23-1.el7.x86_64.rpm: Header V3 DSA/SHA1 Signature, key ID 5072e1f5: NOKEY
error: Failed dependencies:
mysql-community-libs(x86-64) >= 5.7.9 is needed by mysql-community-client-5.7.23-1.el7.x86_64
解决方法是在命令后面增加 2 个参数( --nodeps --force )来破坏他们之间的依赖关系
[[email protected] mysql]# rpm -ivh mysql-community-client-5.7.23-1.el7.x86_64.rpm --nodeps --force
warning: mysql-community-client-5.7.23-1.el7.x86_64.rpm: Header V3 DSA/SHA1 Signature, key ID 5072e1f5: NOKEY
Preparing...                          ################################# [100%]
Updating / installing...
1:mysql-community-client-5.7.23-1.e################################# [100%]
问题解决了,正常安装最后一个rpm包
[[email protected] mysql]# rpm -ivh mysql-community-server-5.7.23-1.el7.x86_64.rpm
warning: mysql-community-server-5.7.23-1.el7.x86_64.rpm: Header V3 DSA/SHA1 Signature, key ID 5072e1f5: NOKEY
Preparing...                          ################################# [100%]
Updating / installing...
1:mysql-community-server-5.7.23-1.e################################# [100%]
初始化:
首先将mysql添加到系统服务中去
[[email protected] mysql]# systemctl start mysqld.service
启动mysql服务
[[email protected] mysql]# service mysqld start
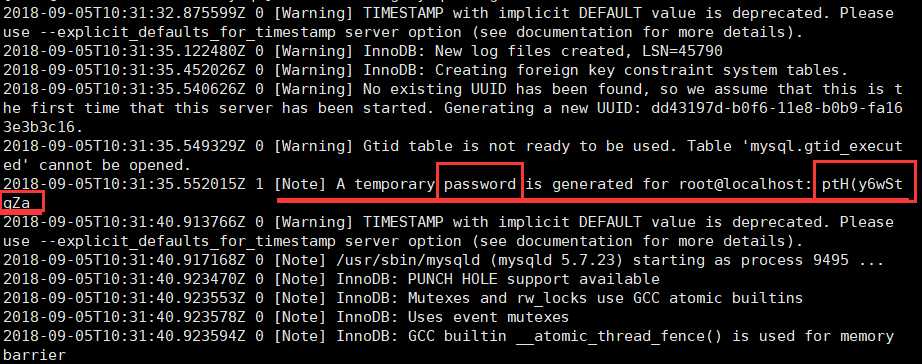
这时候如果想登陆,是不知道密码的,所以需要查看一下初始密码
[[email protected] mysql]# cat /var/log/mysqld.log

使用这个初始密码进行登陆,然后把密码改一下
[[email protected] mysql]# mysql -u root -p
Enter password:
mysql> set password = password(‘密码密码密码‘);
Query OK, 0 rows affected, 1 warning (0.00 sec)
为了方便以后使用SQLyog等数据库软件远程连接,需要开启外部远程访问权限
mysql> grant all privileges on *.* to ‘root‘ @‘%‘ identified by ‘密码密码密码!‘;
Query OK, 0 rows affected, 1 warning (0.00 sec)
再立即刷新一下
mysql> flush privileges;
Query OK, 0 rows affected (0.01 sec)
mysql> exit;
Bye
这时候如果使用远程数据库软件进行连接还是会失败,因为没有开启3306端口,来开启一下
[[email protected] mysql]# /sbin/iptables -I INPUT -p tcp --dport 3306 -j ACCEPT
在保存本次更改的时候出错了
[[email protected]]# /etc/rc.d/init.d/iptables save
-bash: /etc/rc.d/init.d/iptables: No such file or directory
这是因为防火墙没开,查看一下,还真是防火墙没开
[[email protected] mysql]# systemctl status firewalld
● firewalld.service - firewalld - dynamic firewall daemon
  Loaded: loaded (/usr/lib/systemd/system/firewalld.service; disabled; vendor preset: enabled)
  Active: inactive (dead)
再来开启一下防火墙
[[email protected] mysql]# systemctl start firewalld
[[email protected] mysql]# systemctl status firewalld
● firewalld.service - firewalld - dynamic firewall daemon
  Loaded: loaded (/usr/lib/systemd/system/firewalld.service; disabled; vendor preset: enabled)
  Active: active (running) since Wed 2018-09-05 19:05:13 CST; 7s ago
 Main PID: 33978 (firewalld)
   CGroup: /system.slice/firewalld.service
           └─33978 /usr/bin/python -Es /usr/sbin/firewalld --nofork --nopid

Sep 05 19:05:12 instance-6z7m60u3 systemd[1]: Starting firewalld - dynamic firewall daemon...
Sep 05 19:05:13 instance-6z7m60u3 systemd[1]: Started firewalld - dynamic firewall daemon.
防火墙开启成功后,接着开启3306端口,并且再刷新一下防火墙
[[email protected] mysql]# firewall-cmd --zone=public --add-port=3306/tcp --permanent
success
[[email protected] mysql]# firewall-cmd --reload
success
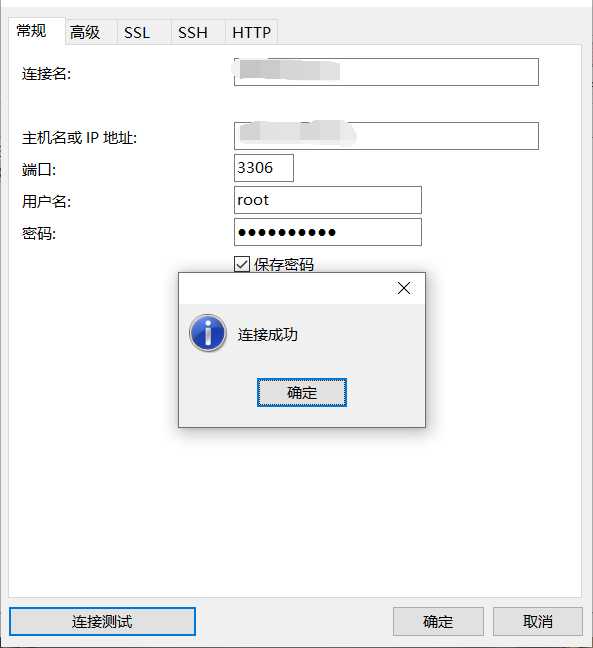
使用navicat测试连接一下,连接成功了!

以上是关于centos7.1上安装Mysql5.7.23的主要内容,如果未能解决你的问题,请参考以下文章