MySQL主从复制实现
Posted Timothy_lai
tags:
篇首语:本文由小常识网(cha138.com)小编为大家整理,主要介绍了MySQL主从复制实现相关的知识,希望对你有一定的参考价值。
上回提到了用Thinkphp框架来实现数据库的读写分离,现在就来简单说说mysql的主从复制。
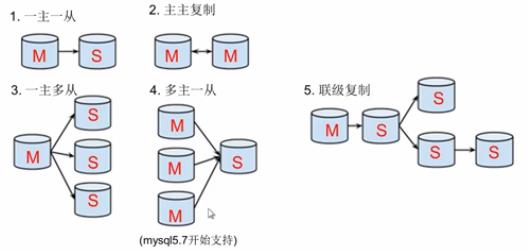
形式
- 一主一从(也就是这里要实现的形式)
- 主主复制
- 一主多从
- 多主一从(MySQL5.7开始支持)
- 联级复制
如图:图来自互联网

条件
- 主库开启binlog日志(设置log-bin参数)
- 主从server-id不同(这个要小心)
- 从库服务器能连通主库
原理
- 从库生成两个线程,一个I/O线程,一个SQL线程;
- i/o线程去请求主库 的binlog,并将得到的binlog日志写到relay log(中继日志) 文件中;
- 主库会生成一个 log dump 线程,用来给从库 i/o线程传binlog;
- SQL 线程,会读取relay log文件中的日志,并解析成具体操作,来实现主从的操作一致,而最终数据一致;
步骤
- 在主数据库配置文件中加入以下代码
- [root@localhost ~]# vim /etc/my.cnf
log-bin=mysql-bin // 将mysql二进制日志取名为mysql-bin
binlog_format=mixed // 二进制日志的格式,有三种:statement/row/mixed,具体分别不多做解释,这里使用mixed
server-id=111 // 为服务器设置一个独一无二的id便于区分,这里使用ip地址的最后一位充当server-id
- 配置完成后,保存并重启主MySQL数据库
- 在从数据库重复同样的操作,不一样的是server-id要写主数据库的,这里写的是server-id=110;
- 保存并重启从MySQL数据库
- 登录主MySQL数据库,在主数据库为从数据库分配一个账号,用于从数据库共享主数据库的日志文件
GRANT replication slave ON *.* TO \'slave\'@\'%\' IDENTIFIED BY \'123456\';
-
mysql> GRANT replication slave ON *.* TO \'slave\'@\'%\' IDENTIFIED BY \'123456\';
Query OK, 0 rows affected (0.00 sec) - 查看主服务器BIN日志的信息(执行完之后记录下这两值,然后在配置完从服务器之前不要对主服务器进行任何操作,因为每次操作数据库时这两值会发生改变);
-
mysql> show master status;
+------------------+----------+--------------+------------------+-------------------+
| File | Position | Binlog_Do_DB | Binlog_Ignore_DB | Executed_Gtid_Set |
+------------------+----------+--------------+------------------+-------------------+
| mysql-bin.000001 | 315 | | | |
+------------------+----------+--------------+------------------+-------------------+
1 row in set (0.00 sec) - 进入从数据库
- 如果之前有配置过主从复制,一定要先关闭slave
- 关闭命令为:stop slave
- 配置开始:change master to master_host=\'192.168.33.110\',master_user=\'slave\',master_password=\'123456\',
master_log_file=\'mysql-bin.000001\',master_log_pos=315; - 参数解释:
master_host=\'192.168.33.110\' // 设置要连接的主服务器的ip地址
master_user=\'slave\' // 设置要连接的主服务器的用户名
master_password=\'123456\' // 设置要连接的主服务器的密码
master_log_file=\'mysql-bin.000001\' // 设置要连接的主服务器的bin日志的日志名称,即show slave status命令得到的信息File列名称
master_log_pos=315 // 设置要连接的主服务器的bin日志的记录位置,即show slave status命令得到的信息Position列名称,(这里注意,最后一项不需要加引号。否则配置失败)
从数据库配置完成,重启MySQL服务
-
mysql> start slave;
Query OK, 0 rows affected, 1 warning (0.00 sec) -
mysql> show slave status \\G
*************************** 1. row ***************************
Slave_IO_State: Waiting for master to send event
Master_Host: 192.168.33.110
Master_User: slave
Master_Port: 3306
Connect_Retry: 60
Master_Log_File: mysql-bin.000001
Read_Master_Log_Pos: 1036
Relay_Log_File: localhost-relay-bin.000002
Relay_Log_Pos: 1004
Relay_Master_Log_File: mysql-bin.000001
Slave_IO_Running: Yes
Slave_SQL_Running: Yes
Replicate_Do_DB:
Replicate_Ignore_DB:
Replicate_Do_Table:
Replicate_Ignore_Table:
Replicate_Wild_Do_Table:
Replicate_Wild_Ignore_Table:
Last_Errno: 0
Last_Error:
Skip_Counter: 0
Exec_Master_Log_Pos: 1036
Relay_Log_Space: 1181
Until_Condition: None
Until_Log_File:
Until_Log_Pos: 0
Master_SSL_Allowed: No
Master_SSL_CA_File:
Master_SSL_CA_Path:
Master_SSL_Cert:
Master_SSL_Cipher:
Master_SSL_Key:
Seconds_Behind_Master: 0
Master_SSL_Verify_Server_Cert: No
Last_IO_Errno: 0
Last_IO_Error:
Last_SQL_Errno: 0
Last_SQL_Error:
Replicate_Ignore_Server_Ids:
Master_Server_Id: 111
Master_UUID: 39a19e0a-7957-11e6-aa19-0800272020f4
Master_Info_File: /Data/data/mysql/data/master.info
SQL_Delay: 0
SQL_Remaining_Delay: NULL
Slave_SQL_Running_State: Slave has read all relay log; waiting for the slave I/O thread to update it
Master_Retry_Count: 86400
Master_Bind:
Last_IO_Error_Timestamp:
Last_SQL_Error_Timestamp:
Master_SSL_Crl:
Master_SSL_Crlpath:
Retrieved_Gtid_Set:
Executed_Gtid_Set:
Auto_Position: 0
1 row in set (0.00 sec) - 如果这两个全部是yes,才表示成功,否则失败;Slave_IO_Running: Yes;Slave_SQL_Running: Yes
最后就可以测试是否可以了~~~
以上是关于MySQL主从复制实现的主要内容,如果未能解决你的问题,请参考以下文章