XMemcached的基本使用
Posted chenzheng8975
tags:
篇首语:本文由小常识网(cha138.com)小编为大家整理,主要介绍了XMemcached的基本使用相关的知识,希望对你有一定的参考价值。
XMemcached是memcached的一个java客户端,基于java nio,支持memcached的所有协议。本文简要介绍XMemcached的基本使用。
一、添加依赖
<dependency>
            <groupId>com.googlecode.xmemcached</groupId>
            <artifactId>xmemcached</artifactId>
            <version>2.4.0</version>
        </dependency>
二、创建Java文件
UserModel.java
package com.czhappy.memcached_project.vo;

import java.io.Serializable;

public class UserModel implements Serializable{

    private int uuid;
    private String userName;
    private int age;

    public UserModel(){}

    public UserModel(int uuid, String userName, int age) {
        this.uuid = uuid;
        this.userName = userName;
        this.age = age;
    }

    public int getUuid() {
        return uuid;
    }

    public void setUuid(int uuid) {
        this.uuid = uuid;
    }

    public String getUserName() {
        return userName;
    }

    public void setUserName(String userName) {
        this.userName = userName;
    }

    public int getAge() {
        return age;
    }

    public void setAge(int age) {
        this.age = age;
    }

    @Override
    public String toString() {
        return "UserModel{" +
                "uuid=" + uuid +
                ", userName=\'" + userName + \'\\\'\' +
                ", age=" + age +
                \'}\';
    }
}
ConnectonHelper.java
package com.czhappy.memcached_project.utils;

import net.rubyeye.xmemcached.MemcachedClient;
import net.rubyeye.xmemcached.MemcachedClientBuilder;
import net.rubyeye.xmemcached.XMemcachedClient;
import net.rubyeye.xmemcached.XMemcachedClientBuilder;
import net.rubyeye.xmemcached.utils.AddrUtil;
import org.junit.Test;

import java.io.IOException;
import java.net.InetSocketAddress;
import java.util.Map;

public class ConnectonHelper {

    public static MemcachedClient getClient(){
        // 连接配置
        MemcachedClientBuilder memcachedClientBuilder =
                new XMemcachedClientBuilder(AddrUtil.getAddresses("192.168.84.128:2222"));
        // 创建与服务端之间的连接[ip地址,端口号,用户名和密码]
        // 获取操作业务对象
        MemcachedClient memcachedClient = null;
        try {
            memcachedClient = memcachedClientBuilder.build();
        } catch (IOException e) {
            e.printStackTrace();
        }

        return memcachedClient;
    }

    public static void main(String[] args) throws Exception {

        // 连接配置
        // 创建与服务端之间的连接[ip地址,端口号,用户名和密码]
        // 获取操作业务对象
        MemcachedClient memcachedClient =
                new XMemcachedClient("192.168.84.128",2222);

        // 操作业务
        String str = "Hello World!";
        boolean isSuccess = memcachedClient.set("k1", 3600, str);

        String value = memcachedClient.get("k1");

        System.out.println("value="+value);

        // 关闭与服务端连接
        memcachedClient.shutdown();

    }

}
执行Main方法,判断是否连接成功:

三、基本使用
- 定义MemcachedClient
static MemcachedClient client = ConnectonHelper.getClient();
- 定义查询【get/gets】方法
public static void showQuery(String key)throws  Exception{

        UserModel um = client.get(key);
        System.out.println("get方法获取的值="+um);
    }
- 定义新增【set,add】方法
public static void showAdd(UserModel um) throws Exception {

        client.set("set-user:"+um.getUuid(),3600,um);

        client.add("add-user:"+um.getUuid(),3600,um);

    }
测试:
UserModel um = new UserModel(1, "李四", 55);
showAdd(um);
showQuery("set-user:1");
showQuery("add-user:1");
查询测试结果:

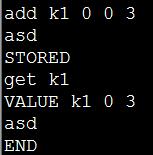
我们通过命令行添加k1,用来测试update方法:
- 定义修改【replace,append,prepend】方法
public static void showUpdate(UserModel um) throws Exception{
        client.replace("set-user:"+um.getUuid(),3600,um);

        // Hi! asd chenz
        client.prepend("k1","Hi! ");
        client.append("k1"," chenz");

    }
测试:
UserModel um = new UserModel(1, "王五", 60);
showUpdate(um);
查询测试结果:
showQuery("set-user:1");


- 定义删除【delete】方法
public static void showDelete(String key)throws  Exception{
        boolean isSuccess = client.delete(key);
        System.out.println("delete结果="+isSuccess);
    }
测试删除:
showDelete("k1");

- 定义检查更新【cas】方法
public static void showCAS(UserModel um)throws  Exception{
        String key = "set-user:" + um.getUuid();
        // 第一件事先获取版本号
        GetsResponse<UserModel> userModelGetsResponse = showGets(key);
        long cas = userModelGetsResponse.getCas();

//        // 演示cas版本是否生效
//        UserModel um1 = new UserModel(1,"happy admin",20);
//        showUpdate(um1);


        // 进行更新操作
        boolean isSuccess = client.cas(key, 3600, um, cas);
        System.out.println("更新结果="+isSuccess);

    }
测试:
UserModel um = new UserModel(1, "科比", 35);
showCAS(um);

查询结果:
showQuery("set-user:1");

问题:在获取版本号之后及cas数据之前,这一段存在时间差,可能会因为版本号的问题导致操作失败,因此,XMemcached特地封装了xmcas
public static void showXMCAS() throws  Exception {

        // 操作XMemcached提供的CAS操作
        client.cas("k1", new CASOperation<String>() {
            // 重试次数
            public int getMaxTries() {
                return Integer.MAX_VALUE;
            }
            // 修改内容
            public String getNewValue(long cas, String currentValue) {
                return "Hi ! "+currentValue + "!!!!!";
            }
        });

    }
- 定义数值操作【incr/decr】方法
public static void showNumChange()throws  Exception{

        MemcachedClient memcachedClient = ConnectonHelper.getClient();

        long result = memcachedClient.incr("k5",5,10);
        System.out.println("result1 = "+result);

        result = memcachedClient.incr("k5",40,10);
        System.out.println("result2 = "+result);

        result = memcachedClient.decr("k5",25,10);
        System.out.println("result3 = "+result);

        result = memcachedClient.decr("k5",30,10);
        System.out.println("result4 = "+result);
    }
测试结果:
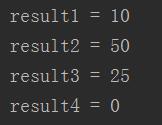
针对上述结果,给出以下解释说明:
/*
            long result = memcachedClient.incr("k5",5,10);
            result1 = 10  -> API【如果key不存在,则第三个参数为初始值】

            result = memcachedClient.incr("k5",40,10);
            result2 = 50  -> 如果key存在,则进行递增或递减操作

            result = memcachedClient.decr("k5",25,10);
            result3 = 25  -> 如果key存在,则进行递增或递减操作

            result = memcachedClient.decr("k5",30,10);
            result4 = 0   -> decr是不能减出负数
         */
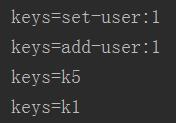
- 获取所有的key列表
public static void showKeyIterator() throws  Exception{
        KeyIterator keyIterator = client.getKeyIterator(AddrUtil.getOneAddress("192.168.84.128:2222"));
        while(keyIterator.hasNext()){
            System.out.println("keys="+keyIterator.next());
        }
    }
- XMemcached提供的计数器
public static void showCounter() throws Exception {

        Counter counter = new Counter(client,"k5",10);
        long c1 = counter.incrementAndGet();
        System.out.println("c1="+c1);
        long c2 = counter.decrementAndGet();
        System.out.println("c2="+c2);
        long c3 = counter.addAndGet(88);
        System.out.println("c3="+c3);
        long c4 = counter.addAndGet(-10000);
        System.out.println("c4="+c4);
        counter.set(50);
        long c5 = counter.get();
        System.out.println("c5="+c5);
        String key = counter.getKey();
        System.out.println("key="+key);

    }
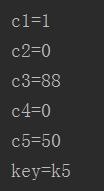
测试结果:
- 更新数据过期时间
一般采用:
/*
 1、先存入一条数据 【设置过过期时间 10个小时】
 2、先获取待更新过期时间的数据
 3、再通过 replace | set 方法,将数据修改回去,同时设置过期时间
 */
通过XMemcached,我们这样做:
/*
 1、先存入一条数据 【设置过过期时间 10个小时】
 2、直接使用touch进行更新过期时间
 */
public static void showTouch() throws  Exception {


        client.set("k1",3600,"Hello happy");
        client.touch("k1",10);
    }
- 演示命名空间
因为memcached中没有数据表的概念,XMemcached引入了命名空间的概念,可以对数据进行分块存储,而实际底层操作则是变相的修改key的名称来实现的。
public static void showNameSpace() throws  Exception {
        String ns1 = "ns1";
        String ns2 = "ns2";
        // 赋值操作
        client.withNamespace(ns1, new MemcachedClientCallable<String>() {
            public String call(MemcachedClient memcachedClient) throws MemcachedException, InterruptedException, TimeoutException {

                memcachedClient.set("k10",0," Hello chenz!! ");

                return null;
            }
        });

        String str = client.get("k10");
        System.out.println("str="+str);

        String k10 = client.withNamespace(ns1, new MemcachedClientCallable<String>() {
            public String call(MemcachedClient memcachedClient) throws MemcachedException, InterruptedException, TimeoutException {
                return memcachedClient.get("k10");
            }
        });

        System.out.println("k10="+k10);

        String k102 = client.withNamespace(ns2, new MemcachedClientCallable<String>() {
            public String call(MemcachedClient memcachedClient) throws MemcachedException, InterruptedException, TimeoutException {
                return memcachedClient.get("k10");
            }
        });

        System.out.println("k102="+k102);

    }
测试结果:

我们通过查询以下memcached中的所有key
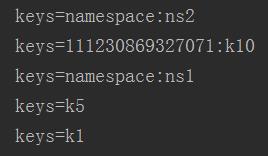
可以看到前面三个是系统为我们创建并和namespace相关的,我们查询一下namespace:ns1的value值,即可看出其中端倪:

以上是关于XMemcached的基本使用的主要内容,如果未能解决你的问题,请参考以下文章