CentOS 7 nginx+tomcat+redis session处理方案之session复制
Posted bigdevilking
tags:
篇首语:本文由小常识网(cha138.com)小编为大家整理,主要介绍了CentOS 7 nginx+tomcat+redis session处理方案之session复制相关的知识,希望对你有一定的参考价值。
我们可以借助于session存储于redis之后,实现session在多个站点,多台服务器共享的情况下,统一通过session_id来管理用户的session数据
准备工作:
Nginx 192.168.94.33
Tomcat1 192.168.94.11
Tomcat2 192.168.94.22
Redis 192.168.94.66
关闭防火墙和SElinux
安装nginx :
[[email protected] ~]# wget http://nginx.org/packages/centos/7/x86_64/RPMS/nginx-1.14.0-1.el7_4.ngx.x86_64.rpm
[[email protected] ~]# yum -y install pcre-devel zlib-devel openssl-devel
[[email protected] ~]# rpm -i nginx-1.14.0-1.el7_4.ngx.x86_64.rpm
[[email protected] ~]# vim /etc/nginx/nginx.conf    # 修改配置文件 添加以下内容
upstream backend {
        server 192.168.94.11:8080 max_fails=1 fail_timeout=10s;
        server 192.168.94.22:8080 max_fails=1 fail_timeout=10s;

    }
    server {
        listen 80;
        location /{
            proxy_pass http://backend;

        }

    }
[[email protected] ~]# systemctl restart nginx
安装resid :
# 最简单的yum下载
[[email protected] ~]# yum -y install redis
# 或者下载源码包
[[email protected] ~]# wget http://download.redis.io/releases/redis-4.0.10.tar.gz
[[email protected] ~]# tar xf redis-4.0.10.tar.gz -C /usr/local/
[[email protected] ~]# cd /usr/local/
[[email protected] local]# mv redis-4.0.10/ redis
[[email protected] local]# cd redis/
[[email protected] local]# make
[[email protected] redis]# ls
00-RELEASENOTES  COPYING  Makefile   redis.conf       runtest-sentinel  tests
BUGS             deps     MANIFESTO  runtest          sentinel.conf     utils
CONTRIBUTING     INSTALL  README.md  runtest-cluster  src
[[email protected] redis]# vim redis.conf
# 把daemonize no 的行改成 daemonize yes
# 默认是只监听在本机的本地IP地址:127.0.0.1的6379端口
# 把bind 127.0.0.0 改成 bind 0.0.0.0
# 根据需要,修改监听端口
启动、停止 redis
启动 :
# 启动服务方式是 redis-server 配置文件
[[email protected] redis]# src/redis-server redis.conf
# 指定多个配置文件,启动多次,可以启动多个redis进程:
比如:创建一个端口是6380的配置文件,并启动
src/redis-server redis_port_6380.conf
停止 :
# 关闭指定redis src/redis-cli -p 端口 shutdown
[[email protected]redis redis]# src/redis-cli -p 6379 shutdown
# 或者
[[email protected]redis redis]# pkill redis-server
安装Tomcat
解压tomcat、jdk到指定的目录
[[email protected] ~]# tar -xf apache-tomcat-9.0.2.tar.gz
[[email protected] ~]# mv apache-tomcat-9.0.2 /usr/local/tomcat
[[email protected] ~]# tar -xf jdk-8u181-linux-x64.tar.gz
[[email protected] ~]# mv apache-tomcat-9.0.2 /usr/local/java
指定jdk或者修改jdk环境变量:
指定jdk :
[[email protected] ~]# vim /usr/local/tomcat/bin/catalina.sh
# 添加以下内容
 export JAVA_HOME=/usr/local/java
 export JRE_HOME=/usr/local/java/jre
修改jdk环境变量
[[email protected] ~]# vim /etc/profile
# 添加以下内容
export JAVA_HOME=/usr/local/java
export PATH=$JAVA_HOME/bin:$PATH
export CLASSPATH=/usr/local/java/lib:/usr/local/java/jre/lib/charsets.jar
[email protected] ~]# source /etc/profile
将下面的三个jar包拷贝到tomcat/lib目录下
commons-pool2-2.4.2.jar、jedis-2.9.0.jar、tomcat85-session-redis-1.0.jar
修改context.xml文件
[[email protected] ~]# vim /usr/local/tomcat/conf/context.xml
# 添加以下内容
<Valve className="com.orangefunction.tomcat.redissessions.RedisSessionHandlerValve" />
 <Manager className="com.orangefunction.tomcat.redissessions.RedisSessionManager"
        host="192.168.94.66"    # redis的IP
        port="6379"    #redis的端口
        database="0"
        maxInactiveInterval="60" />
创建测试文件:
[[email protected] ~]# cd /usr/local/tomcat/webapps/
[[email protected] webapps]# mkdir test
[[email protected] webapps]# vim test/index.jsp


<%@ page language="java" contentType="text/html; charset=UTF-8" import="java.net.InetAddress"
  pageEncoding="UTF-8"%>
<!DOCTYPE html PUBLIC "-//W3C//DTD HTML 4.01 Transitional//EN" "http://www.w3.org/TR/html4/lo
<html>
<head>
<meta http-equiv="Content-Type" content="text/html; charset=UTF-8">
<title>Insert title here</title>
</head>
<body>
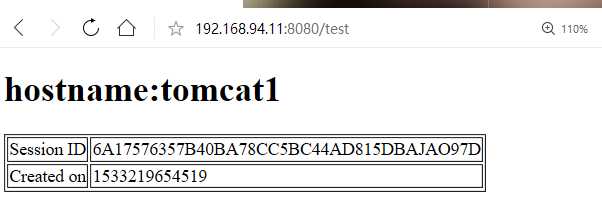
  <h1>hostname:tomcat1</h1>    #tomcat2 为 hostname:tomcat2

  <table border="1">
    <tr>
      <td>Session ID</td>
      <td><%= session.getId() %></td>
    </tr>
    <tr>
      <td>Created on</td>
      <td><%= session.getCreationTime() %></td>
    </tr>
  </table>


</body>
</html>
测试 :
用浏览器访问tomcat1 , 刷新之后session id 没变化

访问tomcat2 , 刷新后 session ID没变化

访问ningx , 刷新后session ID 没变化 ,tomcat1 和 tomcat2 在轮询

