大数据自动化安装部署方案——集群系统环境设置
Posted 牧梦者
tags:
篇首语:本文由小常识网(cha138.com)小编为大家整理,主要介绍了大数据自动化安装部署方案——集群系统环境设置相关的知识,希望对你有一定的参考价值。
1.前期准备
1.1系统和yum源镜像准备
需要的条件:
① 至少三台刚装上Centos7.0系统的物理机或者虚拟机;
② CentOS-7.0-x86_64-bin-DVD1.iso镜像,用于制作本地yum源;
注意:本文三台物理机或虚拟机的操作系统镜像是CentOS-7-x86_64-Minimal-1804.iso。
用于制作本地yum源的CentOS-7.0-x86_64-bin-DVD1.iso镜像默认存放于第一节点node1的/opt/system下

1.2 配置文件host_ip.txt和frames.tx准备
host_ip.txt文件为集群ip、hostname、root账号密码配置;而frames.txt为所需要安装的软件配置说明,其中false为不安装,true为安装
host_ip.txt内容为:
192.168.187.201 node1 root hadoop
192.168.187.202 node2 root hadoop
192.168.187.203 node3 root hadoop
frames.txt内容为:
jdk-8u181-linux-x64.tar.gz true
scala-2.11.0.tgz true
hadoop-2.7.6.tar.gz true
hbase-2.0.1-bin.tar.gz true
apache-hive-2.3.3-bin.tar.gz true
zookeeper-3.4.13.tar.gz true
spark-2.3.1-bin-hadoop2.7.tgz true
kafka_2.11-1.1.1.tgz true
1.3 安装软件准备
需要在官网上下载frames.txt所列的软件安装包,可以自行下载。
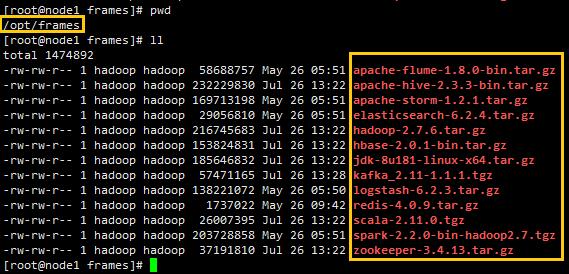
这里默认所有的软件安装包放在第一节点node1的/opt/frames目录下,下面涉及软件部分的shell操作都会根据/opt/frames/目录下是否有该软件再进行自动安装。

1.4 shell命令文本准备
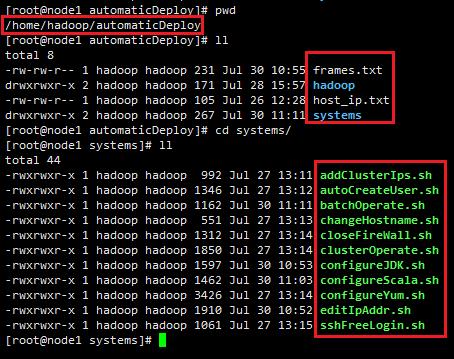
以下shell文本文件,以及host_ip.txt和frames.txt文件,都默认放置在第一节点node1的/home/hadoop/automaticDeploy目录下,如图:

2.模块化自动安装部署
注意:以下所有shell命令的执行,都需要以root用户执行
模块化自动安装部署包括IP地址设置、机器名hostname修改、host配置文件修改、关闭防火墙/SELINUX、添加bigdata用户名、配置yum源、配置SSH无密码登录、配置JDK环境、配置Scala环境共9个模块。
2.1 集群中每台机器IP地址的设置
集群中每台机器首先需要设置IP地址,保证机器与机器之间可以直接通过ip地址访问。
IP地址设置shell命令文件editIpAddr.sh代码如下:
#! /bin/bash
################
#针对Centos-7.0
################

#处理涉及到IP地址设置的网络文件,备份并创建新的
function doWithNetworkFile()
{
 #1.查找/etc/sysconfig/network-scripts/目录下是否存在ifcfg-ens33文件,存在则重命名为.bak结尾的
 fileResult=`find /etc/sysconfig/network-scripts/ -name "ifcfg-ens33"`

 if [[ $fileResult != "" ]]
 then
     #2.创建一个ifcfg-ens33文件用于配置网络设置
     result=`find /etc/sysconfig/network-scripts -wholename $fileResult.bak`
     if [[ -z $result ]]
     then
         mv $fileResult $fileResult.bak
     fi
     cp $fileResult.bak $fileResult
 else
     touch /etc/sysconfig/network-scripts/ifcfg-ens33
 fi
}

#配置ip地址
function configureIpAddr()
{
 ip=$1
 gateway=$2
 fileUrl=/etc/sysconfig/network-scripts/ifcfg-ens33

 #1.把ifcfg-ens33文件非#开头的行注释掉
 sed -i \'s/^[^#]/#&/\' $fileUrl

 UUID=`grep "^#UUID=*" $fileUrl | head -1`

 #2.配置内网IP地址
 #连接类型
 echo "TYPE=Ethernet" >> $fileUrl
 #静态IP
 echo "BOOTPROTO=static" >> $fileUrl
 echo "DEFROUTE=yes" >> $fileUrl
 echo "IPV4_FAILURE_FATAL=no" >> $fileUrl
 #IPV6关闭
 echo "IPV6INIT=no" >> $fileUrl
 #配置名字
 echo "NAME=ens33" >> $fileUrl
 #唯一标识
 echo "${UUID:1}" >> $fileUrl
 #网卡名称
 echo "DEVICE=ens33" >> $fileUrl
 #开机即启动网络
 echo "ONBOOT=yes" >> $fileUrl
 #IP地址
 echo "IPADDR=$ip" >> $fileUrl
 echo "PREFIX=24" >> $fileUrl
 #网络掩码
 echo "NETMASK=255.255.255.0" >> $fileUrl
 #网关
 echo "GATEWAY=$gateway" >> $fileUrl
}

function editIpAddr()
{
 ip=$1
 gateway=$2

 #处理涉及到IP地址设置的网络文件,备份并创建新的
 doWithNetworkFile
 #在/etc/sysconfig/network-scripts/ifcfg-ens33上设置IP地址
 configureIpAddr $ip $gateway

 #重启网络服务
 service network restart
}

ip=$1
gateway=$2
editIpAddr $ip $gateway
分别在三台机器上以root用户执行如下命令:
/home/hadoop/automaticDeploy/systems/editIpAddr.sh 192.168.187.*** 192.168.187.2
注意:
①网关192.168.187.2需要通过 route -n 命令(CentOS7以上使用)查看,如图:

②不同机器的ip地址是不一样的,这里指IP地址的前三个数值是一样,前三个数值与网关的前三个数值是一致的;只有最后一个***是根据需求设置,一般在0~255之间。这里我假定三个节点node1、node2、node3的IP分别为192.168.187.201,192.168.187.202,192.168.187.203。
2.2 修改机器名hostname
changeHostname.sh代码如下:
#! /bin/bash

#修改机器名hostname
function changeHostname()
{
 hostname=$1
 #echo "change the hostname $1"

 egrep "^HOSTNAME=" /etc/sysconfig/network >& /dev/null
 if [ $? -eq 0 ]
 then
      #存在则删除旧的hostname
      sed -i "/^HOSTNAME=/d" /etc/sysconfig/network
 fi
 #添加新的hostname
 echo "HOSTNAME=$hostname" >> /etc/sysconfig/network

 #echo "change the hostname $1 successfully"
}

#获取参数
node=$1

if [ -z $node ]
then
    echo "参数为空,请输入参数node1,node2,node3..."
else
    changeHostname $node
fi
以root用户执行如下命令,$hostname为参数传值,设为node1、node2、node3....
/home/hadoop/automaticDeploy/systems/changeHostname.sh $hostname
2.3 host配置文件修改
addClusterIps.sh代码如下:
#! /bin/bash

#添加Ip、hostname到/etc/hosts文件里面
function addIpToHostFile()
{
 ip=$1
 hostname=$2
 #查询$ip是否存在于/etc/hosts里面
 egrep "^$ip" /etc/hosts >& /dev/null
 if [ $? -eq 0 ]
 then
     #$?是上一个程序执行是否成功的标志,如果执行成功则$?为0,否则不为0,存在则先把就的ip设置删除掉
     sed -i "/^$ip/d" /etc/hosts
 fi

 #把ip、hostname添加到/etc/hosts中
 echo "$ip $hostname" >> /etc/hosts
}

#执行ssh免密登录之前,hosts文件里面需要存储每台机器的ip地址
function editHostFile()
{
 #echo "edit the host file"

 #1./home/hadoop/host_ip.txt文件中读取ip和hostname
 while read line
 do
   #提取文件中的ip
   ip=`echo $line | cut -d " " -f1`
   #提取文件中的用户名
   hostname=`echo $line | cut -d " " -f2`

   addIpToHostFile $ip $hostname
 done < /home/hadoop/automaticDeploy/host_ip.txt #读取存储ip的文件

 #echo "edit the host file successfully"
}

editHostFile
以root用户执行命令:
/home/hadoop/automaticDeploy/systems/addClusterIps.sh
2.4 关闭防火墙、SELINUX
closeFirewall.sh命令如下:
#! /bin/bash

function closeFirewallAndGetenforce()
{
 #1.关闭防火墙
 firewallStatus=`firewall-cmd --state`
 if [[ $firewallStatus = "running" ]]
 then
     systemctl stop firewalld.service &&systemctl disable firewalld.service
 fi

 #2.关闭getenforce
 getenforceStatus=`getenforce`
 egrep "^SELINUX=enforcing" /etc/selinux/config >& /dev/null
 if [[ $getenforceStatus = "Enforcing" || $? -eq 0 ]]
 then
     sed -i \'s/^SELINUX=enforcing/SELINUX=disabled/\' /etc/selinux/config
 fi

 #3.重启,使设置生效
 #reboot
}

function startFirewallAndGetenforce()
{
 #1.开启防火墙
 firewallStatus=`firewall-cmd --state`
 if [[ $firewallStatus != "running" ]]
 then
    systemctl enable firewalld.service && systemctl start firewalld.service
 fi

 #2.开启getenforce
 getenforceStatus=`getenforce`
 egrep "^SELINUX=disabled" /etc/selinux/config >& /dev/null
 if [[ $getenforceStatus = "Disabled" || $? -eq 0 ]]
 then
    sed -i \'s/^SELINUX=disabled/SELINUX=enforcing/\' /etc/selinux/config
 fi

 #3.重启,使设置生效
 #reboot
}

operate=$1

if [ -z $operate ]
then
    echo "参数为空,请输入参数close或start"
else
    if [[ $operate = "close" ]]
    then
        closeFirewallAndGetenforce
    fi
    if [[ $operate = "start" ]]
    then
        startFirewallAndGetenforce
    fi
fi
这里提供开启和关闭防火墙两种功能,方便操作。以root用户执行该shell命令时,需要输入参数close或start:
/home/hadoop/automaticDeploy/systems/closeFirewall.sh close
2.5 添加系统bigdata用户
autoCreateUser.sh代码如下:
#! /bin/bash

#创建bigdata用户组,创建bigdata用户并设置密码
function createUserAndGroup()
{
 echo "start to create user \'bigdata\'!"

 user=$1
 group=$2

 #create group if not exists
 #在/etc/group中查找用户组是否存在,并把错误输出输到/dev/null中
 egrep "^$group" /etc/group >& /dev/null
 # 判断上一命令是否等于0,不等于则创建用户组
 if [ $? -ne 0 ]
 then
     groupadd $group
 fi

 #create user if not exists
 egrep "^$user" /etc/passwd >& /dev/null
 if [ $? -ne 0 ]
 then
     useradd -g $group $user
 fi

 #在shell中使用expect实现自动输入密码,通常需要与\'expect <<EOF EOF\'、spawn、子expect一起使用
 expect << EOF
 spawn passwd $user
 expect "New password:"
 send "${user}\\r"
 expect "Retype new password:"
 send "${user}\\r"
 expect eof;
EOF
}

#删除bigdata用户,删除bigdata用户组
function deleteUserAndGroup()
{
 user=$1
 group=$2

 echo "delete the user:" $user " and the userGroup:" $group
 userdel -r $user
 if [ $user != $group ]
 then
     groupdel $group
 fi
}

operate=$1

if [ -z $operate ]
then
    echo "参数为空,请输入参数create或delete"
else
    if [[ $operate = "create" ]]
    then
        createUserAndGroup bigdata bigdata
    fi
    if [[ $operate = "delete" ]]
    then
        deleteUserAndGroup bigdata bigdata
    fi
fi
这里提供创建、删除用户两种操作,以root用户执行该命令需要输入参数create或者delete:
/home/hadoop/automaticDeploy/systems/autoCreateUser.sh create
2.6 配置yum源
由于大数据平台一般是在内网环境下搭建的,所以需要配置本地yum源,用以解决一些依赖包缺少的问题,这里以node1节点作为本地yum源所在的服务器,以CentOS-7.0-x86_64-bin-DVD1.iso作为yum源的source。
configureYum.sh代码如下:
#! /bin/bash

#配置yum源
function configureYumSource()
{
 yumUrl=$1
 yumFile=$2

 #1.把CentOS-Media.repo文件非#开头的行注释掉
 sed -i \'s/^[^#]/#&/\' $yumFile
 #2.配置本地源
 echo "[base]" >> $yumFile
 echo "name=CentOS-Local" >> $yumFile
 echo "baseurl=$yumUrl" >> $yumFile
 echo "gpgcheck=0" >> $yumFile
 echo "enabled=1" >> $yumFile
 echo "gpgkey=file:///etc/pki/rpm-gpg/RPM-GPG-KEY-CentOS-7" >> $yumFile
 #3.清除YUM缓存
 yum clean all > /dev/null 2>&1
 #4.列出可用的YUM源
 yum repolist > /dev/null 2>&1
}

#处理并保证只有一个CentOS-Media.repo文件存在
function doWithRepoFile()
{
 #1.进入到yum.repos.d目录
 cd /etc/yum.repos.d/

 #2.查找/etc/yum.repos.d/目录下是否存在.repo结尾的文件,存在则重命名为.repo.bak结尾的
 fileResult=`find /etc/yum.repos.d/ -name "*.repo"`
 for file in $fileResult
 do
   onlyFile=`find /etc/yum.repos.d -wholename $file.bak`
   if [[ -z $onlyFile ]]
   then
        mv $file $file.bak
   fi
 done

 #3.只创建一个.repo文件用于配置本地yum源
 result=`find /etc/yum.repos.d/ -name CentOS-Media.repo.bak`
 if [[ -z $result ]]
 then
     touch CentOS-Media.repo
 else
     cp CentOS-Media.repo.bak CentOS-Media.repo
 fi
}

#############################################################################
#同一函数及其调用的子函数,父函数与子函数均有一样的变量名,而内容不一样会报错
#############################################################################

#配置本地源
function localYumSource()
{
 systemUrl=$1
 ip=$2
 yumFile=/etc/yum.repos.d/CentOS-Media.repo

 #1.不存在则创建mount的目录
 if [ ! -d /var/iso ]
 then
      mkdir /var/iso
 fi

 #挂载系统,已挂载则不再次挂载
 if [ ! -d /var/iso/CentOS_BuildTag ]
 then
     mount -o loop $systemUrl /var/iso
 fi

 #2.处理并保证只有一个CentOS-Media.repo的文件用于配置本地yum源
 doWithRepoFile

 #3.配置yum源
 configureYumSource file:///var/iso $yumFile

 #4.安装相应的软件
 httpdIsExists=`rpm -qa | grep http`
 if [[ -z $httpdIsExists ]]
 then
     yum install -y httpd
 fi

 #5.开启httpd使用浏览器访问
 #service httpd start
 httpdStatus=`systemctl status httpd.service`
 result=$(echo $httpdStatus | grep "Active: active (running)")
 if [[ $result = "" ]]
 then
     systemctl start httpd.service
 fi

 #6.将YUM源配置到httpd中,其他的服务器可通过网络访问这个内网中的YUM源
 httpUrl=/var/www/html/CentOS-7.0
 if [ ! -e $httpUrl/lock ]
 then
     cp -r /var/iso $httpUrl
     echo "lock" >> $httpUrl/lock
 fi

 #7.取消先前挂载的镜像 强制取消,哈哈哈哈
 umount -fl /var/iso

 #8.修改yum源指向的地址
 sed -i \'s/^baseurl\\=file:\\/\\/\\/var\\/iso/baseurl\\=http:\\/\\/\'$ip\'\\/CentOS-7.0/\' $yumFile

 #9.清除YUM缓存
 yum clean all > /dev/null 2>&1

 #10.列出可用的YUM源
 yum repolist > /dev/null 2>&1
 #echo "create the local yum source successfully"
}

#配置远程yum源
function remoteYumSource()
{
 ip=$1
 yumUrl=http://$ip/CentOS-7.0
 yumFile=/etc/yum.repos.d/CentOS-Media.repo

 #1.处理并保证只有一个CentOS-Media.repo的文件用于配置yum源
 doWithRepoFile

 #2.配置yum源
 configureYumSource $yumUrl $yumFile
}

hostname=$1

if [[ $hostname = "node1" ]]
then
    localYumSource /opt/system/CentOS-7-x86_64-DVD-1804.iso 192.168.187.201
else
    remoteYumSource 192.168.187.201
fi
以root用户执行代码如下,参数$hostname一般为node1、node2、node3:
/home/hadoop/automaticDeploy/systems/configureYum.sh $hostname
2.7 配置SSH无密码登录
sshFreeLogin代码如下:
#! /bin/bash

function sshFreeLogin()
{
 #1.检测expect服务是否存在,不存在则使用yum安装expect
 expectIsExists=`rpm -qa | grep expect`
 if [ -z $expectIsExists ]
 then
      yum -y install expect
 fi

 #2.密钥对不存在则创建密钥
 [ ! -f /root/.ssh/id_rsa.pub ] && ssh-keygen -t rsa -P "" -f /root/.ssh/id_rsa

 while read line;do
       #提取文件中的ip
       hostname=`echo $line | cut -d " " -f2`
       #提取文件中的用户名
       user_name=`echo $line | cut -d " " -f3`
       #提取文件中的密码
       pass_word=`echo $line | cut -d " " -f4`

       expect <<EOF
              #复制公钥到目标主机
              spawn ssh-copy-id $hostname
              expect {
                      #expect实现自动输入密码
                      "yes/no" { send "yes\\n";exp_continue }
                      "password" { send "$pass_word\\n";exp_continue }
                      eof
              }
EOF
 # 读取存储ip的文件
 done < /home/hadoop/automaticDeploy/host_ip.txt

}

sshFreeLogin
以root用户执行代码如下:
/home/hadoop/automaticDeploy/systems/sshFreeLogin.sh
2.8 配置JDK环境
configureJDK.sh代码如下:
#! /bin/bash

function configureJDK()
{
 #1.在frames.txt中查看是否需要安装java
 javaInfo=`egrep "^jdk" /home/hadoop/automaticDeploy/frames.txt`

 java=`echo $javaInfo | cut -d " " -f1`
 isInstall=`echo $javaInfo | cut -d " " -f2`

 #是否安装
 if [[ $isInstall = "true" ]];then

    #2.查看/opt/frames目录下是否有java安装包
    javaIsExists=`find /opt/frames -name $java`

    if [[ ${#javaIsExists} -ne 0 ]];then

        if [ -d /usr/lib/java ];then
              rm -rf /usr/lib/java
        fi

        mkdir /usr/lib/java && chmod -R 777 /usr/lib/java

        #2.解压到指定文件夹/usr/lib/java中
        echo "开启解压jdk安装包"
        tar -zxvf $javaIsExists -C /usr/lib/java >& /dev/null
        echo "jdk安装包解压完毕"

        java_home=`find /usr/lib/java -maxdepth 1 -name "jdk*"`

        #3.在/etc/profile配置JAVA_HOME
        profile=/etc/profile
        sed -i "/^export JAVA_HOME/d" $profile
        echo "export JAVA_HOME=$java_home" >> $profile

        #4.在/etc/profile配置PATH
        sed -i "/^export PATH=\\$PATH:\\$JAVA_HOME\\/bin/d" $profile
        echo "export PATH=\\$PATH:\\$JAVA_HOME/bin" >> $profile
        sed -i "/^export CLASSPATH=.:\\$JAVA_HOME/d" $profile
        echo "export CLASSPATH=.:\\$JAVA_HOME/lib/dt.jar:\\$JAVA_HOME/lib/tools.jar" >> $profile

        #5.更新/etc/profile文件
        source /etc/profile && source /etc/profile
    else
         echo "/opt/frames目录下没有jdk安装包"
    fi
 else
     echo "/opt/frames目录下没有jdk安装包"
 fi
}

configureJDK
以root用户执行代码如下:
/home/hadoop/automaticDeploy/systems/configureJDK.sh
2.9 配置Scala环境
configureScala.sh代码如下:
#! /bin/bash

function configureScala()
{
 #1.在frames.txt中查看是否需要安装scala
 scalaInfo=`egrep "^scala" /home/hadoop/automaticDeploy/frames.txt`

 scala=`echo $scalaInfo | cut -d " " -f1`
 isInstall=`echo $scalaInfo | cut -d " " -f2`

 #是否安装
 if [[ $isInstall = "true" ]];then

     #1.查找/opt/frames目录下是否有Scala安装包
     scalaIsExists=`find /opt/frames -name $scala`

    if [[ ${#scalaIsExists} -ne 0 ]];then

       if [ -d /usr/lib/scala ];then
            rm -rf /usr/lib/scala
       fi

       mkdir /usr/lib/scala && chmod -R 777 /usr/lib/scala

       #2.解压到指定文件夹/usr/lib/scala中
       以上是关于大数据自动化安装部署方案——集群系统环境设置的主要内容,如果未能解决你的问题,请参考以下文章