Nginx 负载均衡如何配置,高并发报502如何返回正常信息?
Posted
tags:
篇首语:本文由小常识网(cha138.com)小编为大家整理,主要介绍了Nginx 负载均衡如何配置,高并发报502如何返回正常信息?相关的知识,希望对你有一定的参考价值。
参考技术A 负载均衡入口服务器配置入口
upstream mServer
server 149.129.114.100:8080 weight=2 fail_timeout=30s max_fails=0;
server 149.129.75.101:8080 weight=4 fail_timeout=30s max_fails=0;
server 149.129.76.102:8080 weight=4 fail_timeout=30s max_fails=0;
server
listen 80;
server_name www.xxx.com;
#charset koi8-r;
#access_log logs/host.access.log main;
#遇到502、503、504等状态码时,我们可以改变将之成200,这样在调用接口时,就可以正常的返回信息,给用户提供良好的交互环境。
error_page 502 503 504 =200 /dealwith_502?callback=$arg_callback;
location /dealwith_502
#下面这些header,是为了防止跨域问题
add_header 'Content-Type' 'application/json; charset=utf-8';
add_header 'Access-Control-Allow-Origin' '*';
add_header 'Access-Control-Allow-Headers' 'Origin, X-Requested-With, Content-Type, Accept';
add_header 'Access-Control-Allow-Methods' 'GET, POST, PUT';
set $ret_body ' "status": 0, "info": "系统繁忙,请稍后访问", "data": [] ';
if ( $arg_callback != "" )
return 200 'try$arg_callback($ret_body)catch(e)';
return 200 $ret_body;
location /
root html;
proxy_pass http://mServer;
proxy_set_header Host $host;
index index.php index.html index.htm;
服务器1
server
listen 8080;
#listen [::]:80;
server_name 149.129.114.100;
index home.html index.htm index.php default.html default.htm default.php;
root /home/wwwroot/xxx;
#error_page 404 /404.html;
error_page 502 503 504 =200 /dealwith_502?callback=$arg_callback;
location /dealwith_502
add_header 'Content-Type' 'application/json; charset=utf-8';
add_header 'Access-Control-Allow-Origin' '*';
add_header 'Access-Control-Allow-Headers' 'Origin, X-Requested-With, Content-Type, Accept';
add_header 'Access-Control-Allow-Methods' 'GET, POST, PUT';
set $ret_body ' "status": 0, "info": "系统繁忙,请稍后访问", "data": [] ';
if ( $arg_callback != "" )
return 200 'try$arg_callback($ret_body)catch(e)';
return 200 $ret_body;
location /
if (!-e $request_filename)
rewrite ^(.*)$ /index.php/$1 last;
break;
location ~ [^/]\.php(/|$)
# comment try_files $uri =404; to enable pathinfo
#try_files $uri =404;
fastcgi_pass unix:/tmp/php-cgi.sock;
fastcgi_index index.php;
include fastcgi.conf;
include pathinfo.conf;
fastcgi_param PHP_ADMIN_VALUE "open_basedir=/home/wwwroot/:/tmp/:/proc/";
location ~ .*\.(gif|jpg|jpeg|png|bmp|swf)$
expires 30d;
location ~ .*\.(js|css)?$
expires 12h;
其他服务器配置和服务器1的配置是相同的,这样就可以避免高并发的出现。我做的 项目 就是这样处理的。
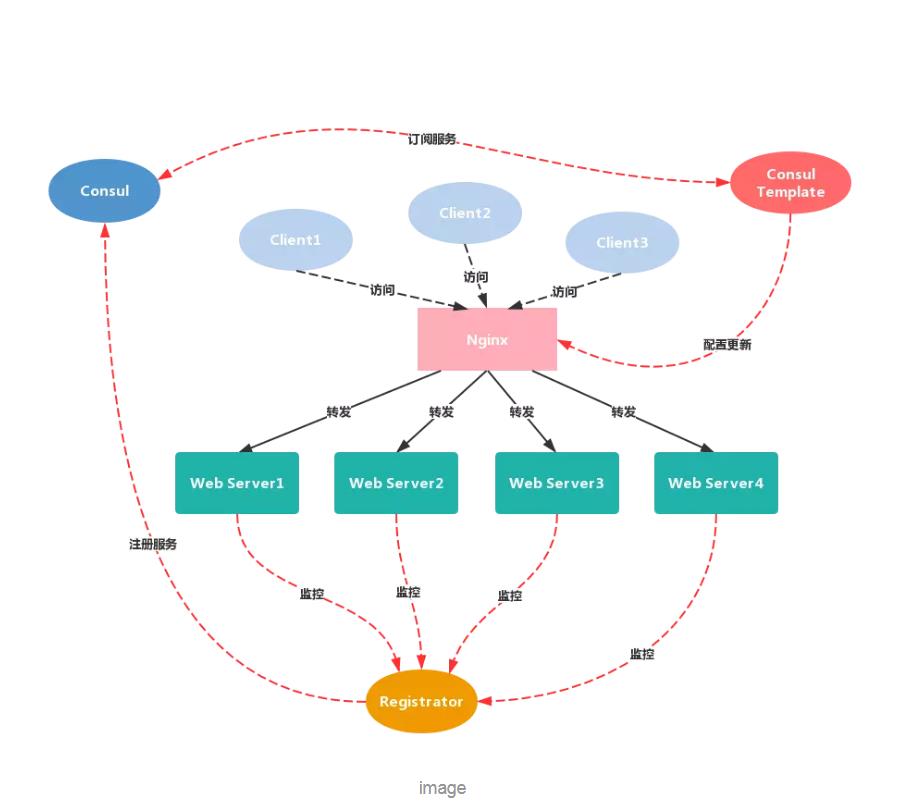
负载均衡 之 nginx+consul+consul template
前几篇先是记载了如何通过nginx配置服务负载均衡,后面记载了如何通过 ocelot 配置 服务负载均衡,分别介绍了用webapi注册服务以及配置文件注册服务,通过ocelot webapi + consul 配置负载均衡系列学习完毕。
然而nginx负载均衡没有服务发现,依然不能用生产环境,本篇将介绍如何通过 nginx+consul 配置多台服务器的负载均衡并支持服务发现。
试验背景和目的:一个微服务,有一个网关入口,如果网关出现故障,那么整个微服务马上瘫痪,那么我们有必要把网关布署在多台服务器上,如果其中有一台出现故障,还有其他服务器在起到微服务网关角色。
下面依然是在同一台linux机子上模似和试验。
内容包括:
1. nginx服务,做负载均衡
2. consul服务,做服务发现
3. consul template,做动态改变nginx配置并重启nginx服务
4. 3个网关webapi,分别是
192.168.1.23:8101
192.168.1.23:8102
192.168.1.23:8103
(在展开试验步骤之前,对背景进行大概的介绍是非常重要,我发现很多技术文章一上来二话不说就是贴代码)
$ wget https://releases.hashicorp.com/consul/1.4.4/consul_1.4.4_linux_amd64.zip
$ sudo apt-get install unzip
$ unzip consul_1.4.4_linux_amd64.zip
$ sudo mv consul /usr/local/bin/consul
以上命令,在官网下了个包,然后解压了一下,里面只有一个 consul文件,把文件移到了/usr/local/bin/consul。
{
"encrypt": "Wd7HAMtcgg5RQ2hZhHE9xw==",
"services": [
{
"id": "api1",
"name": "apigateway",
"tags": [ "apigateway" ],
"address": "192.168.1.23",
"port": 8101,
"checks": [
{
"id": "ApiServiceA_Check",
"name": "ApiServiceA_Check",
"http": "http://192.168.1.23:8101/health",
"interval": "10s",
"tls_skip_verify": false,
"method": "GET",
"timeout": "1s"
}
]
},
{
"id": "api2",
"name": "apigateway",
"tags": [ "apigateway" ],
"address": "192.168.1.23",
"port": 8102,
"checks": [
{
"id": "ApiServiceB_Check",
"name": "ApiServiceB_Check",
"http": "http://192.168.1.23:8102/health",
"interval": "10s",
"tls_skip_verify": false,
"method": "GET",
"timeout": "1s"
}
]
}
]
}
3、安装 consul-template,
$ wget https://releases.hashicorp.com/consul-template/0.19.3/consul-template_0.19.3_linux_amd64.zip
$ unzip consul-template_0.19.3_linux_amd64.zip
$ mv consul-template /usr/bin/
测试一下安装有没有成功:
$ consul-template -v
4、创建一个consul 模板文件

文件内容:
upstream ocelot {
    {{range service "apigateway"}}
    server {{ .Address }}:{{ .Port }};
    {{ end }}
}


server {
        listen       8105;
        location / {
            proxy_pass   http://ocelot ;
            proxy_http_version 1.1;
            proxy_set_header Upgrade $http_upgrade;
            proxy_set_header Connection keep-alive;
            proxy_set_header Host $http_host;
            proxy_set_header X-Real-IP $remote_addr;
            proxy_set_header X-Forwarded-For $proxy_add_x_forwarded_for;
            proxy_cache_bypass $http_upgrade;

        }

  }
相比之前写死下游服务节点:
 upstream ocelot {
      server localhost:8104;
      server localhost:8102;
      server localhost:8103;

    }
现在这块的内容,将会动态地去consul服务数据库中读取,注意服务名称,"apigateway", 这个名称是注册到consul时所用的 service name。
模板准备好之后,要被nginx配置所引用,下面修改nginx的配置文件:
include /consul/nginx-template/*.conf;
加上这一句,意思是 引用一下
/consul/nginx-template/ 下面的所有conf文件的nginx配置信息
下面运行consul-template:
consul-template --consul-addr 192.168.1.23:8500 --template "/consul/nginx-template/nginx.ctmpl:/consul/nginx-template/vhost.conf:service nginx restart" --log-level=info
这句的意思是,将从consul服务数据中读取 最新的服务发现结果,将有关于 apigateway 的数据,实时地更新到 consul/nginx-template/vhost.conf, 更新的过程用的模板是 /consul/nginx-template/nginx.ctmpl, 更新完之后顺便执行了一下 service nginx restart,重启了nginx服务。
执行完之后,我们可以看到 在consul/nginx-template/ 多了一个 vhost.conf文件,里面的内容是
upstream ocelot {

    server 192.168.1.23:8101;

    server 192.168.1.23:8102;

    server 192.168.1.23:8103;

}


server {
        listen       8105;
        location / {
            proxy_pass   http://ocelot ;
            proxy_http_version 1.1;
            proxy_set_header Upgrade $http_upgrade;
            proxy_set_header Connection keep-alive;
            proxy_set_header Host $http_host;
            proxy_set_header X-Real-IP $remote_addr;
            proxy_set_header X-Forwarded-For $proxy_add_x_forwarded_for;
            proxy_cache_bypass $http_upgrade;

        }

  }
确实是我们要内容。
下面,把其中一个webapi停掉,
$ supervisorctl
$ stop apigateway3
把第3个网关api停掉了
看会发生什么事?
2019/04/17 07:59:24.954777 [INFO] (runner) initiating run
2019/04/17 07:59:24.958652 [INFO] (runner) rendered "/consul/nginx-template/nginx.ctmpl" => "/consul/nginx-template/vhost.conf"
2019/04/17 07:59:24.958722 [INFO] (runner) executing command "service nginx restart" from "/consul/nginx-template/nginx.ctmpl" => "/consul/nginx-template/vhost.conf"
2019/04/17 07:59:24.958913 [INFO] (child) spawning: service nginx restart
这时consul-template会告诉我们,nginx配置更新的消息,
再打开vhost.conf
upstream ocelot {

    server 192.168.1.23:8101;

    server 192.168.1.23:8102;

}


server {
        listen       8105;
        location / {
            proxy_pass   http://ocelot ;
            proxy_http_version 1.1;
            proxy_set_header Upgrade $http_upgrade;
            proxy_set_header Connection keep-alive;
            proxy_set_header Host $http_host;
            proxy_set_header X-Real-IP $remote_addr;
            proxy_set_header X-Forwarded-For $proxy_add_x_forwarded_for;
            proxy_cache_bypass $http_upgrade;

        }

  }
下游服务节点少了一个,nginx配置确实得到及时的更正。
将consul服务开启加入守护进程,以保证机器重启能自启动consul 服务:
[program:consul]
command=consul agent -server -ui -bootstrap-expect=1 -data-dir=/tmp/consul -node=consul-1 -client=0.0.0.0 -bind=0.0.0.0 -datacenter=dc1 -config-dir=/consul/testservices
startsecs=10
autostart=true
autorestart=true
stderr_logfile=/var/log/applogs/consul.err.log
stdout_logfile=/var/log/applogs/consul.out.log
user=root
stopsignal=INT

[program:consultemplate]
command=consul-template --consul-addr 192.168.1.23:8500 --template "/consul/nginx-template/nginx.ctmpl:/consul/nginx-template/vhost.conf:service nginx restart" --log-level=info
startsecs=10
autostart=true
autorestart=true
stderr_logfile=/var/log/applogs/consul-template.err.log
stdout_logfile=/var/log/applogs/consul-template.out.log
user=root
stopsignal=INT
上面是在做试验,但生产环境下:
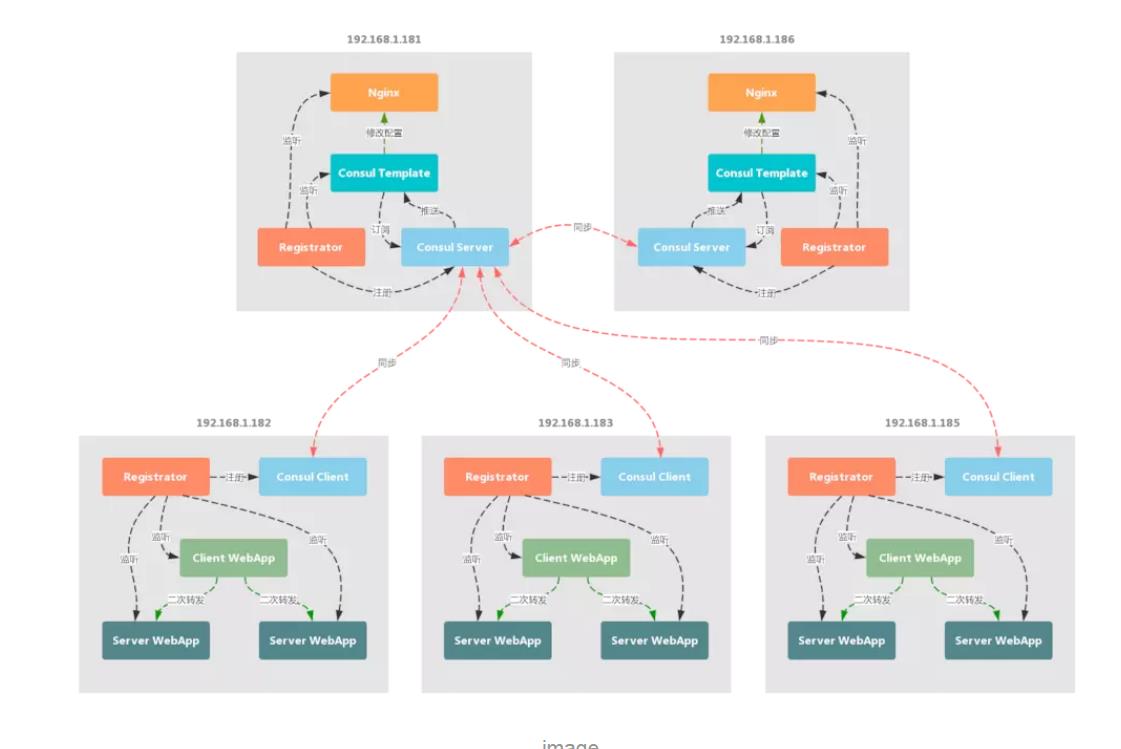
1.只有一台nginx服务器是不够的,最好要有两台nginx服务,通过keepalived配置两台nginx服务器,一主一从。这样就避免了如果一台nginx服务器故障了,就没法做负载均衡。
2.只有一个consul服务是不够的,官方建议是要有3个node共同组成一个datacenter。这样就避免了只有一台服务器在提供服务发现的功能。
3. 3个网关应该是部署在3台不同的web 服务器上面。
后面,可能会学习一下如果对2台nginx服务器做keepalive联盟。关于nginx+keepalive 配置双机 master/backup 的文章:https://blog.51cto.com/12922638/2155817
本文参考文章:https://www.jianshu.com/p/fa41434d444a
最后盗一下里面两张图:


以上是关于Nginx 负载均衡如何配置,高并发报502如何返回正常信息?的主要内容,如果未能解决你的问题,请参考以下文章