Memcached集群原理以及搭建
Posted 个性灬浪漫
tags:
篇首语:本文由小常识网(cha138.com)小编为大家整理,主要介绍了Memcached集群原理以及搭建相关的知识,希望对你有一定的参考价值。
概述:memcached尽管是“分布式”缓存服务器,但服务器端并没有分布式功能,各个memcached不会互相通信以共享数据,这完全取决memcached api的客户端所使用的路由算法;
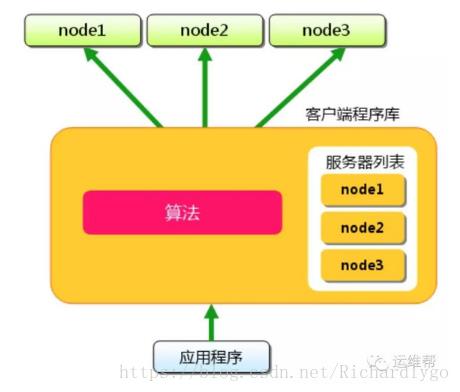
客户端路由算法:
1.求余数hash算法:先用key做一个hash运算得到一个整数,再去做hash算法,根据余数进行路由选择,这种算法适用于大多数据需求,但不适合用在动态变化的环境中,比如:有大量机器添加或者删除时,会导致大量对象的存储位置失效;
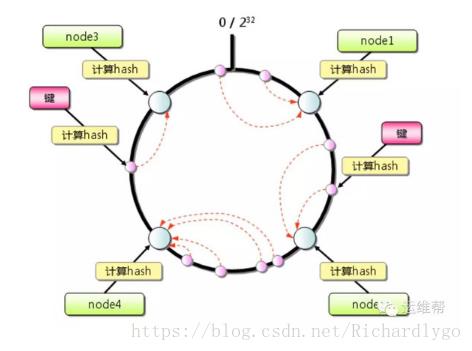
2.一致性hash算法:适用于动态变化的环境中,原理是按照hash算法把对应的key通过一定的hash算法处理后,映射形成一个首尾相接的闭合循环,然后通过使用与对象存储一样的hash算法将节点机器也映射到环中,按顺时针方向将所有对象存储到离客户端最近的node节点上,如下图;
Memcached主主复制集群;
案例环境:
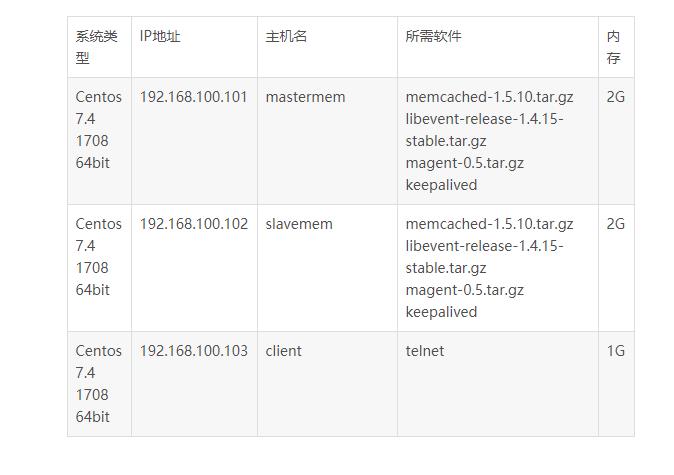
注意点:
1.magent概述:Magent是一款开源的Memcached代理服务器软件,采用 Magent 缓存代理,防止单点现象,缓存代理也可以做备份,通过客户端连接到缓存代理服务器,缓存代理服务器连接缓存服务器,缓存代理服务器可以连接多台Memcached机器;
2.常见memcached+magent运行架构:
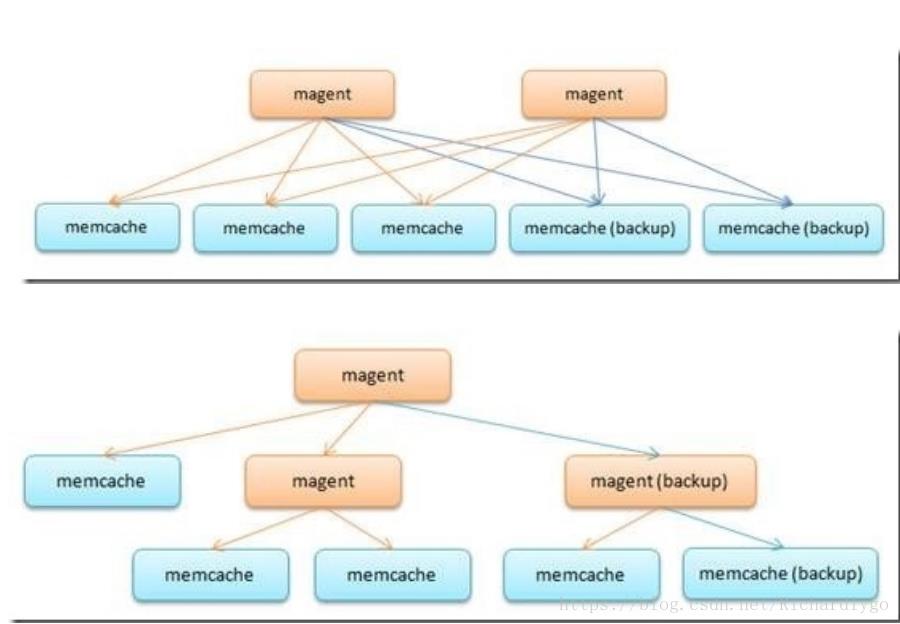
上图此模型已经能够很好的解决一个节点,一组服务器的缓存数据服务,但是如果在北方网通架设了一组服务器,同时在南方电信又架设了另外一组服务器,那么这两组相对独立的节点之间如何做到数据的同步与共享,基于magent与memcached的解决方案如下:
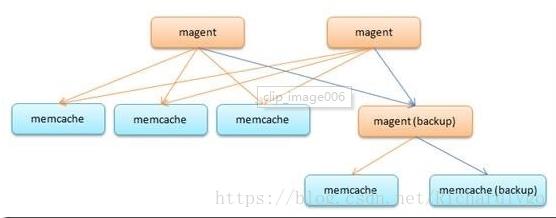
架构详解:
http://blog.51cto.com/ultrasql/1633897
3.为避免magent节点单点故障问题,可以使用keepalived服务为其实现高可用;
案例步骤:
部署两个节点的Memcached程序(在此两个节点的安装一致,在此列举master节点的配置);
部署master节点的magent程序,部署完成传送给slave节点;
安装两个节点的Keepalived程序(在此两个节点的安装一致,在此列举master节点的配置);
配置master节点的keepalived服务;
配置slave节点的keepalived服务;
client节点测试双主复制集群;
部署两个节点的Memcached程序(在此两个节点的安装一致,在此列举master节点的配置);
[root@mastermem ~]# ls
libevent-release-1.4.15-stable.tar.gz memcached-1.5.10.tar.gz
[root@mastermem ~]# tar zxvf libevent-release-1.4.15-stable.tar.gz -C /usr/src/
[root@mastermem ~]# cd /usr/src/libevent-release-1.4.15-stable/
[root@mastermem libevent-release-1.4.15-stable]# ./autogen.sh
[root@mastermem libevent-release-1.4.15-stable]# ./configure --prefix=/usr/local/libevent
[root@mastermem libevent-release-1.4.15-stable]# make && make install
[root@mastermem libevent-release-1.4.15-stable]# cd
[root@mastermem ~]# ln -s /usr/local/libevent/lib/libevent* /usr/lib64/
[root@mastermem ~]# tar zxvf memcached-1.5.10.tar.gz -C /usr/src/
[root@mastermem ~]# cd /usr/src/memcached-1.5.10/
[root@mastermem memcached-1.5.10 ~]# ./configure --prefix=/usr/local/memcached --with-libevent=/usr/local/libevent/
[root@mastermem memcached-1.5.10 ~]# make && make install
[root@mastermem memcached-1.5.10 ~]# cd
[root@mastermem ~]# ln -s /usr/local/memcached/bin/* /usr/local/bin/
部署master节点的magent程序,部署完成传送给slave节点;
[root@mastermem ~]# ls magent-0.5.tar.gz
magent-0.5.tar.gz
[root@mastermem ~]# mkdir magent
[root@mastermem ~]# tar zxvf magent-0.5.tar.gz -C magent/
ketama.c
magent.c
ketama.h
Makefile
[root@mastermem ~]# cd magent
[root@mastermem magent]# ls
ketama.c ketama.h magent.c Makefile
[root@mastermem magent]# vi ketama.h ##在文件开头添加
#ifndef SSIZE_MAX
#define SSIZE_MAX 32767
#endif
[root@mastermem magent]# vi Makefile
1 LIBS = -levent -lm -L /usr/local/libevent/lib ##选项为小-L
2 INCLUDE= -I /usr/local/libevent/include ##选项为大-i
[root@mastermem magent]# make
gcc -Wall -O2 -g -I /usr/local/libevent/include -c -o magent.o magent.c
gcc -Wall -O2 -g -I /usr/local/libevent/include -c -o ketama.o ketama.c
gcc -Wall -O2 -g -o magent magent.o ketama.o -levent -lm -L /usr/local/libevent/lib
[root@mastermem magent]# ls
ketama.c ketama.h ketama.o magent magent.c magent.o Makefile
[root@mastermem magent]# cp magent /usr/bin/
[root@mastermem magent]# scp magent 192.168.100.102:/usr/bin/
[root@mastermem magent]# cd
安装两个节点的Keepalived程序(在此两个节点的安装一致,在此列举master节点的配置);
[root@mastermem ~]# yum -y install keepalived
配置master节点的keepalived服务;
[root@mastermem ~]# vi /etc/keepalived/keepalived.conf
global_defs {
router_id R1
}
vrrp_instance VI_1 {
state MASTER
interface eth0
virtual_router_id 1
priority 100
advert_int 1
authentication {
auth_type PASS
auth_pass 1111
}
virtual_ipaddress {
192.168.100.250
}
}
[root@mastermem ~]# vi /opt/check.sh
#!/bin/bash
while true;do
K=$(ip a|grep 192.168.100.250|wc -l)
if [ $K -ne 0 ];then
magent -u root -n 51200 -l 192.168.100.250 -p 12000 -s 192.168.100.101:11211 -b 192.168.100.102:11211
else
pkill -9 magent
fi
M=$(netstat -utpln |grep mem|wc -l)
if [ $M -eq 0 ];then
systemctl stop keepalived
fi
done
注解:magent参数详解:
-u ##指定运行用户
-n ##最大的连接数,默认为4096
-l ##小写L,magent监听的ip地址
-p ##magent监听的端口
-s ##设置memcached主缓存的ip地址和端口
-b ##设置memcached备缓存的ip地址和端口
[root@mastermem ~]# chmod +x /opt/check.sh
[root@mastermem ~]# memcached -u root -d -m 128m
[root@mastermem ~]# netstat -utpln |grep memcached
tcp 0 0 0.0.0.0:11211 0.0.0.0:* LISTEN 7117/memcached
[root@mastermem ~]# /opt/check.sh &
[root@mastermem ~]# jobs -l
[1]+ 16273 运行中 /opt/check.sh &
[root@mastermem ~]# ip a|grep 192.168.100.250
inet 192.168.100.250/32 scope global eth0
[root@mastermem ~]# netstat -utpln |grep magent
tcp 0 0 192.168.100.250:12000 0.0.0.0:* LISTEN 22834/magent
配置slave节点的keepalived服务;
[root@slavemem ~]# vi /etc/keepalived/keepalived.conf
global_defs {
router_id R2
}
vrrp_instance VI_1 {
state BACKUP
interface eth0
virtual_router_id 1
priority 99
advert_int 1
authentication {
auth_type PASS
auth_pass 1111
}
virtual_ipaddress {
192.168.100.250
}
}
[root@slavemem ~]# vi /opt/check.sh
#!/bin/bash
while true;do
K=$(ip a|grep 192.168.100.250|wc -l)
if [ $K -ne 0 ];then
memcached -u root -d -m 128m
magent -u root -n 51200 -l 192.168.100.250 -p 12000 -s 192.168.100.102:11211 -b 192.168.100.101:11211
else
pkill magent
fi
done
[root@slavemem ~]# chmod +x /opt/check.sh
[root@slavemem ~]# /opt/check.sh &
[1] 18066
[root@slavemem ~]# jobs -l
[1]+ 18066 完成 /opt/check.sh
[root@slavemem ~]# memcached -u root -d -m 128m
[root@slavemem ~]# netstat -utpln |grep mem
tcp 0 0 0.0.0.0:11211 0.0.0.0:* LISTEN 17920/memcached
[root@slavemem ~]# systemctl start keepalived
[root@slavemem ~]# ip a|grep 192.168.100.250
[root@slavemem ~]# netstat -utpln |grep magent
client节点测试双主复制集群;
此时192.168.100.101节点为master,VIP在master节点,运行memcahed、magent进程;
[root@client ~]# yum -y install telnet
[root@client ~]# telnet 192.168.100.250 12000
Trying 192.168.100.250...
Connected to 192.168.100.250.
Escape character is \'^]\'.
set k1 0 0 5
hello
STORED
get k1
VALUE k1 0 5
hello
END
quit
Connection closed by foreign host.
将192.168.100.101节点的memcached进程关闭,模拟故障,后台运行的脚本导致keepalived服务关闭,keepalived服务关闭,导致magent进程关闭;
[root@mastermem ~]# netstat -utpln |grep mem
tcp 0 0 0.0.0.0:11211 0.0.0.0:* LISTEN 63140/memcached
[root@mastermem ~]# kill -9 63140
[root@mastermem ~]# netstat -utpln |grep mem
[root@mastermem ~]# netstat -utpln |grep magent
[root@mastermem ~]# ip a |grep 192.168.100.250
此时验证slave节点的进程情况,VIP转移到slave节点上;
[root@slavemem ~]# ip a|grep 192.168.100.250
inet 192.168.100.250/32 scope global eth0
[root@slavemem ~]# netstat -utpln |grep mem
tcp 0 0 0.0.0.0:11211 0.0.0.0:* LISTEN 17920/memcached
[root@slavemem ~]# netstat -utpln |grep magent
tcp 0 0 192.168.100.250:12000 0.0.0.0:* LISTEN 53789/magent
客户端测试读写数据;
[root@client ~]# telnet 192.168.100.250 12000
Trying 192.168.100.250...
Connected to 192.168.100.250.
Escape character is \'^]\'.
get k1
VALUE k1 0 5
hello
END
set k2 0 0 2
ha
STORED
get k2
VALUE k2 0 2
ha
END
quit
Connection closed by foreign host.
————————————————
原文链接:https://blog.csdn.net/Richardlygo/article/details/81710859
以上是关于Memcached集群原理以及搭建的主要内容,如果未能解决你的问题,请参考以下文章