简介
MHA(Master HA)是一款开源的 mysql 的高可用程序,它为 MySQL 主从复制架构提供了 automating master failover 功能。MHA 在监控到 master 节点故障时,会提升其中拥有最新数据的 slave 节点成为新的master 节点,在此期间,MHA 会通过于其它从节点获取额外信息来避免一致性方面的问题。MHA 还提供了 master 节点的在线切换功能,即按需切换 master/slave 节点。
MHA 是由日本人 yoshinorim(原就职于DeNA现就职于FaceBook)开发的比较成熟的 MySQL 高可用方案。MHA只负责Mysql主库的高可用,主库发生故障时, MHA会选择一个数据最接近原主库的候选节点作为新的主节点,并补齐和之前Dead Master差异的Binlog, 数据补齐之后,将写vip飘逸到新主库上对外提供服务.MHA还提供在线主库切换的功能,能够安全地切换当前运行的主库到一个新的主库上(通过将从库提升为主库)大概0.5-2秒即可完成.
MHA原理
服务角色
MHA服务有两种角色, MHA Manager(管理节点)和MHA Node(数据节点)
MHA Manager
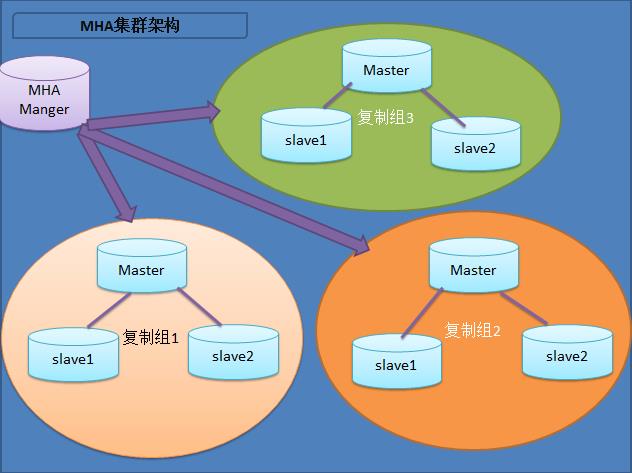
通常单独部署在一台独立机器上管理多个 master/slave 集群(组),每个 master/slave 集群称作一个 application,用来管理统筹整个集群。
MHA node
运行在每台 MySQL 服务器上(master/slave/manager),它通过监控具备解析和清理 logs 功能的脚本来加快故障转移
主要是接收管理节点所发出指令的代理,代理需要运行在每一个 mysql 节点上。简单讲 node 就是用来收集从节点服务器上所生成的 bin-log 。对比打算提升为新的主节点之上的从节点的是否拥有并完成操作,如果没有发给新主节点在本地应用后提升为主节点。

由上图我们可以看出,每个复制组内部和 Manager 之间都需要ssh实现无密码互连,只有这样,在 Master 出故障时, Manager 才能顺利的连接进去,实现主从切换功能。
/*
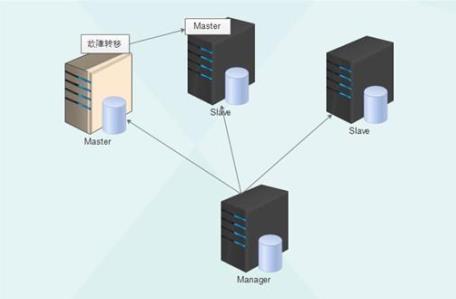
		当Master出现故障时,他可以自动将最新数据的Slave提升为新的Master,然后将所有其他的Slave重新指向新的Master, 整个故障转移过程对应的程序是完全透明的.
*/
工作原理

# MHA工作原理总结为以下几条:
# 1 从宕机崩溃的 master 保存二进制日志事件(binlog events);
# 2 识别含有最新更新的 slave ;
# 3 应用差异的中继日志(relay log) 到其他 slave ;
# 4 应用从 master 保存的二进制日志事件(binlog events);
# 5 提升一个 slave 为新 master ;
# 6 使用其他的 slave 连接新的 master 进行复制。
在MHA自动故障切换过程中,MHA试图从宕机的主服务器上保存二进制日志,最大程度的保证数据的不丢失,但这并不总是可行的。例如,如果主服务器硬件故障或无法通过ssh访问,MHA没法保存二进制日志,只进行故障转移而丢失了最新的数据。使用MySQL 5.5的半同步复制,可以大大降低数据丢失的风险。MHA可以与半同步复制结合起来。如果只有一个slave已经收到了最新的二进制日志,MHA可以将最新的二进制日志应用于其他所有的slave服务器上,因此可以保证所有节点的数据一致性
环境配置
MHA 对 MYSQL 复制环境有特殊要求,例如各节点都要开启二进制日志及中继日志,各从节点必须显示启用其
read-only属性,并关闭relay_log_purge功能等,这里对配置做事先说明。
| 主机名 | IP | 服务角色 | 备注 |
|---|---|---|---|
| Manager | 192.168.43.125 | Manager控制器 | 监控管理 |
| master | 192.168.43.241 | 数据库主 | |
| slave1 | 192.168.43.183 | 数据库从 | |
| slave2 | 192.168.43.252 | 数据库从 |
配置ssh免密
注意是四台机器互相喔
echo -e "\\n" |ssh-keygen  -t dsa -N ""
ssh-copy-id -i .ssh/id_dsa.pub slave1
ssh-copy-id -i .ssh/id_dsa.pub slave2
ssh-copy-id -i .ssh/id_dsa.pub master
准备Mysql主从复制环境
注意
binlog-do-db 和 replicate-ignore-db 设置必须相同。 MHA 在启动时候会检测过滤规则,如果过滤规则不同,MHA 不启动监控和故障转移
安装mysql
tar xf mysql-5.7.25-linux-glibc2.12-x86_64.tar.gz  -C /usr/local/
useradd mysql -s /sbin/nologin -M
mv mysql-5.7.25-linux-glibc2.12-x86_64 /usr/local/mysql
cd /usr/local/mysql
mkdir logs
\\cp  support-files/mysql.server /etc/init.d/mysqld
chmod +x /etc/init.d/mysqld
chown -R mysql:mysql /usr/local/mysql/
ln -s /usr/local/mysql/bin/* /usr/local/bin/
chkconfig --add mysqld
mysqld --initialize-insecure --user=mysql --basedir=/usr/local/mysql/ --datadir=/usr/local/mysql/data/


`/etc/my.cnf  master`
[mysqld]
basedir=/usr/local/mysql/
datadir=/usr/local/mysql/data
socket=/usr/local/mysql/mysql.sock
port=3306
log_error=/usr/local/mysql/logs/error.log

server-id = 1
binlog_format = row
expire_logs_days = 30
max_binlog_size  = 100M
gtid_mode = ON
enforce_gtid_consistency = ON
log-bin = /usr/local/mysql/logs/mysql-bin
log_bin_index = /usr/local/mysql/logs/mysql-bin.index
log-slave-updates = ON

[mysqld_safe]
log_error=/usr/local/mysql/logs/error.log
pid-file=/usr/local/mysql/logs/mysql.pid

[client]
socket=/usr/local/mysql/mysql.sock


/etc/init.d/mysqld start
mysql

set password=password(\'ZHOUjian.22\');
配置从节点
`/etc/my.cnf  slave1`
cat /etc/my.cnf
[mysqld]
basedir=/usr/local/mysql/
datadir=/usr/local/mysql/data
socket=/usr/local/mysql/mysql.sock
port=3306
log_error=/usr/local/mysql/logs/error.log

server-id = 2
gtid_mode = ON
enforce_gtid_consistency = ON
log-slave-updates = ON
skip-slave-start = true
expire_logs_days = 30
max_binlog_size  = 100M
read_only = ON
log-bin = /usr/local/mysql/logs/mysql-bin
log_bin_index = /usr/local/mysql/logs/mysql-bin.index
relay-log = /usr/local/mysql/logs/relay-log
relay-log-index = /usr/local/mysql/logs/relay-log-index
relay-log-info-file = /usr/local/mysql/logs/relay-log.info
master-info-repository = table
relay-log-info-repository = table

[mysqld_safe]
log_error=/usr/local/mysql/logs/error.log
pid-file=/usr/local/mysql/logs/mysql.pid

[client]
socket=/usr/local/mysql/mysql.sock


`/etc/my.cnf  slave2`
cat /etc/my.cnf
[mysqld]
basedir=/usr/local/mysql/
datadir=/usr/local/mysql/data
socket=/usr/local/mysql/mysql.sock
port=3306
log_error=/usr/local/mysql/logs/error.log

server-id = 3
gtid_mode = ON
enforce_gtid_consistency = ON
log-slave-updates = ON
skip-slave-start = true
expire_logs_days = 30
max_binlog_size  = 100M
read_only = ON
log-bin = /usr/local/mysql/logs/mysql-bin
log_bin_index = /usr/local/mysql/logs/mysql-bin.index
relay-log = /usr/local/mysql/logs/relay-log
relay-log-index = /usr/local/mysql/logs/relay-log-index
relay-log-info-file = /usr/local/mysql/logs/relay-log.info
master-info-repository = table
relay-log-info-repository = table

[mysqld_safe]
log_error=/usr/local/mysql/logs/error.log
pid-file=/usr/local/mysql/logs/mysql.pid

[client]
socket=/usr/local/mysql/mysql.sock
配置slave一主多从复制
`主库执行以下增加权限配置`
mysql> grant replication slave on *.* to \'repl\'@\'192.168.43.%\' identified by \'ZHOUjian.22\';

mysql> grant all privileges on *.* to \'mha\'@\'192.168.43.%\' identified by \'ZHOUjian.22\';
mysql> flush privileges;


`两个从库添加repl同步权限`
change master to
master_host=\'192.168.43.241\',
master_user=\'repl\',
master_password=\'ZHOUjian.22\',
master_auto_position=1;

start slave;
show slave status\\G;
             Slave_IO_Running: Yes   # io_thread  负责从主master取数据
            Slave_SQL_Running: Yes   # sql_thread  从取来数据应用到从库上
检测一主多从复制
master节点
mysql> show processlist;
+----+------+---------------+------+-------------+------+---------------------------------------------------------------+------------------+
| Id | User | Host          | db   | Command     | Time | State                                                         | Info             |
+----+------+---------------+------+-------------+------+---------------------------------------------------------------+------------------+
|  6 | repl | mysql03:40668 | NULL | Binlog Dump | 2922 | Master has sent all binlog to slave; waiting for more updates | NULL             |
|  7 | root | localhost     | NULL | Query       |    0 | starting                                                      | show processlist |
|  8 | repl | manager:56232 | NULL | Binlog Dump |    9 | Master has sent all binlog to slave; waiting for more updates | NULL             |
+----+------+---------------+------+-------------+------+---------------------------------------------------------------+------------------+
3 rows in set (0.00 sec)
安装配置MHA
在所有 Mysql 节点授权拥有管理权限的用户可在本地网络中有其他节点上远程访问。 当然, 此时仅需要且只能在 master 节点运行类似如下 SQL 语句即可。
wget https://github.com/yoshinorim/mha4mysql-manager/releases/download/v0.58/mha4mysql-manager-0.58-0.el7.centos.noarch.rpm

 wget https://github.com/yoshinorim/mha4mysql-node/releases/download/v0.58/mha4mysql-node-0.58-0.el7.centos.noarch.rpm


# 所有机器安装下面依赖包
yum -y install perl-DBD-MySQL -y

# 三node节点分别安装
rpm -ivh mha4mysql-node-0.58-0.el7.centos.noarch.rpm


# manager先安装node再安装manager
yum install epel-release -y
yum -y install perl-DBD-MySQL perl-Config-Tiny perl-Log-Dispatch perl-Parallel-ForkManager perl-Time-HiRes

rpm -ivh mha4mysql-node-0.58-0.el7.centos.noarch.rpm
rpm -ivh mha4mysql-manager-0.58-0.el7.centos.noarch.rpm
配置机器之间免密
ssh-keygen

# 四台机器分别之间相互免密
ssh-copy-id 192.168.43.183
ssh-copy-id 192.168.43.47
ssh-copy-id 192.168.43.241
ssh-copy-id 192.168.43.252
配置全局配置文件
mkdir -p /var/log/mha/mha1
mkdir /etc/mha
cat /etc/mha/mha1.cnf
[server default]
manager_log=/var/log/mha/mha1/manager
manager_workdir=/var/log/mha/mha1
master_binlog_dir=/usr/local/mysql/data
password=ZHOUjian.22
ping_interval=2
repl_password=ZHOUjian.22
repl_user=repl
ssh_user=root
user=mha

[server1]
hostname=192.168.43.241
port=3306

[server2]
hostname=192.168.43.183
port=3306

[server3]
hostname=192.168.43.252
no_master=1
port=3306


# 测试配置
[root@manager masterha]# masterha_check_ssh --conf=/etc/mha/mha1.cnf
# Wed Oct 14 12:55:32 2020 - [info] All SSH connection tests passed successfully.

[root@manager ~]#  masterha_check_repl --conf=/etc/mha/mha1.cnf

# MySQL Replication Health is OK.
启动mha
nohup masterha_manager --conf=/etc/mha/mha1.cnf -remove_dead_master_conf --ignore_last_failover < /dev/null > /var/log/mha/mha1/manager.log 2>&1 &


ps -ef |grep manager
root      14203    963  0 01:36 pts/0    00:00:00 grep --color=auto manager
[1]+  Exit 1                  nohup masterha_manager --conf=/etc/mha/mha1.cnf -remove_dead_master_conf --ignore_last_failover ha/mha1/manager.log < /dev/null > /var/log/m 2>&1
MHA管理
软件包工具介绍
提供的工具
MHA会提供诸多工具程序,常见的如下所示
/*
		1. Manager节点:  可以单独部署在一台独立的机器上管理多个master-slave集群,也可以部署在一台slave节点上
		2. Node节点:  运行在每节点上
*/
Manager节点
masterha_check_ssh: # MHA 依赖的 ssh 环境监测工具;
masterha_check_repl:# MYSQL 复制环境检测工具;

masterga_manager:   # MHA 服务主程序;启动MHA管理器,自动监控和自动故障转移
		# 常用参数
  	# --conf={config file path}:
    #    应用或本地范围的配置参数文件,必须指定.

    # --global-conf={global config file path}:
    #    全局范围的配置参数,默认/etc/masterha_default.cnf

    # manager_workdir, --workdir:
    #    manager工作的目录,存放mha manager产生关联的状态文件.

    # mastera_log, --log_output
    #    存放mha manager产生的日志文件,如果没有设置,将会使用标准输出.
    #    当执行failover, mha manager忽略此配置, 使用标准的输出

    # wait_on_monitor_error=(seconds):
    #    在监控的过程,当发出错误了, masterha_manager等待wait_no_monitor_error的时间后退出.
    #    如果设置为0,直接退出,这个好处,是当后台运行master monitor和failover scripts的时候,
    #    masterha_manager可以在wait_no_monitor_error时间到达之前重启监控.

    # --ignore_fail_on_start
    #    默认的情况下,当一个或多个从库宕机后,主库监控(不是failover)进程无法启动,除非ignore_fail_on_start参数开启.


    # Failover参数
    # --last_failover_minute=(minutes):
    #    当最近的一个failover切换发生在last_failover_minute(默认为8小时)之内,
    #    MHA manager将不会切换,因为他会认为有些问题没有得到解决,如果设置了--ignore_last_failover参数,参数(--last_failover_minute)将会失效.

    # --ignore_last_failover:
    #    如果最近failover失败,MHA将不会再次开始failover机制:
    #    常规步骤:
    #       1. 手动清理failover错误文件,此文件一般在manager_workdir/app_name.failover.error文件,
    #           然后在启动failover机制,如果设置此参数,MHA将会继续failover不管上次failover状态.


    # wait_on_failover_error=(seconds)
    #    在failover的过程,当发出错误了,masterha_manager等待wait_no_failover_error的时间后退出,
    #    如果设置为0,直接退出,这个好处,是当后台运行master monitor和failover scripts的时候,
    #     masterha_manager可以在wait_no_failover_error时间到达之前重启监控.

    # --remove_dead_master_conf
    #     如果设置此参数,当成功failover后,MHA manager将会自动删除配置文件中关于dead master的配置选项.

masterha_check_status:# MHA 运行状态探测工具;

# Example
[root@manager ~]# masterha_check_status --conf=/masterha/app1.cnf
app1 (pid:14555) is running(0:PING_OK), master:192.168.43.241


masterha_master_monitor: # MYSQL master 节点可用性监测工具;
masterha_master_swith:master:# 节点切换工具;
  	# masterha_manager是一个自动监控和执行主服务器故障转移的程序,masterha_master_switch程序不监控master.
    # masterha_master_switch可以用于主服务故障转移,也可以用于在线切换.


masterha_conf_host:  # 添加或删除配置的节点;
# 在某些情况,可能希望自动在配置文件中添加/删除主机条目,例如,当你设置新的从属服务器时,
# 不需要手动编辑配置文件,只需添加新的主机条目.

masterha_stop: # 关闭 MHA 服务的工具。
Node节点
这些工具都是由MHA Manager的脚本触发,无须认为操作
save_binary_logs: # 保存和复制 master 的二进制日志;
apply_diff_relay_logs:# 识别差异的中继日志事件并应用于其他 slave;
purge_relay_logs: # 清除中继日志(不会阻塞 SQL 线程);
# MySQL数据库主从复制在缺省情况下从库的relay log会在SQL线程执行完被自动删除,但对于MHA场景下,
# 对于某些滞后从库的恢复依赖于其他从库的relay log,因此采取禁用自动删除功能以及定义清理的方法,
# 对于清理过大的relay log需要注意引起的复制延迟,资源开销等,MHA可通过purge_relay_logs脚本及配置cronjob来完成此项任务.


# 自定义扩展:
secondary_check_script:# 通过多条网络路由检测master的可用性;
master_ip_failover_script:# 更新application使用的masterip;
report_script:# 发送报告;
init_conf_load_script:# 加载初始配置参数;
master_ip_online_change_script;  # 更新master节点ip地址。
MHA自动故障转移
模拟主数据库宕机
[root@master ~]# /etc/init.d/mysqld stop


[root@master ~]# tailf  /var/log/mha/mha1/manager
Thu Oct 15 01:16:37 2020 - [info] -- Slave recovery on host 192.168.43.252(192.168.43.252:3306) started, pid: 14071. Check tmp log /var/log/mha/mha1/192.168.43.252_3306_20201015011635.log if it takes time..
Thu Oct 15 01:16:38 2020 - [info]
Thu Oct 15 01:16:38 2020 - [info] Log messages from 192.168.43.252 ...
Thu Oct 15 01:16:38 2020 - [info]
Thu Oct 15 01:16:37 2020 - [info]  Resetting slave 192.168.43.252(192.168.43.252:3306) and starting replication from the new master 192.168.43.183(192.168.43.183:3306)..
Thu Oct 15 01:16:37 2020 - [info]  Executed CHANGE MASTER.
Thu Oct 15 01:16:37 2020 - [info]  Slave started.
Thu Oct 15 01:16:37 2020 - [info]  gtid_wait(21c673b5-0e3b-11eb-9f94-000c2923a3e6:1,
a784a36d-0e39-11eb-9711-000c29053764:1-2) completed on 192.168.43.252(192.168.43.252:3306). Executed 2 events.
Thu Oct 15 01:16:38 2020 - [info] End of log messages from 192.168.43.252.
Thu Oct 15 01:16:38 2020 - [info] -- Slave on host 192.168.43.252(192.168.43.252:3306) started.
Thu Oct 15 01:16:38 2020 - [info] All new slave servers recovered successfully.
Thu Oct 15 01:16:38 2020 - [info]
Thu Oct 15 01:16:38 2020 - [info] * Phase 5: New master cleanup phase..
Thu Oct 15 01:16:38 2020 - [info]
Thu Oct 15 01:16:38 2020 - [info] Resetting slave info on the new master..
Thu Oct 15 01:16:38 2020 - [info]  192.168.43.183: Resetting slave info succeeded.
Thu Oct 15 01:16:38 2020 - [info] Master failover to 192.168.43.183(192.168.43.183:3306) completed successfully.
Thu Oct 15 01:16:38 2020 - [info] Deleted server1 entry from /etc/mha/mha1.cnf .
Thu Oct 15 01:16:38 2020 - [info]

----- Failover Report -----

mha1: MySQL Master failover 192.168.43.241(192.168.43.241:3306) to 192.168.43.183(192.168.43.183:3306) succeeded

Master 192.168.43.241(192.168.43.241:3306) is down!

Check MHA Manager logs at tracker1:/var/log/mha/mha1/manager for details.

Started automated(non-interactive) failover.
Selected 192.168.43.183(192.168.43.183:3306) as a new master.
192.168.43.183(192.168.43.183:3306): OK: Applying all logs succeeded.
192.168.43.252(192.168.43.252:3306): OK: Slave started, replicating from 192.168.43.183(192.168.43.183:3306)
192.168.43.183(192.168.43.183:3306): Resetting slave info succeeded.
Master failover to 192.168.43.183(192.168.43.183:3306) completed successfully.
恢复主库
mysql> change master to  master_host=\'192.168.43.241\', MASTER_PORT=3306,MASTER_USER=\'repl\',MASTER_PASSWORD=\'ZHOUjian.22\',MASTER_AUTO_POSITION=1;
mysql> start slave;

mysql> SHOW SLAVE STATUS\\G;
*************************** 1. row ***************************
               Slave_IO_State:
                  Master_Host: 192.168.43.241
                  Master_User: repl
                  Master_Port: 3306

`验证主从切换`
`我们可以查看183这台Mha自动切换的主库有两个从库了`
mysql> show processlist;
+----+------+---------------+------+------------------+------+---------------------------------------------------------------+------------------+
| Id | User | Host          | db   | Command          | Time | State                                                         | Info             |
+----+------+---------------+------+------------------+------+---------------------------------------------------------------+------------------+
| 14 | repl | manager:10199 | NULL | Binlog Dump GTID |  580 | Master has sent all binlog to slave; waiting for more updates | NULL             |
| 15 | repl | mysql02:46340 | NULL | Binlog Dump GTID |  145 | Master has sent all binlog to slave; waiting for more updates | NULL             |
| 16 | root | localhost     | NULL | Query            |    0 | starting                                                      | show processlist |
+----+------+---------------+------+------------------+------+---------------------------------------------------------------+------------------+
3 rows in set (0.00 sec)
重新将配置文件少去的宕机master配置加入到mha配置
[root@manager ~]# cat /etc/mha/mha1.cnf
[server default]
manager_log=/var/log/mha/mha1/manager
manager_workdir=/var/log/mha/mha1
master_binlog_dir=/usr/local/mysql/data
password=ZHOUjian.22
ping_interval=2
repl_password=ZHOUjian.22
repl_user=repl
ssh_user=root
user=mha

[server1]
hostname=192.168.43.241
port=3306

[server2]
hostname=192.168.43.183
port=3306

[server3]
hostname=192.168.43.252
no_master=1
port=3306


# 重启Mha
nohup masterha_manager --conf=/etc/mha/mha1.cnf -remove_dead_master_conf --ignore_last_failover < /dev/null > /var/log/mha/mha1/manager.log 2>&1 &
发生故障时,MHA做了什么
1 . 当作为master的192.168.43.241主机上的Mysql宕机以后, MHA通过检测发现192.168.43.241的mysql宕机了,就会将binlog日志最全的从库192.168.43.183(备用master)立刻提升为主库,而其他的从库会指向新的主库进行再次同步.
2 . MHA自己会结束自己的进程,还会将/etc/mha/app1.cnf配置文件中发生故障的那台主机去除.
配置vip漂移
漂移方式
/*
		1. 通过keepalived的方式,管理虚拟IP的漂移.
		2. 通过MHA自带脚本的方式,管理虚拟IP的漂移,用mha自带的一个VIP漂移的脚本,
		那台服务器变为(master),就漂到那个上面,根据binlog最新的slave提升
*/
编写漂移脚本
[root@manager ~]# cat /usr/local/bin/master_ip_failover
#!/usr/bin/env perl
#  Copyright (C) 2011 DeNA Co.,Ltd.
#
#  This program is free software; you can redistribute it and/or modify
#  it under the terms of the GNU General Public License as published by
#  the Free Software Foundation; either version 2 of the License, or
#  (at your option) any later version.
#
#  This program is distributed in the hope that it will be useful,
#  but WITHOUT ANY WARRANTY; without even the implied warranty of
#  MERCHANTABILITY or FITNESS FOR A PARTICULAR PURPOSE.  See the
#  GNU General Public License for more details.
#
#  You should have received a copy of the GNU General Public License
#   along with this program; if not, write to the Free Software
#  Foundation, Inc.,
#  51 Franklin Street, Fifth Floor, Boston, MA  02110-1301  USA
## Note: This is a sample script and is not complete. Modify the script based on your environment.
use strict;
use warnings FATAL => \'all\';
use Getopt::Long;
use MHA::DBHelper;
my (
  $command,        $ssh_user,         $orig_master_host,
  $orig_master_ip, $orig_master_port, $new_master_host,
  $new_master_ip,  $new_master_port,  $new_master_user,
  $new_master_password
);
my $vip = \'192.168.43.100/24\';
my $key = \'1\';
my $ssh_start_vip = "/sbin/ifconfig ens32:$key $vip";
my $ssh_stop_vip = "/sbin/ifconfig ens32:$key down";
GetOptions(
  \'command=s\'             => \\$command,
  \'ssh_user=s\'            => \\$ssh_user,
  \'orig_master_host=s\'    => \\$orig_master_host,
  \'orig_master_ip=s\'      => \\$orig_master_ip,
  \'orig_master_port=i\'    => \\$orig_master_port,
  \'new_master_host=s\'     => \\$new_master_host,
  \'new_master_ip=s\'       => \\$new_master_ip,
  \'new_master_port=i\'     => \\$new_master_port,
  \'new_master_user=s\'     => \\$new_master_user,
  \'new_master_password=s\' => \\$new_master_password,
);
exit &main();
sub main {
  if ( $command eq "stop" || $command eq "stopssh" ) {
    # $orig_master_host, $orig_master_ip, $orig_master_port are passed.
    # If you manage master ip address at global catalog database,
    # invalidate orig_master_ip here.
    my $exit_code = 1;
    eval {
      # updating global catalog, etc
      $exit_code = 0;
    };
    if ($@) {
      warn "Got Error: $@\\n";
      exit $exit_code;
    }
    exit $exit_code;
  }
  elsif ( $command eq "start" ) {
    # all arguments are passed.
    # If you manage master ip address at global catalog database,
    # activate new_master_ip here.
    # You can also grant write access (create user, set read_only=0, etc) here.
    my $exit_code = 10;
    eval {
      my $new_master_handler = new MHA::DBHelper();
      # args: hostname, port, user, password, raise_error_or_not
      $new_master_handler->connect( $new_master_ip, $new_master_port,
        $new_master_user, $new_master_password, 1 );
      ## Set read_only=0 on the new master
      $new_master_handler->disable_log_bin_local();
      print "Set read_only=0 on the new master.\\n";
      $new_master_handler->disable_read_only();
      ## Creating an app user on the new master
      print "Creating app user on the new master..\\n";
      FIXME_xxx_create_user( $new_master_handler->{dbh} );
      $new_master_handler->enable_log_bin_local();
      $new_master_handler->disconnect();
      ## Update master ip on the catalog database, etc
      # FIXME_xxx;
      $exit_code = 0;
    };
    if ($@) {
      warn $@;
      # If you want to continue failover, exit 10.
      exit $exit_code;
    }
    exit $exit_code;
  }
  elsif ( $command eq "status" ) {
    # do nothing
    exit 0;
  }
  else {
    &usage();
    exit 1;
  }
}
sub usage {
  print
"Usage: master_ip_failover --command=start|stop|stopssh|status --orig_master_host=host --orig_master_ip=ip --orig_master_port=port --new_master_host=host --new_master_ip=ip --new_master_port=port\\n";
}
master添加vip
[root@mysql-master ~]# ifconfig ens32:1 192.168.43.100/24
防止manager监控程序自动死掉
[root@manager ~]# cat /usr/local/bin/masterha_start.sh
nohup masterha_manager --conf=/etc/mha/mha1.cnf -remove_dead_master_conf --ignore_last_failover < /dev/null > /var/log/mha/mha1/manager.log 2>&1 &
[root@manager ~]# chmod +x /usr/local/bin/masterha_start.sh

[root@manager ~]# nohup /usr/local/bin/manager_status_check &
[root@manager ~]# echo "nohup /usr/local/bin/manager_status_check &" >> /etc/rc.d/rc.local


# 只要修复好主库,添加好配置就能自动运行,不用专门再去输入命令启动
