React 实现组件拖拽功能
Posted
tags:
篇首语:本文由小常识网(cha138.com)小编为大家整理,主要介绍了React 实现组件拖拽功能相关的知识,希望对你有一定的参考价值。
参考技术A html5原生支持拖拽功能,没有看过相关文档,恰好自己想实现一下React组件的拖拽,在网上看了一些文章之后再结合自己的思考实现了一个简陋的圆形,感觉性能不是很好。/**
* Created by w on 2018/3/16.
*/
import Reactfrom 'react';
import ReactDOMfrom 'react-dom';
import './dragImg.css';
class DragImgextends React.Component
constructor(props)
super(props);
this.state =
cursor:'pointer',
relativeX:0,
relatveY:0,
isDragging:false
;
this.handleMouseEnter =this.handleMouseEnter.bind(this);
this.handleMouseLeave =this.handleMouseLeave.bind(this);
this.handleMouseDown =this.handleMouseDown.bind(this);
this.handleMouseUp =this.handleMouseUp.bind(this);
this.handleMouseMove =this.handleMouseMove.bind(this);
componentDidMount()
let node =this.refs.dragPanel;
node.style.left ='50px';
node.style.top ='50px';
handleMouseEnter(e)
this.setState(
cursor:'cursor'
)
handleMouseLeave(e)
this.setState(
isDragging:false
)
handleMouseDown(e)
this.setState(
isDragging:true
)
handleMouseUp(e)
console.log(this.state.isDragging);
this.setState(
relativeX:0,
relativeY:0,
isDragging:false
)
handleMouseMove(e)
let node =this.refs.dragPanel;
this.setState(
cursor:'move',
relativeX: e.clientX -node.offsetLeft,
relativeY: e.clientY -node.offsetTop,
);
if (this.state.isDragging)
node.style.left = e.pageX -this.state.relativeX +'px';
node.style.top = e.pageY -this.state.relativeY +'px';
render()
return
onMouseEnter=this.handleMouseEnter onMouseLeave=this.handleMouseLeave onMouseDown=this.handleMouseDown onMouseUp=this.handleMouseUp onMouseMove=this.handleMouseMove ref="dragPanel" style='cursor':this.state.cursor>
ReactDOM.render(,document.getElementById('root'));
+ e.clientX,e.clientY和e.pageX,e.PageY的区别是算不算上滚动条
鸿蒙实现拖拽组件的功能
前言
对于拖拽功能,我们需要用到的是DraggedListener
准备
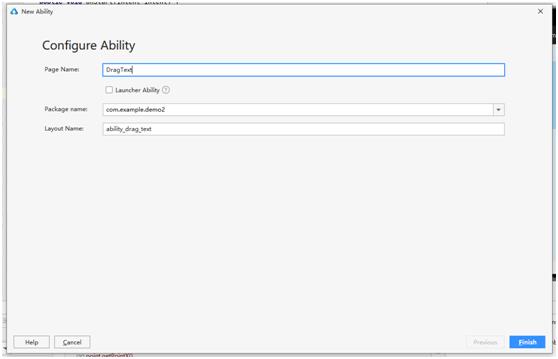
首先我们新建一个页面用于实现拖拽的功能

然后弹窗中输入页面名称
将页面的slice定义到MainAbility中
public class MainAbility extends Ability {
    @Override
    public void onStart(Intent intent) {
        super.onStart(intent);
        super.setMainRoute(DragTextSlice.class.getName());
    }
}
最后,我们在其相应的样式文件中定义一个组件用于拖动,页面采用PositionLayout的布局格式
ability_drag_text.xml:
<?xml version="1.0" encoding="utf-8"?>
<PositionLayout
    xmlns:ohos="http://schemas.huawei.com/res/ohos"
    ohos:id="$+id:darg"
    ohos:height="match_parent"
    ohos:width="match_parent"
    ohos:background_element="#3387CEFA">
    <Text
        ohos:id="$+id:drag_text_1"
        ohos:height="50vp"
        ohos:width="200vp"
        ohos:background_element="#9987CEFA"
        ohos:position_x="100"
        ohos:position_y="20"
        ohos:text="Title"
        ohos:text_alignment="center"
        ohos:text_size="20fp"/>
</PositionLayout>
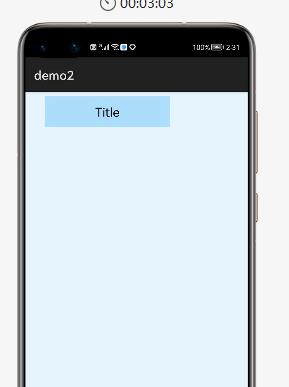
然后我们在模拟器查看页面如下:
实现拖拽功能
首先我们需要定义point和componentPo用于保存拖拽前触屏点的位置以及模块左上角位置
    private Point point;
    private final ThreadLocal<Point> componentPo = new ThreadLocal<Point>();
然后就是获取组件以及给组件设置setDraggedListener事件了
textFirst.setDraggedListener(Component.DRAG_HORIZONTAL_VERTICAL, new Component.DraggedListener() {
            @Override
            public boolean onDragPreAccept(Component component, int dragDirection) {
                return true;
            }
            @Override
            public void onDragDown(Component component, DragInfo dragInfo) {
            }
            @Override
            public void onDragStart(Component component, DragInfo dragInfo) {
            	//获取拖拽前触摸点位置
                point = dragInfo.startPoint;
                //获取拖拽前组件在父组件中的左上角起始位置
                componentPo.set(new Point(component.getContentPositionX(), component.getContentPositionY()));
            }
            @Override
            public void onDragUpdate(Component component, DragInfo dragInfo) {
                float xOffset = dragInfo.updatePoint.getPointX() - point.getPointX();
                float yOffset = dragInfo.updatePoint.getPointY() - point.getPointY();
                //setContentPosition为组件在父组件中的位置
                component.setContentPosition(componentPo.get().getPointX() + xOffset, componentPo.get().getPointY() + yOffset);
                componentPo.set(new Point(component.getContentPositionX(), component.getContentPositionY()));
            }
            @Override
            public void onDragEnd(Component component, DragInfo dragInfo) {
            }
            @Override
            public void onDragCancel(Component component, DragInfo dragInfo) {
            }
        });
其中onDragStart方法将拖拽前触摸点的位置保存到point中;将拖拽前组件左上角位置保存到componentPo中
然后onDragUpdate中,dragInfo.updatePoint.getPointX()为拖拽后触摸点位置,所以相求X方向的便宜良则用拖拽后触摸点X坐标减去拖拽前X坐标,Y方向同理
最后使用拖拽前模块坐上角位置分别加上X和Y方向的便宜量,得到并设置拖拽后模块左上角的位置
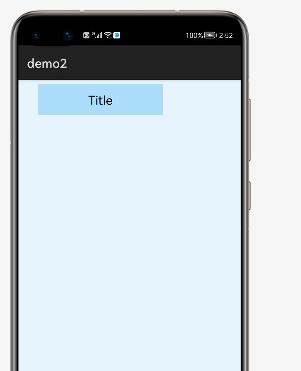
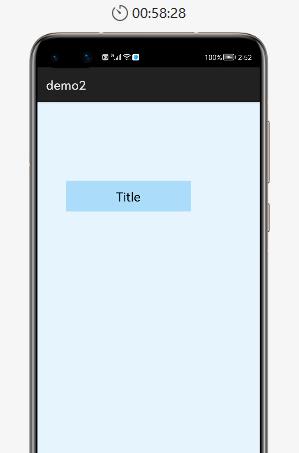
效果如下:
拖拽前:
拖拽后
更多技术交流请加入QQ群
群名称:华为鸿蒙harmonyos开发
群 号:1164091073
以上是关于React 实现组件拖拽功能的主要内容,如果未能解决你的问题,请参考以下文章