Android 重学系列 ion驱动源码浅析
Posted
tags:
篇首语:本文由小常识网(cha138.com)小编为大家整理,主要介绍了Android 重学系列 ion驱动源码浅析相关的知识,希望对你有一定的参考价值。
参考技术A 上一篇文章,在解析初始化GraphicBuffer中,遇到一个ion驱动,对图元进行管理。首先看看ion是怎么使用的:我们按照这个流程分析ion的源码。
如果对ion使用感兴趣,可以去这篇文章下面看 https://blog.csdn.net/hexiaolong2009/article/details/102596744
本文基于android的Linux内核版本3.1.8
遇到什么问题欢迎来本文讨论 https://www.jianshu.com/p/5fe57566691f
什么是ion?如果是音视频,Camera的工程师会对这个驱动比较熟悉。最早的GPU和其他驱动协作申请一块内存进行绘制是使用比较粗暴的共享内存。在Android系统中使用的是匿名内存。最早由三星实现了一个Display和Camera共享内存的问题,曾经在Linux社区掀起过一段时间。之后各路大牛不断的改进之下,就成为了dma_buf驱动。并在 Linux-3.3 主线版本合入主线。现在已经广泛的运用到各大多媒体开发中。
首先介绍dma_buf的2个角色,importer和exporter。importer是dma_buf驱动中的图元消费者,exporter是dma_buf驱动中的图元生产者。
这里借用大佬的图片:
ion是基于dma_buf设计完成的。经过阅读源码,其实不少思路和Android的匿名内存有点相似。阅读本文之前就算不知道dma_buf的设计思想也没关系,我不会仔细到每一行,我会注重其在gralloc服务中的申请流程,看看ion是如何管理共享内存,为什么要抛弃ashmem。
我们先来看看ion的file_operation:
只有一个open和ioctl函数。但是没有mmap映射。因此mmap映射的时候一定其他对象在工作。
我们关注显卡英伟达的初始化模块。
文件:/ drivers / staging / android / ion / tegra / tegra_ion.c
module_platform_driver实际上就是我之前经常提到过的module_init的一个宏,多了一个register注册到对应名字的平台中的步骤。在这里面注册了一个probe方法指针,probe指向的tegra_ion_probe是加载内核模块注册的时候调用。
先来看看对应的结构体:
再来看看对应ion内的堆结构体:
完成的事情如下几个步骤:
我们不关注debug模式。其实整个就是我们分析了很多次的方法。把这个对象注册miscdevice中。等到insmod就会把整个整个内核模块从dev_t的map中关联出来。
我们来看看这个驱动结构体:
文件:/ drivers / staging / android / ion / ion_heap.c
这里有四个不同堆会申请出来,我们主要来看看默认的ION_HEAP_TYPE_SYSTEM对应的heap流程。
其实真正象征ion的内存堆是下面这个结构体
不管原来的那个heap,会新建3个ion_system_heap,分别order为8,4,0,大于4为大内存。意思就是这个heap中持有一个ion_page_pool 页资源池子,里面只有对应order的2的次幂,内存块。其实就和伙伴系统有点相似。
还会设置flag为ION_HEAP_FLAG_DEFER_FREE,这个标志位后面会用到。
文件:/ drivers / staging / android / ion / ion_page_pool.c
在pool中分为2个链表一个是high_items,另一个是low_items。他们之间的区分在此时就是以2为底4的次幂为分界线。
文件:/ drivers / staging / android / ion / ion.c
因为打开了标志位ION_HEAP_FLAG_DEFER_FREE和heap存在shrink方法。因此会初始化两个回收函数。
文件:/ drivers / staging / android / ion / ion_heap.c
此时会创建一个内核线程,调用ion_heap_deferred_free内核不断的循环处理。不过由于这个线程设置的是SCHED_IDLE,这是最低等级的时间片轮转抢占。和Handler那个adle一样的处理规则,就是闲时处理。
在这个循环中,不断的循环销毁处理heap的free_list里面已经没有用的ion_buffer缓冲对象。
文件:/ drivers / staging / android / ion / ion_system_heap.c
注册了heap的销毁内存的方法。当系统需要销毁页的时候,就会调用通过register_shrinker注册进来的函数。
文件:/ drivers / staging / android / ion / ion_page_pool.c
整个流程很简单,其实就是遍历循环需要销毁的页面数量,接着如果是8的次幂就是移除high_items中的page缓存。4和0则销毁low_items中的page缓存。至于为什么是2的次幂其实很简单,为了销毁和申请简单。__free_pages能够整页的销毁。
文件:/ drivers / staging / android / ion / ion.c
主要就是初始化ion_client各个参数,最后把ion_client插入到ion_device的clients。来看看ion_client结构体:
核心还是调用ion_alloc申请一个ion缓冲区的句柄。最后把数据拷贝会用户空间。
这个实际上就是找到最小能承载的大小,去申请内存。如果8kb申请内存,就会拆分积分在0-4kb,4kb-16kb,16kb-128kb区间找。刚好dma也是在128kb之内才能申请。超过这个数字就禁止申请。8kb就会拆成2个4kb保存在第一个pool中。
最后所有的申请的page都添加到pages集合中。
文件:/ drivers / staging / android / ion / ion_page_pool.c
能看到此时会从 ion_page_pool冲取出对应大小区域的空闲页返回上层,如果最早的时候没有则会调用ion_page_pool_alloc_pages申请一个新的page。由于引用最终来自ion_page_pool中,因此之后申请之后还是在ion_page_pool中。
这里的处理就是为了避免DMA直接内存造成的缓存差异(一般的申请,默认会带一个DMA标志位)。换句话说,是否打开cache其实就是,关闭了则使用pool的cache,打开了则不使用pool缓存,只依赖DMA的缓存。
我们可以看另一个dma的heap,它是怎么做到dma内存的一致性.
文件: drivers / staging / android / ion / ion_cma_heap.c
能看到它为了能办到dma缓存的一致性,使用了dma_alloc_coherent创建了一个所有强制同步的地址,也就是没有DMA缓存的地址。
这里出现了几个新的结构体,sg_table和scatterlist
文件:/ lib / scatterlist.c
这里面实际上做的事情就是一件:初始化sg_table.
sg_table中有一个核心的对象scatterlist链表。如果pages申请的对象数量<PAGE_SIZE/sizeof(scatterlist),每一项sg_table只有一个scatterlist。但是超出这个数字就会增加一个scatterlist。
用公式来说:
换句话说,每一次生成scatterlist的链表就会直接尽可能占满一页,让内存更好管理。
返回了sg_table。
初始化ion_handle,并且记录对应的ion_client是当前打开文件的进程,并且设置ion_buffer到handle中。使得句柄能够和buffer关联起来。
每当ion_buffer需要销毁,
重学SpringBoot系列之Spring cache详解
重学SpringBoot系列之Spring cache详解
为什么使用缓存
使用缓存是一个很“高性价比”的性能优化方式,尤其是对于有大量重复查询的程序来说。通常来说,在WEB后端应用程序来说,耗时比较大的往往有两个地方:一个是查数据库,一个是调用其它服务的API(因为其它服务最终也要去做查数据库等耗时操作)。
重复查询也有两种。一种是我们在应用程序中代码写得不好,写的for循环,可能每次循环都用重复的参数去查询了。这种情况,比较聪明一点的程序员都会对这段代码进行重构,用Map来把查出来的东西暂时放在内存里,后续去查询之前先看看Map里面有没有,没有再去查数据库,其实这就是一种缓存的思想。
另一种重复查询是大量的相同或相似请求造成的。比如资讯网站首页的文章列表、电商网站首页的商品列表、微博等社交媒体热搜的文章等等,当大量的用户都去请求同样的接口,同样的数据,如果每次都去查数据库,那对数据库来说是一个不可承受的压力。所以我们通常会把高频的查询进行缓存,我们称它为“热点”。
为什么使用Spring Cache
前面提到了缓存有诸多的好处,于是大家就摩拳擦掌准备给自己的应用加上缓存的功能。但是网上一搜却发现缓存的框架太多了,各有各的优势,比如Redis、Memcached、Guava、Caffeine等等。
如果我们的程序想要使用缓存,就要与这些框架耦合。聪明的架构师已经在利用接口来降低耦合了,利用面向对象的抽象和多态的特性,做到业务代码与具体的框架分离。
但我们仍然需要显式地在代码中去调用与缓存有关的接口和方法,在合适的时候插入数据到缓存里,在合适的时候从缓存中读取数据。
想一想AOP的适用场景,这不就是天生就应该AOP去做的吗?
是的,Spring Cache就是一个这个框架。它利用了AOP,实现了基于注解的缓存功能,并且进行了合理的抽象,业务代码不用关心底层是使用了什么缓存框架,只需要简单地加一个注解,就能实现缓存功能了。而且Spring Cache也提供了很多默认的配置,用户可以3秒钟就使用上一个很不错的缓存功能。
如何使用Spring Cache
使用SpringCache分为很简单的三步:加依赖,开启缓存,加缓存注解。
加依赖
gradle:
implementation 'org.springframework.boot:spring-boot-starter-cache'
maven:
<dependency>
    <groupId>org.springframework.boot</groupId>
    <artifactId>spring-boot-starter-cache</artifactId>
</dependency>
开启缓存
在启动类加上@EnableCaching注解即可开启使用缓存。
@SpringBootApplication
@EnableCaching
public class CachingApplication

	public static void main(String[] args)
		SpringApplication.run(CachingApplication.class, args);
加缓存注解
在要缓存的方法上面添加@Cacheable注解,即可缓存这个方法的返回值。
@Override
@Cacheable("books")
public Book getByIsbn(String isbn)
    simulateSlowService();
    return new Book(isbn, "Some book");


// Don't do this at home
private void simulateSlowService()
    try
        long time = 3000L;
        Thread.sleep(time);
     catch (InterruptedException e)
        throw new IllegalStateException(e);
测试
@Override
public void run(String... args)
    logger.info(".... Fetching books");
    logger.info("isbn-1234 -->" + bookRepository.getByIsbn("isbn-1234"));
    logger.info("isbn-4567 -->" + bookRepository.getByIsbn("isbn-4567"));
    logger.info("isbn-1234 -->" + bookRepository.getByIsbn("isbn-1234"));
    logger.info("isbn-4567 -->" + bookRepository.getByIsbn("isbn-4567"));
    logger.info("isbn-1234 -->" + bookRepository.getByIsbn("isbn-1234"));
    logger.info("isbn-1234 -->" + bookRepository.getByIsbn("isbn-1234"));
测试一下,可以发现。第一次和第二次(第二次参数和第一次不同)调用getByIsbn方法,会等待3秒,而后面四个调用,都会立即返回。
常用注解
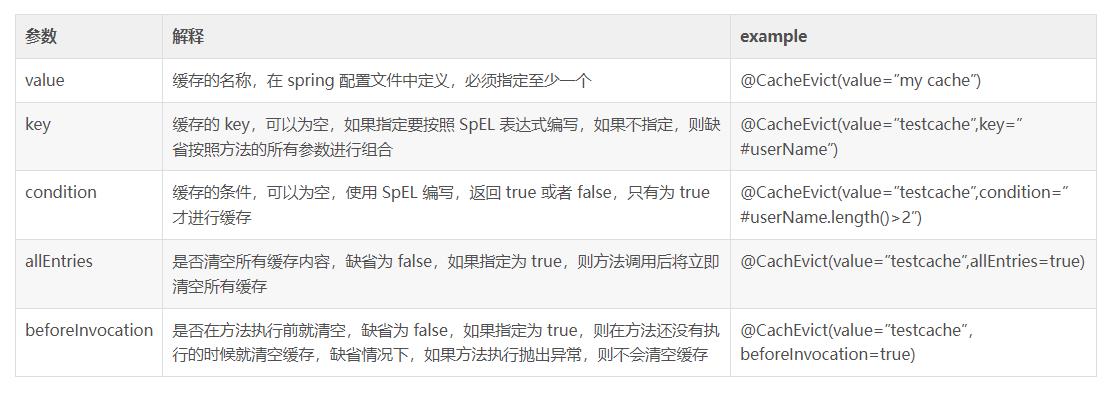
Spring Cache有几个常用注解,分别为@Cacheable、@CachePut、@CacheEvict、@Caching、@CacheConfig。除了最后一个CacheConfig外,其余四个都可以用在类上或者方法级别上,如果用在类上,就是对该类的所有public方法生效,下面分别介绍一下这几个注解。
@Cacheable
@Cacheble注解表示这个方法有了缓存的功能,方法的返回值会被缓存下来,下一次调用该方法前,会去检查是否缓存中已经有值,如果有就直接返回,不调用方法。如果没有,就调用方法,然后把结果缓存起来。这个注解一般用在查询方法上。
-
value、cacheNames:两个等同的参数(cacheNames为Spring 4新增,作为value的别名),用于指定缓存存储的集合名。由于Spring 4中新增了@CacheConfig,因此在Spring 3中原本必须有的value属性,也成为非必需项了 -
key:和cacheNames共同组成一个key,非必需,缺省按照函数的所有参数组合作为key值,若自己配置需使用SpEL表达式,比如:@Cacheable(key = "#p0"):使用函数第一个参数作为缓存的key值,更多关于SpEL表达式的详细内容可参考官方文档 -
condition:缓存对象的条件,非必需,也需使用SpEL表达式,只有满足表达式条件的内容才会被缓存,比如:@Cacheable(key = "#p0", condition = "#p0.length() < 3"),表示只有当第一个参数的长度小于3的时候才会被缓存,若做此配置上面的AAA用户就不会被缓存,读者可自行实验尝试,在函数调用前进行判断,因此result这种spel里面进行判断时,永远为null. -
unless:另外一个缓存条件参数,非必需,需使用SpEL表达式。它不同于condition参数的地方在于它的判断时机,该条件是在函数被调用之后才做判断的,所以它可以通过对result进行判断。 -
keyGenerator:用于指定key生成器,非必需。若需要指定一个自定义的key生成器,我们需要去实现org.springframework.cache.interceptor.KeyGenerator接口,并使用该参数来指定。需要注意的是:该参数与key是互斥的 -
cacheManager:用于指定使用哪个缓存管理器,非必需。只有当有多个时才需要使用 -
cacheResolver:用于指定使用那个缓存解析器,非必需。需通过org.springframework.cache.interceptor.CacheResolver接口来实现自己的缓存解析器,并用该参数指定。
作用和配置方法

    /** * 根据ID获取Tasklog * @param id * @return */
    @Cacheable(value = CACHE_KEY, key = "#id",condition = "#result != null")
    public Tasklog findById(String id)
        System.out.println("FINDBYID");
        System.out.println("ID:"+id);
        return taskLogMapper.selectById(id);
缓存中spel表达式可取值

@CachePut
@CachePut 的作用 主要针对方法配置,能够根据方法的请求参数对其结果进行缓存,和 @Cacheable 不同的是,它每次都会触发真实方法的调用
作用和配置方法

    /** * 添加tasklog * @param tasklog * @return */
    @CachePut(value = CACHE_KEY, key = "#tasklog.id")
    public Tasklog create(Tasklog tasklog)
        System.out.println("CREATE");
        System.err.println (tasklog);
        taskLogMapper.insert(tasklog);
        return tasklog;
@CacheEvict
@CachEvict 的作用 主要针对方法配置,能够根据一定的条件对缓存进行清空
一般用在更新或者删除的方法上。
作用和配置方法

    /** * 根据ID删除Tasklog * @param id */
    @CacheEvict(value = CACHE_KEY, key = "#id")
    public void delete(String id)
        System.out.println("DELETE");
        System.out.println("ID:"+id);
        taskLogMapper.deleteById(id);
@Caching
Java注解的机制决定了,一个方法上只能有一个相同的注解生效。那有时候可能一个方法会操作多个缓存(这个在删除缓存操作中比较常见,在添加操作中不太常见)。
Spring Cache当然也考虑到了这种情况,@Caching注解就是用来解决这类情况的,大家一看它的源码就明白了。
public @interface Caching
	Cacheable[] cacheable() default ;
	CachePut[] put() default ;
	CacheEvict[] evict() default ;
有时候我们可能组合多个Cache注解使用;比如用户新增成功后,我们要添加id–>user;username—>user;email—>user的缓存;此时就需要@Caching组合多个注解标签了
@Caching(put =
@CachePut(value = "user", key = "#user.id"),
@CachePut(value = "user", key = "#user.username"),
@CachePut(value = "user", key = "#user.email")
)
public User save(User user)
@CacheConfig
前面提到的四个注解,都是Spring Cache常用的注解。每个注解都有很多可以配置的属性。
但这几个注解通常都是作用在方法上的,而有些配置可能又是一个类通用的,这种情况就可以使用@CacheConfig了,它是一个类级别的注解,可以在类级别上配置cacheNames、keyGenerator、cacheManager、cacheResolver等。
例如:
所有的@Cacheable()里面都有一个value=“xxx”的属性,这显然如果方法多了,写起来也是挺累的,如果可以一次性声明完 那就省事了, 所以,有了@CacheConfig这个配置,@CacheConfig is a class-level annotation that allows to share the cache names,如果你在你的方法写别的名字,那么依然以方法的名字为准。
@CacheConfig是一个类级别的注解。
/** * 测试服务层 */
@Service
@CacheConfig(cacheNames= "taskLog")
public class TaskLogService

    @Autowired  private TaskLogMapper taskLogMapper;
    @Autowired  private net.sf.ehcache.CacheManager cacheManager;

    /** * 缓存的key */
    public static final String CACHE_KEY   = "taskLog";

    /** * 添加tasklog * @param tasklog * @return */
    @CachePut(key = "#tasklog.id")
    public Tasklog create(Tasklog tasklog)
        System.out.println("CREATE");
        System.err.println (tasklog);
        taskLogMapper.insert(tasklog);
        return tasklog;


    /** * 根据ID获取Tasklog * @param id * @return */
    @Cacheable(key = "#id")
    public Tasklog findById(String id)
        System.out.println("FINDBYID");
        System.out.println("ID:"+id);
        return taskLogMapper.selectById(id);
自定义缓存注解
比如之前的那个@Caching组合,会让方法上的注解显得整个代码比较乱,此时可以使用自定义注解把这些注解组合到一个注解中,如:
@Caching(put =
    @CachePut(value = "user", key = "#user.id"),
    @CachePut(value = "user", key = "#user.username"),
    @CachePut(value = "user", key = "#user.email")
)
@Target(ElementType.METHOD, ElementType.TYPE)
@Retention(RetentionPolicy.RUNTIME)
@Inherited
public @interface UserSaveCache
这样我们在方法上使用如下代码即可,整个代码显得比较干净。
@UserSaveCache
public User save(User user)
完整应用案例
1.启动类加注解,开启缓存功能
@SpringBootApplication
@EnableCaching//开启使用缓存
public class Application
    public static void main(String[] args)
    SpringApplication.run(Application.class, args);
2.自定义一个pojo对象
@AllArgsConstructor
@NoArgsConstructor
@Data
public class Tasklog

    @JsonProperty("id")
    private Integer id;
    @JsonProperty("name")
    private String name;
    @JsonProperty("age")
    private Integer age;
3.自定义注解
@Caching(put =
    @CachePut(value = "taskLog", key = "#tasklog.id"),
    @CachePut(value = "taskLog", key = "#tasklog.name"),
    @CachePut(value = "taskLog", key = "#tasklog.age")
)
@Target(ElementType.METHOD, ElementType.TYPE)
@Retention(RetentionPolicy.RUNTIME)
@Inherited
public @interface CustomCache
4.service层书写
/** * 测试服务层 */
@Service
//缓存中的key由cacheNames::key组成
@CacheConfig(cacheNames = "taskLog")
public class TaskLogService

    //模拟数据库的map
    private static Map<Integer, Object> map=new ConcurrentHashMap<>();

    static

     map.put(1,new Tasklog(1,"大忽悠和小朋友",18));


    /**
     * 缓存的key
     */
    public static final String CACHE_KEY = "taskLog";

    /**
     * 添加tasklog * @param tasklog * @return
     */
    //触发真实方法的调用,对请求结果进行缓存处理
    @CachePut(key = "#tasklog.id")
    public Tasklog create(Tasklog tasklog)
        System.out.println("CREATE");
        System.err.println(tasklog);
        map.put(tasklog.getId(),tasklog);
        return tasklog;


    @CustomCache//自定义注解---会生成三个key
    public Tasklog createByCustom(Tasklog tasklog)
        System.out.println("CREATE");
        System.err.println(tasklog);
        map.put(tasklog.getId(),tasklog);
        return tasklog;


    /**
     * 根据ID获取Tasklog * @param id * @return
     */
    //如果缓存中有对应的key,不进行方法调用,否则进行方法调用,并缓存返回值
    @Cacheable(key = "#id")
    public Tasklog findById(Integer id)

        System.out.println("FINDBYID");
        System.out.println("ret:" +  map.get(id));
        return (Tasklog) map.get(id);


    /** * 根据ID删除Tasklog * @param id */
    @CacheEvict(value = CACHE_KEY, key = "#id")
    public void delete(Integer id)
        System.out.println("DELETE");
          map.remove(id);
4.controller层
@RestController
@RequestMapping(value ="/rest")
public class TaskLogController

    @Autowired
    private TaskLogService taskLogService;

    /**
     * 添加tasklog
     */
    @PutMapping("task")
    public Tasklog create(Tasklog tasklog)
     return  taskLogService.create(tasklog);


    @PutMapping("task_C")
    public Tasklog createCustom(Tasklog tasklog)
        return  taskLogService.createByCustom(tasklog);


    /**
     * 根据ID获取Tasklog
     */
    @GetMapping("task")
    public Tasklog findById(@RequestParam Integer id)
         return taskLogService.findById(id);


    /**
     * 根据ID删除Tasklog
     */
    @DeleteMapping("task")
    public String delById(@RequestParam Integer id)
     taskLogService.delete(id);
        return "删除成功";
结合源码剖析注解的运行流程
前面提到的几个注解@Cacheable、@CachePut、@CacheEvict、@CacheConfig,都有一些可配置的属性。这些配置的属性都可以在抽象类CacheOperation及其子类中可以找到。它们大概是这样的关系:

负责解析每个注解的类是SpringCacheAnnotationParser类:


…每个注解都对应有响应的解析方法
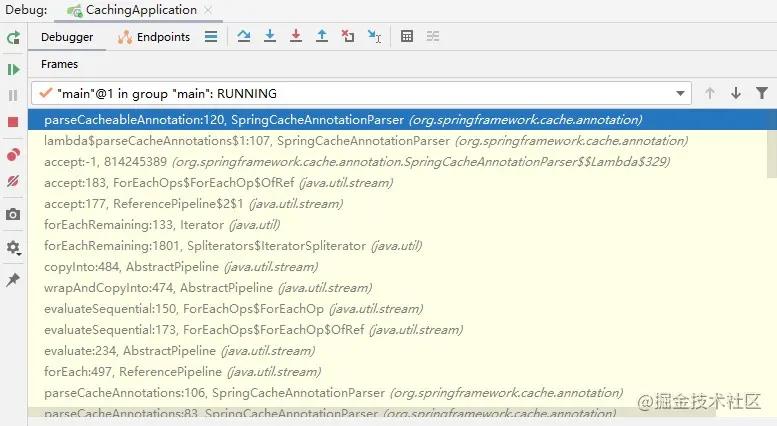
那这个SpringCacheAnnotationParser是在什么时候被调用的呢?很简单,我们在这个类的某个方法上打个断点,然后debug就行了,比如parseCacheableAnnotation方法。

在debug界面,可以看到调用链非常长,前面是我们熟悉的IOC注册Bean的一个流程,直到我们看到了一个叫做AbstractAutowireCapableBeanFactory的BeanFactory,然后这个类在创建Bean的时候会去找是否有Advisor。正好Spring Cache源码里就定义了这么一个Advisor:BeanFactoryCacheOperationSourceAdvisor。
这个Advisor返回的PointCut是一个CacheOperationSourcePointcut,这个PointCut复写了matches方法,在里面去获取了一个CacheOperationSource,调用它的getCacheOperations方法。这个CacheOperationSource是个接口,主要的实现类是AnnotationCacheOperationSource。在findCacheOperations方法里,就会调用到我们最开始说的SpringCacheAnnotationParser了。
这样就完成了基于注解的解析。
入口:基于AOP的拦截器
那我们实际调用方法的时候,是怎么处理的呢?我们知道,使用了AOP的Bean,会生成一个代理对象,实际调用的时候,会执行这个代理对象的一系列的Interceptor。Spring Cache使用的是一个叫做CacheInterceptor的拦截器。我们如果加了缓存相应的注解,就会走到这个拦截器上。这个拦截器继承了CacheAspectSupport类,会执行这个类的execute方法,这个方法就是我们要分析的核心方法了。
@Cacheable的sync
我们继续看之前提到的execute方法,该方法首先会判断是否是同步。这里的同步配置是用的@Cacheable的sync–(sync表示是否加锁)属性,默认是false。如果配置了同步的话,多个线程尝试用相同的key去缓存拿数据的时候,会是一个同步的操作。

上图是老版本的写法,下面是最新版本的写法
private Object execute(final CacheOperationInvoker invoker, Method method, CacheAspectSupport以上是关于Android 重学系列 ion驱动源码浅析的主要内容,如果未能解决你的问题,请参考以下文章