SQLite数据库存储
Posted 要加油
tags:
篇首语:本文由小常识网(cha138.com)小编为大家整理,主要介绍了SQLite数据库存储相关的知识,希望对你有一定的参考价值。
前几天学习到SQLite数据库存储这一节,我没想到原来android 系统是有内置的数据库的,比连接本地的sqlserver方便多了,不用用户名和密码,现在让我来记录一下:
android专门提供了一个SQLiteOpenHelper帮助类,能让我们简单地对数据库进行创建与升级。SQLiteOpenHelper是抽象类,所以需要自己去写一个类继承来SQLiteOpenHelper类,该类必须重写oncreate()与onUpgrade()方法,。构建出SQLiteOpenHelper的实例之后,再调用 它的getReadableDatabase() 或getWritableDatabase() 方法就能够创建数据库了,数 据库文件会存放在/data/data/<package name>/databases/目录下。此时,重写的onCreate() 方法 也会得到执行,所以通常会在这里去处理一些创建表的逻辑。现在我们希望创建一个名为BookStore.db的数据库,在数据库里新建一张表,表中有id(主键)、作者、价格、页数、书名。开始新建一个类去继承SQLiteOpenHelpe:
(1)MyDatabase.java
 1 package com.example.databasetest;
 2
 3 import android.content.Context;
 4 import android.database.sqlite.SQLiteDatabase;
 5 import android.database.sqlite.SQLiteOpenHelper;
 6 import android.widget.Toast;
 7
 8 import androidx.annotation.Nullable;
 9
10 public class MyDatabase extends SQLiteOpenHelper {
11     private Context mcontext;
12     public static final  String CREATE_BOOK="create table book("
13             +"id integer primary key autoincrement,"
14             +"author text,"
15             +"price real,"
16             +"pages integer,"
17             +"name text);";//创建一个名为book的表,表中有id(主键),作者,价格,页数和书名
18
19     public static final  String CREATE_Categoty="create table Categoty("
20             +"id integer primary key autoincrement,"
21             +"Categoty_code integer,"
22             +"Categoty_name text);";//创建一个名为bCategoty的表,表中有id(主键),分类代码、分类名
23     /**
24      * 构造方法
25      * @param context to use for locating paths to the the database
26      * @param name 数据库的名字
27      * @param factory to use for creating cursor objects, or null for the default
28      * @param version 表示当前数据库的版本
29      */
30     public MyDatabase(@Nullable Context context, @Nullable String name, @Nullable SQLiteDatabase.CursorFactory factory, int version) {
31         super(context, name, factory, version);
32         mcontext=context;
33     }
34
35     @Override
36     public void onCreate(SQLiteDatabase db) {
37         db.execSQL(CREATE_BOOK);//调用SQLiteDatabase的execSQL方法去创建表
38         db.execSQL(CREATE_Categoty);
39         Toast.makeText(mcontext,"建表成功",Toast.LENGTH_SHORT).show();
40
41     }
42
43     @Override
44     public void onUpgrade(SQLiteDatabase db, int oldVersion, int newVersion) {
45         db.execSQL("drop table if exists book");
46         db.execSQL("drop table if exists Categoty");
47         onCreate(db);
48
49     }
50 }
(2)activity_main.xml

 1 <?xml version="1.0" encoding="utf-8"?>
 2 <LinearLayout xmlns:android="http://schemas.android.com/apk/res/android"
 3     android:orientation="vertical"
 4     android:layout_width="match_parent"
 5     android:layout_height="match_parent">
 6
 7     <Button
 8         android:id="@+id/create_database"
 9         android:layout_width="match_parent"
10         android:layout_height="wrap_content"
11         android:text="创建数据库"/>
12     <Button
13         android:id="@+id/addData"
14         android:layout_width="match_parent"
15         android:layout_height="wrap_content"
16         android:text="添加数据"/>
17     <Button
18         android:id="@+id/alterData"
19         android:layout_width="match_parent"
20         android:layout_height="wrap_content"
21         android:text="修改数据"/>
22     <Button
23         android:id="@+id/findData"
24         android:layout_width="match_parent"
25         android:layout_height="wrap_content"
26         android:text="查询数据"/>
27     <Button
28         android:id="@+id/cancelData"
29         android:layout_width="match_parent"
30         android:layout_height="wrap_content"
31         android:text="删除数据"/>
32
33 </LinearLayout>

(3)MainActivity.java
 1 package com.example.databasetest;
 2
 3 import androidx.appcompat.app.AppCompatActivity;
 4
 5 import android.content.ContentValues;
 6 import android.database.Cursor;
 7 import android.database.sqlite.SQLiteDatabase;
 8 import android.os.Bundle;
 9 import android.util.Log;
10 import android.view.View;
11 import android.widget.Button;
12
13 public class MainActivity extends AppCompatActivity implements View.OnClickListener{
14     private MyDatabase dbHelper;
15     private Button createDB,addData,alterData,cancelData,findData;
16     SQLiteDatabase db;
17     @Override
18     protected void onCreate(Bundle savedInstanceState) {
19         super.onCreate(savedInstanceState);
20         setContentView(R.layout.activity_main);
21         init();//初始化组件
22         dbHelper=new MyDatabase(this,"BookStore.db",null,2);//创建SQLiteOpenHelper实例
23
24
25     }
26     private void init(){
27         addData=(Button)findViewById(R.id.addData);
28         alterData=(Button)findViewById(R.id.alterData);
29         findData=(Button)findViewById(R.id.findData);
30         cancelData=(Button)findViewById(R.id.cancelData);
31         createDB=(Button)findViewById(R.id.create_database);
32         addData.setOnClickListener(this);
33         alterData.setOnClickListener(this);
34         findData.setOnClickListener(this);
35         cancelData.setOnClickListener(this);
36         createDB.setOnClickListener(this);
37     }
38     @Override
39     public void onClick(View v) {
40         switch (v.getId()){
41             case R.id.create_database://建表
42                 db=dbHelper.getWritableDatabase();
43                 break;
44             case R.id.addData://添加数据
45                 db=dbHelper.getWritableDatabase();
46                 ContentValues values=new ContentValues();
47                 //开始组装第一条数据
48                 values.put("name","《平凡的世界》");
49                 values.put("author","panq");
50                 values.put("pages",454);
51                 values.put("price",45);
52                 db.insert("book",null,values);
53                 //第二条数据
54                 values.put("name","《离散数学》");
55                 values.put("author","panq");
56                 values.put("pages",600);
57                 values.put("price",50);
58                 db.insert("book",null,values);
59                 break;
60             case R.id.alterData://修改数据
61                 db=dbHelper.getWritableDatabase();
62                 ContentValues value=new ContentValues();
63                 value.put("price",20);
64                 //修改《平凡的世界》书的价格
65                 db.update("book",value,"name=?",new String []{"《平凡的世界》"});
66                 break;
67             case R.id.cancelData://删除数据
68                 db=dbHelper.getWritableDatabase();
69                 //删除大于500页的书
70                 db.delete("book","pages>?",new String[]{"500"});
71                 break;
72             case R.id.findData://查询数据
73                 db=dbHelper.getWritableDatabase();
74                 Cursor cursor=db.query("book",null,null,null,null,null,null);
75                 if(cursor.moveToFirst()){
76                     do{
77                         //遍历cursor对像,打印数据
78                         String name=cursor.getString(cursor.getColumnIndex("name"));
79                         String author=cursor.getString(cursor.getColumnIndex("author"));
80                         double price=cursor.getDouble(cursor.getColumnIndex("price"));
81                         int pages=cursor.getInt(cursor.getColumnIndex("pages"));
82                         Log.i("MainActivity","book name is "+name);
83                         Log.i("MainActivity","book author is "+author);
84                         Log.i("MainActivity","book price is "+price);
85                         Log.i("MainActivity","book pages is "+pages);
86                     }while (cursor.moveToNext());
87                 }
88                 cursor.close();
89                 break;
90
91
92         }
93
94     }
95 }
运行程序后,点击建表、添加数据、删除数据按钮后如何查看表中的数据呢?通过adb shell来对数据库和表的创建情况进行检查
首先,找到adb.exe的路径位置,如我的adb.exe路径是C:\\Users\\Asus\\AppData\\Local\\Android\\Sdk\\platform-tools
然后,右击我的电脑--属性--高级系统设置--环境变量,找到系统变量的path,添加adb.exe的路径到后面。详细操作看:https://www.cnblogs.com/plsmile/p/11172693.html
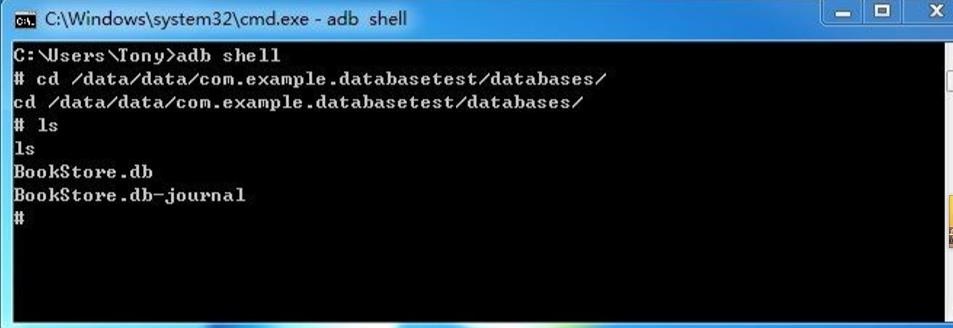
设置完环境变量后,打开cmd窗口,输入adb shell,接下来使用cd命令进入到/data/data/com.example.databasetest/databases/目录下,,并使用ls 命令查看到该目录里的文件,如图所示:

现在要打开数据库,只需要键入sqlite3,后面加上数据库名即 可。
打开数据库后,输入select * from 表名即可查看表的数据,如图所示:(图是随便找的)

这样就OK啦,比连接sqlserver方便多了。
以上是关于SQLite数据库存储的主要内容,如果未能解决你的问题,请参考以下文章
